
Users Manual - English
Page 14
... ...15 Upper thread recommendations...16 Fabric recommendations ...16 Display recommendations...16 Basic Procedures ...17 Installing the Bobbin ...18 Removing the bobbin case ...18 Installing the bobbin ...19 Installing the bobbin case...19 Turning ON the Machine 20 Understanding the screens ...21 Screen overview...22 Selecting an Embroidery Pattern 23 Selecting an embroidery pattern...24 Editing the...
... ...15 Upper thread recommendations...16 Fabric recommendations ...16 Display recommendations...16 Basic Procedures ...17 Installing the Bobbin ...18 Removing the bobbin case ...18 Installing the bobbin ...19 Installing the bobbin case...19 Turning ON the Machine 20 Understanding the screens ...21 Screen overview...22 Selecting an Embroidery Pattern 23 Selecting an embroidery pattern...24 Editing the...

Users Manual - English
Page 17
... Maintenance...193 Cleaning the LCD...193 Cleaning the machine surface ...193 Cleaning the hook ...193 Cleaning around the needle plate...194 Cleaning the bobbin case ...195 Oiling the machine ...196 Troubleshooting ...198 On-screen troubleshooting ...198 Troubleshooting ...199 Error messages ...207 If the LCD cannot be read ...213 If the ...
... Maintenance...193 Cleaning the LCD...193 Cleaning the machine surface ...193 Cleaning the hook ...193 Cleaning around the needle plate...194 Cleaning the bobbin case ...195 Oiling the machine ...196 Troubleshooting ...198 On-screen troubleshooting ...198 Troubleshooting ...199 Error messages ...207 If the LCD cannot be read ...213 If the ...
Users Manual - English
Page 19
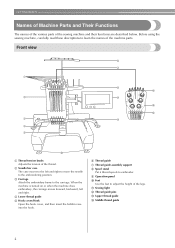
... to the left and right. 4 Lower thread guide 5 Hook cover/Hook Open the hook cover, and then insert the bobbin case into the hook. 6 Thread guide 7 Thread guide assembly support 8 Spool stand Put 6 thread spools to embroider. 9 Operation panel 0 Feet Use the feet to the carriage. A ...
... to the left and right. 4 Lower thread guide 5 Hook cover/Hook Open the hook cover, and then insert the bobbin case into the hook. 6 Thread guide 7 Thread guide assembly support 8 Spool stand Put 6 thread spools to embroider. 9 Operation panel 0 Feet Use the feet to the carriage. A ...

Users Manual - English
Page 21
.... 30. 31. 32 No. If any item is missing or damaged, contact your retailer. Part Name Model Name Parts Code 1 Accessory case XC6482-051 2 Needle set (2 pcs.) PRHA1BR11 XC6469-001 3 Prewound bobbin (6 pcs.) XC6368-051 4 Spool net (6 pcs.) S34455-000 5 Seam ripper X54243-051 6 Scissors XC1807-121 7 Tweezers XC6542-051 8 Touch pen...
.... 30. 31. 32 No. If any item is missing or damaged, contact your retailer. Part Name Model Name Parts Code 1 Accessory case XC6482-051 2 Needle set (2 pcs.) PRHA1BR11 XC6469-001 3 Prewound bobbin (6 pcs.) XC6368-051 4 Spool net (6 pcs.) S34455-000 5 Seam ripper X54243-051 6 Scissors XC1807-121 7 Tweezers XC6542-051 8 Touch pen...
Users Manual - English
Page 35
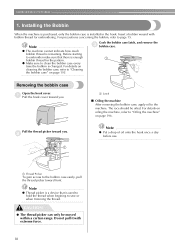
... extreme force. 18 Before starting to embroider make sure that is changed. Grab the bobbin case latch, and remove the 3 bobbin case. 1 Removing the bobbin case Open the hook cover. 1 Pull the hook cover toward you . For precautions concerning the bobbin, refer to the bobbin case easily, pull the thread picker toward front. Note ● Put a drop of oil...
... extreme force. 18 Before starting to embroider make sure that is changed. Grab the bobbin case latch, and remove the 3 bobbin case. 1 Removing the bobbin case Open the hook cover. 1 Pull the hook cover toward you . For precautions concerning the bobbin, refer to the bobbin case easily, pull the thread picker toward front. Note ● Put a drop of oil...
Users Manual - English
Page 36
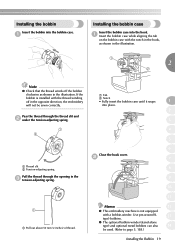
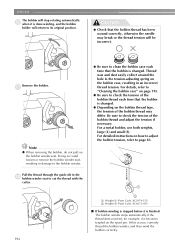
... the 3 tension-adjusting spring. 1 1 Pull out about 50 mm (2 inches) of thread. 1 Tab 2 Notch • Fully insert the bobbin case until it snaps 1 into the hook. 1 Insert the bobbin case while aligning the tab on the bobbin case with the notch in the hook, as shown in the opposite direction, the embroidery will not be used...
... the 3 tension-adjusting spring. 1 1 Pull out about 50 mm (2 inches) of thread. 1 Tab 2 Notch • Fully insert the bobbin case until it snaps 1 into the hook. 1 Insert the bobbin case while aligning the tab on the bobbin case with the notch in the hook, as shown in the opposite direction, the embroidery will not be used...
Users Manual - English
Page 102
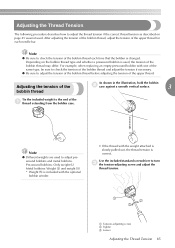
...; Be sure to adjust the tension of the bobbin thread before adjusting the tension of the 1 thread extending from the bobbin case. After adjusting the tension of the bobbin thread, adjust the tension of the upper thread for each time that the bobbin is correct. Use the included standard screwdriver to... check the tension of the bobbin thread may differ. As shown in the...
...; Be sure to adjust the tension of the bobbin thread before adjusting the tension of the 1 thread extending from the bobbin case. After adjusting the tension of the bobbin thread, adjust the tension of the upper thread for each time that the bobbin is correct. Use the included standard screwdriver to... check the tension of the bobbin thread may differ. As shown in the...

Users Manual - English
Page 172
... and its accessories / 188 Setting up the optional bobbin winder / 189 Connecting the AC adapter / 189 Winding the bobbin / 190 Maintenance ...193 Cleaning the LCD / 193 Cleaning the machine surface / 193 Cleaning the hook / 193 Cleaning around the needle plate / 194 Cleaning the bobbin case / 195 Oiling the machine / 196 Troubleshooting ...198 On-screen...
... and its accessories / 188 Setting up the optional bobbin winder / 189 Connecting the AC adapter / 189 Winding the bobbin / 190 Maintenance ...193 Cleaning the LCD / 193 Cleaning the machine surface / 193 Cleaning the hook / 193 Cleaning around the needle plate / 194 Cleaning the bobbin case / 195 Oiling the machine / 196 Troubleshooting ...198 On-screen...
Users Manual - English
Page 209
... it becomes tangled on the spool pin. Pull the thread through the guide slit in an incorrect thread tension. For details, refer to "Cleaning the bobbin case" on page 195. ● Be sure to cut the thread with the cutter. 192 1 2 1 Weight (L) (Parts Code: XC5974-151) 2 Weight (S) (Parts Code: XC6631-051) ■...
... it becomes tangled on the spool pin. Pull the thread through the guide slit in an incorrect thread tension. For details, refer to "Cleaning the bobbin case" on page 195. ● Be sure to cut the thread with the cutter. 192 1 2 1 Weight (L) (Parts Code: XC5974-151) 2 Weight (S) (Parts Code: XC6631-051) ■...
Users Manual - English
Page 210
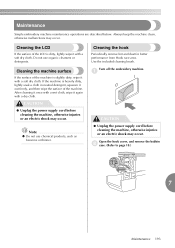
... ● Unplug the power supply cord before cleaning the machine, otherwise injuries or an electric shock may occur. Open the hook cover, and remove the bobbin 2 case. (Refer to page 18.) 7 Maintenance 193 Use the included cleaning brush. Turn off the embroidery machine. 1 CAUTION ● Unplug the power supply cord before cleaning...
... ● Unplug the power supply cord before cleaning the machine, otherwise injuries or an electric shock may occur. Open the hook cover, and remove the bobbin 2 case. (Refer to page 18.) 7 Maintenance 193 Use the included cleaning brush. Turn off the embroidery machine. 1 CAUTION ● Unplug the power supply cord before cleaning...
Users Manual - English
Page 211
... the machine, otherwise injuries or an electric shock may be damaged. Turn off the embroidery machine. 1 CAUTION ● If the hook is finished, insert the bobbin 4 case into the hook, and then close the hook cover. (Refer to remove 3 any lint and dust from the hook and its surrounding area. Cleaning around...
... the machine, otherwise injuries or an electric shock may be damaged. Turn off the embroidery machine. 1 CAUTION ● If the hook is finished, insert the bobbin 4 case into the hook, and then close the hook cover. (Refer to remove 3 any lint and dust from the hook and its surrounding area. Cleaning around...
Users Manual - English
Page 212
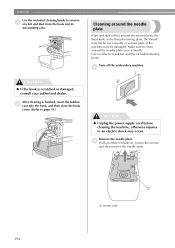
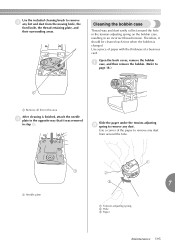
...from the moving knife, the fixed knife, the thread retaining plate, and their surrounding areas. Open the hook cover, remove the bobbin 1 case, and then remove the bobbin. (Refer to page 18.) 1 1 Remove all lint in this area After cleaning is finished, attach the needle 4 plate in.... Use the included cleaning brush to remove 3 any lint and dust from around the hole in the tension-adjusting spring on the bobbin case, resulting in step 2. Cleaning the bobbin case Thread wax and dust easily collect around the hole. 1 Needle plate 1 7 1 Tension-adjusting spring 2 Hole 3 Paper Maintenance...
...from the moving knife, the fixed knife, the thread retaining plate, and their surrounding areas. Open the hook cover, remove the bobbin 1 case, and then remove the bobbin. (Refer to page 18.) 1 1 Remove all lint in this area After cleaning is finished, attach the needle 4 plate in.... Use the included cleaning brush to remove 3 any lint and dust from around the hole in the tension-adjusting spring on the bobbin case, resulting in step 2. Cleaning the bobbin case Thread wax and dust easily collect around the hole. 1 Needle plate 1 7 1 Tension-adjusting spring 2 Hole 3 Paper Maintenance...
Users Manual - English
Page 213
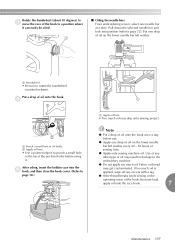
... machine before cleaning the machine, otherwise injuries or an electric shock may occur. Open the hook cover, and remove the bobbin 2 case. (Refer to remove 3 any lint and dust from inside the bobbin case. Use the enclosed cleaning brush to page 19.) 196 APPENDIX Note ● Do not bend the tension-adjusting spring. In... life of the specified thickness to page 19.) CAUTION ● Unplug the power supply cord before the first time that it is finished, insert the bobbin 4 into the bobbin case and the bobbin case into the hook, and then close the hook cover. (Refer to clean the...
... machine before cleaning the machine, otherwise injuries or an electric shock may occur. Open the hook cover, and remove the bobbin 2 case. (Refer to remove 3 any lint and dust from inside the bobbin case. Use the enclosed cleaning brush to page 19.) 196 APPENDIX Note ● Do not bend the tension-adjusting spring. In... life of the specified thickness to page 19.) CAUTION ● Unplug the power supply cord before the first time that it is finished, insert the bobbin 4 into the bobbin case and the bobbin case into the hook, and then close the hook cover. (Refer to clean the...
Users Manual - English
Page 214
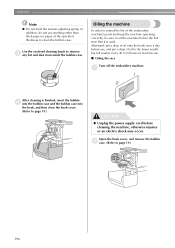
After oiling, insert the bobbin case into position (refer to page 72). Fabric or thread may drip onto sewing project. Put a drop of oil onto the hook. 4 1 2 1 Punch a small hole in ...
After oiling, insert the bobbin case into position (refer to page 72). Fabric or thread may drip onto sewing project. Put a drop of oil onto the hook. 4 1 2 1 Punch a small hole in ...
Users Manual - English
Page 217
... specifically for this machine is catching somewhere. Thread the upper thread correctly. Use the correct bobbin. Using a data design system, correct the thread density and overstitching settings in the needle bar case. There are being sewn. The upper thread is not threaded correctly. If the thread does not move, it . 1 Consult your...
... specifically for this machine is catching somewhere. Thread the upper thread correctly. Use the correct bobbin. Using a data design system, correct the thread density and overstitching settings in the needle bar case. There are being sewn. The upper thread is not threaded correctly. If the thread does not move, it . 1 Consult your...

Users Manual - English
Page 219
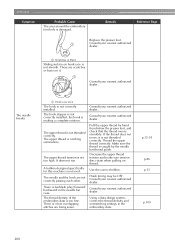
...and re-thread the machine. There are burns on hook is incorrect. The upper thread tension is too much. The bobbin case is correctly wound or rewind the bobbin. Make sure thread passes completely under upper and middle thread guide. Decrease the upper thread tension. Replace the... is loose in the hook, clean the hook. The lower thread tension is not smooth. The thread does not roll out of the bobbin case smoothly. APPENDIX Symptom Probable Cause Sliding surface on it. 1 Remedy Reference Page Consult your nearest authorized dealer. Consult your nearest authorized dealer....
...and re-thread the machine. There are burns on hook is incorrect. The upper thread tension is too much. The bobbin case is correctly wound or rewind the bobbin. Make sure thread passes completely under upper and middle thread guide. Decrease the upper thread tension. Replace the... is loose in the hook, clean the hook. The lower thread tension is not smooth. The thread does not roll out of the bobbin case smoothly. APPENDIX Symptom Probable Cause Sliding surface on it. 1 Remedy Reference Page Consult your nearest authorized dealer. Consult your nearest authorized dealer....

Users Manual - English
Page 220
Delete all stitches with a zero pitch. Delete all stitches with a small pitch. The bobbin case is not taut. Replace the bobbin case. Be sure to age of the embroidery data is too fine. p.28, 67 The embroidery frame is too Use an embroidery frame that it is ...
Delete all stitches with a zero pitch. Delete all stitches with a small pitch. The bobbin case is not taut. Replace the bobbin case. Be sure to age of the embroidery data is too fine. p.28, 67 The embroidery frame is too Use an embroidery frame that it is ...
Users Manual - English
Page 233
... Automatic lock stitch 88 Automatic needle-threading button 3, 39 Automatic needle-threading mechanism 39 B Backing 165 Basic procedures 17 Bobbin 15, 18, 19 Bobbin case 18, 19, 85, 195 Bobbin winder 188 Brightness of LCD 141, 142 Buzzer 141, 142 C Cancel key 51, 57 Canton fleece 167 Canvas 167... needle bars and thread colors 33 preview image 27 thread spool changes 75 thread tension 45 Cleaning around the needle plate 194 bobbin case 195 hook 193 LCD 193 machine surface 193 Color information 145 Color thread table 163 Combining patterns 119 Common screen 49 Corduroy ...
... Automatic lock stitch 88 Automatic needle-threading button 3, 39 Automatic needle-threading mechanism 39 B Backing 165 Basic procedures 17 Bobbin 15, 18, 19 Bobbin case 18, 19, 85, 195 Bobbin winder 188 Brightness of LCD 141, 142 Buzzer 141, 142 C Cancel key 51, 57 Canton fleece 167 Canvas 167... needle bars and thread colors 33 preview image 27 thread spool changes 75 thread tension 45 Cleaning around the needle plate 194 bobbin case 195 hook 193 LCD 193 machine surface 193 Color information 145 Color thread table 163 Combining patterns 119 Common screen 49 Corduroy ...


