
Accessory Catalog - English
Page 2
CONTENTS EMBROIDERY FRAMES (SQUARE 2 EMBROIDERY FRAMES (SQUARE) for PR-1000 4 EMBROIDERY FRAMES (ROUND) for PR-1000 6 CAP FRAMES 8 CAP FRAMES for PR-1000/650/620 10 CAP FRAMES for PR-1000 12 CYLINDER FRAMES for PR-1000/650/620 14 BORDER FRAMES for PR-1000 16 BOBBIN WINDER SET 18 OTHERS 20 - 1 -
CONTENTS EMBROIDERY FRAMES (SQUARE 2 EMBROIDERY FRAMES (SQUARE) for PR-1000 4 EMBROIDERY FRAMES (ROUND) for PR-1000 6 CAP FRAMES 8 CAP FRAMES for PR-1000/650/620 10 CAP FRAMES for PR-1000 12 CYLINDER FRAMES for PR-1000/650/620 14 BORDER FRAMES for PR-1000 16 BOBBIN WINDER SET 18 OTHERS 20 - 1 -
Accessory Catalog - English
Page 20
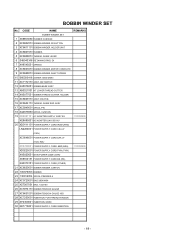
..., E4 7 XA9545051 SPRING 8 XC6633051 BOBBIN WINDER MOTOR COMPLETE 9 XC6628051 BOBBIN WINDER SHAFT SPRING 10 060300416 SCREW, BIND M3X4 11 XC7172151 ASSY, BW SWITCH 12 XA5876051 BOBBIN BASE ASSY 13 X80321001 NT LOWER THREAD CUTTER 14 XA5877051 BOBBIN THREAD CUTTER HOLDER 15 XC6639151 ASSY:...(IRL) XA0070151 POWER SUPPLY CORD (OTHER) 21 XC6630051 BOBBIN WINDER CARTON 22 100376053 BOBBIN 23 130012054 SPOOL PRESSER A 24 XC5720051 BAG 260X440H 25 X57367051 BAG, 135X150 26 XC5974151 BOBBIN TENSION GAUGE 27 XC6631051 BOBBIN TENSION GAUGE 45G 28 XC7250051 INSERTION FOR THREAD TENSION 29...
..., E4 7 XA9545051 SPRING 8 XC6633051 BOBBIN WINDER MOTOR COMPLETE 9 XC6628051 BOBBIN WINDER SHAFT SPRING 10 060300416 SCREW, BIND M3X4 11 XC7172151 ASSY, BW SWITCH 12 XA5876051 BOBBIN BASE ASSY 13 X80321001 NT LOWER THREAD CUTTER 14 XA5877051 BOBBIN THREAD CUTTER HOLDER 15 XC6639151 ASSY:...(IRL) XA0070151 POWER SUPPLY CORD (OTHER) 21 XC6630051 BOBBIN WINDER CARTON 22 100376053 BOBBIN 23 130012054 SPOOL PRESSER A 24 XC5720051 BAG 260X440H 25 X57367051 BAG, 135X150 26 XC5974151 BOBBIN TENSION GAUGE 27 XC6631051 BOBBIN TENSION GAUGE 45G 28 XC7250051 INSERTION FOR THREAD TENSION 29...
Users Manual - English
Page 14
... ...15 Upper thread recommendations...16 Fabric recommendations ...16 Display recommendations...16 Basic Procedures ...17 Installing the Bobbin ...18 Removing the bobbin case ...18 Installing the bobbin ...19 Installing the bobbin case...19 Turning ON the Machine 20 Understanding the screens ...21 Screen overview...22 Selecting an Embroidery Pattern 23 Selecting an embroidery pattern...24...
... ...15 Upper thread recommendations...16 Fabric recommendations ...16 Display recommendations...16 Basic Procedures ...17 Installing the Bobbin ...18 Removing the bobbin case ...18 Installing the bobbin ...19 Installing the bobbin case...19 Turning ON the Machine 20 Understanding the screens ...21 Screen overview...22 Selecting an Embroidery Pattern 23 Selecting an embroidery pattern...24...
Users Manual - English
Page 15
...77 Change thread spools message...77 Easily changing the thread spools...78 If the Thread Breaks or the Bobbin Thread Runs Out While Embroidering 79 If the upper thread breaks...79 If the bobbin thread breaks or runs out ...80 Embroidering From the Beginning or Middle of the Pattern 81 Resume ...Embroidering After Turning OFF the Machine 83 Adjusting the Thread Tension 85 Adjusting the tension of the bobbin thread ...85 Adjusting the tension of the ...
...77 Change thread spools message...77 Easily changing the thread spools...78 If the Thread Breaks or the Bobbin Thread Runs Out While Embroidering 79 If the upper thread breaks...79 If the bobbin thread breaks or runs out ...80 Embroidering From the Beginning or Middle of the Pattern 81 Resume ...Embroidering After Turning OFF the Machine 83 Adjusting the Thread Tension 85 Adjusting the tension of the bobbin thread ...85 Adjusting the tension of the ...
Users Manual - English
Page 17
... ...185 Additional digitizing information...186 Using the Optional Bobbin Winder 188 Precautions ...188 Optional bobbin winder and its accessories 188 Setting up the optional bobbin winder ...189 Connecting the AC adapter ...189 Winding the bobbin ...190 Maintenance...193 Cleaning the LCD...193 Cleaning the... machine surface ...193 Cleaning the hook ...193 Cleaning around the needle plate...194 Cleaning the bobbin case ...195 Oiling the machine ...196 Troubleshooting ...198 On-screen troubleshooting ...198 Troubleshooting ...199 Error messages ...207 If ...
... ...185 Additional digitizing information...186 Using the Optional Bobbin Winder 188 Precautions ...188 Optional bobbin winder and its accessories 188 Setting up the optional bobbin winder ...189 Connecting the AC adapter ...189 Winding the bobbin ...190 Maintenance...193 Cleaning the LCD...193 Cleaning the... machine surface ...193 Cleaning the hook ...193 Cleaning around the needle plate...194 Cleaning the bobbin case ...195 Oiling the machine ...196 Troubleshooting ...198 On-screen troubleshooting ...198 Troubleshooting ...199 Error messages ...207 If ...
Users Manual - English
Page 19
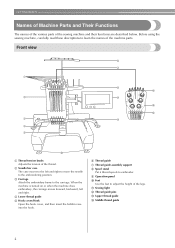
.... 2 Needle bar case The case moves to the left and right. 4 Lower thread guide 5 Hook cover/Hook Open the hook cover, and then insert the bobbin case into the hook. 6 Thread guide 7 Thread guide assembly support 8 Spool stand Put 6 thread spools to embroider. 9 Operation panel 0 Feet Use the feet to learn...
.... 2 Needle bar case The case moves to the left and right. 4 Lower thread guide 5 Hook cover/Hook Open the hook cover, and then insert the bobbin case into the hook. 6 Thread guide 7 Thread guide assembly support 8 Spool stand Put 6 thread spools to embroider. 9 Operation panel 0 Feet Use the feet to learn...

Users Manual - English
Page 20
... machine is sewing Off : When the machine is turned off 4 2 Thread trimming button Press the thread trimming button to trim both the upper and the bobbin threads. 3 Automatic needle-threading button Press the automatic needle threading button to thread the needle. 4 LCD (touch panel) Touch the keys that appear on the...
... machine is sewing Off : When the machine is turned off 4 2 Thread trimming button Press the thread trimming button to trim both the upper and the bobbin threads. 3 Automatic needle-threading button Press the automatic needle threading button to thread the needle. 4 LCD (touch panel) Touch the keys that appear on the...

Users Manual - English
Page 21
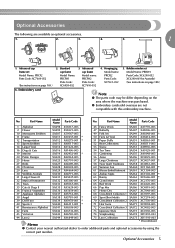
... the following accessories are included with this machine. Part Name Model Name Parts Code 1 Accessory case XC6482-051 2 Needle set (2 pcs.) PRHA1BR11 XC6469-001 3 Prewound bobbin (6 pcs.) XC6368-051 4 Spool net (6 pcs.) S34455-000 5 Seam ripper X54243-051 6 Scissors XC1807-121 7 Tweezers XC6542-051 8 Touch pen XA9940-051 9 Needle changing tool...
... the following accessories are included with this machine. Part Name Model Name Parts Code 1 Accessory case XC6482-051 2 Needle set (2 pcs.) PRHA1BR11 XC6469-001 3 Prewound bobbin (6 pcs.) XC6368-051 4 Spool net (6 pcs.) S34455-000 5 Seam ripper X54243-051 6 Scissors XC1807-121 7 Tweezers XC6542-051 8 Touch pen XA9940-051 9 Needle changing tool...
Users Manual - English
Page 22
... XC6290-061(for Australia) (See instructions on page 188.) Note ● The parts code may be differ depending on page 169.) 6. Optional Accessories 5 Embroidery card 2. Bobbin winder set Model Name: PRCF2 Parts Code: XC7609-052 (See instructions on the area where the machine was purchased. ● Embroidery cards sold overseas are...
... XC6290-061(for Australia) (See instructions on page 188.) Note ● The parts code may be differ depending on page 169.) 6. Optional Accessories 5 Embroidery card 2. Bobbin winder set Model Name: PRCF2 Parts Code: XC7609-052 (See instructions on the area where the machine was purchased. ● Embroidery cards sold overseas are...
Users Manual - English
Page 30
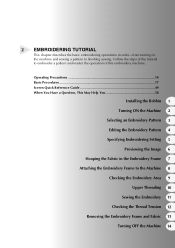
... to finishing sewing. Operating Precautions 14 Basic Procedures ...17 Screen Quick Reference Guide 49 When You Have a Question, This May Help You 58 Installing the Bobbin 1 Turning ON the Machine 2 Selecting an Embroidery Pattern 3 Editing the Embroidery Pattern 4 Specifying Embroidering Setting 5 Previewing the Image 6 Hooping the Fabric in order-from turning...
... to finishing sewing. Operating Precautions 14 Basic Procedures ...17 Screen Quick Reference Guide 49 When You Have a Question, This May Help You 58 Installing the Bobbin 1 Turning ON the Machine 2 Selecting an Embroidery Pattern 3 Editing the Embroidery Pattern 4 Specifying Embroidering Setting 5 Previewing the Image 6 Hooping the Fabric in order-from turning...
Users Manual - English
Page 32
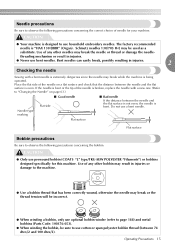
...needle is bent or the tip of needle for this machine. Needle precautions Be sure to observe the following precautions concerning the bobbin. COATS L Polyester ● Use a bobbin thread that the distance between the needle and the flat surface is not even, the needle is "HAX 130 EBBR" (...Organ). The factory recommended needle is bent. Flat surface Flat surface Bobbin precautions Be sure to observe the following precautions concerning the correct choice of the needle is broken, replace the needle with a bent needle is...
...needle is bent or the tip of needle for this machine. Needle precautions Be sure to observe the following precautions concerning the bobbin. COATS L Polyester ● Use a bobbin thread that the distance between the needle and the flat surface is not even, the needle is "HAX 130 EBBR" (...Organ). The factory recommended needle is bent. Flat surface Flat surface Bobbin precautions Be sure to observe the following precautions concerning the correct choice of the needle is broken, replace the needle with a bent needle is...
Users Manual - English
Page 34
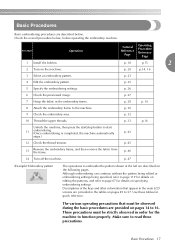
... the main LCD screens are described below , before operating the embroidery machine. Make sure to read these tables for quick reference. Procedure Operation 1 Install the bobbin. 2 Turn on specifying embroidering settings. p. 26 6 Check the previewed image. p. 27 7 Hoop the fabric in order for details on the machine. Although embroidering can continue...
... the main LCD screens are described below , before operating the embroidery machine. Make sure to read these tables for quick reference. Procedure Operation 1 Install the bobbin. 2 Turn on specifying embroidering settings. p. 26 6 Check the previewed image. p. 27 7 Hoop the fabric in order for details on the machine. Although embroidering can continue...
Users Manual - English
Page 35
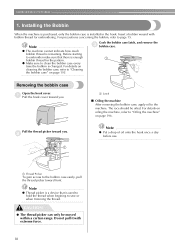
...embroider make sure that is used to hold the thread when begining to sew or when trimming the thread. Grab the bobbin case latch, and remove the 3 bobbin case. 1 Removing the bobbin case Open the hook cover. 1 Pull the hook cover toward you . Do not pull it with... force. 18 Pull the thread picker toward you . 2 1 1 Latch ■ Oiling the machine After removing the bobbin case, apply oil to clean the bobbin case every time the bobbin is enough bobbin thread for embroidering. CAUTION ● The thread picker can only be oiled. EMBROIDERING TUTORIAL 1. Note ● Put a...
...embroider make sure that is used to hold the thread when begining to sew or when trimming the thread. Grab the bobbin case latch, and remove the 3 bobbin case. 1 Removing the bobbin case Open the hook cover. 1 Pull the hook cover toward you . Do not pull it with... force. 18 Pull the thread picker toward you . 2 1 1 Latch ■ Oiling the machine After removing the bobbin case, apply oil to clean the bobbin case every time the bobbin is enough bobbin thread for embroidering. CAUTION ● The thread picker can only be oiled. EMBROIDERING TUTORIAL 1. Note ● Put a...
Users Manual - English
Page 36
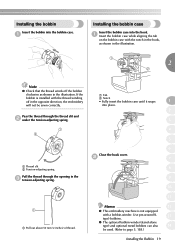
... 3 tension-adjusting spring. 1 1 Pull out about 50 mm (2 inches) of thread. 1 Tab 2 Notch • Fully insert the bobbin case until it snaps 1 into the hook. 1 Insert the bobbin case while aligning the tab on the bobbin case with the notch in the hook, as shown in the opposite direction, the embroidery will not...
... 3 tension-adjusting spring. 1 1 Pull out about 50 mm (2 inches) of thread. 1 Tab 2 Notch • Fully insert the bobbin case until it snaps 1 into the hook. 1 Insert the bobbin case while aligning the tab on the bobbin case with the notch in the hook, as shown in the opposite direction, the embroidery will not...
Users Manual - English
Page 47
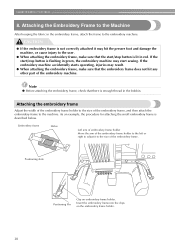
... frame. Positioning slots Positioning Pin Clip on the embroidery frame holder. 30 Attaching the Embroidery Frame to the Machine After hooping the fabric in the bobbin. EMBROIDERING TUTORIAL 8.
... frame. Positioning slots Positioning Pin Clip on the embroidery frame holder. 30 Attaching the Embroidery Frame to the Machine After hooping the fabric in the bobbin. EMBROIDERING TUTORIAL 8.
Users Manual - English
Page 61
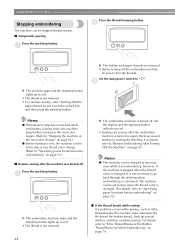
Re-thread the broken thread, back up several stitches, and then continue sewing. For details, refer to "If the Thread Breaks or the Bobbin Thread Runs Out While Embroidering" on page 83. Memo ● The machine can be set to stop at any thread color change " on page 92.) &#... thread is taut, touch the unlock key, and then press the start /stop when the thread color is changed , it is turned on again. X The bobbin and upper threads are trimmed. • Before turning off and the display and the start/stop button. however, if the machine is stopped when the...
Re-thread the broken thread, back up several stitches, and then continue sewing. For details, refer to "If the Thread Breaks or the Bobbin Thread Runs Out While Embroidering" on page 83. Memo ● The machine can be set to stop at any thread color change " on page 92.) &#... thread is taut, touch the unlock key, and then press the start /stop when the thread color is changed , it is turned on again. X The bobbin and upper threads are trimmed. • Before turning off and the display and the start/stop button. however, if the machine is stopped when the...
Users Manual - English
Page 62
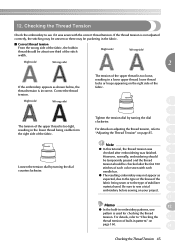
The tension of the fabric, the bobbin thread should be checked after embroidering was sewn with each 8 needle bar. ● The resulting embroidery may be uneven or there may not appear as ...
The tension of the fabric, the bobbin thread should be checked after embroidering was sewn with each 8 needle bar. ● The resulting embroidery may be uneven or there may not appear as ...
Users Manual - English
Page 76
... off the machine once to page 49.) When You Have a Question, This May Help You 59 The thread dust or lint is gathered under the bobbin's tension spring. ■ The frame came out from the carriage Make sure that the positioning pins are placed into the frame's positioning slot and hole...
... off the machine once to page 49.) When You Have a Question, This May Help You 59 The thread dust or lint is gathered under the bobbin's tension spring. ■ The frame came out from the carriage Make sure that the positioning pins are placed into the frame's positioning slot and hole...
Users Manual - English
Page 78
... spools message / 77 Easily changing the thread spools / 78 If the Thread Breaks or the Bobbin Thread Runs Out While Embroidering 79 If the upper thread breaks / 79 If the bobbin thread breaks or runs out / 80 Embroidering From the Beginning or Middle of the Pattern 81 ...Resume Embroidering After Turning OFF the Machine 83 Adjusting the Thread Tension 85 Adjusting the tension of the bobbin thread / 85 Adjusting the tension of fabric / 69 Embroidery Frame Position and Movement 70 Changing the Embroidering Position 72 Adjusting the angle /...
... spools message / 77 Easily changing the thread spools / 78 If the Thread Breaks or the Bobbin Thread Runs Out While Embroidering 79 If the upper thread breaks / 79 If the bobbin thread breaks or runs out / 80 Embroidering From the Beginning or Middle of the Pattern 81 ...Resume Embroidering After Turning OFF the Machine 83 Adjusting the Thread Tension 85 Adjusting the tension of the bobbin thread / 85 Adjusting the tension of fabric / 69 Embroidery Frame Position and Movement 70 Changing the Embroidering Position 72 Adjusting the angle /...
Users Manual - English
Page 96
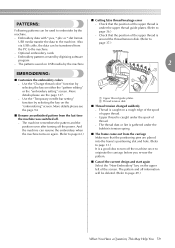
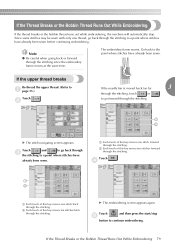
Note ● Be careful when going back or forward through the stitching. If the Thread Breaks or the Bobbin Thread Runs Out While Embroidering If the thread breaks or the bobbin thread runs out while embroidering, the machine will automatically stop button to continue embroidering. Touch . 4 1 ...moves one thread, go forward through the stitching since the embroidery frame moves at the same time. If the Thread Breaks or the Bobbin Thread Runs Out While Embroidering 79 Go back to a point where stitches have already been sewn. Touch and to go back through ...
Note ● Be careful when going back or forward through the stitching. If the Thread Breaks or the Bobbin Thread Runs Out While Embroidering If the thread breaks or the bobbin thread runs out while embroidering, the machine will automatically stop button to continue embroidering. Touch . 4 1 ...moves one thread, go forward through the stitching since the embroidery frame moves at the same time. If the Thread Breaks or the Bobbin Thread Runs Out While Embroidering 79 Go back to a point where stitches have already been sewn. Touch and to go back through ...


