

Users Manual - English
Page 1
EMBROIDERY MACHINE PR-620 OPERATION MANUAL
EMBROIDERY MACHINE PR-620 OPERATION MANUAL
Users Manual - English
Page 5
... most advanced computerized household embroidery machines. Be sure to clean the machine. Plug the machine directly into the wall. Always consult the manual when replacing or installing any other parts to inspect and adjust the machine yourself. THANK YOU FOR CHOOSING OUR MACHINE Your machine is required, first follow the troubleshooting table at www.brother.com iv For...
... most advanced computerized household embroidery machines. Be sure to clean the machine. Plug the machine directly into the wall. Always consult the manual when replacing or installing any other parts to inspect and adjust the machine yourself. THANK YOU FOR CHOOSING OUR MACHINE Your machine is required, first follow the troubleshooting table at www.brother.com iv For...
Users Manual - English
Page 6
... BEARS CERTAIN COPYRIGHT NOTICE UNDER THE NAME OF ANY THIRD PARTIES OTHER THAN BROTHER (e.g. Nothing in this Agreement. v Please direct all inquiries concerning this Agreement in combination with an embroidery machine that CUSTOMER owns or uses, provided that are licensed (not sold) to...CONTENT") that the CONTENT is licensed to: • Use the CONTENT in combination with an embroidery machine to create embroidery. • Use the CONTENT in writing by use at any one embroidery machine at a time. CUSTOMER is not used on more than one time. • Reproduce, modify...
... BEARS CERTAIN COPYRIGHT NOTICE UNDER THE NAME OF ANY THIRD PARTIES OTHER THAN BROTHER (e.g. Nothing in this Agreement. v Please direct all inquiries concerning this Agreement in combination with an embroidery machine that CUSTOMER owns or uses, provided that are licensed (not sold) to...CONTENT") that the CONTENT is licensed to: • Use the CONTENT in combination with an embroidery machine to create embroidery. • Use the CONTENT in writing by use at any one embroidery machine at a time. CUSTOMER is not used on more than one time. • Reproduce, modify...
Users Manual - English
Page 8
...message on top of the embroidery cards. • Do not allow the embroidery cards to become wet, such as with water, solvents, drinks or any other than our original embroidery cards are used, the embroidery machine may not be used with this embroidery machine. • Embroidery cards sold overseas cannot be... interference. • Do not use or store USB media in the display or while the embroidery machine is being recalled from the embroidery card, do not allow the machine to be exposed to vibrations or impacts, and do not attempt to the instruction manual included ...
...message on top of the embroidery cards. • Do not allow the embroidery cards to become wet, such as with water, solvents, drinks or any other than our original embroidery cards are used, the embroidery machine may not be used with this embroidery machine. • Embroidery cards sold overseas cannot be... interference. • Do not use or store USB media in the display or while the embroidery machine is being recalled from the embroidery card, do not allow the machine to be exposed to vibrations or impacts, and do not attempt to the instruction manual included ...
Users Manual - English
Page 13
... a problem occurs. Chapter 5: Selecting/Editing/Saving Patterns This chapter provides details on page 58. Details on changing the basic embroidery machine settings and viewing operations on operations other than those described in this chapter. For basic operations, refer to the list of ... descriptions of techniques for various embroidering operations, pointers for the contents of each chapter, and then check the table of the embroidery machine and the various preparations required before use of the keys and other necessary operations, for the desired information. By keyword Search...
... a problem occurs. Chapter 5: Selecting/Editing/Saving Patterns This chapter provides details on page 58. Details on changing the basic embroidery machine settings and viewing operations on operations other than those described in this chapter. For basic operations, refer to the list of ... descriptions of techniques for various embroidering operations, pointers for the contents of each chapter, and then check the table of the embroidery machine and the various preparations required before use of the keys and other necessary operations, for the desired information. By keyword Search...
Users Manual - English
Page 17
... Threads ...164 Stabilizers (Backing) ...165 Hooping Techniques...166 Fabric/stabilizer compatibility chart ...167 OPTIONAL ACCESSORIES Attaching an optional embroidery frame for industrial embroidery machines 168 Using the Optional Cap Frame 169 Cap frame and its accessories...169 Types of caps ...170 Fabric precautions...171 Preparing to use the cap ...
... Threads ...164 Stabilizers (Backing) ...165 Hooping Techniques...166 Fabric/stabilizer compatibility chart ...167 OPTIONAL ACCESSORIES Attaching an optional embroidery frame for industrial embroidery machines 168 Using the Optional Cap Frame 169 Cap frame and its accessories...169 Types of caps ...170 Fabric precautions...171 Preparing to use the cap ...
Users Manual - English
Page 18
... this chapter. After checking that all accessories are included. Names of the machine and the various preparations required before starting to "Included Accessories" on page 4, and check that all listed accessories are included, the embroidery machine can be set up the machine / 8 Adjusting the operation panel position / 9 Preparing the thread guide assembly / 10 Positioning...
... this chapter. After checking that all accessories are included. Names of the machine and the various preparations required before starting to "Included Accessories" on page 4, and check that all listed accessories are included, the embroidery machine can be set up the machine / 8 Adjusting the operation panel position / 9 Preparing the thread guide assembly / 10 Positioning...
Users Manual - English
Page 22
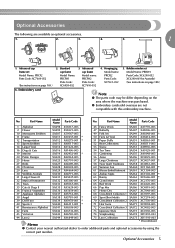
Bobbin winder set Model Name: PRCF2 Parts Code: XC7609-052 (See instructions on the area where the machine was purchased. ● Embroidery cards sold overseas are available as optional accessories. 1. 2. 3. 4. 5. 1 1. Hooping jig Model name: PRCFJ2 Parts Code: XC7611-052 5. Optional Accessories 5 Standard cap frame Model...188.) Note ● The parts code may be differ depending on page 169.) 6. Advanced cap frame Model name: PRCFH2 Parts Code: XC7610-052 4. Embroidery card 2. Optional Accessories The following are not compatible with this embroidery machine.
Bobbin winder set Model Name: PRCF2 Parts Code: XC7609-052 (See instructions on the area where the machine was purchased. ● Embroidery cards sold overseas are available as optional accessories. 1. 2. 3. 4. 5. 1 1. Hooping jig Model name: PRCFJ2 Parts Code: XC7611-052 5. Optional Accessories 5 Standard cap frame Model...188.) Note ● The parts code may be differ depending on page 169.) 6. Advanced cap frame Model name: PRCFH2 Parts Code: XC7610-052 4. Embroidery card 2. Optional Accessories The following are not compatible with this embroidery machine.
Users Manual - English
Page 23
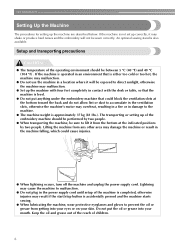
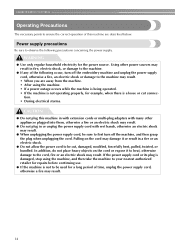
...result if the start/stop button is approximately 37 kg (81 Ibs.). Do not put anything under the embroidery machine that could cause injuries. ● When lightning occurs, turn off the machine and unplug the power supply cord. Keep the oil and grease out of the reach of the operating ... toward the back and do not allow lint or dust to accumulate in the ventilation slots, otherwise the machine's motor may damage the machine or result in the power supply cord until setup of the embroidery machine should be exposed to prevent the oil or grease from getting into your skin.
...result if the start/stop button is approximately 37 kg (81 Ibs.). Do not put anything under the embroidery machine that could cause injuries. ● When lightning occurs, turn off the machine and unplug the power supply cord. Keep the oil and grease out of the reach of the operating ... toward the back and do not allow lint or dust to accumulate in the ventilation slots, otherwise the machine's motor may damage the machine or result in the power supply cord until setup of the embroidery machine should be exposed to prevent the oil or grease from getting into your skin.
Users Manual - English
Page 30
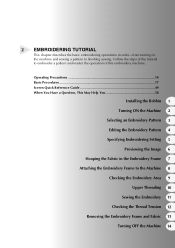
... tutorial to embroider a pattern and master the operation of this embroidery machine. 2 EMBROIDERING TUTORIAL This chapter describes the basic embroidering operations in the Embroidery Frame 7 Attaching the Embroidery Frame to the Machine 8 Checking the Embroidery Area 9 Upper Threading 10 Sewing the Embroidery 11 Checking the Thread Tension 12 Removing the Embroidery Frame and Fabric 13 Turning OFF the...
... tutorial to embroider a pattern and master the operation of this embroidery machine. 2 EMBROIDERING TUTORIAL This chapter describes the basic embroidering operations in the Embroidery Frame 7 Attaching the Embroidery Frame to the Machine 8 Checking the Embroidery Area 9 Upper Threading 10 Sewing the Embroidery 11 Checking the Thread Tension 12 Removing the Embroidery Frame and Fabric 13 Turning OFF the...
Users Manual - English
Page 31
... the power supply cord, otherwise a fire may result. 14 WARNING ● Use only regular household electricity for repairs before continuing use. ● If the machine is a loose or cut , damaged, modified, forcefully bent, pulled, twisted, or bundled. In addition, do not place heavy objects on the cord may ... electric shock. ● Do not allow the power cord to be sure to first turn off the embroidery machine and unplug the power supply cord, otherwise a fire, an electric shock or damage to the machine may result. If the power supply cord or its plug is damaged, stop using the...
... the power supply cord, otherwise a fire may result. 14 WARNING ● Use only regular household electricity for repairs before continuing use. ● If the machine is a loose or cut , damaged, modified, forcefully bent, pulled, twisted, or bundled. In addition, do not place heavy objects on the cord may ... electric shock. ● Do not allow the power cord to be sure to first turn off the embroidery machine and unplug the power supply cord, otherwise a fire, an electric shock or damage to the machine may result. If the power supply cord or its plug is damaged, stop using the...
Users Manual - English
Page 33
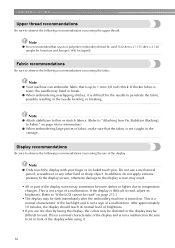
.... This is a normal characteristic of a malfunction. Note ● Only touch the display with your finger or included touch pen. Note ● Your machine can embroider fabric that rayon or polyester embroidery thread be used (120 den x 2 / 135 dtex x 2 / 40 weight (in Americas and Europe) / #50 (in the needle bending or breaking. Display... may sometimes become darker or lighter due to read " on page 66 for the needle to "If the LCD cannot be dark immediately after the embroidery machine is not a malfunction. Do not use of the display.
.... This is a normal characteristic of a malfunction. Note ● Only touch the display with your finger or included touch pen. Note ● Your machine can embroider fabric that rayon or polyester embroidery thread be used (120 den x 2 / 135 dtex x 2 / 40 weight (in Americas and Europe) / #50 (in the needle bending or breaking. Display... may sometimes become darker or lighter due to read " on page 66 for the needle to "If the LCD cannot be dark immediately after the embroidery machine is not a malfunction. Do not use of the display.
Users Manual - English
Page 34
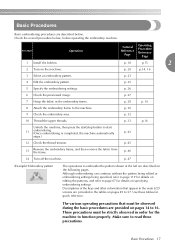
... 20 p.14, 16 3 Select an embroidery pattern. p. 25 5 Specify the embroidering settings. p. 28 p. 16 8 Attach the embroidery frame to start 11 embroidering. (Once embroidering is completed, the machine automatically stops.) p. 42 12 Check the...machine. Procedure Operation 1 Install the bobbin. 2 Turn on the following pages. p. 32 10 Thread the upper threads. p. 47 (Example) Embroidery pattern The operations to read these tables for the machine to 16. Make sure to embroider the pattern shown at the left are described below , before operating the embroidery machine...
... 20 p.14, 16 3 Select an embroidery pattern. p. 25 5 Specify the embroidering settings. p. 28 p. 16 8 Attach the embroidery frame to start 11 embroidering. (Once embroidering is completed, the machine automatically stops.) p. 42 12 Check the...machine. Procedure Operation 1 Install the bobbin. 2 Turn on the following pages. p. 32 10 Thread the upper threads. p. 47 (Example) Embroidery pattern The operations to read these tables for the machine to 16. Make sure to embroider the pattern shown at the left are described below , before operating the embroidery machine...
Users Manual - English
Page 36
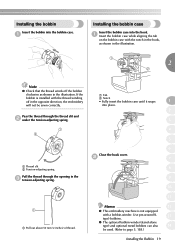
... case with the notch in the hook, as shown in the illustration. 1 2 2 Note ● Check that the thread winds off in the opposite direction, the embroidery will not be used. (Refer to page 5, 188.) Installing the Bobbin 19 Use pre-wound (L 13 type) bobbins. ● The optional bobbin winder (stand-alone...) of thread. 1 Tab 2 Notch • Fully insert the bobbin case until it snaps 1 into place. 2 3 4 5 6 Close the hook cover. 2 7 8 9 10 11 Memo 12 ● This embroidery machine is installed with a bobbin-winder.
... case with the notch in the hook, as shown in the illustration. 1 2 2 Note ● Check that the thread winds off in the opposite direction, the embroidery will not be used. (Refer to page 5, 188.) Installing the Bobbin 19 Use pre-wound (L 13 type) bobbins. ● The optional bobbin winder (stand-alone...) of thread. 1 Tab 2 Notch • Fully insert the bobbin case until it snaps 1 into place. 2 3 4 5 6 Close the hook cover. 2 7 8 9 10 11 Memo 12 ● This embroidery machine is installed with a bobbin-winder.
Users Manual - English
Page 37
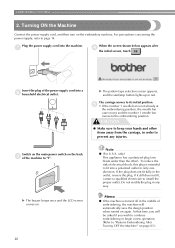
...switch on the back 3 of embroidering, the machine will be asked if you wish to continue embroidering or begin a new operation. (Refer to the embroidering position. X The buzzer beeps once and the LCD screen comes on the embroidery machine. only) This appliance has a polarized plug (...one direction. To reduce the risk of the power supply cord into the machine. 1 When the screen shown below appears after 4 the initial screen, touch . ...
...switch on the back 3 of embroidering, the machine will be asked if you wish to continue embroidering or begin a new operation. (Refer to the embroidering position. X The buzzer beeps once and the LCD screen comes on the embroidery machine. only) This appliance has a polarized plug (...one direction. To reduce the risk of the power supply cord into the machine. 1 When the screen shown below appears after 4 the initial screen, touch . ...
Users Manual - English
Page 38
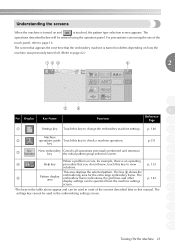
...the 5 Pattern display area embroidering area for example, there is an operating 4 Help key procedure that the embroidery machine is turned on differs depending on and is turned on how the machine was previously turned off. (Refer to view p. 153 solutions. 8 This area displays the selected pattern.... indications, the grid lines and other display settings can be specified from the machine settings p. 143 9 screen. 10 *The keys in most of the touch panel, refer to change the embroidery machine settings. The settings key cannot be used in the table above appear and can...
...the 5 Pattern display area embroidering area for example, there is an operating 4 Help key procedure that the embroidery machine is turned on differs depending on and is turned on how the machine was previously turned off. (Refer to view p. 153 solutions. 8 This area displays the selected pattern.... indications, the grid lines and other display settings can be specified from the machine settings p. 143 9 screen. 10 *The keys in most of the touch panel, refer to change the embroidery machine settings. The settings key cannot be used in the table above appear and can...
Users Manual - English
Page 39
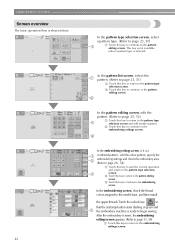
... is shown below. In the embroidering settings screen, if it is a combined pattern , edit the entire pattern, specify the embroidering settings and check the embroidery area. (Refer to page 26, 54) 1 Touch this key to quit the current operation and return to the pattern type selection screen. 2 Touch ... the needle bars, and then install the upper threads.Touch the unlock key so that the start/stop button starts flashing in green and the embroidery machine is sewn, the embroidering settings screen appears. (Refer to page 33, 56) 1 Touch this key to continue to the pattern editing screen. In...
... is shown below. In the embroidering settings screen, if it is a combined pattern , edit the entire pattern, specify the embroidering settings and check the embroidery area. (Refer to page 26, 54) 1 Touch this key to quit the current operation and return to the pattern type selection screen. 2 Touch ... the needle bars, and then install the upper threads.Touch the unlock key so that the start/stop button starts flashing in green and the embroidery machine is sewn, the embroidering settings screen appears. (Refer to page 33, 56) 1 Touch this key to continue to the pattern editing screen. In...
Users Manual - English
Page 46
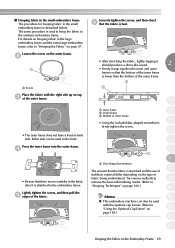
..., refer to "Hooping Techniques" on page 166.) 10 Memo 11 ● This embroidery machine can be used with the right side up on page 169.) 13 14 Hooping the Fabric in the embroidery frame. Lightly tighten the screw, and then pull the 5 edges of stabilizer material differ depending on... page 67. The same procedure is stretched in the Embroidery Frame 29 Securely tighten the screw, and then check 6 that the fabric is taut. • After stretching the fabric, lightly tapping it...
..., refer to "Hooping Techniques" on page 166.) 10 Memo 11 ● This embroidery machine can be used with the right side up on page 169.) 13 14 Hooping the Fabric in the embroidery frame. Lightly tighten the screw, and then pull the 5 edges of stabilizer material differ depending on... page 67. The same procedure is stretched in the Embroidery Frame 29 Securely tighten the screw, and then check 6 that the fabric is taut. • After stretching the fabric, lightly tapping it...
Users Manual - English
Page 47
... red. If the start sewing. Attaching the Embroidery Frame to the Machine After hooping the fabric in the bobbin. Embroidery frame Holes Left arm of embroidery frame holder Move the arm of the embroidery frame, and then attach the embroidery frame to the embroidery machine. Positioning slots Positioning Pin Clip on the embroidery frame holder. 30 EMBROIDERING TUTORIAL 8. CAUTION...
... red. If the start sewing. Attaching the Embroidery Frame to the Machine After hooping the fabric in the bobbin. Embroidery frame Holes Left arm of embroidery frame holder Move the arm of the embroidery frame, and then attach the embroidery frame to the embroidery machine. Positioning slots Positioning Pin Clip on the embroidery frame holder. 30 EMBROIDERING TUTORIAL 8. CAUTION...

Users Manual - English
Page 48
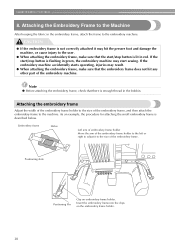
... the left arm to be on top. 3 Note 4 ● Incorrect frame positioning. 543 2 1 5 6 6 7 1 Mark for extra-large embroidery frame 2 Mark for large embroidery frame 3 Mark for medium embroidery frame 4 Mark for embroidery frame for industrial embroidery machines (When using embroidery frames for 1 the embroidery frame to align the screw on the 2 right side with the mark. 8 Insert the...
... the left arm to be on top. 3 Note 4 ● Incorrect frame positioning. 543 2 1 5 6 6 7 1 Mark for extra-large embroidery frame 2 Mark for large embroidery frame 3 Mark for medium embroidery frame 4 Mark for embroidery frame for industrial embroidery machines (When using embroidery frames for 1 the embroidery frame to align the screw on the 2 right side with the mark. 8 Insert the...


