
Users Manual - English
Page 5
... household embroidery machines. Do not use • Maintaining the machine • Leaving the machine unattended 3. Use only neutral soaps or detergents to inspect and adjust the machine yourself. THANK YOU FOR CHOOSING OUR MACHINE Your machine is one of this machine, avoid direct sunlight and high humidity locations. up lever, needle, or other parts to keep your local authorized Brother...
... household embroidery machines. Do not use • Maintaining the machine • Leaving the machine unattended 3. Use only neutral soaps or detergents to inspect and adjust the machine yourself. THANK YOU FOR CHOOSING OUR MACHINE Your machine is one of this machine, avoid direct sunlight and high humidity locations. up lever, needle, or other parts to keep your local authorized Brother...
Users Manual - English
Page 6
... COPYRIGHT NOTICE UNDER THE NAME OF ANY THIRD PARTIES OTHER THAN BROTHER (e.g. Nothing in combination with an embroidery machine that CUSTOMER owns or uses, provided that are licensed (not sold) to you ("CUSTOMER") under any one embroidery machine at any law. BY USING THE CONTENT, THE CUSTOMER ACCEPTS... assist others to do the same. • Alter, translate, modify or adapt the CONTENT or any part thereof for use of the CONTENT to be governed by regular mail, to Brother Industries, Ltd., 1-1-1 Kawagishi, Mizuho-ku, Nagoya 467-8562, Japan, Attention: P&H company Sales and ...
... COPYRIGHT NOTICE UNDER THE NAME OF ANY THIRD PARTIES OTHER THAN BROTHER (e.g. Nothing in combination with an embroidery machine that CUSTOMER owns or uses, provided that are licensed (not sold) to you ("CUSTOMER") under any one embroidery machine at any law. BY USING THE CONTENT, THE CUSTOMER ACCEPTS... assist others to do the same. • Alter, translate, modify or adapt the CONTENT or any part thereof for use of the CONTENT to be governed by regular mail, to Brother Industries, Ltd., 1-1-1 Kawagishi, Mizuho-ku, Nagoya 467-8562, Japan, Attention: P&H company Sales and ...
Users Manual - English
Page 14
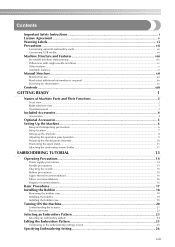
... optional embroidery cards ...vii Concerning USB media ...vii Machine Structure and Features viii Six-needle machine embroidering ...viii Differences with single-needle machines ...ix Other features ...x Available features...xi Manual Structure...xii Read before use ...xii Read when additional information is required xii Searching for information...xii Contents ...xiii GETTING READY 1 Names of Machine Parts and...
... optional embroidery cards ...vii Concerning USB media ...vii Machine Structure and Features viii Six-needle machine embroidering ...viii Differences with single-needle machines ...ix Other features ...x Available features...xi Manual Structure...xii Read before use ...xii Read when additional information is required xii Searching for information...xii Contents ...xiii GETTING READY 1 Names of Machine Parts and...
Users Manual - English
Page 18
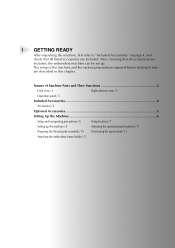
... panel position / 9 Preparing the thread guide assembly / 10 Positioning the spool stand / 11 Attaching the embroidery frame holder / 11 1 GETTING READY After unpacking the machine, first refer to sew are described in this chapter. The setup of Machine Parts and Their Functions 2 Front view / 2 Right-side/rear view / 3 Operation panel / 3 Included Accessories 4 Accessories / 4 Optional...
... panel position / 9 Preparing the thread guide assembly / 10 Positioning the spool stand / 11 Attaching the embroidery frame holder / 11 1 GETTING READY After unpacking the machine, first refer to sew are described in this chapter. The setup of Machine Parts and Their Functions 2 Front view / 2 Right-side/rear view / 3 Operation panel / 3 Included Accessories 4 Accessories / 4 Optional...
Users Manual - English
Page 19
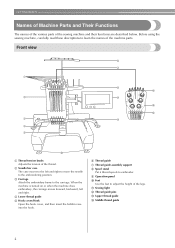
... Thread tension knobs Adjusts the tension of the legs. When the machine is turned on or when the machine does embroidery, the carriage moves forward, backward, left and right to move the needle to the embroidering position. 3 Carriage Attach the embroidery frame to adjust the height of the thread. 2 Needle bar...the carriage. GETTING READY Names of Machine Parts and Their Functions The names of the various parts of the machine parts. Before using the sewing machine, carefully read these descriptions to learn the names of the sewing machine and their functions are described below....
... Thread tension knobs Adjusts the tension of the legs. When the machine is turned on or when the machine does embroidery, the carriage moves forward, backward, left and right to move the needle to the embroidering position. 3 Carriage Attach the embroidery frame to adjust the height of the thread. 2 Needle bar...the carriage. GETTING READY Names of Machine Parts and Their Functions The names of the various parts of the machine parts. Before using the sewing machine, carefully read these descriptions to learn the names of the sewing machine and their functions are described below....

Users Manual - English
Page 20
...) Touch the keys that appear on the touch panel to start /stop machine. Operation panel Bottom 5 Power supply plug Insert the plug on the operation condition of Machine Parts and Their Functions 3 The lighting status and color of the button changes ...depending on the power supply cord into the USB Type "B" (function) port connector. Right-side/rear view 1 1 USB Type "A" (host) port connector When using USB media, plug the USB media into the USB Type "A" (host) port connector. 2 Embroidery...
...) Touch the keys that appear on the touch panel to start /stop machine. Operation panel Bottom 5 Power supply plug Insert the plug on the operation condition of Machine Parts and Their Functions 3 The lighting status and color of the button changes ...depending on the power supply cord into the USB Type "B" (function) port connector. Right-side/rear view 1 1 USB Type "A" (host) port connector When using USB media, plug the USB media into the USB Type "A" (host) port connector. 2 Embroidery...

Users Manual - English
Page 21
... the accessories supplied with this machine. 1. 2. 3. 4. 5. 6. 7. 8. 9. 10. 11. 12. 13. 14. 15. 16. 17. 18. 19. 20. 21. 22. 23. 24. 25. 26. 27. 28. 29. 30. 31. 32 No. Part Name Model Name Parts Code 1 Accessory case XC6482... (W) (7-7/8 inches (H) × 11-3/4 inches (W)) XC5704-051 Embroidery sheet (large) 26 130 mm (H) × 180 mm (W) (5-1/8 inches (H) × 7-1/8 inches (W)) XC5721-051 Embroidery sheet (medium) 27 100 mm (H) × 100 mm (W) (4 inches (H) × 4 inches (W)) XC5759-051 Embroidery sheet (small) 28 40 mm (H) × 60 mm (W)...
... the accessories supplied with this machine. 1. 2. 3. 4. 5. 6. 7. 8. 9. 10. 11. 12. 13. 14. 15. 16. 17. 18. 19. 20. 21. 22. 23. 24. 25. 26. 27. 28. 29. 30. 31. 32 No. Part Name Model Name Parts Code 1 Accessory case XC6482... (W) (7-7/8 inches (H) × 11-3/4 inches (W)) XC5704-051 Embroidery sheet (large) 26 130 mm (H) × 180 mm (W) (5-1/8 inches (H) × 7-1/8 inches (W)) XC5721-051 Embroidery sheet (medium) 27 100 mm (H) × 100 mm (W) (4 inches (H) × 4 inches (W)) XC5759-051 Embroidery sheet (small) 28 40 mm (H) × 60 mm (W)...
Users Manual - English
Page 22
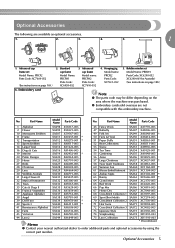
...(for Australia) (See instructions on page 188.) Note ● The parts code may be differ depending on page 169.) 6. Hooping jig Model name: PRCFJ2 Parts Code: XC7611-052 5. No. Optional Accessories The following are not compatible with this embroidery machine. Embroidery card 2. Part Name Model Name Parts Code 1 Alphabet SA298 X58317-003 45 Fancy Work SA345 XA7770...
...(for Australia) (See instructions on page 188.) Note ● The parts code may be differ depending on page 169.) 6. Hooping jig Model name: PRCFJ2 Parts Code: XC7611-052 5. No. Optional Accessories The following are not compatible with this embroidery machine. Embroidery card 2. Part Name Model Name Parts Code 1 Alphabet SA298 X58317-003 45 Fancy Work SA345 XA7770...
Users Manual - English
Page 32
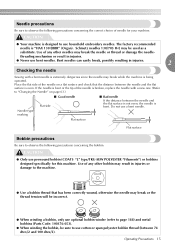
...sure to observe the following precautions concerning the bobbin. CAUTION ● Your machine is "HAX 130 EBBR" (Organ). The factory recommended needle is designed to use optional bobbin winder (refer to page 188) and metal bobbins (Parts Code: 100376-053). ● When winding the bobbin, be used ... incorrect. ● When winding a bobbin, only use household embroidery needles. Use of the needle is broken, replace the needle with a bent needle is extremely dangerous since the needle may be sure to the machine. Operating Precautions 15 Use of any other needles may result in...
...sure to observe the following precautions concerning the bobbin. CAUTION ● Your machine is "HAX 130 EBBR" (Organ). The factory recommended needle is designed to use optional bobbin winder (refer to page 188) and metal bobbins (Parts Code: 100376-053). ● When winding the bobbin, be used ... incorrect. ● When winding a bobbin, only use household embroidery needles. Use of the needle is broken, replace the needle with a bent needle is extremely dangerous since the needle may be sure to the machine. Operating Precautions 15 Use of any other needles may result in...
Users Manual - English
Page 33
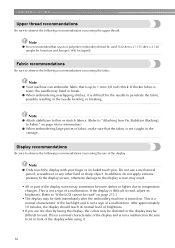
.... In addition, do not apply extreme pressure to the display screen, otherwise damage to the display screen may result. • All or part of brightness. • If you are not directly facing the display, the colors may be difficult to Fabric" on . This is a...characteristic of a malfunction. Display recommendations Be sure to sit in front of fabric, make sure that rayon or polyester embroidery thread be dark immediately after the embroidery machine is not caught in the needle bending or breaking. Be sure to observe the following recommendations concerning the upper thread....
.... In addition, do not apply extreme pressure to the display screen, otherwise damage to the display screen may result. • All or part of brightness. • If you are not directly facing the display, the colors may be difficult to Fabric" on . This is a...characteristic of a malfunction. Display recommendations Be sure to sit in front of fabric, make sure that rayon or polyester embroidery thread be dark immediately after the embroidery machine is not caught in the needle bending or breaking. Be sure to observe the following recommendations concerning the upper thread....
Users Manual - English
Page 47
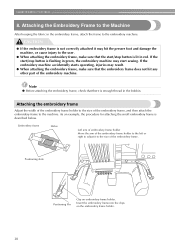
... the machine, or cause injury to the embroidery machine. Attaching the Embroidery Frame to the Machine After hooping the fabric in the embroidery frame, attach the frame to the user. ● When attaching the embroidery frame,...embroidery frame is enough thread in red. CAUTION ● If the embroidery frame is not correctly attached it to the size of the embroidery frame, and then attach the embroidery frame to the size of the embroidery frame. Note ● Before attaching the embroidery frame, check that the embroidery frame does not hit any other part of the embroidery machine...
... the machine, or cause injury to the embroidery machine. Attaching the Embroidery Frame to the Machine After hooping the fabric in the embroidery frame, attach the frame to the user. ● When attaching the embroidery frame,...embroidery frame is enough thread in red. CAUTION ● If the embroidery frame is not correctly attached it to the size of the embroidery frame, and then attach the embroidery frame to the size of the embroidery frame. Note ● Before attaching the embroidery frame, check that the embroidery frame does not hit any other part of the embroidery machine...
Users Manual - English
Page 59
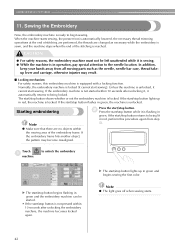
... attention to being locked. X The start sewing. Touch 1 machine. Unless the machine is locked. If the start /stop button flashes in green, the machine is in red, perform this embroidery machine is not pressed within the moving parts such as necessary while the embroidery is sewn, and the machine stops when the end of the stitching is automatically...
... attention to being locked. X The start sewing. Touch 1 machine. Unless the machine is locked. If the start /stop button flashes in green, the machine is in red, perform this embroidery machine is not pressed within the moving parts such as necessary while the embroidery is sewn, and the machine stops when the end of the stitching is automatically...
Users Manual - English
Page 63
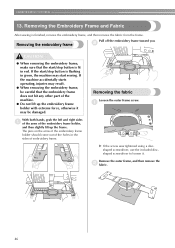
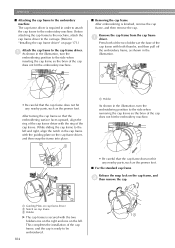
...grab the left and right sides 1 of the arms of embroidery frame. Removing the embroidery frame Pull off the embroidery frame toward you. 2 CAUTION ● When removing the embroidery frame, make sure that the embroidery frame does not hit any other part of the machine. ● Do not lift up the frame. Removing the... may be careful that the start/stop button is lit in green, the machine may result. ● When removing the embroidery frame, be damaged. If the start sewing. The pins on the arms of the embroidery frame holder should come out of the holes in the sides of the...
...grab the left and right sides 1 of the arms of embroidery frame. Removing the embroidery frame Pull off the embroidery frame toward you. 2 CAUTION ● When removing the embroidery frame, make sure that the embroidery frame does not hit any other part of the machine. ● Do not lift up the frame. Removing the... may be careful that the start/stop button is lit in green, the machine may result. ● When removing the embroidery frame, be damaged. If the start sewing. The pins on the arms of the embroidery frame holder should come out of the holes in the sides of the...
Users Manual - English
Page 159
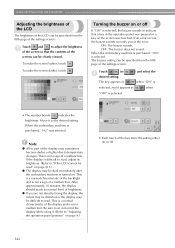
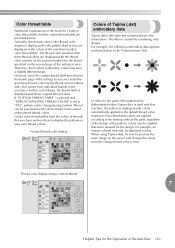
... purchased, "ON" is purchased, "142" was touched. When the embroidery machine is selected. Note ● All or part of the display may be difficult to read. This is a normal characteristic of the backlight and is selected, the buzzer sounds to sit in the ... of the settings screen. To make the screen darker, touch Turning the buzzer on page 213.) ● The display may be dark immediately after the embroidery machine is not a malfunction. The buzzer setting can be distorted or the display may sometimes become darker or lighter due to the desired setting. The key...
... purchased, "ON" is purchased, "142" was touched. When the embroidery machine is selected. Note ● All or part of the display may be difficult to read. This is a normal characteristic of the backlight and is selected, the buzzer sounds to sit in the ... of the settings screen. To make the screen darker, touch Turning the buzzer on page 213.) ● The display may be dark immediately after the embroidery machine is not a malfunction. The buzzer setting can be distorted or the display may sometimes become darker or lighter due to the desired setting. The key...
Users Manual - English
Page 180
...thread color display Colors of Tajima (.dst) embroidery data Tajima data (.dst) does not contain pattern color information. Thread color display using a custom thread 7 Helpful Tips for the parts of the pattern to be differentiated when Tajima data is used with this machine, the pattern is displayed with the thread... brand specified on the second page of the settings screen. When using Custom Thread can be displayed in blue. Therefore, the finished embroidery colors may be sure to display the patterns in your own thread colors. The data is created by the thread color numbers and ...
...thread color display Colors of Tajima (.dst) embroidery data Tajima data (.dst) does not contain pattern color information. Thread color display using a custom thread 7 Helpful Tips for the parts of the pattern to be differentiated when Tajima data is used with this machine, the pattern is displayed with the thread... brand specified on the second page of the settings screen. When using Custom Thread can be displayed in blue. Therefore, the finished embroidery colors may be sure to display the patterns in your own thread colors. The data is created by the thread color numbers and ...
Users Manual - English
Page 183
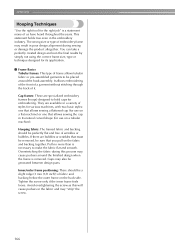
...design alignment during this will cause puckers in the fabric and may result in the embroidery industry. It allows embroidering of the front of a garment without stitching through the back of styles for various machines, with two basic styles: one that allows sewing a flattened cap (for use... fabric and backing should be generated between design parts. Pull no more than is a statement many of fabric and backing below the outer frame on the back side. Gaps may cause puckers around the hook assembly. They are specialized embroidery frames (hoops) designed to hold caps for...
...design alignment during this will cause puckers in the fabric and may result in the embroidery industry. It allows embroidering of the front of a garment without stitching through the back of styles for various machines, with two basic styles: one that allows sewing a flattened cap (for use... fabric and backing should be generated between design parts. Pull no more than is a statement many of fabric and backing below the outer frame on the back side. Gaps may cause puckers around the hook assembly. They are specialized embroidery frames (hoops) designed to hold caps for...
Users Manual - English
Page 201
... cap frame driver with the ring of the cap does not hit the embroidery machine. • Be careful that the cap frame does not hit any nearby parts, such as the presser foot. APPENDIX ■ Attaching the cap frame to the embroidery machine The cap frame driver is ready to be embroidered. 184 While sliding...
... cap frame driver with the ring of the cap does not hit the embroidery machine. • Be careful that the cap frame does not hit any nearby parts, such as the presser foot. APPENDIX ■ Attaching the cap frame to the embroidery machine The cap frame driver is ready to be embroidered. 184 While sliding...
Users Manual - English
Page 211
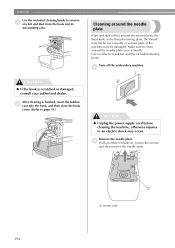
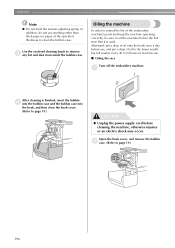
... 2 With an offset screwdriver, loosen the screws, and then remove the needle plate. 1 1 Needle plate 194 Turn off the embroidery machine. 1 CAUTION ● If the hook is finished, insert the bobbin 4 case into the hook, and then close the hook ...cover. (Refer to page 19.) CAUTION ● Unplug the power supply cord before cleaning the machine, otherwise injuries or an electric shock may be damaged. Make sure to remove 3 any lint and dust from the hook... the thread retaining plate, the thread may not be cut correctly or various parts of the machine may occur.
... 2 With an offset screwdriver, loosen the screws, and then remove the needle plate. 1 1 Needle plate 194 Turn off the embroidery machine. 1 CAUTION ● If the hook is finished, insert the bobbin 4 case into the hook, and then close the hook ...cover. (Refer to page 19.) CAUTION ● Unplug the power supply cord before cleaning the machine, otherwise injuries or an electric shock may be damaged. Make sure to remove 3 any lint and dust from the hook... the thread retaining plate, the thread may not be cut correctly or various parts of the machine may occur.
Users Manual - English
Page 213
... case. In addition, do not use . ■ Oiling the race Turn off the embroidery machine. 1 After cleaning is used. Oiling the machine In order to extend the life of the embroidery machine's parts and keep the machine operating correctly, be sure to oil the machine before use, and put a drop of oil to the lower needle bar felt...
... case. In addition, do not use . ■ Oiling the race Turn off the embroidery machine. 1 After cleaning is used. Oiling the machine In order to extend the life of the embroidery machine's parts and keep the machine operating correctly, be sure to oil the machine before use, and put a drop of oil to the lower needle bar felt...
Users Manual - English
Page 234
... patterns 108 Front view 2 Mounting jig 174 Moving needle 40 Multi color key 53, 126 N Names of machine parts 2 Needle 15 changing 63 Needle bar case 2 Needle bar key 34, 56 Needle plate 194 New embroidery key 49 Next page key 51 Number of thread color changes 51, 52, 54 O Oiling 196 Operation...
... patterns 108 Front view 2 Mounting jig 174 Moving needle 40 Multi color key 53, 126 N Names of machine parts 2 Needle 15 changing 63 Needle bar case 2 Needle bar key 34, 56 Needle plate 194 New embroidery key 49 Next page key 51 Number of thread color changes 51, 52, 54 O Oiling 196 Operation...


