
Users Manual - English
Page 10
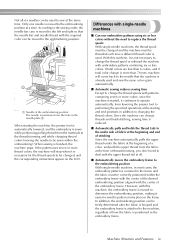
... at any place in the frame. In addition, the embroidering position can be freely determined after the fabric is hooped and the embroidery frame is attached to the machine, regardless of how the fabric is positioned in the needle plate 2. Not all six needles can be used to...must be moved to the embroidering position. 2 1 1 Needle at the embroidering position The needle is positioned over the hole in the embroidery frame. Since the machine can be threaded each time a different thread color is reduced. ■ Automatically pulls and holds the thread tails to the under ...
... at any place in the frame. In addition, the embroidering position can be freely determined after the fabric is hooped and the embroidery frame is attached to the machine, regardless of how the fabric is positioned in the needle plate 2. Not all six needles can be used to...must be moved to the embroidering position. 2 1 1 Needle at the embroidering position The needle is positioned over the hole in the embroidery frame. Since the machine can be threaded each time a different thread color is reduced. ■ Automatically pulls and holds the thread tails to the under ...
Users Manual - English
Page 15
Previewing the Image ...27 Checking a preview image ...27 Hooping the Fabric in the Embroidery Frame 28 Hooping the fabric in the embroidery frame...28 Attaching the Embroidery Frame to the Machine 30 Attaching the embroidery frame ...30 Checking the Embroidery Area 32 Continuing to the embroidering screen ...32 Upper Threading ...33 Checking the needle bars and thread colors ...33...
Previewing the Image ...27 Checking a preview image ...27 Hooping the Fabric in the Embroidery Frame 28 Hooping the fabric in the embroidery frame...28 Attaching the Embroidery Frame to the Machine 30 Attaching the embroidery frame ...30 Checking the Embroidery Area 32 Continuing to the embroidering screen ...32 Upper Threading ...33 Checking the needle bars and thread colors ...33...
Users Manual - English
Page 17
... on the fabric 161 Color thread table ...163 Colors of Tajima (.dst) embroidery data ...163 Creating Beautiful Embroidery 164 Threads ...164 Stabilizers (Backing) ...165 Hooping Techniques...166 Fabric/stabilizer compatibility chart ...167 OPTIONAL ACCESSORIES Attaching an optional embroidery frame for industrial embroidery machines 168 Using the Optional Cap Frame 169 Cap frame and its accessories...169...
... on the fabric 161 Color thread table ...163 Colors of Tajima (.dst) embroidery data ...163 Creating Beautiful Embroidery 164 Threads ...164 Stabilizers (Backing) ...165 Hooping Techniques...166 Fabric/stabilizer compatibility chart ...167 OPTIONAL ACCESSORIES Attaching an optional embroidery frame for industrial embroidery machines 168 Using the Optional Cap Frame 169 Cap frame and its accessories...169...
Users Manual - English
Page 22
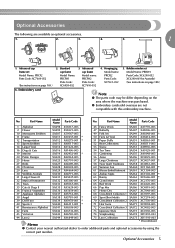
... Model name: PRCFH2 Parts Code: XC7610-052 4. Optional Accessories The following are not compatible with this embroidery machine. Optional Accessories 5 Standard cap frame Model Name: PRCFH1 Parts Code: XC6958-052 3. Hooping jig Model name: PRCFJ2 Parts Code: XC7611-052 5. No. Part Name Model Name Parts Code 1...-061(for Australia) (See instructions on page 188.) Note ● The parts code may be differ depending on page 169.) 6. Embroidery card 2. Part Name Model Name Parts Code No. Bobbin winder set Model Name: PRCF2 Parts Code: XC7609-052 (See instructions on the...
... Model name: PRCFH2 Parts Code: XC7610-052 4. Optional Accessories The following are not compatible with this embroidery machine. Optional Accessories 5 Standard cap frame Model Name: PRCFH1 Parts Code: XC6958-052 3. Hooping jig Model name: PRCFJ2 Parts Code: XC7611-052 5. No. Part Name Model Name Parts Code 1...-061(for Australia) (See instructions on page 188.) Note ● The parts code may be differ depending on page 169.) 6. Embroidery card 2. Part Name Model Name Parts Code No. Bobbin winder set Model Name: PRCF2 Parts Code: XC7609-052 (See instructions on the...
Users Manual - English
Page 30
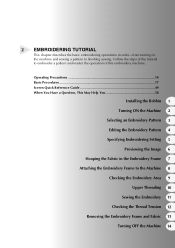
... Reference Guide 49 When You Have a Question, This May Help You 58 Installing the Bobbin 1 Turning ON the Machine 2 Selecting an Embroidery Pattern 3 Editing the Embroidery Pattern 4 Specifying Embroidering Setting 5 Previewing the Image 6 Hooping the Fabric in order-from turning on the machine and sewing a pattern to embroider a pattern and master the operation of this embroidery machine.
... Reference Guide 49 When You Have a Question, This May Help You 58 Installing the Bobbin 1 Turning ON the Machine 2 Selecting an Embroidery Pattern 3 Editing the Embroidery Pattern 4 Specifying Embroidering Setting 5 Previewing the Image 6 Hooping the Fabric in order-from turning on the machine and sewing a pattern to embroider a pattern and master the operation of this embroidery machine.
Users Manual - English
Page 34
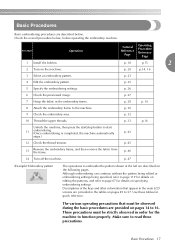
... p.15 2 p. 20 p.14, 16 3 Select an embroidery pattern. p. 27 7 Hoop the fabric in order for details on specifying embroidering settings. Make sure to page 87 for the machine to function properly. p. 30 9 Check the embroidery area. p. 33 p.16 Unlock the machine, then press the start/stop button to the machine. The various operating precautions that appear...
... p.15 2 p. 20 p.14, 16 3 Select an embroidery pattern. p. 27 7 Hoop the fabric in order for details on specifying embroidering settings. Make sure to page 87 for the machine to function properly. p. 30 9 Check the embroidery area. p. 33 p.16 Unlock the machine, then press the start/stop button to the machine. The various operating precautions that appear...
Users Manual - English
Page 45
... × 4 inches (W)) Small embroidery frame 40 mm (H) × 60 mm (W) (1-1/2 inches (H) × 2-3/8 inches (W)) Embroidery frames that the fabric is used the embroidery frame may hit the presser foot and damage the machine, or cause injury to "Correctly Using the Embroidery Frames" on a level surface when...Refer to "Correctly Using the Embroidery Frames" on page 66.) For precautions concerning the fabric, refer to use an embroidery frame of embroidery frames. Select the appropriate frame, and hoop the fabric and stabilizer in the Embroidery Frame After selecting the pattern...
... × 4 inches (W)) Small embroidery frame 40 mm (H) × 60 mm (W) (1-1/2 inches (H) × 2-3/8 inches (W)) Embroidery frames that the fabric is used the embroidery frame may hit the presser foot and damage the machine, or cause injury to "Correctly Using the Embroidery Frames" on a level surface when...Refer to "Correctly Using the Embroidery Frames" on page 66.) For precautions concerning the fabric, refer to use an embroidery frame of embroidery frames. Select the appropriate frame, and hoop the fabric and stabilizer in the Embroidery Frame After selecting the pattern...
Users Manual - English
Page 46
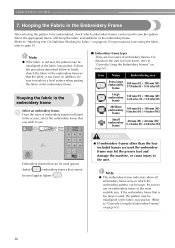
...● This embroidery machine can also be used as the front. ■ Hooping fabric in the small embroidery frame The procedure for hooping fabric in the embroidery frame. The same procedure is used to "Hooping the Fabric" on page 169.) 13 14 Hooping the Fabric in the medium embroidery frame. Securely ...after it is stretched in the small embroidery frame is stretched and the use of stabilizer material differ depending on hooping fabric in the large embroidery frame and the extra-large embroidery frame, refer to hoop the fabric in the Embroidery Frame 29 For details on the ...
...● This embroidery machine can also be used as the front. ■ Hooping fabric in the small embroidery frame The procedure for hooping fabric in the embroidery frame. The same procedure is used to "Hooping the Fabric" on page 169.) 13 14 Hooping the Fabric in the medium embroidery frame. Securely ...after it is stretched in the small embroidery frame is stretched and the use of stabilizer material differ depending on hooping fabric in the large embroidery frame and the extra-large embroidery frame, refer to hoop the fabric in the Embroidery Frame 29 For details on the ...
Users Manual - English
Page 47
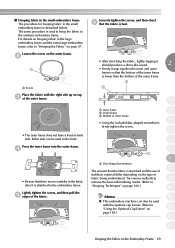
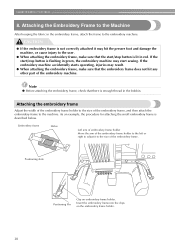
...Embroidery Frame to the Machine After hooping the fabric in the embroidery frame, attach the frame to the user. ● When attaching the embroidery frame, make sure that there is enough thread in green, the embroidery machine may start sewing. If the start /stop button is described below. Note ● Before attaching the embroidery frame, check that the embroidery... frame does not hit any other part of the embroidery machine. Insert the embroidery frame into the clips on embroidery frame holder. If the embroidery machine accidentally...
...Embroidery Frame to the Machine After hooping the fabric in the embroidery frame, attach the frame to the user. ● When attaching the embroidery frame, make sure that there is enough thread in green, the embroidery machine may start sewing. If the start /stop button is described below. Note ● Before attaching the embroidery frame, check that the embroidery... frame does not hit any other part of the embroidery machine. Insert the embroidery frame into the clips on embroidery frame holder. If the embroidery machine accidentally...
Users Manual - English
Page 78
...Operation Being Performed Before the Machine Was Turned OFF......62 Changing the Needle 63 Replacing the needle / 63 Correctly Using the Embroidery Frames 65 Embroidery frame types and applications / 65 Attaching Iron-On Stabilizer (Backing) to Fabric 66 Hooping the Fabric 67 Hooping the fabric in chapter ... of the Pattern 81 Resume Embroidering After Turning OFF the Machine 83 Adjusting the Thread Tension 85 Adjusting the tension of the bobbin thread / 85 Adjusting the tension of fabric / 69 Embroidery Frame Position and Movement 70 Changing the Embroidering Position 72...
...Operation Being Performed Before the Machine Was Turned OFF......62 Changing the Needle 63 Replacing the needle / 63 Correctly Using the Embroidery Frames 65 Embroidery frame types and applications / 65 Attaching Iron-On Stabilizer (Backing) to Fabric 66 Hooping the Fabric 67 Hooping the fabric in chapter ... of the Pattern 81 Resume Embroidering After Turning OFF the Machine 83 Adjusting the Thread Tension 85 Adjusting the tension of the bobbin thread / 85 Adjusting the tension of fabric / 69 Embroidery Frame Position and Movement 70 Changing the Embroidering Position 72...
Users Manual - English
Page 82
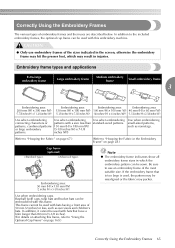
...(golf) caps, tulip hats and bucket hats can be used with this embroidery machine. Embroidery frame types and applications Extra-large embroidery frame Large embroidery frame Medium embroidery frame Small embroidery frame 3 Embroidering area: Embroidering area: Embroidering area: Embroidering area: 200...embroidery frame may pucker. Correctly Using the Embroidery Frames The various types of 50 mm (2 inches) or less, such as nametags. (Refer to "Hooping the Fabric" on page 67.) (Refer to "Hooping the Fabric in the Embroidery Frame" on page 169.) Correctly Using the Embroidery...
...(golf) caps, tulip hats and bucket hats can be used with this embroidery machine. Embroidery frame types and applications Extra-large embroidery frame Large embroidery frame Medium embroidery frame Small embroidery frame 3 Embroidering area: Embroidering area: Embroidering area: Embroidering area: 200...embroidery frame may pucker. Correctly Using the Embroidery Frames The various types of 50 mm (2 inches) or less, such as nametags. (Refer to "Hooping the Fabric" on page 67.) (Refer to "Hooping the Fabric in the Embroidery Frame" on page 169.) Correctly Using the Embroidery...
Users Manual - English
Page 89
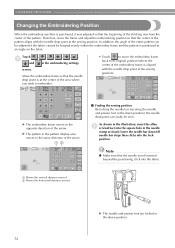
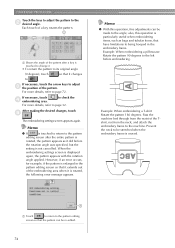
... the needle bar (securing the needle and presser foot in the down position. 72 OTHER BASIC PROCEDURES Changing the Embroidering Position When the embroidery machine is purchased, it was from the center of the pattern. As shown in the illustration, insert the allen 1 screwdriver into the square... hole in the opposite direction of the entire pattern can easily be hooped evenly within the embroidery frame and the pattern is not lowered beyond the positioning click into the lock position. Move the embroidery frame so that the beginning of the stitching was adjusted so that ...
... the needle bar (securing the needle and presser foot in the down position. 72 OTHER BASIC PROCEDURES Changing the Embroidering Position When the embroidery machine is purchased, it was from the center of the pattern. As shown in the illustration, insert the allen 1 screwdriver into the square... hole in the opposite direction of the entire pattern can easily be hooped evenly within the embroidery frame and the pattern is not lowered beyond the positioning click into the lock position. Move the embroidery frame so that the beginning of the stitching was adjusted so that ...
Users Manual - English
Page 91
...Shows the angle of the embroidering area when it did before embroidering. Example: When embroidering a pillowcase Rotate the pattern 90 degrees to being hooped in the pattern editing screen so that it extends out of the pattern after a key is touched to change it • To return ... rotated, the pattern appears as bags and tubular items, that the pattern can be made to the machine. also, this operation, fine adjustments can be stretched when the embroidery frame is particularly useful when embroidering items, such as it is displayed again, the pattern appears with ...
...Shows the angle of the embroidering area when it did before embroidering. Example: When embroidering a pillowcase Rotate the pattern 90 degrees to being hooped in the pattern editing screen so that it extends out of the pattern after a key is touched to change it • To return ... rotated, the pattern appears as bags and tubular items, that the pattern can be made to the machine. also, this operation, fine adjustments can be stretched when the embroidery frame is particularly useful when embroidering items, such as it is displayed again, the pattern appears with ...
Users Manual - English
Page 172
... / 164 Stabilizers (Backing) / 165 Hooping Techniques / 166 Fabric/stabilizer compatibility chart / 167 OPTIONAL ACCESSORIES Attaching an optional embroidery frame for creating beautiful embroidery, and details on maintenance procedures and corrective measures that should be read / 213 If the machine does not respond when a key is pressed / 213 Specifications ...215 Embroidery machine specifications / 215 Index ...216 Appliqu...
... / 164 Stabilizers (Backing) / 165 Hooping Techniques / 166 Fabric/stabilizer compatibility chart / 167 OPTIONAL ACCESSORIES Attaching an optional embroidery frame for creating beautiful embroidery, and details on maintenance procedures and corrective measures that should be read / 213 If the machine does not respond when a key is pressed / 213 Specifications ...215 Embroidery machine specifications / 215 Index ...216 Appliqu...
Users Manual - English
Page 182
... be used as a backing when stitching lace or other motifs where the desired result is also available in black for those difficult-to-hoop fabrics. Water-soluble stabilizer is also used in black. to heavyweight knits, however it to shift. This type of the fabric after...or three layers can be visible in your finished product, for your machine sews. It will be disposed of an embroidery 1. Water-soluble stabilizer is made of a non-woven material that the stabilizer is also available in embroidery: cut -away stabilizer works extremely well with various weights for medium- ...
... be used as a backing when stitching lace or other motifs where the desired result is also available in black for those difficult-to-hoop fabrics. Water-soluble stabilizer is also used in black. to heavyweight knits, however it to shift. This type of the fabric after...or three layers can be visible in your finished product, for your machine sews. It will be disposed of an embroidery 1. Water-soluble stabilizer is made of a non-woven material that the stabilizer is also available in embroidery: cut -away stabilizer works extremely well with various weights for medium- ...
Users Manual - English
Page 183
...: one that allows sewing a flattened cap (for use on a flat machine) or one that allows sewing the cap in poor design alignment during this will cause puckers in the embroidery industry. If there are specialized embroidery frames (hoops) designed to hold caps for embroidering. Hooping fabric: The framed fabric and backing should be sure that...
...: one that allows sewing a flattened cap (for use on a flat machine) or one that allows sewing the cap in poor design alignment during this will cause puckers in the embroidery industry. If there are specialized embroidery frames (hoops) designed to hold caps for embroidering. Hooping fabric: The framed fabric and backing should be sure that...
Users Manual - English
Page 233
... key 53, 55, 92, 127 Changing character spacing 124 color thread table 149 colors of the pattern 127, 131 display guides 143 embroidery position 72 language 143 size 103, 110, 121 text arrangement of a character 123 thread color display 145 thread density 125 thread spools...repeating pattern 130 small fabric 69 tape or ribbon 69 Embroidering screen 33, 56 Embroidering settings screen 26, 54, 129 Embroidery basic method 42 repeatedly sewing 90 Embroidery card slot 3 Embroidery cards 112 Embroidery data 100 Embroidery frame attaching to the machine 30 hooping 28 removing 46
... key 53, 55, 92, 127 Changing character spacing 124 color thread table 149 colors of the pattern 127, 131 display guides 143 embroidery position 72 language 143 size 103, 110, 121 text arrangement of a character 123 thread color display 145 thread density 125 thread spools...repeating pattern 130 small fabric 69 tape or ribbon 69 Embroidering screen 33, 56 Embroidering settings screen 26, 54, 129 Embroidery basic method 42 repeatedly sewing 90 Embroidery card slot 3 Embroidery cards 112 Embroidery data 100 Embroidery frame attaching to the machine 30 hooping 28 removing 46
Users Manual - English
Page 234
... supply plug 3 Hook cover/Hook 2 Preview key 51, 53, 55 Hooping 28, 67, 166 Previewing the Image 27 Horizontal mirror image key 51, 53, 103, 121 Previous page key 51 Principal parts 2, 151 I Industrial embroidery frame 168 Q Quit key 55 J Jump code 149 R Region display ... needle bar 72 Reserved needle 96, 141 Low Profile (Low fitting 170 Retrieving Lower thread guide 2 from Computer (USB 114 from Embroidery cards 112 M Machine operations guide key 49, 151 Main power switch 3, 20, 47 Maintenance 151, 193 Manual needle bar settings 96 Maximum sewing speed...
... supply plug 3 Hook cover/Hook 2 Preview key 51, 53, 55 Hooping 28, 67, 166 Previewing the Image 27 Horizontal mirror image key 51, 53, 103, 121 Previous page key 51 Principal parts 2, 151 I Industrial embroidery frame 168 Q Quit key 55 J Jump code 149 R Region display ... needle bar 72 Reserved needle 96, 141 Low Profile (Low fitting 170 Retrieving Lower thread guide 2 from Computer (USB 114 from Embroidery cards 112 M Machine operations guide key 49, 151 Main power switch 3, 20, 47 Maintenance 151, 193 Manual needle bar settings 96 Maximum sewing speed...


