
Accessory Catalog - English
Page 21
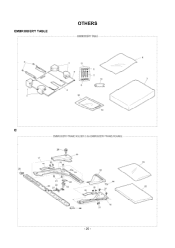
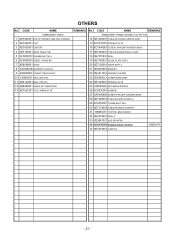
EMBROIDERY TABLE OTHERS EMBROIDERY FRAME HOLDER (for PR-1000) - 20 -
EMBROIDERY TABLE OTHERS EMBROIDERY FRAME HOLDER (for PR-1000) - 20 -
Accessory Catalog - English
Page 22
OTHERS No. CODE NAME REMARKS EMBROIDERY FRAME HOLDER C (for PR-1000) 14 XE7400001 TUBULAR ROUND ARM RA ASSY 15 XC7076051 SPRING,PLATE 16 XC7644051 SCREW, PAM (S/P WASHER) M3X5 17 XE7149001 TUBLAR ROUND... 32 XE7416001 SEAL C 33 XE2641001 BAG 280X470H 34 XD0639050 BUBBLE SHEET 300X300 1000023079 35 XE7419001 CARTON - 21 - CODE NAME EMBROIDERY TABLE 1 XE7423001 POLYSTYRENE FOAM PAD CORNER 2 XE7424001 PAD 3 XE7425001 CARTON 4 XE7197001 WIDE TABLE TOP 5 XC5553051 THUMB BOLT M4 L 6 XC6459051 SHEET 1400X2000 7 XE8036001 STUD 8 025040236 WASHER PLAIN M 4 9 008400603 SCREW ...
OTHERS No. CODE NAME REMARKS EMBROIDERY FRAME HOLDER C (for PR-1000) 14 XE7400001 TUBULAR ROUND ARM RA ASSY 15 XC7076051 SPRING,PLATE 16 XC7644051 SCREW, PAM (S/P WASHER) M3X5 17 XE7149001 TUBLAR ROUND... 32 XE7416001 SEAL C 33 XE2641001 BAG 280X470H 34 XD0639050 BUBBLE SHEET 300X300 1000023079 35 XE7419001 CARTON - 21 - CODE NAME EMBROIDERY TABLE 1 XE7423001 POLYSTYRENE FOAM PAD CORNER 2 XE7424001 PAD 3 XE7425001 CARTON 4 XE7197001 WIDE TABLE TOP 5 XC5553051 THUMB BOLT M4 L 6 XC6459051 SHEET 1400X2000 7 XE8036001 STUD 8 025040236 WASHER PLAIN M 4 9 008400603 SCREW ...
Users Manual - English
Page 5
... never be used. 3. For repair or adjustment In the event a malfunction occurs or adjustment is required, first follow the troubleshooting table at www.brother.com iv For additional product information and updates, visit our web site at the back of the most advanced computerized household embroidery machines...Plug the machine directly into the wall. For a longer service life 1. Use only neutral soaps or detergents to keep your local authorized Brother dealer. Do not drop or hit the machine. 4. Always consult the manual when replacing or installing any other parts to inspect and ...
... never be used. 3. For repair or adjustment In the event a malfunction occurs or adjustment is required, first follow the troubleshooting table at www.brother.com iv For additional product information and updates, visit our web site at the back of the most advanced computerized household embroidery machines...Plug the machine directly into the wall. For a longer service life 1. Use only neutral soaps or detergents to keep your local authorized Brother dealer. Do not drop or hit the machine. 4. Always consult the manual when replacing or installing any other parts to inspect and ...
Users Manual - English
Page 11
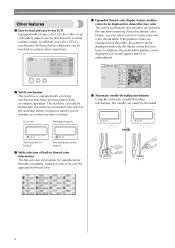
...be displayed as it would appear after the machine is equipped with a locking mechanism that helps prevent injuries from accidental operation. From this table, the pattern can be displayed with only the thread colors that you have. The machine can only be started . ■ Wide ...in green ■ Automatic needle-threading mechanism Using the automatic needle-threading mechanism, the needle can select colors to create your own color thread table. x If the pattern colors are stored in the machine's memory. Lit in red Flashing in a nearly realistic image. The color of...
...be displayed as it would appear after the machine is equipped with a locking mechanism that helps prevent injuries from accidental operation. From this table, the pattern can be displayed with only the thread colors that you have. The machine can only be started . ■ Wide ...in green ■ Automatic needle-threading mechanism Using the automatic needle-threading mechanism, the needle can select colors to create your own color thread table. x If the pattern colors are stored in the machine's memory. Lit in red Flashing in a nearly realistic image. The color of...
Users Manual - English
Page 13
...the machine This machine is equipped with seven or more colors, and other information that appear in the main LCD screens are described in the tables on the LCD will be taken when a problem occurs. For details on the use of this manual. For basic operations, refer to page ...the first page of contents. By screen Descriptions of the keys and other necessary operations, for the contents of each chapter, and then check the table of chapter 2. Follow the steps of the tutorial to use Chapter 1: Getting Ready The setup of this chapter. Learning how to embroider a pattern...
...the machine This machine is equipped with seven or more colors, and other information that appear in the main LCD screens are described in the tables on the LCD will be taken when a problem occurs. For details on the use of this manual. For basic operations, refer to page ...the first page of contents. By screen Descriptions of the keys and other necessary operations, for the contents of each chapter, and then check the table of chapter 2. Follow the steps of the tutorial to use Chapter 1: Getting Ready The setup of this chapter. Learning how to embroider a pattern...
Users Manual - English
Page 16
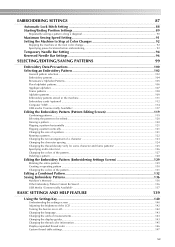
......143 Changing the units of measurements ...143 Changing the display guides...143 Changing the thread color information ...145 Display expanded thread color ...146 Custom thread table settings...147 xv
......143 Changing the units of measurements ...143 Changing the display guides...143 Changing the thread color information ...145 Display expanded thread color ...146 Custom thread table settings...147 xv
Users Manual - English
Page 17
... Operation of the Machine 160 Checking the thread tension of built-in patterns 160 Sewing a pattern aligned with a mark on the fabric 161 Color thread table ...163 Colors of Tajima (.dst) embroidery data ...163 Creating Beautiful Embroidery 164 Threads ...164 Stabilizers (Backing) ...165 Hooping Techniques...166 Fabric/stabilizer compatibility chart ...167...
... Operation of the Machine 160 Checking the thread tension of built-in patterns 160 Sewing a pattern aligned with a mark on the fabric 161 Color thread table ...163 Colors of Tajima (.dst) embroidery data ...163 Creating Beautiful Embroidery 164 Threads ...164 Stabilizers (Backing) ...165 Hooping Techniques...166 Fabric/stabilizer compatibility chart ...167...
Users Manual - English
Page 23
...; Do not use the machine in a location where it will not be exposed to malfunction. ● Do not plug in contact with the desk or table, so that could cause injuries. ● When lightning occurs, turn off the machine and unplug the power supply cord. Keep the oil and grease out...
...; Do not use the machine in a location where it will not be exposed to malfunction. ● Do not plug in contact with the desk or table, so that could cause injuries. ● When lightning occurs, turn off the machine and unplug the power supply cord. Keep the oil and grease out...

Users Manual - English
Page 24
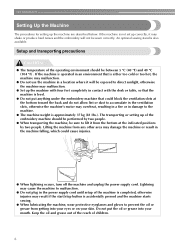
... that meets the following conditions. Setup location Setup the machine in a location exposed to prevent malfunctions or damage, do not set up on an unstable table or desk. Setting Up the Machine 7
... that meets the following conditions. Setup location Setup the machine in a location exposed to prevent malfunctions or damage, do not set up on an unstable table or desk. Setting Up the Machine 7

Users Manual - English
Page 25
... packing material is steady. If it . Setting up the machine When setting up the machine while making sure that they securely contact the desk or table. More than 50 mm (2 inches) 589 mm (23-3/16 inches) More than 350 mm (13-3/4 inches) More than 512 mm More than 250 mm (20...
... packing material is steady. If it . Setting up the machine When setting up the machine while making sure that they securely contact the desk or table. More than 50 mm (2 inches) 589 mm (23-3/16 inches) More than 350 mm (13-3/4 inches) More than 512 mm More than 250 mm (20...
Users Manual - English
Page 34
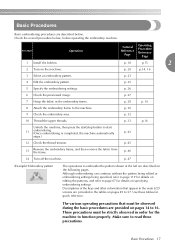
... Basic embroidering procedures are described below , before operating the embroidery machine. p. 30 9 Check the embroidery area. p. 27 7 Hoop the fabric in the tables on pages 49 to read these tables for details on the machine. Basic Procedures 17 Procedure Operation 1 Install the bobbin. 2 Turn on specifying embroidering settings. p. 45 13 Remove the...
... Basic embroidering procedures are described below , before operating the embroidery machine. p. 30 9 Check the embroidery area. p. 27 7 Hoop the fabric in the tables on pages 49 to read these tables for details on the machine. Basic Procedures 17 Procedure Operation 1 Install the bobbin. 2 Turn on specifying embroidering settings. p. 45 13 Remove the...
Users Manual - English
Page 38
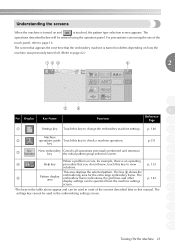
.... The embroidery frame indications, the grid lines and other display settings can be specified from the machine settings p. 143 9 screen. 10 *The keys in the table above appear and can be entered using the operation panel. For precautions concerning the use of the screens described later in the embroidering settings screen...
.... The embroidery frame indications, the grid lines and other display settings can be specified from the machine settings p. 143 9 screen. 10 *The keys in the table above appear and can be entered using the operation panel. For precautions concerning the use of the screens described later in the embroidering settings screen...
Users Manual - English
Page 66
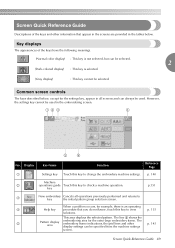
... settings can always be selected. 2 (Dark-colored display) : This key is an operating 4 Help key procedure that appear in the screens are provided in the tables below , except for the extra-large embroidery frame. Screen Quick Reference Guide 49 However, the settings key cannot be specified from the machine settings p. 143...
... settings can always be selected. 2 (Dark-colored display) : This key is an operating 4 Help key procedure that appear in the screens are provided in the tables below , except for the extra-large embroidery frame. Screen Quick Reference Guide 49 However, the settings key cannot be specified from the machine settings p. 143...

Users Manual - English
Page 113
... machine automatically assigns thread colors to 1 display the third page of the settings screen. If a needle bar is specified, that is removed from the thread table appears enlarged.
... machine automatically assigns thread colors to 1 display the third page of the settings screen. If a needle bar is specified, that is removed from the thread table appears enlarged.

Users Manual - English
Page 144
... pattern The colors of the pattern can be changed and previewed on page 92.) 9 Touch this key to close this screen. 0 Name of the table Touch and until the color to be 2 changed appears at the top of the thread color sequence display. 1 The thread color for the part of... the pattern displayed at the top will appear with the thread colors that you used the table for changing color, the thread spools can be changed . Touch , , and to "Specifying pause locations before embroidering" on the screen. X The change 1 The color ...
... pattern The colors of the pattern can be changed and previewed on page 92.) 9 Touch this key to close this screen. 0 Name of the table Touch and until the color to be 2 changed appears at the top of the thread color sequence display. 1 The thread color for the part of... the pattern displayed at the top will appear with the thread colors that you used the table for changing color, the thread spools can be changed . Touch , , and to "Specifying pause locations before embroidering" on the screen. X The change 1 The color ...

Users Manual - English
Page 145
... editing screen appears again. X The screen shown below appears. X The pattern is specified or if you have. (Refer to "Custom thread table settings" on page 92. ● The color thread table can be changed to a custom thread that you create to reflect the thread colors that you wish to change are changed...
... editing screen appears again. X The screen shown below appears. X The pattern is specified or if you have. (Refer to "Custom thread table settings" on page 92. ● The color thread table can be changed to a custom thread that you create to reflect the thread colors that you wish to change are changed...

Users Manual - English
Page 156
... / 143 Changing the units of measurements / 143 Changing the display guides / 143 Changing the thread color information / 145 Display expanded thread color / 146 Custom thread table settings / 147 Specifying jumpstitch trimming / "DST" jump codes for trimming / 149 Deleting short stitches / 150 Specifying the remaining length of the settings key, the machine...
... / 143 Changing the units of measurements / 143 Changing the display guides / 143 Changing the thread color information / 145 Display expanded thread color / 146 Custom thread table settings / 147 Specifying jumpstitch trimming / "DST" jump codes for trimming / 149 Deleting short stitches / 150 Specifying the remaining length of the settings key, the machine...
Users Manual - English
Page 157
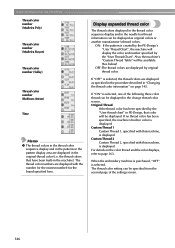
...three threads, refer to page 145. 7 DISPLAY EXPANDED THREAD COLOR The thread colors displayed in the thread color sequence display and in color thread table, as a thread color from the machine's built-in the needle bar thread information can be specified. 3 The TOTAL COUNT counter shows the .... 4 The TOTAL TIME counter shows the total amount of the screen until the desired page is created with your local authorized Brother dealer or at www.brother.com for details on available updates. 6 CHANGING THE THREAD COLOR DISPLAY The color information in the thread color sequence display and the...
...three threads, refer to page 145. 7 DISPLAY EXPANDED THREAD COLOR The thread colors displayed in the thread color sequence display and in color thread table, as a thread color from the machine's built-in the needle bar thread information can be specified. 3 The TOTAL COUNT counter shows the .... 4 The TOTAL TIME counter shows the total amount of the screen until the desired page is created with your local authorized Brother dealer or at www.brother.com for details on available updates. 6 CHANGING THE THREAD COLOR DISPLAY The color information in the thread color sequence display and the...

Users Manual - English
Page 158
... desired settings, touch to return to the needle bar specified here until the setting is cancelled. For details on create a Custom thread table, refer to "Reserved Needle Bar Settings" on page 147. The specified color remains assigned to the screen that appear in the screens ...to be changed . For details on specifying these settings, refer to "Custom thread table settings" on page 96. ■ Page 4 B CUSTOM THREAD TABLE Create a Custom Thread Table from this page. E UNIT Enables the units of measurements that was displayed before the settings screen was...
... desired settings, touch to return to the needle bar specified here until the setting is cancelled. For details on create a Custom thread table, refer to "Reserved Needle Bar Settings" on page 147. The specified color remains assigned to the screen that appear in the screens ...to be changed . For details on specifying these settings, refer to "Custom thread table settings" on page 96. ■ Page 4 B CUSTOM THREAD TABLE Create a Custom Thread Table from this page. E UNIT Enables the units of measurements that was displayed before the settings screen was...
Users Manual - English
Page 163
... machine is purchased, "OFF" is displayed. The thread color numbers are displayed as original colors or another manufacturer's thread colors. Also, the machine's "Custom Thread Table" will be displayed as specified in the procedure described in "Changing the thread color information" on the color thread and the color displays, refer to...
... machine is purchased, "OFF" is displayed. The thread color numbers are displayed as original colors or another manufacturer's thread colors. Also, the machine's "Custom Thread Table" will be displayed as specified in the procedure described in "Changing the thread color information" on the color thread and the color displays, refer to...


