
Users Manual - English
Page 9
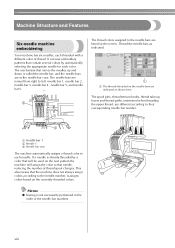
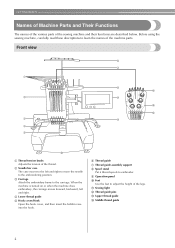
... selecting the appropriate needle for each color. The needle bars are in the order of thread. The spool pins, thread tension knobs, thread take-up and down is called the needle bar, and the needle bars are named from right to left: needle bar 1, needle bar 2, needle bar 3, needle bar 4 , needle bar 5, and needle bar 6. 3 1 The thread colors assigned to each needle. Machine Structure and Features Six-needle machine embroidering Your...
... selecting the appropriate needle for each color. The needle bars are in the order of thread. The spool pins, thread tension knobs, thread take-up and down is called the needle bar, and the needle bars are named from right to left: needle bar 1, needle bar 2, needle bar 3, needle bar 4 , needle bar 5, and needle bar 6. 3 1 The thread colors assigned to each needle. Machine Structure and Features Six-needle machine embroidering Your...
Users Manual - English
Page 10
... the pattern uses seven or more thread colors, the machine will come back to the needle that the needle bar and needle thread with the upper thread tail at all six needles can be moved to the embroidering position. 2 1 1 Needle at any place in the frame. If total colors are less than 6 colors, and...materials at the starting and end positions in addition to changing the thread colors. Only one needle is moved to the machine, regardless of the embroidery frame. According to the sewing order, the needle bar case is moved to the left and right so that the machine is already used . ...
... the pattern uses seven or more thread colors, the machine will come back to the needle that the needle bar and needle thread with the upper thread tail at all six needles can be moved to the embroidering position. 2 1 1 Needle at any place in the frame. If total colors are less than 6 colors, and...materials at the starting and end positions in addition to changing the thread colors. Only one needle is moved to the machine, regardless of the embroidery frame. According to the sewing order, the needle bar case is moved to the left and right so that the machine is already used . ...
Users Manual - English
Page 15
... the Embroidery Area 32 Continuing to the embroidering screen ...32 Upper Threading ...33 Checking the needle bars and thread colors ...33 Upper threading ...35 Threading the needle ...39 Sewing the Embroidery...42 Starting embroidering ...42 Stopping embroidering...44 Checking the Thread Tension 45...: ...59 OTHER BASIC PROCEDURES 61 Resume the Operation Being Performed Before the Machine Was Turned OFF 62 Changing the Needle ...63 Replacing the needle...63 Correctly Using the Embroidery Frames 65 Embroidery frame types and applications ...65 Attaching Iron-On Stabilizer (Backing) to...
... the Embroidery Area 32 Continuing to the embroidering screen ...32 Upper Threading ...33 Checking the needle bars and thread colors ...33 Upper threading ...35 Threading the needle ...39 Sewing the Embroidery...42 Starting embroidering ...42 Stopping embroidering...44 Checking the Thread Tension 45...: ...59 OTHER BASIC PROCEDURES 61 Resume the Operation Being Performed Before the Machine Was Turned OFF 62 Changing the Needle ...63 Replacing the needle...63 Correctly Using the Embroidery Frames 65 Embroidery frame types and applications ...65 Attaching Iron-On Stabilizer (Backing) to...
Users Manual - English
Page 16
... the Machine to Stop at Color Changes 92 Stopping the machine at the next color change 92 Specifying pause locations before embroidering 92 Temporary Needle Bar Setting 94 Reserved Needle Bar Settings 96 SELECTING/EDITING/SAVING PATTERNS 99 Embroidery Data Precautions 100 Selecting an Embroidery Pattern 102 General pattern selection ...102 Embroidery patterns ...104...
... the Machine to Stop at Color Changes 92 Stopping the machine at the next color change 92 Specifying pause locations before embroidering 92 Temporary Needle Bar Setting 94 Reserved Needle Bar Settings 96 SELECTING/EDITING/SAVING PATTERNS 99 Embroidery Data Precautions 100 Selecting an Embroidery Pattern 102 General pattern selection ...102 Embroidery patterns ...104...
Users Manual - English
Page 19
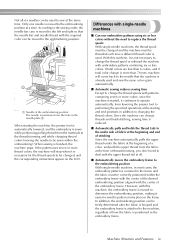
... or when the machine does embroidery, the carriage moves forward, backward, left and right to move the needle to the embroidering position. 3 Carriage Attach the embroidery frame to adjust the height of the thread. 2 Needle bar case The case moves to the left and right. 4 Lower thread guide 5 Hook cover/Hook Open the...
... or when the machine does embroidery, the carriage moves forward, backward, left and right to move the needle to the embroidering position. 3 Carriage Attach the embroidery frame to adjust the height of the thread. 2 Needle bar case The case moves to the left and right. 4 Lower thread guide 5 Hook cover/Hook Open the...
Users Manual - English
Page 37
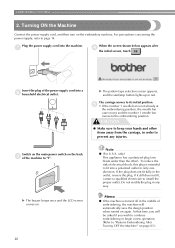
... turned off in any injuries. Memo ● If the machine is not already at the embroidering position, the needle bar case moves and the number 1 needle bar moves to prevent any way. EMBROIDERING TUTORIAL 2. Note ● (For U.S.A. only) This appliance has a polarized plug (one direction. For precautions concerning the power supply, refer ...
... turned off in any injuries. Memo ● If the machine is not already at the embroidering position, the needle bar case moves and the number 1 needle bar moves to prevent any way. EMBROIDERING TUTORIAL 2. Note ● (For U.S.A. only) This appliance has a polarized plug (one direction. For precautions concerning the power supply, refer ...
Users Manual - English
Page 39
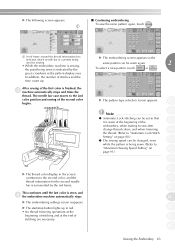
... and add another pattern. 2 Touch this key to continue to the embroidering settings screen. In the embroidering screen, check the thread colors assigned to the needle bars, and then install the upper threads.Touch the unlock key so that the start/stop button starts flashing in green and the embroidery machine is...
... and add another pattern. 2 Touch this key to continue to the embroidering settings screen. In the embroidering screen, check the thread colors assigned to the needle bars, and then install the upper threads.Touch the unlock key so that the start/stop button starts flashing in green and the embroidery machine is...
Users Manual - English
Page 50
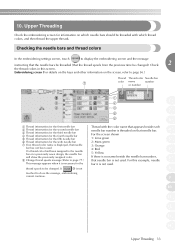
... to page 56.) Thread Thread color Needle bar color name number or number 1 2 3 1 Thread information for the first needle bar 2 Thread information for the second needle bar 3 Thread information for the third needle bar 4 Thread information for the fourth needle bar 5 Thread information for the fifth needle bar 6 Thread information for the sixth needle bar Thread with which needle bars should be changed . 10. Check 2 the...
... to page 56.) Thread Thread color Needle bar color name number or number 1 2 3 1 Thread information for the first needle bar 2 Thread information for the second needle bar 3 Thread information for the third needle bar 4 Thread information for the fourth needle bar 5 Thread information for the fifth needle bar 6 Thread information for the sixth needle bar Thread with which needle bars should be changed . 10. Check 2 the...

Users Manual - English
Page 51
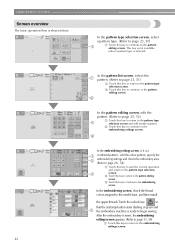
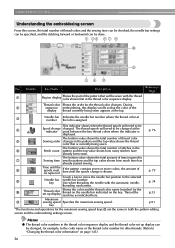
... flashing in green and the embroidery machine can be specified in the embroidering screen. 1 Shows the embroidering order for the thread colors. 2 Indicates the needle bar number where the thread color at the left is assigned. 3 Shows the number of thread color changes, the number of stitches, the embroidering time and... the length of stitches and the sewing time can be changed. 4 Touch a key to move the selected needle bar to be checked and various embroidering settings can start sewing. If the upper threading is being performed or the...
... flashing in green and the embroidery machine can be specified in the embroidering screen. 1 Shows the embroidering order for the thread colors. 2 Indicates the needle bar number where the thread color at the left is assigned. 3 Shows the number of thread color changes, the number of stitches, the embroidering time and... the length of stitches and the sewing time can be changed. 4 Touch a key to move the selected needle bar to be checked and various embroidering settings can start sewing. If the upper threading is being performed or the...
Users Manual - English
Page 52
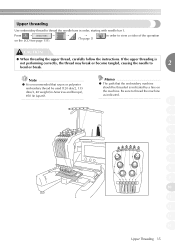
Be sure to thread the needle bars in order, starting with needle bar 1. If the upper threading is indicated by a line on the LCD (see page 151). → → (To page 3) in Japan)). Note ● It is recommended ... Memo ● The path that rayon or polyester embroidery thread be threaded is not performing correctly, the thread may break or become tangled, causing the needle to view a video of the operation CAUTION ● When threading the upper thread, carefully follow the instructions. Press → → on the machine...
Be sure to thread the needle bars in order, starting with needle bar 1. If the upper threading is indicated by a line on the LCD (see page 151). → → (To page 3) in Japan)). Note ● It is recommended ... Memo ● The path that rayon or polyester embroidery thread be threaded is not performing correctly, the thread may break or become tangled, causing the needle to view a video of the operation CAUTION ● When threading the upper thread, carefully follow the instructions. Press → → on the machine...

Users Manual - English
Page 53
...; Make sure that the spool stand is opened in the shape of a V. • When using small spools of thread, be sure to correctly thread the needle bars. 6 1 654 32 1 5 2 4 65 3 21 6 1 6 5 4 1 2 3 5 2 4 3 Place on all spools of thread shorter than the height of the spool pin. 1 Number 1 hole in the thread ...guide above the spool 2 Number 1 hole in the thread guide toward the front of the numbered needle bars. Be very careful to place the enclosed spool mat on the spool pin before placing the spool on the pin. • Use spool cap on...
...; Make sure that the spool stand is opened in the shape of a V. • When using small spools of thread, be sure to correctly thread the needle bars. 6 1 654 32 1 5 2 4 65 3 21 6 1 6 5 4 1 2 3 5 2 4 3 Place on all spools of thread shorter than the height of the spool pin. 1 Number 1 hole in the thread ...guide above the spool 2 Number 1 hole in the thread guide toward the front of the numbered needle bars. Be very careful to place the enclosed spool mat on the spool pin before placing the spool on the pin. • Use spool cap on...
Users Manual - English
Page 55
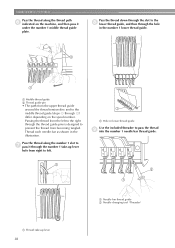
Pass the thread along the thread path 6 indicated on the spool number. Thread each needle bar as shown in lower thread guide Use the included threader to pass the thread 9 into the number 1 needle bar thread guide. 1 1 Thread take-up lever hole from right to left to the right through 6) differ ...depending on the machine, and then pass it through the number 1 take-up lever 38 1 Needle bar thread guide 2 Needle changing tool (Threader) Pass the thread down through the slot to the 8 lower thread guide, and then through the hole in the number ...
Pass the thread along the thread path 6 indicated on the spool number. Thread each needle bar as shown in lower thread guide Use the included threader to pass the thread 9 into the number 1 needle bar thread guide. 1 1 Thread take-up lever hole from right to left to the right through 6) differ ...depending on the machine, and then pass it through the number 1 take-up lever 38 1 Needle bar thread guide 2 Needle changing tool (Threader) Pass the thread down through the slot to the 8 lower thread guide, and then through the hole in the number ...

Users Manual - English
Page 56
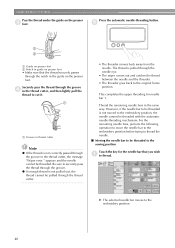
... shown in order to thread the needle. Then, as the sewing position, otherwise the automatic needle-threading 2 mechanism cannot be used , be sure that the needle bar that you turn the handwheel. ● The automatic needle-threading mechanism can thread one needle at the particular needle. Threading the needle Use the automatic needle-threading mechanism to view a video of...
... shown in order to thread the needle. Then, as the sewing position, otherwise the automatic needle-threading 2 mechanism cannot be used , be sure that the needle bar that you turn the handwheel. ● The automatic needle-threading mechanism can thread one needle at the particular needle. Threading the needle Use the automatic needle-threading mechanism to view a video of...
Users Manual - English
Page 57
... guide on presser foot • Make sure that you wish 1 to the embroidery position. 40 This completes the upper threading for the needle bar that the thread securely passes through the groove. ● If enough thread is not pulled out, the thread cannot be threaded to the... through the groove in the guide on the presser foot. For the remaining needle bars, perform the following operation to move the needle bar to the embroidery position before trying to thread the needle. ■ Moving the needle bar to securely pass the thread through the notch in the thread cutter, the ...
... guide on presser foot • Make sure that you wish 1 to the embroidery position. 40 This completes the upper threading for the needle bar that the thread securely passes through the groove. ● If enough thread is not pulled out, the thread cannot be threaded to the... through the groove in the guide on the presser foot. For the remaining needle bars, perform the following operation to move the needle bar to the embroidery position before trying to thread the needle. ■ Moving the needle bar to securely pass the thread through the notch in the thread cutter, the ...
Users Manual - English
Page 59
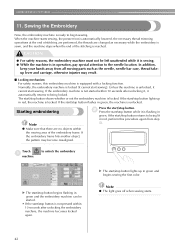
... Embroidery Now, the embroidery machine is unlocked. If the embroidery machine is locked. Starting embroidering Note ● Make sure that there are changed as the needle, needle bar case, thread takeup lever and carriage, otherwise injuries may become misaligned. Note ● The light goes off when sewing starts. 42 In addition, keep your...
... Embroidery Now, the embroidery machine is unlocked. If the embroidery machine is locked. Starting embroidering Note ● Make sure that there are changed as the needle, needle bar case, thread takeup lever and carriage, otherwise injuries may become misaligned. Note ● The light goes off when sewing starts. 42 In addition, keep your...
Users Manual - English
Page 60
... embroidering To sew the same pattern again, touch . 1 A red frame around the thread information box indicates which needle bar is currently being used for the second needle bar is surrounded by the green crosshairs in the screen continues to the 2nd color position and sewing of the second color... begins. This continues until the last color is finished, the 3 machine automatically stops and trims the thread. The needle bar case moves to the second color, and the thread information for sewing. • While the embroidery machine is sewing, the point being...
... embroidering To sew the same pattern again, touch . 1 A red frame around the thread information box indicates which needle bar is currently being used for the second needle bar is surrounded by the green crosshairs in the screen continues to the 2nd color position and sewing of the second color... begins. This continues until the last color is finished, the 3 machine automatically stops and trims the thread. The needle bar case moves to the second color, and the thread information for sewing. • While the embroidery machine is sewing, the point being...
Users Manual - English
Page 62
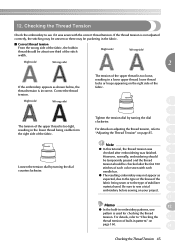
... thread locks or loops appearing on page 85. 5 Note ● In this tutorial, the thread tension was 6 checked after the first 100 stitches of each 8 needle bar. ● The resulting embroidery may be checked after embroidering was sewn with each color sewn with the correct thread tension. 12. The tension of the...
... thread locks or loops appearing on page 85. 5 Note ● In this tutorial, the thread tension was 6 checked after the first 100 stitches of each 8 needle bar. ● The resulting embroidery may be checked after embroidering was sewn with each color sewn with the correct thread tension. 12. The tension of the...
Users Manual - English
Page 73
...be changed at the indicator point between the two thread colors where the indicator is currently being sewn appears at the top. 3 Needle bar Indicates the needle bar number where the thread color at number the left is shown. Thread the machine as indicated here. This indicator shows when the.... p. 34 threading mechanism. 0 Thread color set up display Shows the color and the thread color name (number) for the thread on the needle bar indicated on page 145.) 56 p.91 key *The functions and operations for the maximum sewing speed keys A are the same in the 6 Stitch...
...be changed at the indicator point between the two thread colors where the indicator is currently being sewn appears at the top. 3 Needle bar Indicates the needle bar number where the thread color at number the left is shown. Thread the machine as indicated here. This indicator shows when the.... p. 34 threading mechanism. 0 Thread color set up display Shows the color and the thread color name (number) for the thread on the needle bar indicated on page 145.) 56 p.91 key *The functions and operations for the maximum sewing speed keys A are the same in the 6 Stitch...

Users Manual - English
Page 74
Reference Page p. 92 C Cancel key Touch this key in green. Temporary D needle bar Enables the needle bar settings to the embroidering settings screen. Screen Quick Reference Guide 57 When this key for the machine to stop button p.42 flashes in the following... can start /stop as the next color begins. Use this key to quit sewing and return to manually be specified p. 94 settings key Moves the needle forward or backward through the Forward/ stitching. 2 No. Display B Key Name Reserve Stop key Description While sewing embroidery, touch this key is touched, the...
Reference Page p. 92 C Cancel key Touch this key in green. Temporary D needle bar Enables the needle bar settings to the embroidering settings screen. Screen Quick Reference Guide 57 When this key for the machine to stop button p.42 flashes in the following... can start /stop as the next color begins. Use this key to quit sewing and return to manually be specified p. 94 settings key Moves the needle forward or backward through the Forward/ stitching. 2 No. Display B Key Name Reserve Stop key Description While sewing embroidery, touch this key is touched, the...
Users Manual - English
Page 75
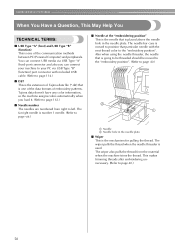
... (*.dst) that is going to be threaded should be moved to the "embroidery position". (Refer to the "embroidery position". The needle bar case is moved to page 163.) ■ Needle number The needles are numbered from the material when the machine trims the thread. This makes trimming threads after embroidering unnecessary. (Refer to left...
... (*.dst) that is going to be threaded should be moved to the "embroidery position". (Refer to the "embroidery position". The needle bar case is moved to page 163.) ■ Needle number The needles are numbered from the material when the machine trims the thread. This makes trimming threads after embroidering unnecessary. (Refer to left...


