
Accessory Catalog - English
Page 18
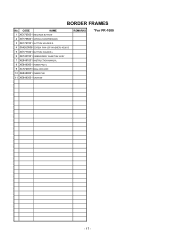
CODE NAME 1 XE1765001 RELEASE BUTTON 2 XE1766001 SPRING COMPRESSION 3 XE1767001 BUTTON HOLDER R 4 0A4260506 SCREW PAN (S/P WASHER) M2.6X5 5 XE1773001 BUTTON HOLDER L 6 XE7407001 EMBROIDERY SHEET BH ASSY 7 XE8491001 INSTRUCTION MANUAL 8 XE8490001 INNER PAD U 9 XC5720051 BAG 260X440H 10 XE8489001 INNER PAD 11 XE8493001 CARTON REMARKS *For PR-1000 - 17 - BORDER FRAMES No.
CODE NAME 1 XE1765001 RELEASE BUTTON 2 XE1766001 SPRING COMPRESSION 3 XE1767001 BUTTON HOLDER R 4 0A4260506 SCREW PAN (S/P WASHER) M2.6X5 5 XE1773001 BUTTON HOLDER L 6 XE7407001 EMBROIDERY SHEET BH ASSY 7 XE8491001 INSTRUCTION MANUAL 8 XE8490001 INNER PAD U 9 XC5720051 BAG 260X440H 10 XE8489001 INNER PAD 11 XE8493001 CARTON REMARKS *For PR-1000 - 17 - BORDER FRAMES No.
Users Manual - English
Page 1
EMBROIDERY MACHINE PR-620 OPERATION MANUAL
EMBROIDERY MACHINE PR-620 OPERATION MANUAL
Users Manual - English
Page 2
...be replaced by or near the carriage, otherwise injuries may result. 18. DANGER - WARNING - Always use bent needles. 13. Use this manual. Do not use the proper needle plate. Always unplug the machine from all instructions before cleaning. Do not allow this machine to be supervised ... the machine to break. 12. Do not use as described in the needle area, such as a toy. Never operate the machine with this manual. 3. Keep ventilation openings of the machine free from the outlet. 9. To disconnect, set the main power switch to the "{" position, which ...
...be replaced by or near the carriage, otherwise injuries may result. 18. DANGER - WARNING - Always use bent needles. 13. Use this manual. Do not use the proper needle plate. Always unplug the machine from all instructions before cleaning. Do not allow this machine to be supervised ... the machine to break. 12. Do not use as described in the needle area, such as a toy. Never operate the machine with this manual. 3. Keep ventilation openings of the machine free from the outlet. 9. To disconnect, set the main power switch to the "{" position, which ...
Users Manual - English
Page 5
...other parts • A power failure occurs during use • Maintaining the machine • Leaving the machine unattended 3. When storing this Operation Manual to assure correct installation. Do not use extension cords. Do not drop or hit the machine. 4. For repair or adjustment In the event a...thread take- Plug the machine directly into the wall. Use only neutral soaps or detergents to keep your local authorized Brother dealer. Always consult the manual when replacing or installing any other parts to inspect and adjust the machine yourself. Do not use or store the ...
...other parts • A power failure occurs during use • Maintaining the machine • Leaving the machine unattended 3. When storing this Operation Manual to assure correct installation. Do not use extension cords. Do not drop or hit the machine. 4. For repair or adjustment In the event a...thread take- Plug the machine directly into the wall. Use only neutral soaps or detergents to keep your local authorized Brother dealer. Always consult the manual when replacing or installing any other parts to inspect and adjust the machine yourself. Do not use or store the ...
Users Manual - English
Page 8
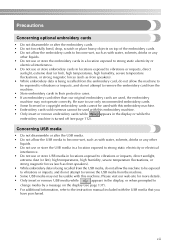
... allow the machine to be usable with this embroidery machine. • Only insert or remove embroidery cards while appears in locations exposed to the instruction manual included with this machine. Please visit our web site for more details. • Only insert or remove USB media while appears in the display, or...
... allow the machine to be usable with this embroidery machine. • Only insert or remove embroidery cards while appears in locations exposed to the instruction manual included with this machine. Please visit our web site for more details. • Only insert or remove USB media while appears in the display, or...
Users Manual - English
Page 13
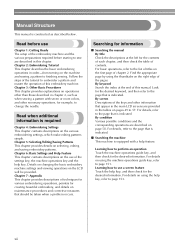
...of the embroidery machine and the various preparations required before starting to sew are described on the right edge of this manual. Searching for the desired information. Find the appropriate page by using the thumbtabs on page 58. By condition Various possible...a help key, refer to the page that is indicated. Follow the steps of chapter 2. By screen Descriptions of contents. Manual Structure This manual is required Chapter 4: Embroidering Settings This chapter contains descriptions on the various embroidering settings, which make editing patterns simple. By keyword...
...of the embroidery machine and the various preparations required before starting to sew are described on the right edge of this manual. Searching for the desired information. Find the appropriate page by using the thumbtabs on page 58. By condition Various possible...a help key, refer to the page that is indicated. Follow the steps of chapter 2. By screen Descriptions of contents. Manual Structure This manual is required Chapter 4: Embroidering Settings This chapter contains descriptions on the various embroidering settings, which make editing patterns simple. By keyword...
Users Manual - English
Page 14
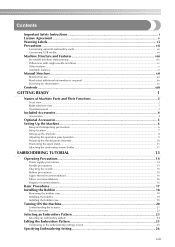
... Concerning USB media ...vii Machine Structure and Features viii Six-needle machine embroidering ...viii Differences with single-needle machines ...ix Other features ...x Available features...xi Manual Structure...xii Read before use ...xii Read when additional information is required xii Searching for information...xii Contents ...xiii GETTING READY 1 Names of Machine Parts...
... Concerning USB media ...vii Machine Structure and Features viii Six-needle machine embroidering ...viii Differences with single-needle machines ...ix Other features ...x Available features...xi Manual Structure...xii Read before use ...xii Read when additional information is required xii Searching for information...xii Contents ...xiii GETTING READY 1 Names of Machine Parts...

Users Manual - English
Page 21
... mm (H) × 100 mm (W) (4 inches (H) × 4 inches (W)) XC5759-051 Embroidery sheet (small) 28 40 mm (H) × 60 mm (W) (1-1/2 inches (H) × 2-3/8 inches (W)) XC5761-051 29 Operation manual XD1133-051 30 Quick reference guide XD0754-051 31 Spool mat (6pcs.) XC7134-051 32 Spool cap (6pcs.) 130012-054 4 GETTING READY Included Accessories After...
... mm (H) × 100 mm (W) (4 inches (H) × 4 inches (W)) XC5759-051 Embroidery sheet (small) 28 40 mm (H) × 60 mm (W) (1-1/2 inches (H) × 2-3/8 inches (W)) XC5761-051 29 Operation manual XD1133-051 30 Quick reference guide XD0754-051 31 Spool mat (6pcs.) XC7134-051 32 Spool cap (6pcs.) 130012-054 4 GETTING READY Included Accessories After...
Users Manual - English
Page 38
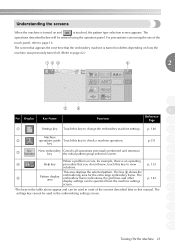
The screen that appears the next time that you do not know, touch this manual. The operations described below will be used in most of the touch panel, refer to page 16. For precautions concerning the use of the screens ...
The screen that appears the next time that you do not know, touch this manual. The operations described below will be used in most of the touch panel, refer to page 16. For precautions concerning the use of the screens ...

Users Manual - English
Page 74
Temporary D needle bar Enables the needle bar settings to the embroidering settings screen. When this key to quit sewing and return to manually be specified p. 94 settings key Moves the needle forward or backward through the Forward/ stitching. Reference Page p. 92 C Cancel key Touch this key is touched, ...
Temporary D needle bar Enables the needle bar settings to the embroidering settings screen. When this key to quit sewing and return to manually be specified p. 94 settings key Moves the needle forward or backward through the Forward/ stitching. Reference Page p. 92 C Cancel key Touch this key is touched, ...

Users Manual - English
Page 113
... you wish to select from the machine's automatic assignments and the specified color remains assigned to a certain needle bar. however, a specific thread color can be manually assigned to it. Touch , , and until the setting is specified. 1 The selected color of the arrow on the spool. 96 Once... bar setting is specified, it remains applied until the color that is removed from the thread table appears enlarged. The manual needle bar settings can be assigned to be specified in the third page of the settings screen. If a needle bar is specified, that needle bar ...
... you wish to select from the machine's automatic assignments and the specified color remains assigned to a certain needle bar. however, a specific thread color can be manually assigned to it. Touch , , and until the setting is specified. 1 The selected color of the arrow on the spool. 96 Once... bar setting is specified, it remains applied until the color that is removed from the thread table appears enlarged. The manual needle bar settings can be assigned to be specified in the third page of the settings screen. If a needle bar is specified, that needle bar ...

Users Manual - English
Page 114
X This cancels the manual needle bar setting. Reserved Needle Bar Settings 97 Touch , , , , or for the 1 number of the needle bar whose setting you wish to cancel. 1 Indicates the number of the selected needle bar Touch . 2 4 1 The anchor disappears from the thread spool. ■ Cancelling the setting To change the setting, first cancel it, and then select the new setting.
X This cancels the manual needle bar setting. Reserved Needle Bar Settings 97 Touch , , , , or for the 1 number of the needle bar whose setting you wish to cancel. 1 Indicates the number of the selected needle bar Touch . 2 4 1 The anchor disappears from the thread spool. ■ Cancelling the setting To change the setting, first cancel it, and then select the new setting.
Users Manual - English
Page 117
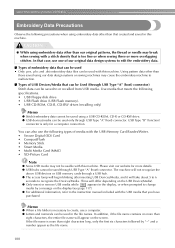
... using a USB CD-ROM, CD-R or CD-RW drive. ● USB devices/media can be used in the display, or when prompted to the instruction manual included with this machine. Memo ● When a file folder is too fine or when sewing three or more than eight characters long, only the first...
... using a USB CD-ROM, CD-R or CD-RW drive. ● USB devices/media can be used in the display, or when prompted to the instruction manual included with this machine. Memo ● When a file folder is too fine or when sewing three or more than eight characters long, only the first...
Users Manual - English
Page 118
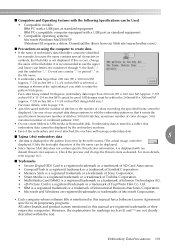
...is not displayed. Ltd. • IBM is a registered trademark or a trademark of International Business Machines Corporation. • Microsoft and Windows are not clearly described within the text. If this manual are registered trademarks of their respective companies. Check the preview and change the name of ...Fuji Photo Film Co. Download the driver from our Web site (www.brother.com).) ■ Precautions on using the computer to...
...is not displayed. Ltd. • IBM is a registered trademark or a trademark of International Business Machines Corporation. • Microsoft and Windows are not clearly described within the text. If this manual are registered trademarks of their respective companies. Check the preview and change the name of ...Fuji Photo Film Co. Download the driver from our Web site (www.brother.com).) ■ Precautions on using the computer to...

Users Manual - English
Page 131
...position of the computer. Note ● The connectors on the USB cable can only be temporarily recalled and used from our Web site (www.brother.com). ■ Connecting Plug the USB cable connector into the 1 corresponding connectors on the computer and the USB Type "B" (function) port ... the USB port of the USB port on the computer (or USB hub), refer to the machine. If a connection is written to the instruction manual for the corresponding equipment. ● Connection through a USB hub may not be connected meets the following operating conditions. ● Compatible models: IBM...
...position of the computer. Note ● The connectors on the USB cable can only be temporarily recalled and used from our Web site (www.brother.com). ■ Connecting Plug the USB cable connector into the 1 corresponding connectors on the computer and the USB Type "B" (function) port ... the USB port of the USB port on the computer (or USB hub), refer to the machine. If a connection is written to the instruction manual for the corresponding equipment. ● Connection through a USB hub may not be connected meets the following operating conditions. ● Compatible models: IBM...

Users Manual - English
Page 132
..., repeat step 1. Touch . 2 Memo ● For details on page 136.) • If the wrong pattern was selected or you decide not to PE-DESIGN instruction Manual. • To add a pattern from "Removable Disk". Select an embroidery pattern. 3 Touch the desired pattern. • If you wish to the machine. X The selected pattern...
..., repeat step 1. Touch . 2 Memo ● For details on page 136.) • If the wrong pattern was selected or you decide not to PE-DESIGN instruction Manual. • To add a pattern from "Removable Disk". Select an embroidery pattern. 3 Touch the desired pattern. • If you wish to the machine. X The selected pattern...
Users Manual - English
Page 168
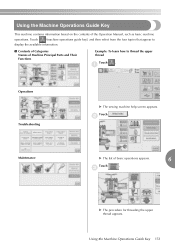
... appears. Using the Machine Operations Guide Key 151 Using the Machine Operations Guide Key This machine contains information based on the contents of the Operation Manual, such as basic machine operations.
... appears. Using the Machine Operations Guide Key 151 Using the Machine Operations Guide Key This machine contains information based on the contents of the Operation Manual, such as basic machine operations.
Users Manual - English
Page 224
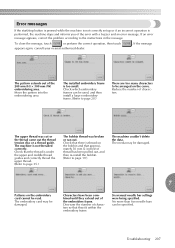
... thread tension disc or a thread guide. The embroidery card may be read. Move the pattern into the embroidering area. The media may be specified. Six manual needle bar settings were being specified. Check which embroidery frames can be damaged. Decrease the number of characters so that they extend out of the...
... thread tension disc or a thread guide. The embroidery card may be read. Move the pattern into the embroidering area. The media may be specified. Six manual needle bar settings were being specified. Check which embroidery frames can be damaged. Decrease the number of characters so that they extend out of the...
Users Manual - English
Page 232
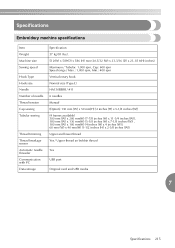
...(H) inches) Maximum / Tubular: 1,000 spm, Cap: 600 spm Speed range / Max.: 1,000 spm, Min.: 400 spm Vertical rotary hook Normal size (Type L) HA130EBBR / #11 6 needles Manual (Option) 130 mm (W) x 50 mm(H) (2 inches (H) x 5-1/8 inches (W)) (4 frames available) 300 mm (W) x 200 mm(H) (7-7/8 inches (H) x 11-3/4 inches (W)), 180 mm (W) x 130 mm(H) (5-1/8 inches (H) x 7-1/8 inches (W)) , 100 mm (W) x 100...
...(H) inches) Maximum / Tubular: 1,000 spm, Cap: 600 spm Speed range / Max.: 1,000 spm, Min.: 400 spm Vertical rotary hook Normal size (Type L) HA130EBBR / #11 6 needles Manual (Option) 130 mm (W) x 50 mm(H) (2 inches (H) x 5-1/8 inches (W)) (4 frames available) 300 mm (W) x 200 mm(H) (7-7/8 inches (H) x 11-3/4 inches (W)), 180 mm (W) x 130 mm(H) (5-1/8 inches (H) x 7-1/8 inches (W)) , 100 mm (W) x 100...
Users Manual - English
Page 234
... Lower thread guide 2 from Computer (USB 114 from Embroidery cards 112 M Machine operations guide key 49, 151 Main power switch 3, 20, 47 Maintenance 151, 193 Manual needle bar settings 96 Maximum sewing speed key 55, 56 Merge key 53 from memory 111 from USB media 117 Right-side/rear view 3 Rotate...
... Lower thread guide 2 from Computer (USB 114 from Embroidery cards 112 M Machine operations guide key 49, 151 Main power switch 3, 20, 47 Maintenance 151, 193 Manual needle bar settings 96 Maximum sewing speed key 55, 56 Merge key 53 from memory 111 from USB media 117 Right-side/rear view 3 Rotate...


