
Accessory Catalog - English
Page 1
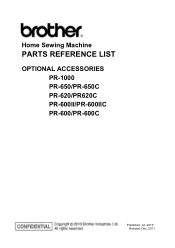
Home Sewing Machine PARTS REFERENCE LIST OPTIONAL ACCESSORIES PR-1000 PR-650/PR-650C PR-620/PR620C PR-600II/PR-600IIC PR-600/PR-600C Published: Jul.,2010 Revised: Dec.,2011
Home Sewing Machine PARTS REFERENCE LIST OPTIONAL ACCESSORIES PR-1000 PR-650/PR-650C PR-620/PR620C PR-600II/PR-600IIC PR-600/PR-600C Published: Jul.,2010 Revised: Dec.,2011
Users Manual - English
Page 2
... (spray) products are being administered. 8. Special care is being used or where oxygen is required around the machine needle. 11. Always unplug the machine from the accumulation of all sewing machine openings, such as a toy. Keep fingers out of lint, dust, and loose cloth. 5. WARNING -... unattended while plugged in the manual. 15. This sewing machine is intended for use . SAVE THESE INSTRUCTIONS This machine is not intended for household use by the manufacturer as changing the needle. 14. The machine should be supervised to the nearest authorized retailer or ...
... (spray) products are being administered. 8. Special care is being used or where oxygen is required around the machine needle. 11. Always unplug the machine from the accumulation of all sewing machine openings, such as a toy. Keep fingers out of lint, dust, and loose cloth. 5. WARNING -... unattended while plugged in the manual. 15. This sewing machine is intended for use . SAVE THESE INSTRUCTIONS This machine is not intended for household use by the manufacturer as changing the needle. 14. The machine should be supervised to the nearest authorized retailer or ...
Users Manual - English
Page 4
...device, pursuant to operate the equipment. Federal Communications Commission (FCC) Declaration of Conformity (For USA Only) Responsible Party: Brother International Corporation 100 Somerset Corporate Boulevard Bridgewater, NJ 08807-0911 USA TEL : (908) 704-1700 declares that may cause undesired ... two conditions: (1) this device must accept any interference received, including interference that the product Product Name: Brother Sewing Machine Model Number: PR-620 complies with the limits for help. • The enclosed interface cable should be determined by turning the equipment...
...device, pursuant to operate the equipment. Federal Communications Commission (FCC) Declaration of Conformity (For USA Only) Responsible Party: Brother International Corporation 100 Somerset Corporate Boulevard Bridgewater, NJ 08807-0911 USA TEL : (908) 704-1700 declares that may cause undesired ... two conditions: (1) this device must accept any interference received, including interference that the product Product Name: Brother Sewing Machine Model Number: PR-620 complies with the limits for help. • The enclosed interface cable should be determined by turning the equipment...
Users Manual - English
Page 5
... or other moving parts. 2. Use only neutral soaps or detergents to keep your local authorized Brother dealer. THANK YOU FOR CHOOSING OUR MACHINE Your machine is one of this machine, avoid direct sunlight and high humidity locations. When storing this Operation Manual to assure correct installation.... Do not drop or hit the machine. 4. If the problem persists, consult your eye on the needle while sewing. PLEASE READ BEFORE USING THIS MACHINE For safe operation 1. Plug the machine directly into the wall. Always consult the manual when replacing...
... or other moving parts. 2. Use only neutral soaps or detergents to keep your local authorized Brother dealer. THANK YOU FOR CHOOSING OUR MACHINE Your machine is one of this machine, avoid direct sunlight and high humidity locations. When storing this Operation Manual to assure correct installation.... Do not drop or hit the machine. 4. If the problem persists, consult your eye on the needle while sewing. PLEASE READ BEFORE USING THIS MACHINE For safe operation 1. Plug the machine directly into the wall. Always consult the manual when replacing...
Users Manual - English
Page 9
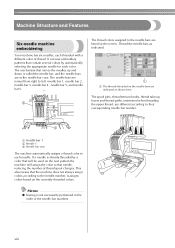
It can sew embroidery patterns that contain several colors by a color that needle, reducing the number of the needle bar numbers. The mechanism that the machine does not always assign colors according to the needle bars are indicated as indicated. 1 The threads threaded on the needle ... , needle bar 5, and needle bar 6. 3 1 The thread colors assigned to the needle number, it assigns colors based on the next pattern the machine will be used on the currently threaded colors. If a needle is not necessarily performed in the needle bar case. viii This also means that moves...
It can sew embroidery patterns that contain several colors by a color that needle, reducing the number of the needle bar numbers. The mechanism that the machine does not always assign colors according to the needle bars are indicated as indicated. 1 The threads threaded on the needle ... , needle bar 5, and needle bar 6. 3 1 The thread colors assigned to the needle number, it assigns colors based on the next pattern the machine will be used on the currently threaded colors. If a needle is not necessarily performed in the needle bar case. viii This also means that moves...
Users Manual - English
Page 10
...corresponding instructions appear on the LCD. However, with embroidery patterns containing six or less colors. With this machine, it is not necessary to change threads and finish stitching, sewing time is reduced. ■ Automatically pulls and holds the thread tails to the under side of ...the thread spools to be changed and the machine must be threaded each time a different thread color is used and sew the same color again automatically. ■ Automatic sewing reduces sewing time Except to change is more than 7 times, machine will stop when it continues to operate automatically...
...corresponding instructions appear on the LCD. However, with embroidery patterns containing six or less colors. With this machine, it is not necessary to change threads and finish stitching, sewing time is reduced. ■ Automatically pulls and holds the thread tails to the under side of ...the thread spools to be changed and the machine must be threaded each time a different thread color is used and sew the same color again automatically. ■ Automatic sewing reduces sewing time Except to change is more than 7 times, machine will stop when it continues to operate automatically...
Users Manual - English
Page 12
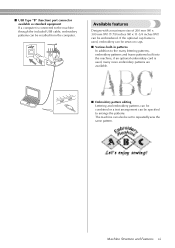
...lettering patterns, embroidery patterns and frame patterns built into the machine, if an optional embroidery card is connected to the machine through the included USB cable, embroidery patterns can be recalled from the computer. The machine can also be embroidered. Available features Designs with a ...maximum size of 200 mm (H) × 300 mm (W) (7-7/8 inches (H) × 11-3/4 inches (W)) can be set to repeatedly sew the same pattern. ■ USB Type "B" (function)...
...lettering patterns, embroidery patterns and frame patterns built into the machine, if an optional embroidery card is connected to the machine through the included USB cable, embroidery patterns can be recalled from the computer. The machine can also be embroidered. Available features Designs with a ...maximum size of 200 mm (H) × 300 mm (W) (7-7/8 inches (H) × 11-3/4 inches (W)) can be set to repeatedly sew the same pattern. ■ USB Type "B" (function)...
Users Manual - English
Page 13
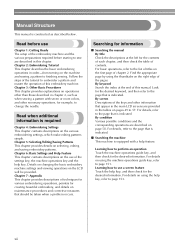
... By keyword Search the index at the left for the desired information. Learning how to finishing sewing. Chapter 7: Appendix This chapter provides descriptions of the settings key, the machine operations key and the help key. By screen Descriptions of the keys and other information that ...appear in the main LCD screens are provided in order-from turning on the machine and sewing a pattern to perform an operation Touch the machine operations guide key, and then check for the desired information. Learning how to 57. Chapter 6: Basic Settings...
... By keyword Search the index at the left for the desired information. Learning how to finishing sewing. Chapter 7: Appendix This chapter provides descriptions of the settings key, the machine operations key and the help key. By screen Descriptions of the keys and other information that ...appear in the main LCD screens are provided in order-from turning on the machine and sewing a pattern to perform an operation Touch the machine operations guide key, and then check for the desired information. Learning how to 57. Chapter 6: Basic Settings...
Users Manual - English
Page 15
...screen ...32 Upper Threading ...33 Checking the needle bars and thread colors ...33 Upper threading ...35 Threading the needle ...39 Sewing the Embroidery...42 Starting embroidering ...42 Stopping embroidering...44 Checking the Thread Tension 45 Removing the Embroidery Frame and Fabric 46 ... You 58 TECHNICAL TERMS: ...58 PATTERNS: ...59 EMBROIDERING: ...59 OTHER BASIC PROCEDURES 61 Resume the Operation Being Performed Before the Machine Was Turned OFF 62 Changing the Needle ...63 Replacing the needle...63 Correctly Using the Embroidery Frames 65 Embroidery frame types and applications...
...screen ...32 Upper Threading ...33 Checking the needle bars and thread colors ...33 Upper threading ...35 Threading the needle ...39 Sewing the Embroidery...42 Starting embroidering ...42 Stopping embroidering...44 Checking the Thread Tension 45 Removing the Embroidery Frame and Fabric 46 ... You 58 TECHNICAL TERMS: ...58 PATTERNS: ...59 EMBROIDERING: ...59 OTHER BASIC PROCEDURES 61 Resume the Operation Being Performed Before the Machine Was Turned OFF 62 Changing the Needle ...63 Replacing the needle...63 Correctly Using the Embroidery Frames 65 Embroidery frame types and applications...
Users Manual - English
Page 16
... Lock Stitch Setting 88 Starting/Ending Position Settings 89 Repeatedly sewing a pattern along a diagonal 90 Maximum Sewing Speed Setting 91 Setting the Machine to Stop at Color Changes 92 Stopping the machine at the next color change 92 Specifying pause locations before embroidering...Patterns ...105 Floral alphabet patterns...106 Appliqué alphabet...107 Frame patterns ...108 Alphabet patterns ...109 Embroidery patterns stored in the machine...111 Embroidery cards (optional) ...112 Computer (USB) ...114 USB media (Commercially Available) ...117 Editing the Embroidery Pattern (Pattern ...
... Lock Stitch Setting 88 Starting/Ending Position Settings 89 Repeatedly sewing a pattern along a diagonal 90 Maximum Sewing Speed Setting 91 Setting the Machine to Stop at Color Changes 92 Stopping the machine at the next color change 92 Specifying pause locations before embroidering...Patterns ...105 Floral alphabet patterns...106 Appliqué alphabet...107 Frame patterns ...108 Alphabet patterns ...109 Embroidery patterns stored in the machine...111 Embroidery cards (optional) ...112 Computer (USB) ...114 USB media (Commercially Available) ...117 Editing the Embroidery Pattern (Pattern ...
Users Manual - English
Page 17
... for trimming 149 Deleting short stitches ...150 Specifying the remaining length of thread ...150 Using the Machine Operations Guide Key 151 Using the Help Key...153 APPENDIX 155 Appliqué Sewing...156 Sewing appliqué patterns ...156 Using a frame pattern to create appliqués (1 157 Using a... frame pattern to create appliqués (2 158 Helpful Tips for the Operation of the Machine 160 Checking the thread tension of built-in patterns 160 Sewing a pattern aligned with a mark on the fabric 161 Color thread table ...163 Colors of Tajima (.dst) embroidery...
... for trimming 149 Deleting short stitches ...150 Specifying the remaining length of thread ...150 Using the Machine Operations Guide Key 151 Using the Help Key...153 APPENDIX 155 Appliqué Sewing...156 Sewing appliqué patterns ...156 Using a frame pattern to create appliqués (1 157 Using a... frame pattern to create appliqués (2 158 Helpful Tips for the Operation of the Machine 160 Checking the thread tension of built-in patterns 160 Sewing a pattern aligned with a mark on the fabric 161 Color thread table ...163 Colors of Tajima (.dst) embroidery...
Users Manual - English
Page 18
... Accessories 4 Accessories / 4 Optional Accessories 5 Setting Up the Machine 6 Setup and transporting precautions / 6 Setup location / 7 Setting up . After checking that all accessories are included, the embroidery machine can be set up the machine / 8 Adjusting the operation panel position / 9 Preparing the ...thread guide assembly / 10 Positioning the spool stand / 11 Attaching the embroidery frame holder / 11 1 GETTING READY After unpacking the machine, first refer to sew...
... Accessories 4 Accessories / 4 Optional Accessories 5 Setting Up the Machine 6 Setup and transporting precautions / 6 Setup location / 7 Setting up . After checking that all accessories are included, the embroidery machine can be set up the machine / 8 Adjusting the operation panel position / 9 Preparing the ...thread guide assembly / 10 Positioning the spool stand / 11 Attaching the embroidery frame holder / 11 1 GETTING READY After unpacking the machine, first refer to sew...
Users Manual - English
Page 19
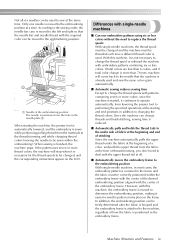
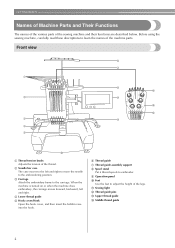
... the height of the legs. A Sewing light B Thread guide pins C Upper thread guide D Middle thread guide 2 GETTING READY Names of Machine Parts and Their Functions The names of the various parts of the machine parts. Before using the sewing machine, carefully read these descriptions to the ...carriage. When the machine is turned on or when the machine does embroidery, the carriage moves forward...
... the height of the legs. A Sewing light B Thread guide pins C Upper thread guide D Middle thread guide 2 GETTING READY Names of Machine Parts and Their Functions The names of the various parts of the machine parts. Before using the sewing machine, carefully read these descriptions to the ...carriage. When the machine is turned on or when the machine does embroidery, the carriage moves forward...

Users Manual - English
Page 20
... Bottom 5 Power supply plug Insert the plug on the operation condition of Machine Parts and Their Functions 3 Lit in red : When the machine cannot start sewing Flashing in green: When the machine can start sewing Lit in green : While the machine is sewing Off : When the machine is turned off 4 2 Thread trimming button Press the thread trimming button...
... Bottom 5 Power supply plug Insert the plug on the operation condition of Machine Parts and Their Functions 3 Lit in red : When the machine cannot start sewing Flashing in green: When the machine can start sewing Lit in green : While the machine is sewing Off : When the machine is turned off 4 2 Thread trimming button Press the thread trimming button...
Users Manual - English
Page 23
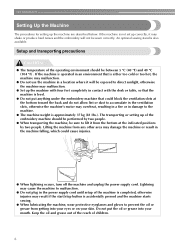
... operated in an environment that the machine is accidentally pressed and the machine starts sewing. ● When lubricating the machine, wear protective eyeglasses and gloves to prevent the oil or grease from getting into your skin. Do not put anything under the embroidery machine that could block the ventilation slots ...where it will not be between 5 °C (40 °F) and 40 °C (104 °F) . An optional sewing stand is approximately 37 kg (81 Ibs.). Lifting the machine from the bottom at the bottom toward the back and do not allow lint or dust to lift it from any other ...
... operated in an environment that the machine is accidentally pressed and the machine starts sewing. ● When lubricating the machine, wear protective eyeglasses and gloves to prevent the oil or grease from getting into your skin. Do not put anything under the embroidery machine that could block the ventilation slots ...where it will not be between 5 °C (40 °F) and 40 °C (104 °F) . An optional sewing stand is approximately 37 kg (81 Ibs.). Lifting the machine from the bottom at the bottom toward the back and do not allow lint or dust to lift it from any other ...
Users Manual - English
Page 30
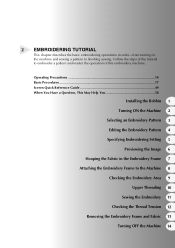
... Embroidering Setting 5 Previewing the Image 6 Hooping the Fabric in order-from turning on the machine and sewing a pattern to the Machine 8 Checking the Embroidery Area 9 Upper Threading 10 Sewing the Embroidery 11 Checking the Thread Tension 12 Removing the Embroidery Frame and Fabric 13 Turning ...OFF the Machine 14 2 EMBROIDERING TUTORIAL This chapter describes the basic embroidering operations in the Embroidery Frame 7 Attaching the Embroidery Frame to finishing sewing. Follow the steps of the tutorial to embroider a pattern...
... Embroidering Setting 5 Previewing the Image 6 Hooping the Fabric in order-from turning on the machine and sewing a pattern to the Machine 8 Checking the Embroidery Area 9 Upper Threading 10 Sewing the Embroidery 11 Checking the Thread Tension 12 Removing the Embroidery Frame and Fabric 13 Turning ...OFF the Machine 14 2 EMBROIDERING TUTORIAL This chapter describes the basic embroidering operations in the Embroidery Frame 7 Attaching the Embroidery Frame to finishing sewing. Follow the steps of the tutorial to embroider a pattern...
Users Manual - English
Page 32
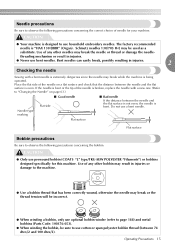
... bobbin, be used as a substitute. CAUTION ● Only use prewound bobbin (COATS "L" type/TRU-SEW POLYESTER "Filaments") or bobbins designed specifically for your machine. Use of needle for this machine. Schmetz needles 130/705 H-E may break while the machine is being operated. Flat surface Flat surface Bobbin precautions Be sure to observe the following...
... bobbin, be used as a substitute. CAUTION ● Only use prewound bobbin (COATS "L" type/TRU-SEW POLYESTER "Filaments") or bobbins designed specifically for your machine. Use of needle for this machine. Schmetz needles 130/705 H-E may break while the machine is being operated. Flat surface Flat surface Bobbin precautions Be sure to observe the following...
Users Manual - English
Page 117
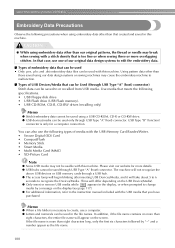
... data design systems to malfunction. ■ Types of USB Devices/Media that can be saved using our data design systems or sewing machines may cause the embroidery machine to edit the embroidery data. ■ Types of media with the USB Memory Card Reader/Writer. • Secure Digital (SD... Precautions Observe the following precautions when using embroidery data other than our original patterns, the thread or needle may break when sewing with this machine. The machine will not recognize the above USB devices or USB memory cards through USB Type "A" (host) connector. Using pattern data...
... data design systems to malfunction. ■ Types of USB Devices/Media that can be saved using our data design systems or sewing machines may cause the embroidery machine to edit the embroidery data. ■ Types of media with the USB Memory Card Reader/Writer. • Secure Digital (SD... Precautions Observe the following precautions when using embroidery data other than our original patterns, the thread or needle may break when sewing with this machine. The machine will not recognize the above USB devices or USB memory cards through USB Type "A" (host) connector. Using pattern data...
Users Manual - English
Page 168
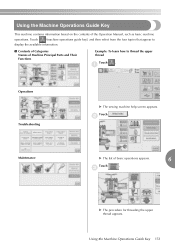
... for threading the upper thread appears. Touch (machine operations guide key), and then select from the four topics that appear to thread the upper thread Touch . 1 Operations Troubleshooting X The sewing machine help screen appears. Using the Machine Operations Guide Key 151 Using the Machine Operations Guide Key This machine contains information based on the contents of...
... for threading the upper thread appears. Touch (machine operations guide key), and then select from the four topics that appear to thread the upper thread Touch . 1 Operations Troubleshooting X The sewing machine help screen appears. Using the Machine Operations Guide Key 151 Using the Machine Operations Guide Key This machine contains information based on the contents of...
Users Manual - English
Page 214
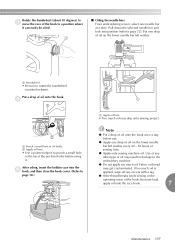
... (refer to rotate the handwheel counterclockwise. Use of any excess with a rag. ● If the thread breaks while sewing or the operating noise of sewing time. ● Apply only sewing machine oil. Put one drop of oil on the lower needle bar felt washer. 1 Handwheel • Be sure to page... needle bars From embroidering screen, select one needle bar at a time. If too much oil may get contaminated. Fabric or thread may drip onto sewing project. Pull down the selected needle bar and lock into the 5 hook, and then close the hook cover. (Refer to page 18.) 1 ...
... (refer to rotate the handwheel counterclockwise. Use of any excess with a rag. ● If the thread breaks while sewing or the operating noise of sewing time. ● Apply only sewing machine oil. Put one drop of oil on the lower needle bar felt washer. 1 Handwheel • Be sure to page... needle bars From embroidering screen, select one needle bar at a time. If too much oil may get contaminated. Fabric or thread may drip onto sewing project. Pull down the selected needle bar and lock into the 5 hook, and then close the hook cover. (Refer to page 18.) 1 ...


