
Users Manual - English
Page 14
... Machine...6 Setup and transporting precautions ...6 Setup location ...7 Setting up the machine...8 Adjusting the operation panel position ...9 Preparing the thread guide assembly ...10 Positioning the spool stand...11 Attaching the embroidery frame holder ...11 EMBROIDERING TUTORIAL 13 Operating Precautions...14 Power supply precautions ...14 Needle precautions ...15 Checking the needle ...15 Bobbin...
... Machine...6 Setup and transporting precautions ...6 Setup location ...7 Setting up the machine...8 Adjusting the operation panel position ...9 Preparing the thread guide assembly ...10 Positioning the spool stand...11 Attaching the embroidery frame holder ...11 EMBROIDERING TUTORIAL 13 Operating Precautions...14 Power supply precautions ...14 Needle precautions ...15 Checking the needle ...15 Bobbin...
Users Manual - English
Page 18
... are included, the embroidery machine can be set up the machine / 8 Adjusting the operation panel position / 9 Preparing the thread guide assembly / 10 Positioning the spool stand / 11 Attaching the embroidery frame holder / 11 The setup of Machine Parts and Their Functions 2 Front view / 2 Right-side/rear view / 3 Operation panel / 3 Included Accessories...
... are included, the embroidery machine can be set up the machine / 8 Adjusting the operation panel position / 9 Preparing the thread guide assembly / 10 Positioning the spool stand / 11 Attaching the embroidery frame holder / 11 The setup of Machine Parts and Their Functions 2 Front view / 2 Right-side/rear view / 3 Operation panel / 3 Included Accessories...
Users Manual - English
Page 19
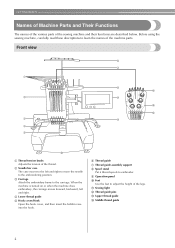
... thread guide 5 Hook cover/Hook Open the hook cover, and then insert the bobbin case into the hook. 6 Thread guide 7 Thread guide assembly support 8 Spool stand Put 6 thread spools to embroider. 9 Operation panel 0 Feet Use the feet to the carriage. When the machine is turned on or when the machine does...
... thread guide 5 Hook cover/Hook Open the hook cover, and then insert the bobbin case into the hook. 6 Thread guide 7 Thread guide assembly support 8 Spool stand Put 6 thread spools to embroider. 9 Operation panel 0 Feet Use the feet to the carriage. When the machine is turned on or when the machine does...
Users Manual - English
Page 23
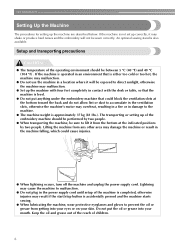
An optional sewing stand is approximately 37 kg (81 Ibs.). If the machine is operated in an environment that is either too cold or too hot, the machine may ...
An optional sewing stand is approximately 37 kg (81 Ibs.). If the machine is operated in an environment that is either too cold or too hot, the machine may ...

Users Manual - English
Page 28
... the embroidery frame holder Setting Up the Machine 11 X Secure the spool stand in the opened up, 2 tighten the thumb screw. 1 Thumb screws Align the holes in the embroidery frame 2 holder with the pins on the frame-mounting ...plate 2 Holes in the embroidering position. frame holder Loosen the thumb screw, and then open up 1 the spool stand to the left and right. 1 Attach the embroidery frame holder to the carriage. 1 Remove the two thumb screws of the 1 embroidery frame holder. 2 1 Thumb screw...
... the embroidery frame holder Setting Up the Machine 11 X Secure the spool stand in the opened up, 2 tighten the thumb screw. 1 Thumb screws Align the holes in the embroidery frame 2 holder with the pins on the frame-mounting ...plate 2 Holes in the embroidering position. frame holder Loosen the thumb screw, and then open up 1 the spool stand to the left and right. 1 Attach the embroidery frame holder to the carriage. 1 Remove the two thumb screws of the 1 embroidery frame holder. 2 1 Thumb screw...
Users Manual - English
Page 36
..., the embroidery will not be used. (Refer to page 5, 188.) Installing the Bobbin 19 Use pre-wound (L 13 type) bobbins. ● The optional bobbin winder (stand-alone type) and optional metal bobbins can also 14 be sewn correctly. If the bobbin is not equipped with the thread winding off the bobbin...
..., the embroidery will not be used. (Refer to page 5, 188.) Installing the Bobbin 19 Use pre-wound (L 13 type) bobbins. ● The optional bobbin winder (stand-alone type) and optional metal bobbins can also 14 be sewn correctly. If the bobbin is not equipped with the thread winding off the bobbin...

Users Manual - English
Page 53
..., and then pass the thread through the number 1 hole in the thread guide toward the front of the machine. 2 1 • Make sure that the spool stand is opened in the shape of a V. • When using small spools of thread, be sure to correctly thread the needle bars. 6 1 654 32 1 5 2 4 65 3 21...
..., and then pass the thread through the number 1 hole in the thread guide toward the front of the machine. 2 1 • Make sure that the spool stand is opened in the shape of a V. • When using small spools of thread, be sure to correctly thread the needle bars. 6 1 654 32 1 5 2 4 65 3 21...
Users Manual - English
Page 235
..., 52 Size (vertical 51, 52 Size key 51, 53, 103, 121 Spacing key 53, 124 Specifications 215 Spool 36 Spool change indicator 56, 76 Spool stand 2, 11 Stabilizer 66, 165, 167 Standard Tail 140, 150 Standard(Pro Style 170 Start/stop button 3, 42 Starting/ending position key 55, 89, 90 Stitch...
..., 52 Size (vertical 51, 52 Size key 51, 53, 103, 121 Spacing key 53, 124 Specifications 215 Spool 36 Spool change indicator 56, 76 Spool stand 2, 11 Stabilizer 66, 165, 167 Standard Tail 140, 150 Standard(Pro Style 170 Start/stop button 3, 42 Starting/ending position key 55, 89, 90 Stitch...
