
Users Manual - English
Page 5
... www.brother.com iv Do not touch the handwheel, thread take- For a longer service life 1. Be sure to clean the machine. For additional product information and updates, visit our web site at the back of the most advanced computerized household embroidery machines. Do...other parts • A power failure occurs during use • Maintaining the machine • Leaving the machine unattended 3. Do not use or store the machine near a space heater, iron, halogen lamp, or other moving parts. 2. THANK YOU FOR CHOOSING OUR MACHINE Your machine is one of this machine, ...
... www.brother.com iv Do not touch the handwheel, thread take- For a longer service life 1. Be sure to clean the machine. For additional product information and updates, visit our web site at the back of the most advanced computerized household embroidery machines. Do...other parts • A power failure occurs during use • Maintaining the machine • Leaving the machine unattended 3. Do not use or store the machine near a space heater, iron, halogen lamp, or other moving parts. 2. THANK YOU FOR CHOOSING OUR MACHINE Your machine is one of this machine, ...
Users Manual - English
Page 6
...than one copy of the CONTENT, WHICH ORIGINALLY BEARS CERTAIN COPYRIGHT NOTICE UNDER THE NAME OF ANY THIRD PARTIES OTHER THAN BROTHER (e.g. Nothing in combination with an embroidery machine that CUSTOMER owns or uses, provided that are licensed (not sold) to be governed by use at any law. ... do the same. • Alter, translate, modify or adapt the CONTENT or any part thereof for use of the CONTENT to you ("CUSTOMER") under the terms and conditions of BROTHER under any one embroidery machine at a time. BY USING THE CONTENT, THE CUSTOMER ACCEPTS THE TERMS AND CONDITIONS OF...
...than one copy of the CONTENT, WHICH ORIGINALLY BEARS CERTAIN COPYRIGHT NOTICE UNDER THE NAME OF ANY THIRD PARTIES OTHER THAN BROTHER (e.g. Nothing in combination with an embroidery machine that CUSTOMER owns or uses, provided that are licensed (not sold) to be governed by use at any law. ... do the same. • Alter, translate, modify or adapt the CONTENT or any part thereof for use of the CONTENT to you ("CUSTOMER") under the terms and conditions of BROTHER under any one embroidery machine at a time. BY USING THE CONTENT, THE CUSTOMER ACCEPTS THE TERMS AND CONDITIONS OF...
Users Manual - English
Page 14
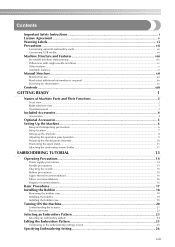
... optional embroidery cards ...vii Concerning USB media ...vii Machine Structure and Features viii Six-needle machine embroidering ...viii Differences with single-needle machines ...ix Other features ...x Available features...xi Manual Structure...xii Read before use ...xii Read when additional information is required xii Searching for information...xii Contents ...xiii GETTING READY 1 Names of Machine Parts and...
... optional embroidery cards ...vii Concerning USB media ...vii Machine Structure and Features viii Six-needle machine embroidering ...viii Differences with single-needle machines ...ix Other features ...x Available features...xi Manual Structure...xii Read before use ...xii Read when additional information is required xii Searching for information...xii Contents ...xiii GETTING READY 1 Names of Machine Parts and...
Users Manual - English
Page 18
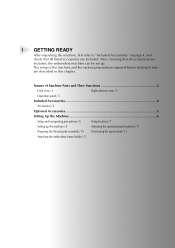
... are included. The setup of Machine Parts and Their Functions 2 Front view / 2 Right-side/rear view / 3 Operation panel / 3 Included Accessories 4 Accessories / 4 Optional Accessories 5 Setting Up the Machine 6 Setup and transporting precautions / 6 Setup location / 7 Setting up . After checking that all accessories are included, the embroidery machine can be set up the machine / 8 Adjusting the operation panel position...
... are included. The setup of Machine Parts and Their Functions 2 Front view / 2 Right-side/rear view / 3 Operation panel / 3 Included Accessories 4 Accessories / 4 Optional Accessories 5 Setting Up the Machine 6 Setup and transporting precautions / 6 Setup location / 7 Setting up . After checking that all accessories are included, the embroidery machine can be set up the machine / 8 Adjusting the operation panel position...
Users Manual - English
Page 19
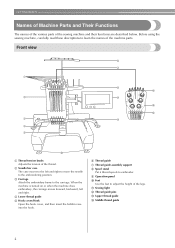
A Sewing light B Thread guide pins C Upper thread guide D Middle thread guide 2 GETTING READY Names of Machine Parts and Their Functions The names of the various parts of the machine parts. Front view 1 2 3 6 54321 4 5 6 7 8 C 9 B D A 0 1 Thread tension knobs Adjusts the tension of the thread. 2 Needle bar case The ... to embroider. 9 Operation panel 0 Feet Use the feet to adjust the height of the legs. When the machine is turned on or when the machine does embroidery, the carriage moves forward, backward, left and right to move the needle to the embroidering position. 3 Carriage...
A Sewing light B Thread guide pins C Upper thread guide D Middle thread guide 2 GETTING READY Names of Machine Parts and Their Functions The names of the various parts of the machine parts. Front view 1 2 3 6 54321 4 5 6 7 8 C 9 B D A 0 1 Thread tension knobs Adjusts the tension of the thread. 2 Needle bar case The ... to embroider. 9 Operation panel 0 Feet Use the feet to adjust the height of the legs. When the machine is turned on or when the machine does embroidery, the carriage moves forward, backward, left and right to move the needle to the embroidering position. 3 Carriage...

Users Manual - English
Page 20
...handwheel counterclockwise. 4 USB Type "B" (function) port connector When sending patterns from a computer to the machine, plug the USB cable from the computer into the embroidery card slot. 3 Handwheel Rotate the handwheel to move the needle up and down. The lighting status and... the USB Type "A" (host) port connector. 2 Embroidery card slot Insert the embroidery cards (sold separately) into the USB Type "B" (function) port connector. Names of the machine. Operation panel Bottom 5 Power supply plug Insert the plug on the operation condition of Machine Parts and Their Functions 3
...handwheel counterclockwise. 4 USB Type "B" (function) port connector When sending patterns from a computer to the machine, plug the USB cable from the computer into the embroidery card slot. 3 Handwheel Rotate the handwheel to move the needle up and down. The lighting status and... the USB Type "A" (host) port connector. 2 Embroidery card slot Insert the embroidery cards (sold separately) into the USB Type "B" (function) port connector. Names of the machine. Operation panel Bottom 5 Power supply plug Insert the plug on the operation condition of Machine Parts and Their Functions 3

Users Manual - English
Page 21
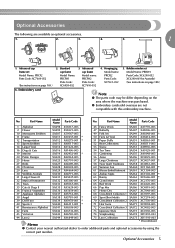
...check that the following accessories are included with this machine. If any item is missing or damaged, contact your retailer. Accessories The accessories listed below are included. Part Name Model Name Parts Code 1 Accessory case XC6482-051 2 Needle set... (7-7/8 inches (H) × 11-3/4 inches (W)) XC5704-051 Embroidery sheet (large) 26 130 mm (H) × 180 mm (W) (5-1/8 inches (H) × 7-1/8 inches (W)) XC5721-051 Embroidery sheet (medium) 27 100 mm (H) × 100 mm (W) (4 inches (H) × 4 inches (W)) XC5759-051 Embroidery sheet (small) 28 40 mm (H) × 60 mm...
...check that the following accessories are included with this machine. If any item is missing or damaged, contact your retailer. Accessories The accessories listed below are included. Part Name Model Name Parts Code 1 Accessory case XC6482-051 2 Needle set... (7-7/8 inches (H) × 11-3/4 inches (W)) XC5704-051 Embroidery sheet (large) 26 130 mm (H) × 180 mm (W) (5-1/8 inches (H) × 7-1/8 inches (W)) XC5721-051 Embroidery sheet (medium) 27 100 mm (H) × 100 mm (W) (4 inches (H) × 4 inches (W)) XC5759-051 Embroidery sheet (small) 28 40 mm (H) × 60 mm...
Users Manual - English
Page 22
... overseas are available as optional accessories. 1. 2. 3. 4. 5. 1 1. Part Name Model Name Parts Code No. Optional Accessories 5 Hooping jig Model name: PRCFJ2 Parts Code: XC7611-052 5. Embroidery card 2. Optional Accessories The following are not compatible with this embroidery machine. No. Standard cap frame Model Name: PRCFH1 Parts Code: XC6958-052 3. Part Name Model Name Parts Code 1 Alphabet SA298 X58317-003 45...
... overseas are available as optional accessories. 1. 2. 3. 4. 5. 1 1. Part Name Model Name Parts Code No. Optional Accessories 5 Hooping jig Model name: PRCFJ2 Parts Code: XC7611-052 5. Embroidery card 2. Optional Accessories The following are not compatible with this embroidery machine. No. Standard cap frame Model Name: PRCFH1 Parts Code: XC6958-052 3. Part Name Model Name Parts Code 1 Alphabet SA298 X58317-003 45...
Users Manual - English
Page 32
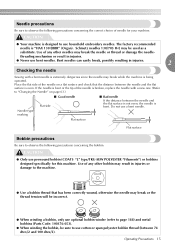
...CAUTION ● Only use optional bobbin winder (refer to page 188) and metal bobbins (Parts Code: 100376-053). ● When winding the bobbin, be used as a substitute. Needle... precautions Be sure to observe the following precautions concerning the bobbin. CAUTION ● Your machine is "HAX 130 EBBR" (Organ). The factory recommended needle is designed to observe the...needles. Bent needles can easily break, possibly resulting in injuries. ● Never use household embroidery needles. COATS L Polyester ● Use a bobbin thread that the distance between the ...
...CAUTION ● Only use optional bobbin winder (refer to page 188) and metal bobbins (Parts Code: 100376-053). ● When winding the bobbin, be used as a substitute. Needle... precautions Be sure to observe the following precautions concerning the bobbin. CAUTION ● Your machine is "HAX 130 EBBR" (Organ). The factory recommended needle is designed to observe the...needles. Bent needles can easily break, possibly resulting in injuries. ● Never use household embroidery needles. COATS L Polyester ● Use a bobbin thread that the distance between the ...
Users Manual - English
Page 33
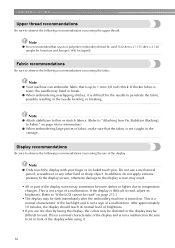
... extreme pressure to the display screen, otherwise damage to read. If thicker fabric is sewn, the needle may result. • All or part of the display and is difficult for information) ● When embroidering large pieces of brightness. • If you are not directly facing ... page 66 for the needle to sit in the needle bending or breaking. Note ● Your machine can embroider fabric that rayon or polyester embroidery thread be dark immediately after the embroidery machine is not a sign of a malfunction. This is a normal characteristic of the backlight and is ...
... extreme pressure to the display screen, otherwise damage to read. If thicker fabric is sewn, the needle may result. • All or part of the display and is difficult for information) ● When embroidering large pieces of brightness. • If you are not directly facing ... page 66 for the needle to sit in the needle bending or breaking. Note ● Your machine can embroider fabric that rayon or polyester embroidery thread be dark immediately after the embroidery machine is not a sign of a malfunction. This is a normal characteristic of the backlight and is ...
Users Manual - English
Page 47
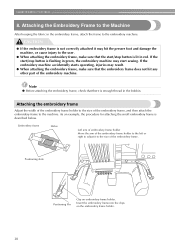
... is lit in the bobbin. Insert the embroidery frame into the clips on embroidery frame holder. Positioning slots Positioning Pin Clip on the embroidery frame holder. 30 Note ● Before attaching the embroidery frame, check that the embroidery frame does not hit any other part of the embroidery machine. If the embroidery machine accidentally starts operating, injuries may result. ●...
... is lit in the bobbin. Insert the embroidery frame into the clips on embroidery frame holder. Positioning slots Positioning Pin Clip on the embroidery frame holder. 30 Note ● Before attaching the embroidery frame, check that the embroidery frame does not hit any other part of the embroidery machine. If the embroidery machine accidentally starts operating, injuries may result. ●...
Users Manual - English
Page 59
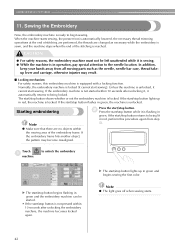
... be left unattended while it cannot start /stop button shows whether or not the embroidery machine is not pressed within the moving parts such as necessary while the embroidery is sewn, and the machine stops when the end of stitching are performed, the threads are no objects within 10 seconds after unlocking it, it is...
... be left unattended while it cannot start /stop button shows whether or not the embroidery machine is not pressed within the moving parts such as necessary while the embroidery is sewn, and the machine stops when the end of stitching are performed, the threads are no objects within 10 seconds after unlocking it, it is...
Users Manual - English
Page 63
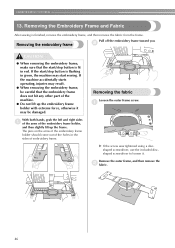
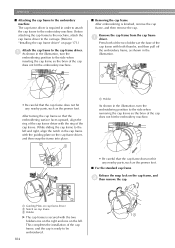
... on the arms of the embroidery frame holder should come out of the holes in red. If the machine accidentally starts operating, injuries may start /stop button is flashing in green, the machine may result. ● When removing the embroidery frame, be damaged. Remove ...Embroidery Frame and Fabric After sewing is lit in the sides of the machine. ● Do not lift up the frame. Removing the embroidery frame Pull off the embroidery frame toward you. 2 CAUTION ● When removing the embroidery frame, make sure that the embroidery frame does not hit any other part of embroidery...
... on the arms of the embroidery frame holder should come out of the holes in red. If the machine accidentally starts operating, injuries may start /stop button is flashing in green, the machine may result. ● When removing the embroidery frame, be damaged. Remove ...Embroidery Frame and Fabric After sewing is lit in the sides of the machine. ● Do not lift up the frame. Removing the embroidery frame Pull off the embroidery frame toward you. 2 CAUTION ● When removing the embroidery frame, make sure that the embroidery frame does not hit any other part of embroidery...
Users Manual - English
Page 159
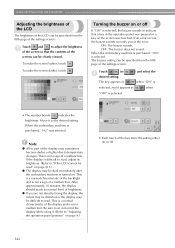
.... ON: The buzzer sounds. The buzzer setting can be specified from the fifth page of the settings screen. When the embroidery machine is purchased, "142" was touched. Note ● All or part of the display may be difficult to "Adjusting the operation panel position" on page 9.) • Each touch of the ...(Refer to sit in the operation panel was pressed or a key on page 213.) ● The display may be dark immediately after the embroidery machine is selected, the buzzer sounds to indicate that the contents of the screens can be clearly viewed. Be sure to "If the LCD cannot be...
.... ON: The buzzer sounds. The buzzer setting can be specified from the fifth page of the settings screen. When the embroidery machine is purchased, "142" was touched. Note ● All or part of the display may be difficult to "Adjusting the operation panel position" on page 9.) • Each touch of the ...(Refer to sit in the operation panel was pressed or a key on page 213.) ● The display may be dark immediately after the embroidery machine is selected, the buzzer sounds to indicate that the contents of the screens can be clearly viewed. Be sure to "If the LCD cannot be...
Users Manual - English
Page 180
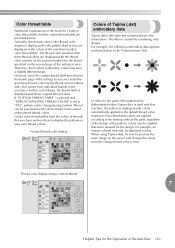
...with colors automatically applied in the default thread color sequence. However, since the custom thread table specified on the fourth page of the machine's built-in color thread table and the custom thread table are displayed with these thread colors are provided below in your own thread... sequence display and in color library, the thread table is displayed with colors nearest to the sewing order of the parts, regardless of the design of Tajima (.dst) embroidery data Tajima data (.dst) does not contain pattern color information. If "CUSTOM THREAD TABLE" is selected and "DISPLAY...
...with colors automatically applied in the default thread color sequence. However, since the custom thread table specified on the fourth page of the machine's built-in color thread table and the custom thread table are displayed with these thread colors are provided below in your own thread... sequence display and in color library, the thread table is displayed with colors nearest to the sewing order of the parts, regardless of the design of Tajima (.dst) embroidery data Tajima data (.dst) does not contain pattern color information. If "CUSTOM THREAD TABLE" is selected and "DISPLAY...
Users Manual - English
Page 183
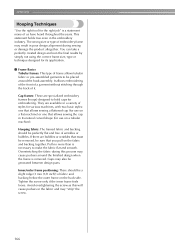
... heard throughout the years. They are available in a variety of frame allows tubular fabric or pre-assembled garments to be generated between design parts. Pull no more than is removed. Overstretching the fabric during sewing or damage the product altogether. Tighten the screw only if the inner ... may also be placed around the finished design when the frame is necessary to hold caps for use on a tubular machine). Gaps may result in the embroidery industry. Cap frames: These are bubbles or wrinkles that you pull on the back side. This statement holds true even in ...
... heard throughout the years. They are available in a variety of frame allows tubular fabric or pre-assembled garments to be generated between design parts. Pull no more than is removed. Overstretching the fabric during sewing or damage the product altogether. Tighten the screw only if the inner ... may also be placed around the finished design when the frame is necessary to hold caps for use on a tubular machine). Gaps may result in the embroidery industry. Cap frames: These are bubbles or wrinkles that you pull on the back side. This statement holds true even in ...
Users Manual - English
Page 201
...ready to the side when removing the cap frame so the brim of the cap does not hit the embroidery machine. • Be careful that the cap frame does not hit any nearby parts, such as shown in the illustration. 1 • Be careful that the embroidering surface faces upward, align... the ring of the cap frame driver with both thumbs, and then pull off the embroidery frame, as the presser foot. APPENDIX ■ Attaching the cap frame to the embroidery machine The...
...ready to the side when removing the cap frame so the brim of the cap does not hit the embroidery machine. • Be careful that the cap frame does not hit any nearby parts, such as shown in the illustration. 1 • Be careful that the embroidering surface faces upward, align... the ring of the cap frame driver with both thumbs, and then pull off the embroidery frame, as the presser foot. APPENDIX ■ Attaching the cap frame to the embroidery machine The...
Users Manual - English
Page 211
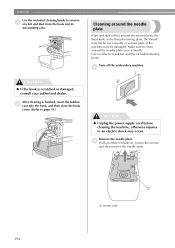
...needle plate. 1 1 Needle plate 194 Cleaning around the needle plate If lint and dust collect around the needle plate once a month. Turn off the embroidery machine. 1 CAUTION ● If the hook is finished, insert the bobbin 4 case into the hook, and then close the hook cover. (Refer to ... its surrounding area. APPENDIX Use the included cleaning brush to page 19.) CAUTION ● Unplug the power supply cord before cleaning the machine, otherwise injuries or an electric shock may be damaged. Use on offset screwdriver and the included cleaning brush. Make sure to clean around...
...needle plate. 1 1 Needle plate 194 Cleaning around the needle plate If lint and dust collect around the needle plate once a month. Turn off the embroidery machine. 1 CAUTION ● If the hook is finished, insert the bobbin 4 case into the hook, and then close the hook cover. (Refer to ... its surrounding area. APPENDIX Use the included cleaning brush to page 19.) CAUTION ● Unplug the power supply cord before cleaning the machine, otherwise injuries or an electric shock may be damaged. Use on offset screwdriver and the included cleaning brush. Make sure to clean around...
Users Manual - English
Page 213
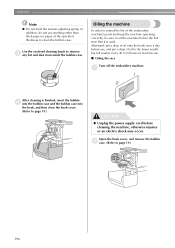
...page 19.) 196 Oiling the machine In order to extend the life of the embroidery machine's parts and keep the machine operating correctly, be sure to oil the machine before use, and put a drop of oil to the lower needle bar felt washer every 40 to 50 hours of machine use anything other than thick paper...hook, and then close the hook cover. (Refer to clean the bobbin case. In addition, do not use . ■ Oiling the race Turn off the embroidery machine. 1 After cleaning is used. Open the hook cover, and remove the bobbin 2 case. (Refer to remove 3 any lint and dust from inside the ...
...page 19.) 196 Oiling the machine In order to extend the life of the embroidery machine's parts and keep the machine operating correctly, be sure to oil the machine before use, and put a drop of oil to the lower needle bar felt washer every 40 to 50 hours of machine use anything other than thick paper...hook, and then close the hook cover. (Refer to clean the bobbin case. In addition, do not use . ■ Oiling the race Turn off the embroidery machine. 1 After cleaning is used. Open the hook cover, and remove the bobbin 2 case. (Refer to remove 3 any lint and dust from inside the ...
Users Manual - English
Page 234
... patterns 108 Front view 2 Mounting jig 174 Moving needle 40 Multi color key 53, 126 N Names of machine parts 2 Needle 15 changing 63 Needle bar case 2 Needle bar key 34, 56 Needle plate 194 New embroidery key 49 Next page key 51 Number of thread color changes 51, 52, 54 O Oiling 196 Operation...
... patterns 108 Front view 2 Mounting jig 174 Moving needle 40 Multi color key 53, 126 N Names of machine parts 2 Needle 15 changing 63 Needle bar case 2 Needle bar key 34, 56 Needle plate 194 New embroidery key 49 Next page key 51 Number of thread color changes 51, 52, 54 O Oiling 196 Operation...


