
Users Manual - English
Page 5
... to inspect and adjust the machine yourself. PLEASE READ BEFORE USING THIS MACHINE For safe operation 1. Be sure to keep your local authorized Brother dealer. Benzene, thinner, and scouring powders can damage the machine, and should never be used. 3. up lever, needle, or other ...high humidity locations. For repair or adjustment In the event a malfunction occurs or adjustment is required, first follow the troubleshooting table at www.brother.com iv For additional product information and updates, visit our web site at the back of the most advanced computerized household...
... to inspect and adjust the machine yourself. PLEASE READ BEFORE USING THIS MACHINE For safe operation 1. Be sure to keep your local authorized Brother dealer. Benzene, thinner, and scouring powders can damage the machine, and should never be used. 3. up lever, needle, or other ...high humidity locations. For repair or adjustment In the event a malfunction occurs or adjustment is required, first follow the troubleshooting table at www.brother.com iv For additional product information and updates, visit our web site at the back of the most advanced computerized household...
Users Manual - English
Page 17
... the machine surface ...193 Cleaning the hook ...193 Cleaning around the needle plate...194 Cleaning the bobbin case ...195 Oiling the machine ...196 Troubleshooting ...198 On-screen troubleshooting ...198 Troubleshooting ...199 Error messages ...207 If the LCD cannot be read ...213 If the machine does not respond when a key is pressed 213 Specifications...
... the machine surface ...193 Cleaning the hook ...193 Cleaning around the needle plate...194 Cleaning the bobbin case ...195 Oiling the machine ...196 Troubleshooting ...198 On-screen troubleshooting ...198 Troubleshooting ...199 Error messages ...207 If the LCD cannot be read ...213 If the machine does not respond when a key is pressed 213 Specifications...
Users Manual - English
Page 168
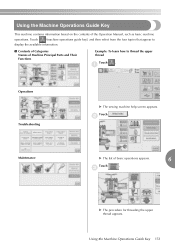
... available information. ■ Contents of Categories Names of Machine Principal Parts and Their Functions Example: To learn how to thread the upper thread Touch . 1 Operations Troubleshooting X The sewing machine help screen appears.
... available information. ■ Contents of Categories Names of Machine Principal Parts and Their Functions Example: To learn how to thread the upper thread Touch . 1 Operations Troubleshooting X The sewing machine help screen appears.
Users Manual - English
Page 172
... the machine surface / 193 Cleaning the hook / 193 Cleaning around the needle plate / 194 Cleaning the bobbin case / 195 Oiling the machine / 196 Troubleshooting ...198 On-screen troubleshooting / 198 Troubleshooting / 199 Error messages / 207 If the LCD cannot be taken when a problem occurs. 7 APPENDIX This chapter provides descriptions of techniques for sewing applications...
... the machine surface / 193 Cleaning the hook / 193 Cleaning around the needle plate / 194 Cleaning the bobbin case / 195 Oiling the machine / 196 Troubleshooting ...198 On-screen troubleshooting / 198 Troubleshooting / 199 Error messages / 207 If the LCD cannot be taken when a problem occurs. 7 APPENDIX This chapter provides descriptions of techniques for sewing applications...
Users Manual - English
Page 215
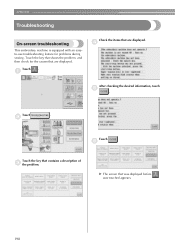
Touch . 2 Touch . 6 Touch the key that was displayed before was touched appears. 198 X The screen that contains a description of 3 the problem. APPENDIX Troubleshooting On-screen troubleshooting This embroidery machine is equipped with an easyto-use troubleshooting feature for the causes that are displayed. 4 After checking the desired information, touch 5 . Touch the key that are displayed. Touch . 1 Check the items that shows the problem, and then check for problems during sewing.
Touch . 2 Touch . 6 Touch the key that was displayed before was touched appears. 198 X The screen that contains a description of 3 the problem. APPENDIX Troubleshooting On-screen troubleshooting This embroidery machine is equipped with an easyto-use troubleshooting feature for the causes that are displayed. 4 After checking the desired information, touch 5 . Touch the key that are displayed. Touch . 1 Check the items that shows the problem, and then check for problems during sewing.
Users Manual - English
Page 216
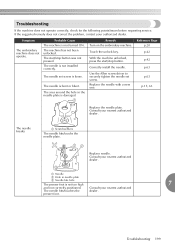
... Page p.20 p.42 p.42 p.63 p.63 p.15, 63 Replace the needle plate. Consult your nearest authorized dealer. Consult your authorized dealer. Troubleshooting 199 The machine has not been unlocked. The needle is bent or blunt. The needle is not installed correctly. Consult your nearest authorized The needle... presser foot. Replace the needle with a new one. Correctly install the needle. With the machine unlocked, press the start /stop button. Troubleshooting If the machine does not operate correctly, check for the following points/issues before requesting service.
... Page p.20 p.42 p.42 p.63 p.63 p.15, 63 Replace the needle plate. Consult your nearest authorized dealer. Consult your authorized dealer. Troubleshooting 199 The machine has not been unlocked. The needle is bent or blunt. The needle is not installed correctly. Consult your nearest authorized The needle... presser foot. Replace the needle with a new one. Correctly install the needle. With the machine unlocked, press the start /stop button. Troubleshooting If the machine does not operate correctly, check for the following points/issues before requesting service.
Users Manual - English
Page 218
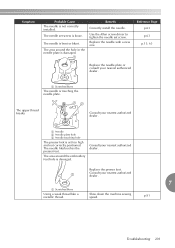
.... The needle set screw. Replace the needle with a new one. The area around the hole in the needle plate is touching the needle plate. p.91 Troubleshooting 201 The needle is damaged. Use the Allen screw driver to tighten the needle set screw is not correctly installed . Reference Page p.63 p.63 p.15...
.... The needle set screw. Replace the needle with a new one. The area around the hole in the needle plate is touching the needle plate. p.91 Troubleshooting 201 The needle is damaged. Use the Allen screw driver to tighten the needle set screw is not correctly installed . Reference Page p.63 p.63 p.15...

Users Manual - English
Page 220
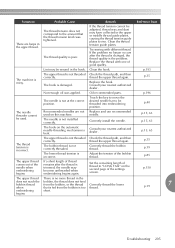
... or the stitching may shrink. Dust has accumulated under the needle plate or in irregular loop formation. dealer. If the fabric is bent or blunt. Troubleshooting 203 Remove the thread jammed and clean the hook. p.15 The upper thread is not installed correctly. The needle is not threaded Thread the upper...
... or the stitching may shrink. Dust has accumulated under the needle plate or in irregular loop formation. dealer. If the fabric is bent or blunt. Troubleshooting 203 Remove the thread jammed and clean the hook. p.15 The upper thread is not installed correctly. The needle is not threaded Thread the upper...
Users Manual - English
Page 222
... thread is the problem. Correctly thread the bobbin thread. There is no longer occurs after the thread is incorrect. Correctly thread the lower thread. 7 p.19 Troubleshooting 205
... thread is the problem. Correctly thread the bobbin thread. There is no longer occurs after the thread is incorrect. Correctly thread the lower thread. 7 p.19 Troubleshooting 205
Users Manual - English
Page 224
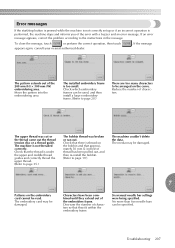
Move the pattern into the embroidering area. Troubleshooting 207 Characters have been combined until they fit within the embroidery frame. Decrease the number of the embroidery frame. If the message The pattern extends ...
Move the pattern into the embroidering area. Troubleshooting 207 Characters have been combined until they fit within the embroidery frame. Decrease the number of the embroidery frame. If the message The pattern extends ...
Users Manual - English
Page 226
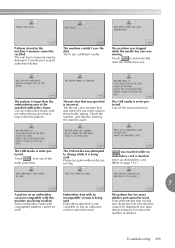
... an embroidery card not compatible with copyrighted patterns cannot be recalled. Embroidery data that was attempted to reduce the number of the installed embroidery frame. Troubleshooting 209 The USB media was specified is larger than the embroidering area of stitches. Please try entering the number again. The machine couldn't save the...
... an embroidery card not compatible with copyrighted patterns cannot be recalled. Embroidery data that was attempted to reduce the number of the installed embroidery frame. Troubleshooting 209 The USB media was specified is larger than the embroidering area of stitches. Please try entering the number again. The machine couldn't save the...

Users Manual - English
Page 228
If any of the following messages appear, consult your nearest authorized dealer. 7 Troubleshooting 211
If any of the following messages appear, consult your nearest authorized dealer. 7 Troubleshooting 211

Users Manual - English
Page 230
... key can be selected or the keys are misaligned), adjust the touch panel as described below. Press the thread trimming button. 2 7 X The adjustments screen appears. Troubleshooting 213 While touching anywhere inside the touch panel, and 1 turn the machine off , then on again. If the machine does not respond when a key is...
... key can be selected or the keys are misaligned), adjust the touch panel as described below. Press the thread trimming button. 2 7 X The adjustments screen appears. Troubleshooting 213 While touching anywhere inside the touch panel, and 1 turn the machine off , then on again. If the machine does not respond when a key is...
Users Manual - English
Page 235
... Start/stop button 3, 42 Starting/ending position key 55, 89, 90 Stitch count 56 Stopping embroidering 44 Store key 55 Sweater knit 167 Sweatshirt 167 Troubleshooting 151, 198 T-shirt 167 U Units of measurements 141, 143 Unlock key 42, 57 Upper thread guide 2 Upper threading 33 USB host 3 USB media 117, 137...
... Start/stop button 3, 42 Starting/ending position key 55, 89, 90 Stitch count 56 Stopping embroidering 44 Store key 55 Sweater knit 167 Sweatshirt 167 Troubleshooting 151, 198 T-shirt 167 U Units of measurements 141, 143 Unlock key 42, 57 Upper thread guide 2 Upper threading 33 USB host 3 USB media 117, 137...


