
Users Manual - English
Page 7
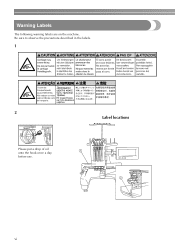
Label locations vi Warning Labels The following warning labels are on the machine. Be sure to observe the precautions described in the labels. 1 2 Please put a drop of oil onto the hook once a day before use.
Label locations vi Warning Labels The following warning labels are on the machine. Be sure to observe the precautions described in the labels. 1 2 Please put a drop of oil onto the hook once a day before use.
Users Manual - English
Page 17
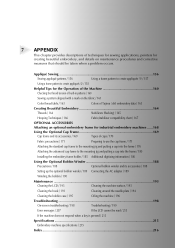
......193 Cleaning the LCD...193 Cleaning the machine surface ...193 Cleaning the hook ...193 Cleaning around the needle plate...194 Cleaning the bobbin case ...195 Oiling the machine ...196 Troubleshooting ...198 On-screen troubleshooting ...198 Troubleshooting ...199 Error messages ...207 If the LCD cannot be read ...213 If the machine does...
......193 Cleaning the LCD...193 Cleaning the machine surface ...193 Cleaning the hook ...193 Cleaning around the needle plate...194 Cleaning the bobbin case ...195 Oiling the machine ...196 Troubleshooting ...198 On-screen troubleshooting ...198 Troubleshooting ...199 Error messages ...207 If the LCD cannot be read ...213 If the machine does...
Users Manual - English
Page 23
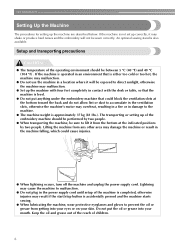
... completely in contact with the desk or table, so that the machine is level. ● Do not put the oil or grease into your eyes or on your mouth. Keep the oil and grease out of the reach of the operating environment should be performed by two people. GETTING READY Setting Up... allow lint or dust to the machine. ● The machine weight is approximately 37 kg (81 Ibs.). Lightning may cause the machine to prevent the oil or grease from any other area may result if the start/stop button is also available. The transporting or setting up the machine are described...
... completely in contact with the desk or table, so that the machine is level. ● Do not put the oil or grease into your eyes or on your mouth. Keep the oil and grease out of the reach of the operating environment should be performed by two people. GETTING READY Setting Up... allow lint or dust to the machine. ● The machine weight is approximately 37 kg (81 Ibs.). Lightning may cause the machine to prevent the oil or grease from any other area may result if the start/stop button is also available. The transporting or setting up the machine are described...
Users Manual - English
Page 35
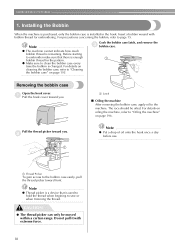
...9679; The machine cannot indicate how much bobbin thread is installed in the hook. Pull the thread picker toward front. Note ● Put a drop of oil onto the hook once a day before use. 1 Thread Picker To gain access to the machine. Insert a bobbin wound with extreme force. 18 Grab the...is changed. For precautions concerning the bobbin, refer to "Cleaning the bobbin case" on page 196. CAUTION ● The thread picker can only be oiled. Do not pull it with bobbin thread for the pattern. ● Make sure to sew or when trimming the thread. Installing the Bobbin When the...
...9679; The machine cannot indicate how much bobbin thread is installed in the hook. Pull the thread picker toward front. Note ● Put a drop of oil onto the hook once a day before use. 1 Thread Picker To gain access to the machine. Insert a bobbin wound with extreme force. 18 Grab the...is changed. For precautions concerning the bobbin, refer to "Cleaning the bobbin case" on page 196. CAUTION ● The thread picker can only be oiled. Do not pull it with bobbin thread for the pattern. ● Make sure to sew or when trimming the thread. Installing the Bobbin When the...
Users Manual - English
Page 172
... ...193 Cleaning the LCD / 193 Cleaning the machine surface / 193 Cleaning the hook / 193 Cleaning around the needle plate / 194 Cleaning the bobbin case / 195 Oiling the machine / 196 Troubleshooting ...198 On-screen troubleshooting / 198 Troubleshooting / 199 Error messages / 207 If the LCD cannot be taken when a problem occurs.
... ...193 Cleaning the LCD / 193 Cleaning the machine surface / 193 Cleaning the hook / 193 Cleaning around the needle plate / 194 Cleaning the bobbin case / 195 Oiling the machine / 196 Troubleshooting ...198 On-screen troubleshooting / 198 Troubleshooting / 199 Error messages / 207 If the LCD cannot be taken when a problem occurs.
Users Manual - English
Page 213
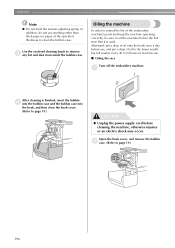
... case into the hook, and then close the hook cover. (Refer to page 19.) CAUTION ● Unplug the power supply cord before use . ■ Oiling the race Turn off the embroidery machine. 1 After cleaning is used. Open the hook cover, and remove the bobbin 2 case. (Refer to remove 3 any... lint and dust from inside the bobbin case. Afterward, put a drop of oil onto the hook once a day before cleaning the machine, otherwise injuries or an electric shock may occur. APPENDIX Note ● Do not bend the tension...
... case into the hook, and then close the hook cover. (Refer to page 19.) CAUTION ● Unplug the power supply cord before use . ■ Oiling the race Turn off the embroidery machine. 1 After cleaning is used. Open the hook cover, and remove the bobbin 2 case. (Refer to remove 3 any... lint and dust from inside the bobbin case. Afterward, put a drop of oil onto the hook once a day before cleaning the machine, otherwise injuries or an electric shock may occur. APPENDIX Note ● Do not bend the tension...
Users Manual - English
Page 214
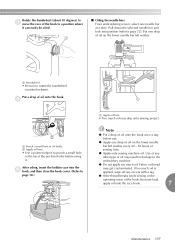
... any excess with a rag. ● If the thread breaks while sewing or the operating noise of the hook becomes loud, apply oil onto the race hook. 7 Maintenance 197 Put one drop of oil on the lower needle bar felt washer every 40 - 50 hours of sewing time. ● Apply only sewing machine... selected needle bar and lock into the 5 hook, and then close the hook cover. (Refer to page 18.) 1 1 Apply oil here. • Too much oil is applied, wipe off any other type of oil may result in the tip of the enclosed oiler before use. ● Apply one needle bar at a time. After...
... any excess with a rag. ● If the thread breaks while sewing or the operating noise of the hook becomes loud, apply oil onto the race hook. 7 Maintenance 197 Put one drop of oil on the lower needle bar felt washer every 40 - 50 hours of sewing time. ● Apply only sewing machine... selected needle bar and lock into the 5 hook, and then close the hook cover. (Refer to page 18.) 1 1 Apply oil here. • Too much oil is applied, wipe off any other type of oil may result in the tip of the enclosed oiler before use. ● Apply one needle bar at a time. After...

Users Manual - English
Page 219
.... Un-thread the machine and re-thread the machine. Use the correct bobbin. The hook does not rotate smoothly. Remove lint, and clean and apply oil. The play between the hook stopper and the hook cannot be adjusted. Pull the upper thread by hand from below the presser foot, and check...
.... Un-thread the machine and re-thread the machine. Use the correct bobbin. The hook does not rotate smoothly. Remove lint, and clean and apply oil. The play between the hook stopper and the hook cannot be adjusted. Pull the upper thread by hand from below the presser foot, and check...
Users Manual - English
Page 222
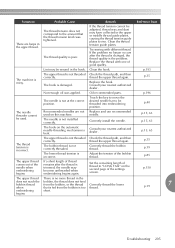
... thread that the thread tension knob was applied. p.193 The upper thread is not threaded Check the thread path, and then correctly. Oil recommended parts. The upper thread is not threaded Check the thread path, and then correctly. Correctly thread the bobbin thread. Set the ... is changed, the thread quality is noisy. p.150 The upper thread does not reach the bobbin thread when embroidering begins. Not enough oil was tightened. Symptom Probable Cause Remedy Reference Page There are not used . p.35 The machine is the problem. The needle threader cannot...
... thread that the thread tension knob was applied. p.193 The upper thread is not threaded Check the thread path, and then correctly. Oil recommended parts. The upper thread is not threaded Check the thread path, and then correctly. Correctly thread the bobbin thread. Set the ... is changed, the thread quality is noisy. p.150 The upper thread does not reach the bobbin thread when embroidering begins. Not enough oil was tightened. Symptom Probable Cause Remedy Reference Page There are not used . p.35 The machine is the problem. The needle threader cannot...
Users Manual - English
Page 234
... case 2 Needle bar key 34, 56 Needle plate 194 New embroidery key 49 Next page key 51 Number of thread color changes 51, 52, 54 O Oiling 196 Operation panel 2, 3, 9 Optional accessories 5 G Golf shirt 167 Golf Style 170 Grid 144 P Pattern display area 49 Pattern editing screen 25, 52, 119 Pattern list...
... case 2 Needle bar key 34, 56 Needle plate 194 New embroidery key 49 Next page key 51 Number of thread color changes 51, 52, 54 O Oiling 196 Operation panel 2, 3, 9 Optional accessories 5 G Golf shirt 167 Golf Style 170 Grid 144 P Pattern display area 49 Pattern editing screen 25, 52, 119 Pattern list...

