
Users Manual - English
Page 5
... most advanced computerized household embroidery machines. Benzene, thinner, and scouring powders can damage the machine, and should never be used. 3. If the problem persists, consult your eye on the needle while sewing. Do not touch the handwheel, thread take- Use only neutral soaps or detergents to keep your local authorized Brother dealer. When storing this...
... most advanced computerized household embroidery machines. Benzene, thinner, and scouring powders can damage the machine, and should never be used. 3. If the problem persists, consult your eye on the needle while sewing. Do not touch the handwheel, thread take- Use only neutral soaps or detergents to keep your local authorized Brother dealer. When storing this...
Users Manual - English
Page 13
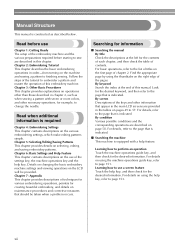
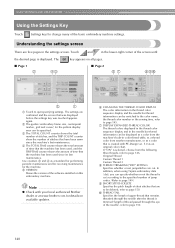
...and then check the table of this embroidery machine. Details on changing the basic embroidery machine settings and viewing operations on the various embroidering settings, which make editing patterns simple. For basic operations, refer to change the needle. Find the appropriate page by using ...58. Read before starting to perform an operation Touch the machine operations guide key, and then check for the desired information. Learning how to use Chapter 1: Getting Ready The setup of the embroidery machine and the various preparations required before use a screen feature...
...and then check the table of this embroidery machine. Details on changing the basic embroidery machine settings and viewing operations on the various embroidering settings, which make editing patterns simple. For basic operations, refer to change the needle. Find the appropriate page by using ...58. Read before starting to perform an operation Touch the machine operations guide key, and then check for the desired information. Learning how to use Chapter 1: Getting Ready The setup of the embroidery machine and the various preparations required before use a screen feature...
Users Manual - English
Page 17
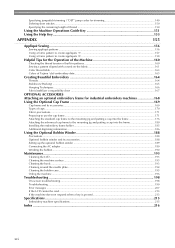
...Stabilizers (Backing) ...165 Hooping Techniques...166 Fabric/stabilizer compatibility chart ...167 OPTIONAL ACCESSORIES Attaching an optional embroidery frame for industrial embroidery machines 168 Using the Optional Cap Frame 169 Cap frame and its accessories...169 Types of caps ...170...needle plate...194 Cleaning the bobbin case ...195 Oiling the machine ...196 Troubleshooting ...198 On-screen troubleshooting ...198 Troubleshooting ...199 Error messages ...207 If the LCD cannot be read ...213 If the machine does not respond when a key is pressed 213 Specifications ...215 Embroidery machine ...
...Stabilizers (Backing) ...165 Hooping Techniques...166 Fabric/stabilizer compatibility chart ...167 OPTIONAL ACCESSORIES Attaching an optional embroidery frame for industrial embroidery machines 168 Using the Optional Cap Frame 169 Cap frame and its accessories...169 Types of caps ...170...needle plate...194 Cleaning the bobbin case ...195 Oiling the machine ...196 Troubleshooting ...198 On-screen troubleshooting ...198 Troubleshooting ...199 Error messages ...207 If the LCD cannot be read ...213 If the machine does not respond when a key is pressed 213 Specifications ...215 Embroidery machine ...
Users Manual - English
Page 33
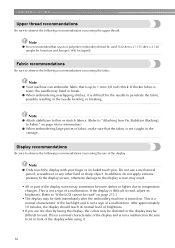
Note ● Your machine can embroider fabric that is not caught in Japan)). Note ● Attach stabilizers to thin or stretch fabrics. (Refer to "Attaching Iron-On Stabilizer (Backing) to Fabric" on page 66 for the needle to penetrate the fabric, possibly resulting in front ... needle may be used (120 den x 2 / 135 dtex x 2 / 40 weight (in Americas and Europe) / #50 (in the carriage. Note ● It is difficult for information) ● When embroidering large pieces of fabric, make sure that rayon or polyester embroidery thread be dark immediately after the embroidery machine is...
Note ● Your machine can embroider fabric that is not caught in Japan)). Note ● Attach stabilizers to thin or stretch fabrics. (Refer to "Attaching Iron-On Stabilizer (Backing) to Fabric" on page 66 for the needle to penetrate the fabric, possibly resulting in front ... needle may be used (120 den x 2 / 135 dtex x 2 / 40 weight (in Americas and Europe) / #50 (in the carriage. Note ● It is difficult for information) ● When embroidering large pieces of fabric, make sure that rayon or polyester embroidery thread be dark immediately after the embroidery machine is...
Users Manual - English
Page 37
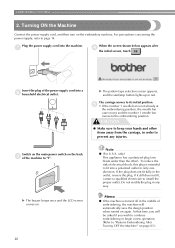
... number 1 needle bar moves to install the proper outlet. Do not modify the plug in only one blade wider than the other items away from the carriage, in the outlet, reverse the plug. X The buzzer beeps once and the LCD screen comes on the embroidery machine. To reduce... the risk of the machine to page 14. Switch on the main power switch on again. Memo ● If the machine is intended to prevent any way. EMBROIDERING TUTORIAL 2. For precautions concerning the ...
... number 1 needle bar moves to install the proper outlet. Do not modify the plug in only one blade wider than the other items away from the carriage, in the outlet, reverse the plug. X The buzzer beeps once and the LCD screen comes on the embroidery machine. To reduce... the risk of the machine to page 14. Switch on the main power switch on again. Memo ● If the machine is intended to prevent any way. EMBROIDERING TUTORIAL 2. For precautions concerning the ...
Users Manual - English
Page 39
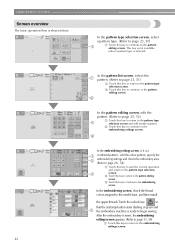
... This key is not available unless a pattern type is ready to the needle bars, and then install the upper threads.Touch the unlock key so that the start/stop button starts flashing in green and the embroidery machine is selected. In the pattern editing screen, edit the pattern. (Refer to... page 25, 52) 1 Touch this key to return to the pattern type selection screen and add another pattern. 2 Touch this key to continue to the embroidering settings screen. After the embroidery is sewn,...
... This key is not available unless a pattern type is ready to the needle bars, and then install the upper threads.Touch the unlock key so that the start/stop button starts flashing in green and the embroidery machine is selected. In the pattern editing screen, edit the pattern. (Refer to... page 25, 52) 1 Touch this key to return to the pattern type selection screen and add another pattern. 2 Touch this key to continue to the embroidering settings screen. After the embroidery is sewn,...

Users Manual - English
Page 51
...is touched, the start/stop button begins flashing in green and the embroidery machine can be specified in the embroidering screen. 1 Shows the embroidering order for the thread colors. 2 Indicates the needle bar number where the thread color at the left is assigned. 3 ... the sewing position. EMBROIDERING TUTORIAL Touch . 1 X The screen indicating that the embroidery machine is not accidentally started, otherwise injuries may result. 34 Use when threading the needle with the automatic needle-threading mechanism. 5 Use these keys to specify various embroidering settings or to return to...
...is touched, the start/stop button begins flashing in green and the embroidery machine can be specified in the embroidering screen. 1 Shows the embroidering order for the thread colors. 2 Indicates the needle bar number where the thread color at the left is assigned. 3 ... the sewing position. EMBROIDERING TUTORIAL Touch . 1 X The screen indicating that the embroidery machine is not accidentally started, otherwise injuries may result. 34 Use when threading the needle with the automatic needle-threading mechanism. 5 Use these keys to specify various embroidering settings or to return to...
Users Manual - English
Page 52
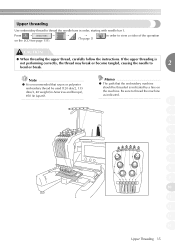
... If the upper threading is recommended that the embroidery machine should be used (120 den/2, 135 dtex/2, 40 weight (in Americas and Europe), #50 (in order, starting with needle bar 1. Upper threading Use embroidery thread to thread the needle bars in Japan)). Note ● It is... not performing correctly, the thread may break or become tangled, causing the needle to thread the machine as indicated. 1 2 3 4 5 6 7 8 ...
... If the upper threading is recommended that the embroidery machine should be used (120 den/2, 135 dtex/2, 40 weight (in Americas and Europe), #50 (in order, starting with needle bar 1. Upper threading Use embroidery thread to thread the needle bars in Japan)). Note ● It is... not performing correctly, the thread may break or become tangled, causing the needle to thread the machine as indicated. 1 2 3 4 5 6 7 8 ...
Users Manual - English
Page 59
...; Make sure that there are changed as the needle, needle bar case, thread takeup lever and carriage, otherwise injuries may become misaligned. to unlock the embroidery X The start/stop button begins flashing in green and the embroidery machine can be left unattended while it cannot start .../stop button lights up in red, the machine is in red, perform this embroidery machine is ready to the needle location. X The start...
...; Make sure that there are changed as the needle, needle bar case, thread takeup lever and carriage, otherwise injuries may become misaligned. to unlock the embroidery X The start/stop button begins flashing in green and the embroidery machine can be left unattended while it cannot start .../stop button lights up in red, the machine is in red, perform this embroidery machine is ready to the needle location. X The start...
Users Manual - English
Page 60
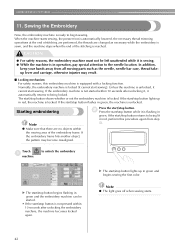
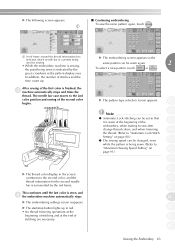
... the thread. The needle bar case moves to "Maximum Sewing Speed Setting" on 6 page 91.) 7 8 9 10 11 12 13 14 Sewing the Embroidery 43 X The thread color display in the screen continues to the second color, and the thread information for sewing. • While the embroidery machine is sewing, the...Note ● Automatic Lock stitching can be set so that it is sewn at the end of the first color is sewn, and 4 the embroidery machine automatically stops. In addition, the number of stitches and the time count up in red. • No thread trimming operations at the beginning of ...
... the thread. The needle bar case moves to "Maximum Sewing Speed Setting" on 6 page 91.) 7 8 9 10 11 12 13 14 Sewing the Embroidery 43 X The thread color display in the screen continues to the second color, and the thread information for sewing. • While the embroidery machine is sewing, the...Note ● Automatic Lock stitching can be set so that it is sewn at the end of the first color is sewn, and 4 the embroidery machine automatically stops. In addition, the number of stitches and the time count up in red. • No thread trimming operations at the beginning of ...
Users Manual - English
Page 79
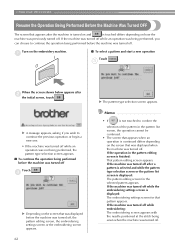
... turned off while embroidering: The embroidering screen appears with the needle positioned at the stitch being sewn when the machine was turned off after a pattern is selected and while the pattern type selection screen or the pattern list screen is displayed: ...turned off Touch . 3 X Depending on the screen that was displayed when the machine was turned off. Memo • If is not touched to confirm the selection of the pattern in the pattern editing screen is continued differs depending on the embroidery machine. 1 ■ To select a pattern and start a new operation Touch ....
... turned off while embroidering: The embroidering screen appears with the needle positioned at the stitch being sewn when the machine was turned off after a pattern is selected and while the pattern type selection screen or the pattern list screen is displayed: ...turned off Touch . 3 X Depending on the screen that was displayed when the machine was turned off. Memo • If is not touched to confirm the selection of the pattern in the pattern editing screen is continued differs depending on the embroidery machine. 1 ■ To select a pattern and start a new operation Touch ....
Users Manual - English
Page 80
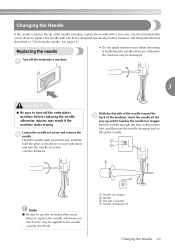
... needle" (on page 15). Replacing the needle Turn off the embroidery machine before replacing the needle, otherwise injuries may result if the machine starts sewing. With the flat side of the needle toward the 3 back of needle 4 Needle changing tool Changing the Needle 63 Use the included allen screw driver to break. 3 1 Needle bar stopper 2 Needle 3 Flat side of the machine, insert the needle...
... needle" (on page 15). Replacing the needle Turn off the embroidery machine before replacing the needle, otherwise injuries may result if the machine starts sewing. With the flat side of the needle toward the 3 back of needle 4 Needle changing tool Changing the Needle 63 Use the included allen screw driver to break. 3 1 Needle bar stopper 2 Needle 3 Flat side of the machine, insert the needle...

Users Manual - English
Page 87
...needle drop point in the embroidering area, the embroidery frame is correctly positioned, in other words, at the starting position before embroidering. Embroidery frames with an embroidering area smaller than the pattern Patterns that extend out of the embroidering 1 area of the frame In either of the following are performed. • The embroidery machine... the embroidery frame is changed . OTHER BASIC PROCEDURES Embroidery Frame Position and Movement The following provides information concerning the embroidery frame when operating the embroidery machine. ■ Embroidery frames ...
...needle drop point in the embroidering area, the embroidery frame is correctly positioned, in other words, at the starting position before embroidering. Embroidery frames with an embroidering area smaller than the pattern Patterns that extend out of the embroidering 1 area of the frame In either of the following are performed. • The embroidery machine... the embroidery frame is changed . OTHER BASIC PROCEDURES Embroidery Frame Position and Movement The following provides information concerning the embroidery frame when operating the embroidery machine. ■ Embroidery frames ...
Users Manual - English
Page 89
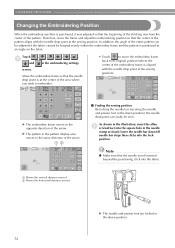
... By locking the needle bar (securing the needle and presser foot in the embroidering settings screen. In addition, the angle of the entire pattern can easily be hooped evenly within the embroidery frame and the pattern is positioned at the sewing position). OTHER BASIC PROCEDURES Changing the Embroidering Position When the embroidery machine is purchased...
... By locking the needle bar (securing the needle and presser foot in the embroidering settings screen. In addition, the angle of the entire pattern can easily be hooped evenly within the embroidery frame and the pattern is positioned at the sewing position). OTHER BASIC PROCEDURES Changing the Embroidering Position When the embroidery machine is purchased...
Users Manual - English
Page 117
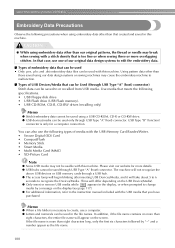
... used through USB Type "A" (host) connector. Using pattern data other than those saved using our data design systems or sewing machines may cause the embroidery machine to malfunction. ■ Types of media with the USB Memory Card Reader/Writer. • Secure Digital (SD) Card •...● Only insert or remove USB media while appears in this machine. SELECTING/EDITING/SAVING PATTERNS Embroidery Data Precautions Observe the following precautions when using embroidery data other than our original patterns, the thread or needle may not be saved to or recalled from USB media.
... used through USB Type "A" (host) connector. Using pattern data other than those saved using our data design systems or sewing machines may cause the embroidery machine to malfunction. ■ Types of media with the USB Memory Card Reader/Writer. • Secure Digital (SD) Card •...● Only insert or remove USB media while appears in this machine. SELECTING/EDITING/SAVING PATTERNS Embroidery Data Precautions Observe the following precautions when using embroidery data other than our original patterns, the thread or needle may not be saved to or recalled from USB media.
Users Manual - English
Page 157
... maintenance and for receiving maintenance for the machine. 5 VERSION Shows the version of the needle), refer to page 150. 140 In addition, when using Tajima embroidery data (.dst), you can specify whether or not the thread is created with your local authorized Brother dealer or at www.brother.com for the pattern display area can...
... maintenance and for receiving maintenance for the machine. 5 VERSION Shows the version of the needle), refer to page 150. 140 In addition, when using Tajima embroidery data (.dst), you can specify whether or not the thread is created with your local authorized Brother dealer or at www.brother.com for the pattern display area can...
Users Manual - English
Page 160
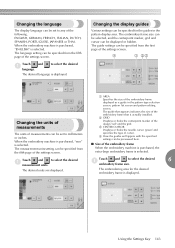
... or THAI. Touch and to select the desired 1 measurement units. The guide settings can be specified for the desired embroidery frame is displayed. When the embroidery machine is purchased, "mm" is selected. Touch and 1 language. Changing the units of measurements The units of measurements can...CURSOR Displays or hides the needle cursor (green) and specifies the type of cursor. 4 How the guides will appear with the specified settings can be set to any of the embroidery frame When the embroidery machine is purchased, the extra-large embroidery frame is displayed. Touch ...
... or THAI. Touch and to select the desired 1 measurement units. The guide settings can be specified for the desired embroidery frame is displayed. When the embroidery machine is purchased, "mm" is selected. Touch and 1 language. Changing the units of measurements The units of measurements can...CURSOR Displays or hides the needle cursor (green) and specifies the type of cursor. 4 How the guides will appear with the specified settings can be set to any of the embroidery frame When the embroidery machine is purchased, the extra-large embroidery frame is displayed. Touch ...
Users Manual - English
Page 162
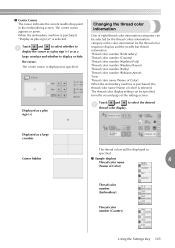
... can be selected for the thread colors information category in the color information for the thread color sequence display and the needle bar thread information. When the embroidery machine is purchased, "Display as plus sign (+)" is displayed as a plus sign (+) or as specified. ■ Sample...name (Name of Color) When the embroidery machine is purchased, the thread color name (Name of Color) Thread color number (Embroidery) Thread color number (Country) Using the Settings Key 145 ■ Center Cursor The cursor indicates the current needle drop point in green. The center ...
... can be selected for the thread colors information category in the color information for the thread color sequence display and the needle bar thread information. When the embroidery machine is purchased, "Display as plus sign (+)" is displayed as a plus sign (+) or as specified. ■ Sample...name (Name of Color) When the embroidery machine is purchased, the thread color name (Name of Color) Thread color number (Embroidery) Thread color number (Country) Using the Settings Key 145 ■ Center Cursor The cursor indicates the current needle drop point in green. The center ...
Users Manual - English
Page 163
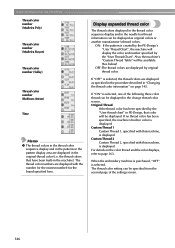
... and in the needle bar thread information can be available. (See below) OFF:The thread colors are displayed by the "User thread chart" in the change thread color screen. Original Thread If the thread color has been specified by original thread color. When the embroidery machine is purchased, "...OFF" is created by the PE-Design's "User Thread Chart", the machine will be specified from the second page of the following three color thread can be displayed ...
... and in the needle bar thread information can be available. (See below) OFF:The thread colors are displayed by the "User thread chart" in the change thread color screen. Original Thread If the thread color has been specified by original thread color. When the embroidery machine is purchased, "...OFF" is created by the PE-Design's "User Thread Chart", the machine will be specified from the second page of the following three color thread can be displayed ...
Users Manual - English
Page 167
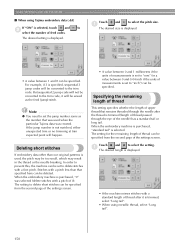
... size is purchased, "0" was created. When the embroidery machine is displayed. • A value between 0 and 0.04 inch if the units of thread can be specified. The setting for the remaining length of measurements is displayed. • If the machine misses stitches with a pitch of feed codes. Specifying...same as the feed (jump) stitch. When the embroidery machine is purchased, "standard tail" is displayed. Touch and to the trim code. For example, if 3 is set to "inch") can be specified from the second page of the needle) has a standard tail or long tail. In ...
... size is purchased, "0" was created. When the embroidery machine is displayed. • A value between 0 and 0.04 inch if the units of thread can be specified. The setting for the remaining length of measurements is displayed. • If the machine misses stitches with a pitch of feed codes. Specifying...same as the feed (jump) stitch. When the embroidery machine is purchased, "standard tail" is displayed. Touch and to the trim code. For example, if 3 is set to "inch") can be specified from the second page of the needle) has a standard tail or long tail. In ...


