
Accessory Catalog - English
Page 22
... 11 XE5132001 BAG_100X100 12 XE8480001 TABLE SET INSERTION 13 XE7421001 TOOL WRENCH M7 REMARKS No. CODE NAME REMARKS EMBROIDERY FRAME HOLDER C (for PR-1000) 14 XE7400001 TUBULAR ROUND ARM RA ASSY 15 XC7076051 SPRING,PLATE 16 XC7644051 SCREW, PAM (S/P WASHER) M3X5 17 XE7149001 TUBLAR ROUND... ARM LC ASSY 18 XE7375001 SEAL 19 XE7140001 GUIDE PLATE ASSY 20 XE7152001 HOOP STAY C 21 XE2270001 MAGNET 22 XE2271001 MAGNET HOLDER 23 060300613 SCREW BIND M3X6 24 XE7143001 SPRING PLATE 25 048030346 RETAINING RING E3 26...
... 11 XE5132001 BAG_100X100 12 XE8480001 TABLE SET INSERTION 13 XE7421001 TOOL WRENCH M7 REMARKS No. CODE NAME REMARKS EMBROIDERY FRAME HOLDER C (for PR-1000) 14 XE7400001 TUBULAR ROUND ARM RA ASSY 15 XC7076051 SPRING,PLATE 16 XC7644051 SCREW, PAM (S/P WASHER) M3X5 17 XE7149001 TUBLAR ROUND... ARM LC ASSY 18 XE7375001 SEAL 19 XE7140001 GUIDE PLATE ASSY 20 XE7152001 HOOP STAY C 21 XE2270001 MAGNET 22 XE2271001 MAGNET HOLDER 23 060300613 SCREW BIND M3X6 24 XE7143001 SPRING PLATE 25 048030346 RETAINING RING E3 26...
Users Manual - English
Page 10
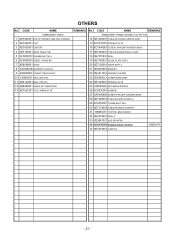
... will come back to the needle that the needle bar and needle thread with the required color can be freely determined after the fabric is hooped and the embroidery frame is attached to the machine, regardless of how the fabric is positioned in the embroidery frame. When sewing is moved to...
... will come back to the needle that the needle bar and needle thread with the required color can be freely determined after the fabric is hooped and the embroidery frame is attached to the machine, regardless of how the fabric is positioned in the embroidery frame. When sewing is moved to...
Users Manual - English
Page 15
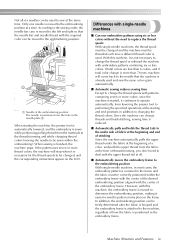
Previewing the Image ...27 Checking a preview image ...27 Hooping the Fabric in the Embroidery Frame 28 Hooping the fabric in the embroidery frame...28 Attaching the Embroidery Frame to the Machine 30 Attaching the embroidery frame ...30 Checking the Embroidery Area ...the needle...63 Correctly Using the Embroidery Frames 65 Embroidery frame types and applications ...65 Attaching Iron-On Stabilizer (Backing) to Fabric 66 Hooping the Fabric...67 Hooping the fabric in the extra-large and large embroidery frames 67 Using the embroidery sheet...68 Large/small pieces of fabric ...69 Embroidery ...
Previewing the Image ...27 Checking a preview image ...27 Hooping the Fabric in the Embroidery Frame 28 Hooping the fabric in the embroidery frame...28 Attaching the Embroidery Frame to the Machine 30 Attaching the embroidery frame ...30 Checking the Embroidery Area ...the needle...63 Correctly Using the Embroidery Frames 65 Embroidery frame types and applications ...65 Attaching Iron-On Stabilizer (Backing) to Fabric 66 Hooping the Fabric...67 Hooping the fabric in the extra-large and large embroidery frames 67 Using the embroidery sheet...68 Large/small pieces of fabric ...69 Embroidery ...
Users Manual - English
Page 17
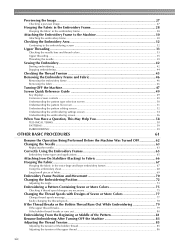
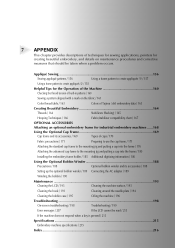
... a mark on the fabric 161 Color thread table ...163 Colors of Tajima (.dst) embroidery data ...163 Creating Beautiful Embroidery 164 Threads ...164 Stabilizers (Backing) ...165 Hooping Techniques...166 Fabric/stabilizer compatibility chart ...167 OPTIONAL ACCESSORIES Attaching an optional embroidery frame for industrial embroidery machines 168 Using the Optional Cap Frame 169...
... a mark on the fabric 161 Color thread table ...163 Colors of Tajima (.dst) embroidery data ...163 Creating Beautiful Embroidery 164 Threads ...164 Stabilizers (Backing) ...165 Hooping Techniques...166 Fabric/stabilizer compatibility chart ...167 OPTIONAL ACCESSORIES Attaching an optional embroidery frame for industrial embroidery machines 168 Using the Optional Cap Frame 169...
Users Manual - English
Page 22
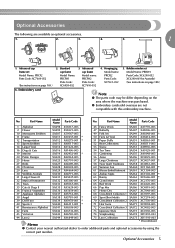
Optional Accessories The following are not compatible with this embroidery machine. No. Embroidery card 2. Part Name Model Name Parts Code No. Hooping jig Model name: PRCFJ2 Parts Code: XC7611-052 5. Part Name Model Name Parts Code 1 Alphabet SA298 X58317-003 45 Fancy Work SA345 XA7770-003 2 Flower ...
Optional Accessories The following are not compatible with this embroidery machine. No. Embroidery card 2. Part Name Model Name Parts Code No. Hooping jig Model name: PRCFJ2 Parts Code: XC7611-052 5. Part Name Model Name Parts Code 1 Alphabet SA298 X58317-003 45 Fancy Work SA345 XA7770-003 2 Flower ...
Users Manual - English
Page 30
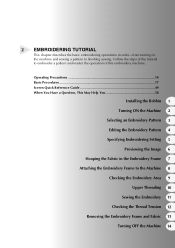
... May Help You 58 Installing the Bobbin 1 Turning ON the Machine 2 Selecting an Embroidery Pattern 3 Editing the Embroidery Pattern 4 Specifying Embroidering Setting 5 Previewing the Image 6 Hooping the Fabric in order-from turning on the machine and sewing a pattern to finishing sewing. 2 EMBROIDERING TUTORIAL This chapter describes the basic embroidering operations in...
... May Help You 58 Installing the Bobbin 1 Turning ON the Machine 2 Selecting an Embroidery Pattern 3 Editing the Embroidery Pattern 4 Specifying Embroidering Setting 5 Previewing the Image 6 Hooping the Fabric in order-from turning on the machine and sewing a pattern to finishing sewing. 2 EMBROIDERING TUTORIAL This chapter describes the basic embroidering operations in...
Users Manual - English
Page 34
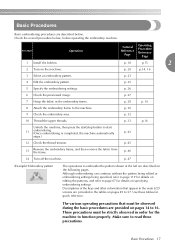
... the left are described below , before operating the embroidery machine. The various operating precautions that appear in the embroidery frame. Make sure to 57. p. 27 7 Hoop the fabric in the main LCD screens are provided on the machine. p. 46 14 Turn off the machine. Tutorial Reference Page Operating Procedure Reference Page...
... the left are described below , before operating the embroidery machine. The various operating precautions that appear in the embroidery frame. Make sure to 57. p. 27 7 Hoop the fabric in the main LCD screens are provided on the machine. p. 46 14 Turn off the machine. Tutorial Reference Page Operating Procedure Reference Page...
Users Manual - English
Page 45
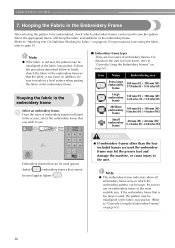
....) For precautions concerning the fabric, refer to "Correctly Using the Embroidery Frames" on the uses for each frame, refer to page 16. Hooping the fabric in the embroidery frame Select an embroidery frame. 1 From the sizes of embroidery frames indicated in the embroidery frame. Note ●... of embroidery frames. CAUTION ● If embroidery frames other than the four included frames are four sizes of the most suitable size. Hooping the Fabric in the Embroidery Frame After selecting the pattern to use . ■ Embroidery frame types There are used to "Correctly Using...
....) For precautions concerning the fabric, refer to "Correctly Using the Embroidery Frames" on the uses for each frame, refer to page 16. Hooping the fabric in the embroidery frame Select an embroidery frame. 1 From the sizes of embroidery frames indicated in the embroidery frame. Note ●... of embroidery frames. CAUTION ● If embroidery frames other than the four included frames are four sizes of the most suitable size. Hooping the Fabric in the Embroidery Frame After selecting the pattern to use . ■ Embroidery frame types There are used to "Correctly Using...
Users Manual - English
Page 46
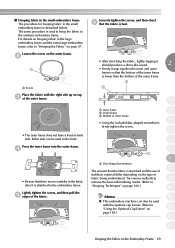
...• After stretching the fabric, lightly tapping it is stretched and the use of stabilizer material differ depending on page 169.) 13 14 Hooping the Fabric in the small embroidery frame is described below. Loosen the screw on page 67. Lightly tighten the screw, and then pull the... Memo 11 ● This embroidery machine can be used as the front. ■ Hooping fabric in the small embroidery frame The procedure for hooping fabric in the Embroidery Frame 29 For details on hooping fabric in the large embroidery frame and the extra-large embroidery frame, refer to...
...• After stretching the fabric, lightly tapping it is stretched and the use of stabilizer material differ depending on page 169.) 13 14 Hooping the Fabric in the small embroidery frame is described below. Loosen the screw on page 67. Lightly tighten the screw, and then pull the... Memo 11 ● This embroidery machine can be used as the front. ■ Hooping fabric in the small embroidery frame The procedure for hooping fabric in the Embroidery Frame 29 For details on hooping fabric in the large embroidery frame and the extra-large embroidery frame, refer to...
Users Manual - English
Page 47
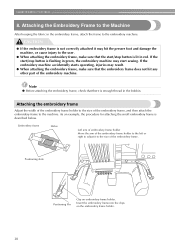
.../stop button is described below. Note ● Before attaching the embroidery frame, check that the start sewing. Attaching the Embroidery Frame to the Machine After hooping the fabric in the bobbin. If the embroidery machine accidentally starts operating, injuries may result. ● When attaching the embroidery frame, make sure that there...
.../stop button is described below. Note ● Before attaching the embroidery frame, check that the start sewing. Attaching the Embroidery Frame to the Machine After hooping the fabric in the bobbin. If the embroidery machine accidentally starts operating, injuries may result. ● When attaching the embroidery frame, make sure that there...
Users Manual - English
Page 78
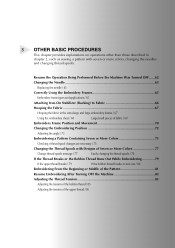
... Replacing the needle / 63 Correctly Using the Embroidery Frames 65 Embroidery frame types and applications / 65 Attaching Iron-On Stabilizer (Backing) to Fabric 66 Hooping the Fabric 67 Hooping the fabric in chapter 2, such as sewing a pattern with Designs of Seven or More Colors 77 Change thread spools message / 77 Easily changing...
... Replacing the needle / 63 Correctly Using the Embroidery Frames 65 Embroidery frame types and applications / 65 Attaching Iron-On Stabilizer (Backing) to Fabric 66 Hooping the Fabric 67 Hooping the fabric in chapter 2, such as sewing a pattern with Designs of Seven or More Colors 77 Change thread spools message / 77 Easily changing...
Users Manual - English
Page 82
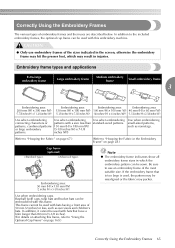
... Frames 65 Correctly Using the Embroidery Frames The various types of 50 mm (2 inches) or less, such as nametags. (Refer to "Hooping the Fabric" on page 67.) (Refer to "Hooping the Fabric in which may result in injuries. Use when embroidering caps. In addition, it cannot be misaligned or the fabric may...
... Frames 65 Correctly Using the Embroidery Frames The various types of 50 mm (2 inches) or less, such as nametags. (Refer to "Hooping the Fabric" on page 67.) (Refer to "Hooping the Fabric in which may result in injuries. Use when embroidering caps. In addition, it cannot be misaligned or the fabric may...

Users Manual - English
Page 83
...) 2 Fabric (wrong side) • When embroidering fabric that should not be ironed or when embroidering an area that is difficult to iron, hoop a layer of the iron-on stabilizer (backing) under the fabric in the embroidery frame without ironing it . ● For other uses of ...stabilizer (backing), refer to "Stabilizers (Backing)" on stabilizer (backing) Memo ● When embroidering thin fabrics, such as towels or corduroy, hoop a layer of ironon stabilizer (backing) under the fabric in the embroidery frame without ironing it . 12 1 Area of embroidery frame 2 Iron-on page...
...) 2 Fabric (wrong side) • When embroidering fabric that should not be ironed or when embroidering an area that is difficult to iron, hoop a layer of the iron-on stabilizer (backing) under the fabric in the embroidery frame without ironing it . ● For other uses of ...stabilizer (backing), refer to "Stabilizers (Backing)" on stabilizer (backing) Memo ● When embroidering thin fabrics, such as towels or corduroy, hoop a layer of ironon stabilizer (backing) under the fabric in the embroidery frame without ironing it . 12 1 Area of embroidery frame 2 Iron-on page...
Users Manual - English
Page 84
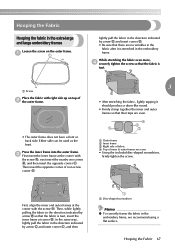
...• Firmly clamp together the inner and outer frames so that the fabric is taut, insert the inner frame at the corner with the screw A. Hooping the Fabric 67 First, align the inner and outer frames at the corner with the screw A, next insert the nearby one corner B, and then insert... the opposite corner C. Press the inner frame into the outer frame. 3 First insert the inner frame at corner B. Hooping the Fabric Hooping the fabric in the extra-large and large embroidery frames Loosen the screw on top of 2 the outer frame. • The outer frame does...
...• Firmly clamp together the inner and outer frames so that the fabric is taut, insert the inner frame at the corner with the screw A. Hooping the Fabric 67 First, align the inner and outer frames at the corner with the screw A, next insert the nearby one corner B, and then insert... the opposite corner C. Press the inner frame into the outer frame. 3 First insert the inner frame at corner B. Hooping the Fabric Hooping the fabric in the extra-large and large embroidery frames Loosen the screw on top of 2 the outer frame. • The outer frame does...
Users Manual - English
Page 85
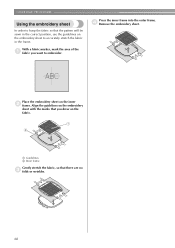
... 2 Inner frame Gently stretch the fabric, so that there are no 3 folds or wrinkles. 68 OTHER BASIC PROCEDURES Using the embroidery sheet In order to hoop the fabric so that the pattern will be sewn in the frame. With a fabric marker, mark the area of the 1 fabric you drew on the...
... 2 Inner frame Gently stretch the fabric, so that there are no 3 folds or wrinkles. 68 OTHER BASIC PROCEDURES Using the embroidery sheet In order to hoop the fabric so that the pattern will be sewn in the frame. With a fabric marker, mark the area of the 1 fabric you drew on the...
Users Manual - English
Page 86
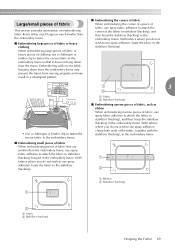
... you do not wish to use spray adhesive, baste the fabric to the stabilizer (backing). 2 1 Ribbon 2 Stabilizer (backing) 1 2 1 Fabric 2 Stabilizer (backing) Hooping the Fabric 69 With fabrics where you do not wish to use spray adhesive, clamp both ends of the fabric, together with excess fabric hanging...the corner of a piece of fabric, use spray fabric adhesive to attach the corner of the fabric to stabilizer (backing), and then hoop the stabilizer (backing) in the embroidery frame. Large/small pieces of fabric This section provides information on embroidering fabric that is either ...
... you do not wish to use spray adhesive, baste the fabric to the stabilizer (backing). 2 1 Ribbon 2 Stabilizer (backing) 1 2 1 Fabric 2 Stabilizer (backing) Hooping the Fabric 69 With fabrics where you do not wish to use spray adhesive, clamp both ends of the fabric, together with excess fabric hanging...the corner of a piece of fabric, use spray fabric adhesive to attach the corner of the fabric to stabilizer (backing), and then hoop the stabilizer (backing) in the embroidery frame. Large/small pieces of fabric This section provides information on embroidering fabric that is either ...
Users Manual - English
Page 89
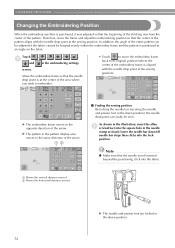
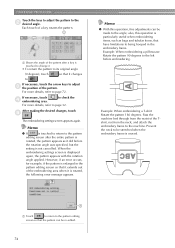
... in the embroidering settings screen. In addition, the angle of the pattern. Touch , , , , , , 1 and in the down position), the needle drop point can easily be hooped evenly within the embroidery frame and the pattern is purchased, it was from the center of the entire pattern can be adjusted if the fabric...
... in the embroidering settings screen. In addition, the angle of the pattern. Touch , , , , , , 1 and in the down position), the needle drop point can easily be hooped evenly within the embroidery frame and the pattern is purchased, it was from the center of the entire pattern can be adjusted if the fabric...
Users Manual - English
Page 91
... it did before embroidering. When the embroidering settings screen is moved. 1 Touch to return to the pattern editing screen so that have limitations to being hooped in the pattern editing screen so that it extends out of the pattern after the entire pattern is not cancelled. Example: When embroidering a T-shirt Rotate...
... it did before embroidering. When the embroidering settings screen is moved. 1 Touch to return to the pattern editing screen so that have limitations to being hooped in the pattern editing screen so that it extends out of the pattern after the entire pattern is not cancelled. Example: When embroidering a T-shirt Rotate...
Users Manual - English
Page 172
... details on the fabric / 161 Color thread table / 163 Colors of Tajima (.dst) embroidery data / 163 Creating Beautiful Embroidery 164 Threads / 164 Stabilizers (Backing) / 165 Hooping Techniques / 166 Fabric/stabilizer compatibility chart / 167 OPTIONAL ACCESSORIES Attaching an optional embroidery frame for the Operation of the Machine 160 Checking the thread tension...
... details on the fabric / 161 Color thread table / 163 Colors of Tajima (.dst) embroidery data / 163 Creating Beautiful Embroidery 164 Threads / 164 Stabilizers (Backing) / 165 Hooping Techniques / 166 Fabric/stabilizer compatibility chart / 167 OPTIONAL ACCESSORIES Attaching an optional embroidery frame for the Operation of the Machine 160 Checking the thread tension...
Users Manual - English
Page 182
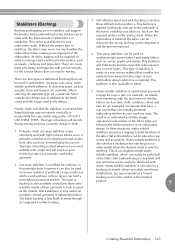
... is an unfinished and often sloppy appearance when fibers of the fabric poke out between the finished stitches of the frame, enabling your fabric to -hoop fabrics. This type of and the process repeated. DO NOT USE THESE TYPES. Polyester mesh cut -away, tear-away, water soluble and self-adhesive. The...
... is an unfinished and often sloppy appearance when fibers of the fabric poke out between the finished stitches of the frame, enabling your fabric to -hoop fabrics. This type of and the process repeated. DO NOT USE THESE TYPES. Polyester mesh cut -away, tear-away, water soluble and self-adhesive. The...


