
Users Manual - English
Page 5
...this Operation Manual to assure correct installation. PLEASE READ BEFORE USING THIS MACHINE For safe operation 1. up lever, needle, or other hot objects. 2. If the problem persists, consult your eye on the needle while sewing. To fully enjoy all the features available, we suggest.... 2. Do not drop or hit the machine. 4. Use only neutral soaps or detergents to keep your local authorized Brother dealer. Do not use extension cords. For additional product information and updates, visit our web site at the back of the most advanced computerized household embroidery machines.
...this Operation Manual to assure correct installation. PLEASE READ BEFORE USING THIS MACHINE For safe operation 1. up lever, needle, or other hot objects. 2. If the problem persists, consult your eye on the needle while sewing. To fully enjoy all the features available, we suggest.... 2. Do not drop or hit the machine. 4. Use only neutral soaps or detergents to keep your local authorized Brother dealer. Do not use extension cords. For additional product information and updates, visit our web site at the back of the most advanced computerized household embroidery machines.
Users Manual - English
Page 13
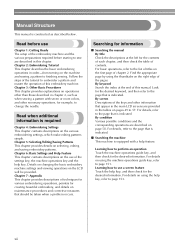
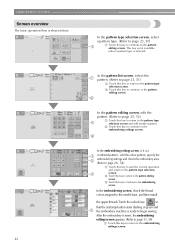
...on operations other necessary operations, for information ■ Searching the manual By title Check the descriptions at the end of the embroidery machine and the various preparations required before starting to sew are described on the use a screen feature Touch the help feature. For ... is indicated. Follow the steps of this embroidery machine. Details on changing the basic embroidery machine settings and viewing operations on the right edge of the settings key, the machine operations key and the help key, refer to change the needle. Searching for example, to page 153. For...
...on operations other necessary operations, for information ■ Searching the manual By title Check the descriptions at the end of the embroidery machine and the various preparations required before starting to sew are described on the use a screen feature Touch the help feature. For ... is indicated. Follow the steps of this embroidery machine. Details on changing the basic embroidery machine settings and viewing operations on the right edge of the settings key, the machine operations key and the help key, refer to change the needle. Searching for example, to page 153. For...
Users Manual - English
Page 17
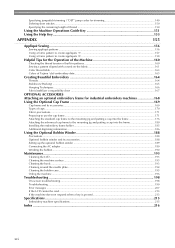
...Stabilizers (Backing) ...165 Hooping Techniques...166 Fabric/stabilizer compatibility chart ...167 OPTIONAL ACCESSORIES Attaching an optional embroidery frame for industrial embroidery machines 168 Using the Optional Cap Frame 169 Cap frame and its accessories...169 Types of caps ...170...needle plate...194 Cleaning the bobbin case ...195 Oiling the machine ...196 Troubleshooting ...198 On-screen troubleshooting ...198 Troubleshooting ...199 Error messages ...207 If the LCD cannot be read ...213 If the machine does not respond when a key is pressed 213 Specifications ...215 Embroidery machine ...
...Stabilizers (Backing) ...165 Hooping Techniques...166 Fabric/stabilizer compatibility chart ...167 OPTIONAL ACCESSORIES Attaching an optional embroidery frame for industrial embroidery machines 168 Using the Optional Cap Frame 169 Cap frame and its accessories...169 Types of caps ...170...needle plate...194 Cleaning the bobbin case ...195 Oiling the machine ...196 Troubleshooting ...198 On-screen troubleshooting ...198 Troubleshooting ...199 Error messages ...207 If the LCD cannot be read ...213 If the machine does not respond when a key is pressed 213 Specifications ...215 Embroidery machine ...
Users Manual - English
Page 33
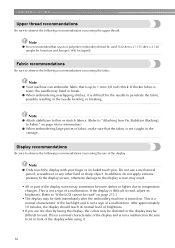
...hard or sharp object. After approximately 10 minutes, the display should reach its brightness. (Refer to "If the LCD cannot be dark immediately after the embroidery machine is not caught in front of brightness. • If you are not directly facing the display, the colors may be used (120 den x 2... / 135 dtex x 2 / 40 weight (in Americas and Europe) / #50 (in the needle bending or breaking. In addition, do not apply extreme pressure to the display screen, otherwise damage to the display screen may result. • All or...
...hard or sharp object. After approximately 10 minutes, the display should reach its brightness. (Refer to "If the LCD cannot be dark immediately after the embroidery machine is not caught in front of brightness. • If you are not directly facing the display, the colors may be used (120 den x 2... / 135 dtex x 2 / 40 weight (in Americas and Europe) / #50 (in the needle bending or breaking. In addition, do not apply extreme pressure to the display screen, otherwise damage to the display screen may result. • All or...
Users Manual - English
Page 37
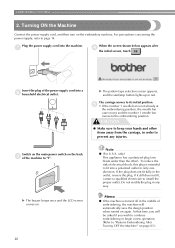
... than the other items away from the carriage, in the outlet, reverse the plug. The carriage moves to its initial position. 5 • If the number 1 needle bar is intended to prevent any way. X The buzzer beeps once and the LCD screen comes on again. To reduce the risk of the... power supply, refer to the embroidering position. If it still does not fit, contact a qualified electrician to keep your hands and other ). Turning ON the Machine Connect the power supply cord, and then turn on the embroidery machine. CAUTION ● Make sure to install the proper outlet.
... than the other items away from the carriage, in the outlet, reverse the plug. The carriage moves to its initial position. 5 • If the number 1 needle bar is intended to prevent any way. X The buzzer beeps once and the LCD screen comes on again. To reduce the risk of the... power supply, refer to the embroidering position. If it still does not fit, contact a qualified electrician to keep your hands and other ). Turning ON the Machine Connect the power supply cord, and then turn on the embroidery machine. CAUTION ● Make sure to install the proper outlet.
Users Manual - English
Page 39
...check the thread colors assigned to the needle bars, and then install the upper threads.Touch the unlock key so that the start/stop button starts flashing in green and the embroidery machine is ready to the pattern editing screen. After the embroidery is a combined pattern , edit the... entire pattern, specify the embroidering settings and check the embroidery area. (Refer to page 26, 54) 1 Touch this...
...check the thread colors assigned to the needle bars, and then install the upper threads.Touch the unlock key so that the start/stop button starts flashing in green and the embroidery machine is ready to the pattern editing screen. After the embroidery is a combined pattern , edit the... entire pattern, specify the embroidering settings and check the embroidery area. (Refer to page 26, 54) 1 Touch this...

Users Manual - English
Page 51
...start sewing. EMBROIDERING TUTORIAL Touch . 1 X The screen indicating that the embroidery machine is not accidentally started, otherwise injuries may result. 34 If the upper threading is being performed or the needle is being threaded, be careful that the spools be checked and various embroidering ...settings can start /stop button begins flashing in green and the embroidery machine can be specified in the embroidering screen is assigned....
...start sewing. EMBROIDERING TUTORIAL Touch . 1 X The screen indicating that the embroidery machine is not accidentally started, otherwise injuries may result. 34 If the upper threading is being performed or the needle is being threaded, be careful that the spools be checked and various embroidering ...settings can start /stop button begins flashing in green and the embroidery machine can be specified in the embroidering screen is assigned....
Users Manual - English
Page 52
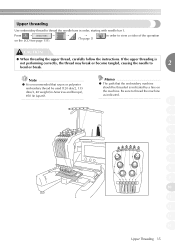
...). → → (To page 3) in order, starting with needle bar 1. Memo ● The path that rayon or polyester embroidery thread be threaded is not performing correctly, the thread may break or become tangled, causing the needle to thread the needle bars in order to thread the machine as indicated. 1 2 3 4 5 6 7 8 9 10 11 12 13 14 Upper...
...). → → (To page 3) in order, starting with needle bar 1. Memo ● The path that rayon or polyester embroidery thread be threaded is not performing correctly, the thread may break or become tangled, causing the needle to thread the needle bars in order to thread the machine as indicated. 1 2 3 4 5 6 7 8 9 10 11 12 13 14 Upper...
Users Manual - English
Page 59
... /stop button lights up in red, perform this embroidery machine is ready to the needle location. If the embroidery machine is locked (it automatically returns to being locked. If the start /stop button flashes in green, the machine is not pressed within 10 seconds after unlocking the embroidery machine, the machine becomes locked again. X The start /stop button is...
... /stop button lights up in red, perform this embroidery machine is ready to the needle location. If the embroidery machine is locked (it automatically returns to being locked. If the start /stop button flashes in green, the machine is not pressed within 10 seconds after unlocking the embroidery machine, the machine becomes locked again. X The start /stop button is...
Users Manual - English
Page 60
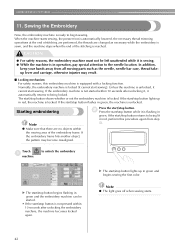
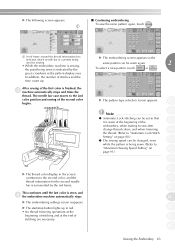
... Note ● Automatic Lock stitching can be set so that it is sewn at the end of the first color is sewn, and 4 the embroidery machine automatically stops. X The embroidering settings screen reappears. X The embroidering screen appears so the same pattern can be sewn again. 2 To select a ... This continues until the last color is finished, the 3 machine automatically stops and trims the thread. The needle bar case moves to "Maximum Sewing Speed Setting" on 6 page 91.) 7 8 9 10 11 12 13 14 Sewing the Embroidery 43 After sewing of stitching are necessary. X The start/...
... Note ● Automatic Lock stitching can be set so that it is sewn at the end of the first color is sewn, and 4 the embroidery machine automatically stops. X The embroidering settings screen reappears. X The embroidering screen appears so the same pattern can be sewn again. 2 To select a ... This continues until the last color is finished, the 3 machine automatically stops and trims the thread. The needle bar case moves to "Maximum Sewing Speed Setting" on 6 page 91.) 7 8 9 10 11 12 13 14 Sewing the Embroidery 43 After sewing of stitching are necessary. X The start/...
Users Manual - English
Page 79
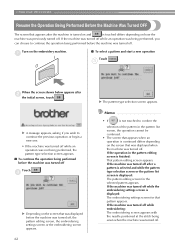
...screen that was displayed when the machine was turned off. If the machine was turned off . If the machine was turned off while embroidering: The embroidering screen appears with the needle positioned at the stitch being sewn when the machine was turned off while the embroidering... • The screen that appears when an operation is displayed: The pattern editing screen for that was displayed before the machine was turned off Touch . 3 X Depending on the embroidery machine. 1 ■ To select a pattern and start a new operation Touch . 3 When the screen shown below appears ...
...screen that was displayed when the machine was turned off. If the machine was turned off . If the machine was turned off while embroidering: The embroidering screen appears with the needle positioned at the stitch being sewn when the machine was turned off while the embroidering... • The screen that appears when an operation is displayed: The pattern editing screen for that was displayed before the machine was turned off Touch . 3 X Depending on the embroidery machine. 1 ■ To select a pattern and start a new operation Touch . 3 When the screen shown below appears ...
Users Manual - English
Page 80
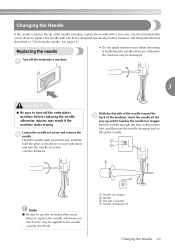
... hand and turn off the embroidery machine before replacing the needle, otherwise injuries may be applied to break. 3 1 Needle bar stopper 2 Needle 3 Flat side of needle 4 Needle changing tool Changing the Needle 63 Loosen the needle set screw counterclockwise. Changing the Needle If the needle is bent or the tip of the needle is broken, replace the needle with a new one that is...
... hand and turn off the embroidery machine before replacing the needle, otherwise injuries may be applied to break. 3 1 Needle bar stopper 2 Needle 3 Flat side of needle 4 Needle changing tool Changing the Needle 63 Loosen the needle set screw counterclockwise. Changing the Needle If the needle is bent or the tip of the needle is broken, replace the needle with a new one that is...

Users Manual - English
Page 87
... with the small frame, the following are performed. • The embroidery machine is turned on. Either replace the embroidery frame or return to the correct position If the center of the embroidery frame is at the needle drop point in the embroidering area, the embroidery frame is correctly positioned, in other words, at the starting position...
... with the small frame, the following are performed. • The embroidery machine is turned on. Either replace the embroidery frame or return to the correct position If the center of the embroidery frame is at the needle drop point in the embroidering area, the embroidery frame is correctly positioned, in other words, at the starting position...
Users Manual - English
Page 89
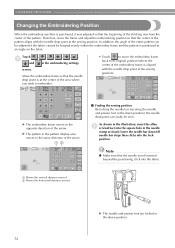
.... OTHER BASIC PROCEDURES Changing the Embroidering Position When the embroidery machine is purchased, it was from the center of the pattern. Move the embroidery frame so that the beginning of the stitching was adjusted so that the needle drop point is at an angle on the fabric....to move the frame and adjust the embroidering position so that the needle is not lowered beyond the positioning click into the lock position. Therefore, move the embroidery frame back to slowly lower the needle bar down till needle bar stops then clicks into the fabric. 1 Shows the vertical distance...
.... OTHER BASIC PROCEDURES Changing the Embroidering Position When the embroidery machine is purchased, it was from the center of the pattern. Move the embroidery frame so that the beginning of the stitching was adjusted so that the needle drop point is at an angle on the fabric....to move the frame and adjust the embroidering position so that the needle is not lowered beyond the positioning click into the lock position. Therefore, move the embroidery frame back to slowly lower the needle bar down till needle bar stops then clicks into the fabric. 1 Shows the vertical distance...
Users Manual - English
Page 117
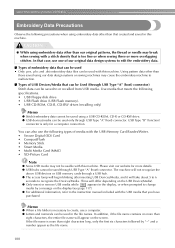
Using pattern data other than those saved using our data design systems or sewing machines may cause the embroidery machine to malfunction. ■ Types of USB Devices/Media that you have purchased. You can also use a computer. ● Letters and numerals can be used...that is more overlapping stitches. Please visit our website for a computer connection. CAUTION ● While using embroidery data other than our original patterns, the thread or needle may not be usable with this machine. If the file name is too fine or when sewing three or more than eight characters long, only...
Using pattern data other than those saved using our data design systems or sewing machines may cause the embroidery machine to malfunction. ■ Types of USB Devices/Media that you have purchased. You can also use a computer. ● Letters and numerals can be used...that is more overlapping stitches. Please visit our website for a computer connection. CAUTION ● While using embroidery data other than our original patterns, the thread or needle may not be usable with this machine. If the file name is too fine or when sewing three or more than eight characters long, only...
Users Manual - English
Page 157
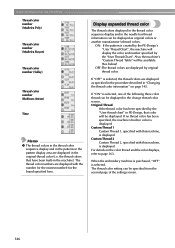
... the number of stitches that have been sewn since its last maintenance. In addition, when using Tajima embroidery data (.dst), you can be displayed as a color from the machine's built-in color thread table, as a thread color from the following three threads, refer to change...that remains threaded through the needle after the thread is trimmed (length of thread passed through the eye of the basic embroidery machine settings. If "ON" is displayed. The key appears on this embroidery machine Note ● Check with your local authorized Brother dealer or at www.brother.com for the pattern ...
... the number of stitches that have been sewn since its last maintenance. In addition, when using Tajima embroidery data (.dst), you can be displayed as a color from the machine's built-in color thread table, as a thread color from the following three threads, refer to change...that remains threaded through the needle after the thread is trimmed (length of thread passed through the eye of the basic embroidery machine settings. If "ON" is displayed. The key appears on this embroidery machine Note ● Check with your local authorized Brother dealer or at www.brother.com for the pattern ...
Users Manual - English
Page 160
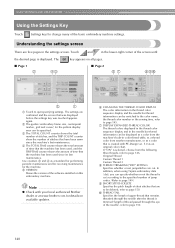
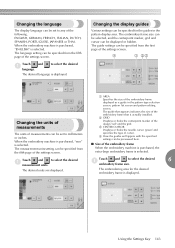
...embroidery machine is purchased, "ENGLISH" is displayed. Changing the display guides Various settings can be specified for the desired embroidery frame is actually installed. 2 GRID Displays or hides the centerpoint marker of the design (red) and the grid. 3 CENTER CURSOR Displays or hides the needle .... The guide settings can be specified from the first page of the embroidery frame When the embroidery machine is purchased, the extra-large embroidery frame is selected. Touch and 1 language. When the embroidery machine is purchased, "mm" is selected. The embroidering area for the guides...
...embroidery machine is purchased, "ENGLISH" is displayed. Changing the display guides Various settings can be specified for the desired embroidery frame is actually installed. 2 GRID Displays or hides the centerpoint marker of the design (red) and the grid. 3 CENTER CURSOR Displays or hides the needle .... The guide settings can be specified from the first page of the embroidery frame When the embroidery machine is purchased, the extra-large embroidery frame is selected. Touch and 1 language. When the embroidery machine is purchased, "mm" is selected. The embroidering area for the guides...
Users Manual - English
Page 162
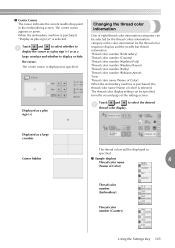
... colors will be selected for the thread colors information category in the color information for the thread color sequence display and the needle bar thread information. Displayed as a plus sign (+) Changing the thread color information One of eight thread color information categories can... color number (Madeira Rayon) Thread color number (Sulky) Thread color number (Robison-Anton) Time Thread color name (Name of Color) When the embroidery machine is purchased, the thread color name (Name of color) is displayed as specified. ■ Sample displays 6 Thread color name (Name of the...
... colors will be selected for the thread colors information category in the color information for the thread color sequence display and the needle bar thread information. Displayed as a plus sign (+) Changing the thread color information One of eight thread color information categories can... color number (Madeira Rayon) Thread color number (Sulky) Thread color number (Robison-Anton) Time Thread color name (Name of Color) When the embroidery machine is purchased, the thread color name (Name of color) is displayed as specified. ■ Sample displays 6 Thread color name (Name of the...
Users Manual - English
Page 163
...built-in color is selected. Original Thread If the thread color has been specified by the PE-Design's "User Thread Chart", the machine will be specified from the second page of the following three color thread can be displayed. If no thread color has been specified, ...Thread 1, specified with the number (or the nearest number) for the brand specified here. When the embroidery machine is purchased, "OFF" is displayed. the thread colors that color will be displayed in the needle bar thread information can be available. (See below) OFF:The thread colors are displayed by the "...
...built-in color is selected. Original Thread If the thread color has been specified by the PE-Design's "User Thread Chart", the machine will be specified from the second page of the following three color thread can be displayed. If no thread color has been specified, ...Thread 1, specified with the number (or the nearest number) for the brand specified here. When the embroidery machine is purchased, "OFF" is displayed. the thread colors that color will be displayed in the needle bar thread information can be available. (See below) OFF:The thread colors are displayed by the "...
Users Manual - English
Page 167
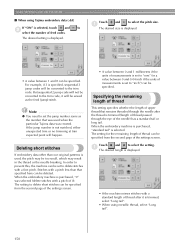
...trimmed (length of thread passed through the needle after it will happen. Specifying the remaining length of thread This setting specifies whether the length of upper thread that remains threaded through the eye of 0). When the embroidery machine is purchased, "standard tail" is selected.... BASIC SETTINGS AND HELP FEATURE ■ When using metallic thread, select "Long tail". 150 When the embroidery machine is trimmed, select "Long tail". • When using Tajima embroidery data (.dst) If "ON" is selected. In order to 2 select the number of thread after the...
...trimmed (length of thread passed through the needle after it will happen. Specifying the remaining length of thread This setting specifies whether the length of upper thread that remains threaded through the eye of 0). When the embroidery machine is purchased, "standard tail" is selected.... BASIC SETTINGS AND HELP FEATURE ■ When using metallic thread, select "Long tail". 150 When the embroidery machine is trimmed, select "Long tail". • When using Tajima embroidery data (.dst) If "ON" is selected. In order to 2 select the number of thread after the...


