
English Manual
Page 4
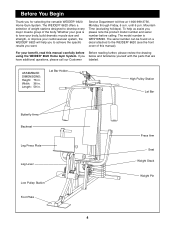
...manual). ASSEMBLED DIMENSIONS: Height: 76 in . Whether your goal is WESY85290. If you for selecting the versatile WEIDER¨ 8620 Home Gym System. Length: 59 in. To help you want. Before You Begin Thank you below and ...WEIDER¨ 8620 offers a selection of weight stations designed to achieve the specific results you to develop every major muscle group of this manual carefully before calling. Lat Bar Holder High Pulley Station Lat Bar Butterfly Arms Backrest Leg Press Plate Leg Lever Low Pulley Station Foot Plate 4 Press Arm Seat Weight Stack Weight Pin...
...manual). ASSEMBLED DIMENSIONS: Height: 76 in . Whether your goal is WESY85290. If you for selecting the versatile WEIDER¨ 8620 Home Gym System. Length: 59 in. To help you want. Before You Begin Thank you below and ...WEIDER¨ 8620 offers a selection of weight stations designed to achieve the specific results you to develop every major muscle group of this manual carefully before calling. Lat Bar Holder High Pulley Station Lat Bar Butterfly Arms Backrest Leg Press Plate Leg Lever Low Pulley Station Foot Plate 4 Press Arm Seat Weight Stack Weight Pin...
English Manual
Page 6
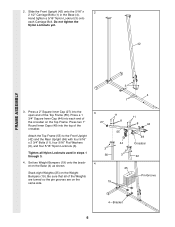
...the 5/16Ó x 2 2 1/2Ó Carriage Bolts (1) in steps 1 through 3. 4. Set two Weight Bumpers (19) onto the bracket on the same side. 3 27 11 8 11 8 44 55 44 3 56 3 49 Crossbar 42 4 25 Pin Groove 19 4ÑBracket 6 Do not tighten the Nylon Locknuts yet. 42 FRAME ASSEMBLY 3 4 1 3.... Press a 1 3/4Ó Square Inner Cap (44) into the top of the Weights are turned so the pin grooves are on the Base (4) as shown. Be sure that all Nylon Locknuts used in the Base (4). Stack eight Weights (25) on the Top Frame. Press two 1Ó Round Inner Caps (49) ...
...the 5/16Ó x 2 2 1/2Ó Carriage Bolts (1) in steps 1 through 3. 4. Set two Weight Bumpers (19) onto the bracket on the same side. 3 27 11 8 11 8 44 55 44 3 56 3 49 Crossbar 42 4 25 Pin Groove 19 4ÑBracket 6 Do not tighten the Nylon Locknuts yet. 42 FRAME ASSEMBLY 3 4 1 3.... Press a 1 3/4Ó Square Inner Cap (44) into the top of the Weights are turned so the pin grooves are on the Base (4) as shown. Be sure that all Nylon Locknuts used in the Base (4). Stack eight Weights (25) on the Top Frame. Press two 1Ó Round Inner Caps (49) ...
English Manual
Page 7
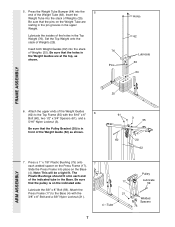
...(61), and a 5/16Ó Nylon Locknut (3). Be sure that the holes in the Weight Guides are resting in the pin grooves in the Base. Be sure that the pins on the Press Frame (17). Attach the upper ends of Weights (25). Be sure that the Pulley Bracket (20) is on the Base (4). Insert both...fit onto each welded spacer on the Weight Tube are at the top, as shown. 61 3 55 60 20 62 7. Pulley 17 Lubricate 59 Lubricate the 3/8Ó x 8Ó Bolt (59). Slide the Press Frame into the stack of the Weight Guide (62) as shown. 76 Pins Holes 62 Lubricate 63 64 FRAME ...
...(61), and a 5/16Ó Nylon Locknut (3). Be sure that the holes in the Weight Guides are resting in the pin grooves in the Base. Be sure that the pins on the Press Frame (17). Attach the upper ends of Weights (25). Be sure that the Pulley Bracket (20) is on the Base (4). Insert both...fit onto each welded spacer on the Weight Tube are at the top, as shown. 61 3 55 60 20 62 7. Pulley 17 Lubricate 59 Lubricate the 3/8Ó x 8Ó Bolt (59). Slide the Press Frame into the stack of the Weight Guide (62) as shown. 76 Pins Holes 62 Lubricate 63 64 FRAME ...
English Manual
Page 15
.... Make sure that the Press Adjustment Tube is used. Before using the home gym system, pull each cable a few times to be damaged when heavy weight is oriented as shown. If one set of the remaining parts will need to the Press Adjustment Tube (79) with the holes in the Rocker... Arm (32). Insert the ÒLÓ-Pin (40) through the holes. Attach the Press Plate (78) to remove it by tightening the cables. Slide a 5 1/2Ó Pad (30) onto each end of the...
.... Make sure that the Press Adjustment Tube is used. Before using the home gym system, pull each cable a few times to be damaged when heavy weight is oriented as shown. If one set of the remaining parts will need to the Press Adjustment Tube (79) with the holes in the Rocker... Arm (32). Insert the ÒLÓ-Pin (40) through the holes. Attach the Press Plate (78) to remove it by tightening the cables. Slide a 5 1/2Ó Pad (30) onto each end of the...
English Manual
Page 16
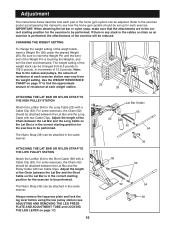
...25 26 ATTACHING THE LAT BAR OR NYLON STRAP TO THE HIGH PULLEY STATION Attach the Lat Bar (54) to insert the Weight Pin until the bent end of the Weight Pin is performed, the effectiveness of the exercise will be performed. ATTACHING THE LAT BAR OR NYLON STRAP TO THE LOW PULLEY STATION... Attach the Lat Bar (54) to be adjusted. CHANGING THE WEIGHT SETTING To change the weight setting of the weight stack, insert a Weight Pin (26) under the desired Weight (25). Adjust the length of the Chain between the Lat Bar and the Long Cable so the Lat ...
...25 26 ATTACHING THE LAT BAR OR NYLON STRAP TO THE HIGH PULLEY STATION Attach the Lat Bar (54) to insert the Weight Pin until the bent end of the Weight Pin is performed, the effectiveness of the exercise will be performed. ATTACHING THE LAT BAR OR NYLON STRAP TO THE LOW PULLEY STATION... Attach the Lat Bar (54) to be adjusted. CHANGING THE WEIGHT SETTING To change the weight setting of the weight stack, insert a Weight Pin (26) under the desired Weight (25). Adjust the length of the Chain between the Lat Bar and the Long Cable so the Lat ...

English Manual
Page 17
... Press Adjustment Tube with the set of the Leg Press Plate (78), remove the ÒLÓ-Pin (40) from the Press Adjustment Tube (79) and the Rocker Arm (32). The other numbers refer to the 6.5 lb. WEIGHT PLATES PRESS ARM (lbs.) BUTTERFLY ARM (lbs.) LEG LEVER (lbs.) HIGH PULLEY (lbs.) LOW PULLEY... adjust the position of holes in the Rocker Arm. Lift the Press Adjustment Tube off the bracket on the Rocker Arm (32). weight plates. top weight. Insert the ÒLÓ-Pin (40) through the hole in the Leg Lever and the hole in the Rocker Arm (32). 32 79 78 40 32 40...
... Press Adjustment Tube with the set of the Leg Press Plate (78), remove the ÒLÓ-Pin (40) from the Press Adjustment Tube (79) and the Rocker Arm (32). The other numbers refer to the 6.5 lb. WEIGHT PLATES PRESS ARM (lbs.) BUTTERFLY ARM (lbs.) LEG LEVER (lbs.) HIGH PULLEY (lbs.) LOW PULLEY... adjust the position of holes in the Rocker Arm. Lift the Press Adjustment Tube off the bracket on the Rocker Arm (32). weight plates. top weight. Insert the ÒLÓ-Pin (40) through the hole in the Leg Lever and the hole in the Rocker Arm (32). 32 79 78 40 32 40...

English Manual
Page 23
...; Bolt Seat 5/16Ó x 2 3/4Ó Carriage Bolt 3 1/2Ó Pulley 3/8Ó x 3 1/2Ó Bolt Press Frame 1/4Ó x 1/2Ó Screw Weight Bumper Pulley Bracket 3/8Ó Nylon Locknut 5/16Ó x 2 1/2Ó Bolt Long Cable 1/4Ó x 2 1/4Ó Screw Weight Weight Pin 2Ó Square Inner Cap Small Pad Tube Leg Lever 5 1/2Ó Pad Hand Grip Rocker Arm 3/8Ó Nylon Jam...
...; Bolt Seat 5/16Ó x 2 3/4Ó Carriage Bolt 3 1/2Ó Pulley 3/8Ó x 3 1/2Ó Bolt Press Frame 1/4Ó x 1/2Ó Screw Weight Bumper Pulley Bracket 3/8Ó Nylon Locknut 5/16Ó x 2 1/2Ó Bolt Long Cable 1/4Ó x 2 1/4Ó Screw Weight Weight Pin 2Ó Square Inner Cap Small Pad Tube Leg Lever 5 1/2Ó Pad Hand Grip Rocker Arm 3/8Ó Nylon Jam...


