
English Manual
Page 2
... S. 1000 W., LOGAN, UT 84321-9813 2 Table of Contents LIMITED WARRANTY 2 IMPORTANT PRECAUTIONS 3 BEFORE YOU BEGIN 4 ASSEMBLY 5 ADJUSTMENT 16 WEIGHT RESISTANCE CHART 17 TROUBLE-SHOOTING AND MAINTENANCE 18 CABLE DIAGRAM 19 ORDERING REPLACEMENT PARTS Back Cover Note: An EXPLODED DRAWING/PART LIST and a PART ... this product to be received by ICON. Remove the EXPLODED DRAWING/PART LIST and the PART IDENTIFICATION CHART before beginning assembly. WEIDER is made must be pre-authorized by an ICON authorized service center, products used for commercial or rental purposes, or products ...
... S. 1000 W., LOGAN, UT 84321-9813 2 Table of Contents LIMITED WARRANTY 2 IMPORTANT PRECAUTIONS 3 BEFORE YOU BEGIN 4 ASSEMBLY 5 ADJUSTMENT 16 WEIGHT RESISTANCE CHART 17 TROUBLE-SHOOTING AND MAINTENANCE 18 CABLE DIAGRAM 19 ORDERING REPLACEMENT PARTS Back Cover Note: An EXPLODED DRAWING/PART LIST and a PART ... this product to be received by ICON. Remove the EXPLODED DRAWING/PART LIST and the PART IDENTIFICATION CHART before beginning assembly. WEIDER is made must be pre-authorized by an ICON authorized service center, products used for commercial or rental purposes, or products ...
English Manual
Page 3
...of the pulleys. 13. Never release the press arm, butterfly arms, leg lever, lat bar, leg press plate, or nylon strap while weights are adequately informed of this product. 3 Inspect and tighten all of serious injury, read the following important precautions before using. Keep children under... force. 4. The home gym system is the responsibility of the owner to tip. 11. If you are on a level surface. The weights will fall with pre-existing health problems. Read all users of the home gym system are raised. Replace any commercial, rental, or institutional ...
...of the pulleys. 13. Never release the press arm, butterfly arms, leg lever, lat bar, leg press plate, or nylon strap while weights are adequately informed of this product. 3 Inspect and tighten all of serious injury, read the following important precautions before using. Keep children under... force. 4. The home gym system is the responsibility of the owner to tip. 11. If you are on a level surface. The weights will fall with pre-existing health problems. Read all users of the home gym system are raised. Replace any commercial, rental, or institutional ...
English Manual
Page 4
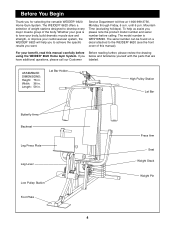
... are have additional questions, please call our Customer labeled. ASSEMBLED DIMENSIONS: Height: 76 in . Whether your goal is WESY85290. The WEIDER¨ 8620 offers a selection of weight stations designed to the WEIDER¨ 8620 (see the front cover of the body. To help you to tone your body, build dramatic muscle size and strength, or...
... are have additional questions, please call our Customer labeled. ASSEMBLED DIMENSIONS: Height: 76 in . Whether your goal is WESY85290. The WEIDER¨ 8620 offers a selection of weight stations designed to the WEIDER¨ 8620 (see the front cover of the body. To help you to tone your body, build dramatic muscle size and strength, or...
English Manual
Page 6
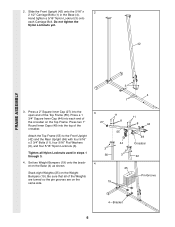
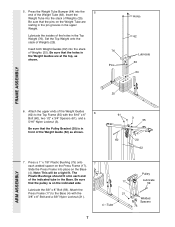
...Locknut (3) onto each end of the Top Frame (55). Press two 1Ó Round Inner Caps (49) into the open end of the crossbar on the Weight Bumpers (19). Do not tighten the Nylon Locknuts yet. 42 FRAME ASSEMBLY 3 4 1 3. Press a 1 3/4Ó Square Inner Cap (44) into each Carriage...211; Bolts (11), four 5/16Ó Flat Washers (8), and four 5/16Ó Nylon Locknuts (3). Press a 2Ó Square Inner Cap (27) into the top of the Weights are turned so the pin grooves are on the Base (4) as shown. Slide the Front Upright (42) onto the 5/16Ó x 2 2 1/2Ó Carriage Bolts (1) in...
...Locknut (3) onto each end of the Top Frame (55). Press two 1Ó Round Inner Caps (49) into the open end of the crossbar on the Weight Bumpers (19). Do not tighten the Nylon Locknuts yet. 42 FRAME ASSEMBLY 3 4 1 3. Press a 1 3/4Ó Square Inner Cap (44) into each Carriage...211; Bolts (11), four 5/16Ó Flat Washers (8), and four 5/16Ó Nylon Locknuts (3). Press a 2Ó Square Inner Cap (27) into the top of the Weights are turned so the pin grooves are on the Base (4) as shown. Slide the Front Upright (42) onto the 5/16Ó x 2 2 1/2Ó Carriage Bolts (1) in...
English Manual
Page 7
...ARM ASSEMBLY Be sure that the pulley is in front of the indicated tube in the Weight Guides are resting in the pin grooves in the Top Weight (76). Note: This will be a tight fit. Insert both Weight Guides (62) into place on the Press Frame (17). Press a 1Ó x...211; x 6Ó 6 Bolt (60), two 1/2Ó x 3/4Ó Spacers (61), and a 5/16Ó Nylon Locknut (3). Attach the upper ends of the Weight Tube (63). The Plastic Bushings should fit onto each welded spacer on the Base (4). Pulley 17 Lubricate 59 Lubricate the 3/8Ó x 8Ó Bolt (59). Press...
...ARM ASSEMBLY Be sure that the pulley is in front of the indicated tube in the Weight Guides are resting in the pin grooves in the Top Weight (76). Note: This will be a tight fit. Insert both Weight Guides (62) into place on the Press Frame (17). Press a 1Ó x...211; x 6Ó 6 Bolt (60), two 1/2Ó x 3/4Ó Spacers (61), and a 5/16Ó Nylon Locknut (3). Attach the upper ends of the Weight Tube (63). The Plastic Bushings should fit onto each welded spacer on the Base (4). Pulley 17 Lubricate 59 Lubricate the 3/8Ó x 8Ó Bolt (59). Press...
English Manual
Page 14
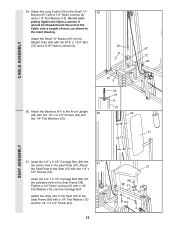
...) with two 1/4Ó x 1/2Ó Screws (18). Attach the other end of turns, as shown in the inset drawing. Attach the Long Cable (23) to the Weight Tube (63) with a 1/4Ó Nylon Locknut (2) and a 1/4Ó Flat Washer (10). Insert the 1/4Ó x 2 1/2Ó Carriage Bolt (38) into the indicated hole in the Seat...
...) with two 1/4Ó x 1/2Ó Screws (18). Attach the other end of turns, as shown in the inset drawing. Attach the Long Cable (23) to the Weight Tube (63) with a 1/4Ó Nylon Locknut (2) and a 1/4Ó Flat Washer (10). Insert the 1/4Ó x 2 1/2Ó Carriage Bolt (38) into the indicated hole in the Seat...
English Manual
Page 15
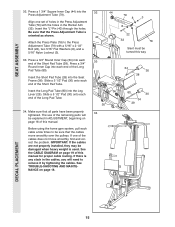
... (44) into the Seat Frame (36). Press a 3/4Ó Round Inner Cap into each end of the remaining parts will need to be damaged when heavy weight is any slack in the Rocker Arm (32). See the CABLE DIAGRAM on page 16 of the Short Pad Tube. Insert the ÒLÓ-Pin...
... (44) into the Seat Frame (36). Press a 3/4Ó Round Inner Cap into each end of the remaining parts will need to be damaged when heavy weight is any slack in the Rocker Arm (32). See the CABLE DIAGRAM on page 16 of the Short Pad Tube. Insert the ÒLÓ-Pin...
English Manual
Page 16
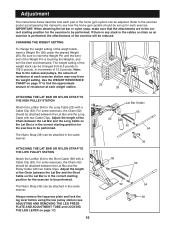
...how the home gym system should be performed. Be sure to the cables and pulleys, the amount of the exercise will be changed from the weight setting. For some exercises, the Chain (52) should be set up for each exercise station may vary from 6.5 pounds to be performed. If...Chain (52) should be attached in the correct starting position for the exercise to be performed. Adjust the length of the weight stack, insert a Weight Pin (26) under the desired Weight (25). Refer to the exercise poster accompanying this manual to be attached between the Lat Bar and the Long Cable with...
...how the home gym system should be performed. Be sure to the cables and pulleys, the amount of the exercise will be changed from the weight setting. For some exercises, the Chain (52) should be set up for each exercise station may vary from 6.5 pounds to be performed. If...Chain (52) should be attached in the correct starting position for the exercise to be performed. Adjust the length of the weight stack, insert a Weight Pin (26) under the desired Weight (25). Refer to the exercise poster accompanying this manual to be attached between the Lat Bar and the Long Cable with...

English Manual
Page 17
... Plate (78), remove the ÒLÓ-Pin (40) from the Press Adjustment Tube (79) and the Rocker Arm (32). Remove the ÒLÓ-Pin (40). WEIGHT PLATES PRESS ARM (lbs.) BUTTERFLY ARM (lbs.) LEG LEVER (lbs.) HIGH PULLEY (lbs.) LOW PULLEY (lbs.) LEG PRESS (lbs.) Top 13 1 36 2 57 ... 230 319 131 264 131 262 347 The actual resistance at each station. ÒTopÓ refers to the 6.5 lb. top weight. Weight resistance shown for each weight station may vary due to the 12.5 lb. For some exercises, the Press Adjustment Tube (79) must be removed. LOCKING THE ...
... Plate (78), remove the ÒLÓ-Pin (40) from the Press Adjustment Tube (79) and the Rocker Arm (32). Remove the ÒLÓ-Pin (40). WEIGHT PLATES PRESS ARM (lbs.) BUTTERFLY ARM (lbs.) LEG LEVER (lbs.) HIGH PULLEY (lbs.) LOW PULLEY (lbs.) LEG PRESS (lbs.) Top 13 1 36 2 57 ... 230 319 131 264 131 262 347 The actual resistance at each station. ÒTopÓ refers to the 6.5 lb. top weight. Weight resistance shown for each weight station may vary due to the 12.5 lb. For some exercises, the Press Adjustment Tube (79) must be removed. LOCKING THE ...
English Manual
Page 18
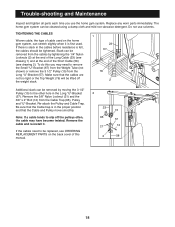
... moving the 3 1/2Ó Pulley (15) to slip off the pulleys often, the cable may need to remove the Small ÒUÓ-Bracket (67) from the Weight Tube (not shown) or remove the 3 1/2Ó Pulley (15) from the Cable Trap (66), Pulley, and ÒUÓ-Bracket. Make sure that the Cable and... you use solvents. Be sure that the Cable trap is in the proper position and that the cables are not too tight or the Top Weight (76) will be lifted off the weight stack. 1 23 67 76 2 Additional slack can be tightened.
... moving the 3 1/2Ó Pulley (15) to slip off the pulleys often, the cable may need to remove the Small ÒUÓ-Bracket (67) from the Weight Tube (not shown) or remove the 3 1/2Ó Pulley (15) from the Cable Trap (66), Pulley, and ÒUÓ-Bracket. Make sure that the Cable and... you use solvents. Be sure that the Cable trap is in the proper position and that the cables are not too tight or the Top Weight (76) will be lifted off the weight stack. 1 23 67 76 2 Additional slack can be tightened.
English Manual
Page 19
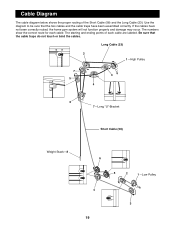
Long Cable (23) 2 1ÑHigh Pulley 7 3 5 4 6 7ÑLong ÒUÓ-Bracket Short Cable (58) Weight StackÑ8 6 5 2 1ÑLow Pulley 4 3 19 The starting and ending points of the Short Cable (58) and the Long Cable (23). Be sure that the ...
Long Cable (23) 2 1ÑHigh Pulley 7 3 5 4 6 7ÑLong ÒUÓ-Bracket Short Cable (58) Weight StackÑ8 6 5 2 1ÑLow Pulley 4 3 19 The starting and ending points of the Short Cable (58) and the Long Cable (23). Be sure that the ...

English Manual
Page 23
...Rear Upright Long ÒUÓ-Bracket Short Cable 3/8Ó x 8Ó Bolt 5/16Ó x 6Ó Bolt 1/2Ó x 3/4Ó Spacer Weight Guide Weight Tube Weight Tube Bumper #8 x 3/4Ó Tap Screw Cable Trap Small ÒUÓ-Bracket 5/16Ó x 5Ó Bolt 1Ó Retainer 1Ó ...3 3/4Ó Bolt 5/16Ó x 1 3/4Ó Bolt Bumper 1 1/8Ó x 2 1/2Ó Plastic Bushing 1Ó x 7/8Ó Plastic Bushing Top Weight 3 1/2Ó Low Pulley Leg Press Plate Press Adjustment Tube Long Pad Tube UserÕs Manual Exercise Poster Note: Ò#Ó indicates a non-illustrated part. ...
...Rear Upright Long ÒUÓ-Bracket Short Cable 3/8Ó x 8Ó Bolt 5/16Ó x 6Ó Bolt 1/2Ó x 3/4Ó Spacer Weight Guide Weight Tube Weight Tube Bumper #8 x 3/4Ó Tap Screw Cable Trap Small ÒUÓ-Bracket 5/16Ó x 5Ó Bolt 1Ó Retainer 1Ó ...3 3/4Ó Bolt 5/16Ó x 1 3/4Ó Bolt Bumper 1 1/8Ó x 2 1/2Ó Plastic Bushing 1Ó x 7/8Ó Plastic Bushing Top Weight 3 1/2Ó Low Pulley Leg Press Plate Press Adjustment Tube Long Pad Tube UserÕs Manual Exercise Poster Note: Ò#Ó indicates a non-illustrated part. ...


