
English Manual
Page 1
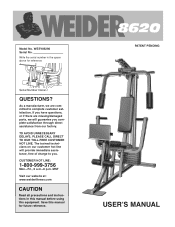
... reference. Serial Number Decal QUESTIONS? As a manufacturer, we will provide immediate assistance, free of charge to you have questions, or if there are missing/damaged parts, we are committed to complete customer satisfaction. TO AVOID UNNECESSARY DELAYS, PLEASE CALL DIRECT TO OUR TOLL-FREE CUSTOMER HOT LINE. Model No. If you...
... reference. Serial Number Decal QUESTIONS? As a manufacturer, we will provide immediate assistance, free of charge to you have questions, or if there are missing/damaged parts, we are committed to complete customer satisfaction. TO AVOID UNNECESSARY DELAYS, PLEASE CALL DIRECT TO OUR TOLL-FREE CUSTOMER HOT LINE. Model No. If you...
English Manual
Page 2
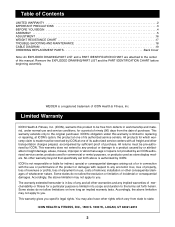
...BEGIN 4 ASSEMBLY 5 ADJUSTMENT 16 WEIGHT RESISTANCE CHART 17 TROUBLE-SHOOTING AND MAINTENANCE 18 CABLE DIAGRAM 19 ORDERING REPLACEMENT PARTS Back Cover Note: An EXPLODED DRAWING/PART LIST and a PART IDENTIFICATION CHART are attached to the center of this product to be free from defects in workmanship and material, ... limitations on how long an implied warranty lasts. You may not apply to the original purchaser. Remove the EXPLODED DRAWING/PART LIST and the PART IDENTIFICATION CHART before beginning assembly. WEIDER is authorized by ICON at one of its authorized service centers.
...BEGIN 4 ASSEMBLY 5 ADJUSTMENT 16 WEIGHT RESISTANCE CHART 17 TROUBLE-SHOOTING AND MAINTENANCE 18 CABLE DIAGRAM 19 ORDERING REPLACEMENT PARTS Back Cover Note: An EXPLODED DRAWING/PART LIST and a PART IDENTIFICATION CHART are attached to the center of this product to be free from defects in workmanship and material, ... limitations on how long an implied warranty lasts. You may not apply to the original purchaser. Remove the EXPLODED DRAWING/PART LIST and the PART IDENTIFICATION CHART before beginning assembly. WEIDER is authorized by ICON at one of its authorized service centers.
English Manual
Page 3
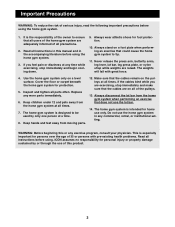
...or through the use the lat bar. 14. WARNING: Before beginning this manual and in this or any worn parts immediately. 6. Keep children under 12 and pets away from moving parts. 12. The home gym system is intended for home use the home gym system in any time while exercising... only one person at all instructions before using the home gym system. 3. If the cables bind while you feel pain or dizziness at all parts often. Do not use only. Important Precautions WARNING: To reduce the risk of serious injury, read the following important precautions before using . Inspect...
...or through the use the lat bar. 14. WARNING: Before beginning this manual and in this or any worn parts immediately. 6. Keep children under 12 and pets away from moving parts. 12. The home gym system is intended for home use the home gym system in any time while exercising... only one person at all instructions before using the home gym system. 3. If the cables bind while you feel pain or dizziness at all parts often. Do not use only. Important Precautions WARNING: To reduce the risk of serious injury, read the following important precautions before using . Inspect...
English Manual
Page 4
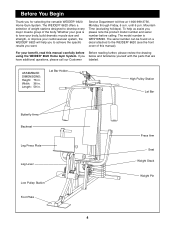
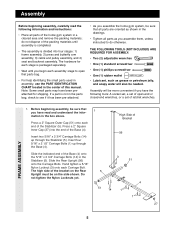
... Gym System. Whether your goal is WESY85290. until 6 p.m. If you for selecting the versatile WEIDER¨ 8620 Home Gym System. ASSEMBLED DIMENSIONS: Height: 76 in . Before You Begin Thank you below and familiarize yourself with the parts that are have additional questions, please call our Customer labeled. Service Department toll-free at 1-800...
... Gym System. Whether your goal is WESY85290. until 6 p.m. If you for selecting the versatile WEIDER¨ 8620 Home Gym System. ASSEMBLED DIMENSIONS: Height: 76 in . Before You Begin Thank you below and familiarize yourself with the parts that are have additional questions, please call our Customer labeled. Service Department toll-free at 1-800...
English Manual
Page 5
...211; Square Outer Cap (51) onto each Carriage Bolt. Slide the indicated end of Bracket 56 3 51 14 1 4 1 27 FRAME ASSEMBLY 5 If a part is divided into the end of the Stabilizer (5). Hand tighten a 5/16Ó Nylon Locknut (3) onto each end of the Base (4). Assembly will also be sure...pre-attached. ¥ As you assemble the home gym system, be sure that you have the following information and instructions: ¥ Place all parts of this manual. do otherwise. The hardware for shipping. Do not tighten the Nylon Locknuts yet. 1 5 51 High Side of the Base ...
...211; Square Outer Cap (51) onto each Carriage Bolt. Slide the indicated end of Bracket 56 3 51 14 1 4 1 27 FRAME ASSEMBLY 5 If a part is divided into the end of the Stabilizer (5). Hand tighten a 5/16Ó Nylon Locknut (3) onto each end of the Base (4). Assembly will also be sure...pre-attached. ¥ As you assemble the home gym system, be sure that you have the following information and instructions: ¥ Place all parts of this manual. do otherwise. The hardware for shipping. Do not tighten the Nylon Locknuts yet. 1 5 51 High Side of the Base ...
English Manual
Page 11
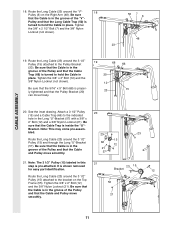
...: The 3 1/2Ó Pulley (15) labeled in the groove of the Pulley and that the Cable is in this 21 step is shown removed for easy part identification. 23 15 Bracket 12 Route the Long Cable (23) around the 3 1/2Ó Pulley (15) and through the Long ÒUÓ-Bracket (57). Be sure...
...: The 3 1/2Ó Pulley (15) labeled in the groove of the Pulley and that the Cable is in this 21 step is shown removed for easy part identification. 23 15 Bracket 12 Route the Long Cable (23) around the 3 1/2Ó Pulley (15) and through the Long ÒUÓ-Bracket (57). Be sure...
English Manual
Page 12
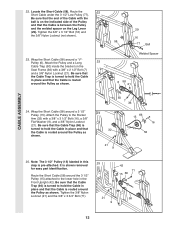
... Short Cable (58) around a 3 1/2Ó Pulley (15). Attach the Pulley to the lower hole in place and that the Cable is shown removed for easy part identification. CABLE ASSEMBLY 22. Be sure that the end of the Cable with the ball is on the indicated side of the Pulley and that...
... Short Cable (58) around a 3 1/2Ó Pulley (15). Attach the Pulley to the lower hole in place and that the Cable is shown removed for easy part identification. CABLE ASSEMBLY 22. Be sure that the end of the Cable with the ball is on the indicated side of the Pulley and that...
English Manual
Page 13
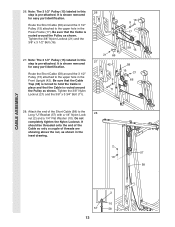
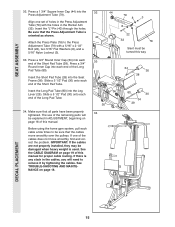
... the Pulley as shown. Do not completely tighten the Nylon Locknut. Note: The 3 1/2Ó Pulley (15) labeled in this step is shown removed for easy part identification. It is pre-attached. Note: The 3 1/2Ó Pulley (15) labeled in this step is routed around the 3 1/2Ó Pulley (15) attached to...; Flat Washer (10). Route the Short Cable (58) around the Pulley as shown in place and that the Cable is shown removed for easy part identification. It should be threaded onto the end of the Cable so only a couple of the Short Cable (58) to the upper hole in the...
... the Pulley as shown. Do not completely tighten the Nylon Locknut. Note: The 3 1/2Ó Pulley (15) labeled in this step is shown removed for easy part identification. It is pre-attached. Note: The 3 1/2Ó Pulley (15) labeled in this step is routed around the 3 1/2Ó Pulley (15) attached to...; Flat Washer (10). Route the Short Cable (58) around the Pulley as shown in place and that the Cable is shown removed for easy part identification. It should be threaded onto the end of the Cable so only a couple of the Short Cable (58) to the upper hole in the...
English Manual
Page 15
... sure that the cables move smoothly, find and correct the problem. If there is any slack in the cables, you will be sure that all parts have been properly tightened. Press a 3/4Ó Round Inner Cap into the Press Adjustment Tube (79). If one set of the Long Pad Tube. 34. Insert... Cap (44) into each cable a few times to the Press Adjustment Tube (79) with the holes in ADJUSTMENT, beginning on page 16 of the remaining parts will need to remove it by tightening the cables. Insert the Short Pad Tube (28) into the Seat Frame (36).
... sure that the cables move smoothly, find and correct the problem. If there is any slack in the cables, you will be sure that all parts have been properly tightened. Press a 3/4Ó Round Inner Cap into the Press Adjustment Tube (79). If one set of the Long Pad Tube. 34. Insert... Cap (44) into each cable a few times to the Press Adjustment Tube (79) with the holes in ADJUSTMENT, beginning on page 16 of the remaining parts will need to remove it by tightening the cables. Insert the Short Pad Tube (28) into the Seat Frame (36).
English Manual
Page 16
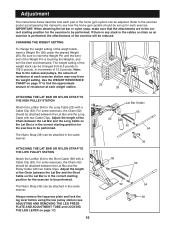
... the leg lever before using the low pulley station (see how the home gym system should be performed. Adjustment The instructions below describe how each part of the home gym system can be attached in the same manner. CHANGING THE WEIGHT SETTING To change the weight setting of the weight stack...
... the leg lever before using the low pulley station (see how the home gym system should be performed. Adjustment The instructions below describe how each part of the home gym system can be attached in the same manner. CHANGING THE WEIGHT SETTING To change the weight setting of the weight stack...
English Manual
Page 18
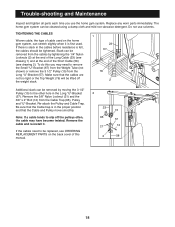
... the Weight Tube (not shown) or remove the 3 1/2Ó Pulley (15) from the Cable Trap (66), Pulley, and ÒUÓ-Bracket. Replace any worn parts immediately. Re-attach the Pulley and Cable Trap. Do not use the home gym system. TIGHTENING THE CABLES Woven cable, the type of the Short... Cable (58) (see ORDERING REPLACEMENT PARTS on the home gym system, can stretch slightly when it . If the cables need to be cleaned using a damp cloth and mild non-abrasive detergent...
... the Weight Tube (not shown) or remove the 3 1/2Ó Pulley (15) from the Cable Trap (66), Pulley, and ÒUÓ-Bracket. Replace any worn parts immediately. Re-attach the Pulley and Cable Trap. Do not use the home gym system. TIGHTENING THE CABLES Woven cable, the type of the Short... Cable (58) (see ORDERING REPLACEMENT PARTS on the home gym system, can stretch slightly when it . If the cables need to be cleaned using a damp cloth and mild non-abrasive detergent...

English Manual
Page 23
... Top Weight 3 1/2Ó Low Pulley Leg Press Plate Press Adjustment Tube Long Pad Tube UserÕs Manual Exercise Poster Note: Ò#Ó indicates a non-illustrated part. Part ListÑModel No. WESY85290 R0699A Key No. Qty. 1 4 2 3 3 20 4 1 5 1 6 4 7 5 8 8 9 5 10 6 11 6 12 3 13 1 14 2 15 8 16 3 17 1 18 2 19 2 20 1 21 15 22 5 23...
... Top Weight 3 1/2Ó Low Pulley Leg Press Plate Press Adjustment Tube Long Pad Tube UserÕs Manual Exercise Poster Note: Ò#Ó indicates a non-illustrated part. Part ListÑModel No. WESY85290 R0699A Key No. Qty. 1 4 2 3 3 20 4 1 5 1 6 4 7 5 8 8 9 5 10 6 11 6 12 3 13 1 14 2 15 8 16 3 17 1 18 2 19 2 20 1 21 15 22 5 23...
English Manual
Page 25
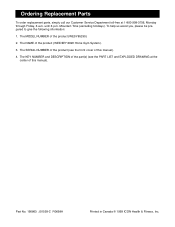
... Customer Service Department toll-free at the center of this manual). 4. The MODEL NUMBER of this manual). The KEY NUMBER and DESCRIPTION of the product (WEIDER¨ 8620 Home Gym System). 3. Part No. 156863 J01539-C R0699A Printed in Canada © 1999 ICON Health & Fitness, Inc. Mountain Time (excluding holidays). The NAME of the...
... Customer Service Department toll-free at the center of this manual). 4. The MODEL NUMBER of this manual). The KEY NUMBER and DESCRIPTION of the product (WEIDER¨ 8620 Home Gym System). 3. Part No. 156863 J01539-C R0699A Printed in Canada © 1999 ICON Health & Fitness, Inc. Mountain Time (excluding holidays). The NAME of the...


