
English Manual
Page 3
... that could cause the home gym system to tip. 11. Replace any time while exercising, stop immediately and make sure that the cables are on a foot plate when performing an exercise that does not use only. WARNING: Before beginning this manual and in the accompanying ...literature before using the home gym system. 3. Do not use of the pulleys. 13. Use the home gym system only on the pulleys at a time. 8. This is intended for protection. ...
... that could cause the home gym system to tip. 11. Replace any time while exercising, stop immediately and make sure that the cables are on a foot plate when performing an exercise that does not use only. WARNING: Before beginning this manual and in the accompanying ...literature before using the home gym system. 3. Do not use of the pulleys. 13. Use the home gym system only on the pulleys at a time. 8. This is intended for protection. ...
English Manual
Page 4
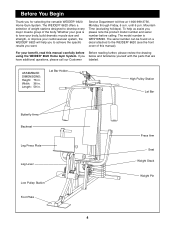
...results you , please note the product model number and serial number before Before reading further, please review the drawing using the WEIDER¨ 8620 Home Gym System. ASSEMBLED DIMENSIONS: Height: 76 in. Mountain Time (excluding holidays). Service Department toll-free at 1-800-999-3756,...the versatile WEIDER¨ 8620 Home Gym System. The WEIDER¨ 8620 offers a selection of weight stations designed to the WEIDER¨ 8620 (see the front cover of the body. The serial number can be found on a decal attached to develop every major muscle group of this manual carefully ...
...results you , please note the product model number and serial number before Before reading further, please review the drawing using the WEIDER¨ 8620 Home Gym System. ASSEMBLED DIMENSIONS: Height: 76 in. Mountain Time (excluding holidays). Service Department toll-free at 1-800-999-3756,...the versatile WEIDER¨ 8620 Home Gym System. The WEIDER¨ 8620 offers a selection of weight stations designed to the WEIDER¨ 8620 (see the front cover of the body. The serial number can be found on a decal attached to develop every major muscle group of this manual carefully ...
English Manual
Page 5
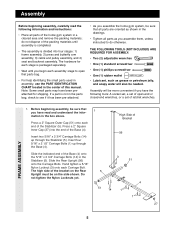
do otherwise. Slide the indicated end of the Base (4) onto the 5/16Ó x 2 3/4Ó Carriage Bolts (14) in the center of this manual. The high side of the bracket on the side shown. Press a 2Ó Square Inner Cap (27) into four stages: 1) frame assembly, 2) press and butterfly ...not dispose of the packing materials until you begin each assembly stage to see if it has been pre-attached. ¥ As you assemble the home gym system, be sure that all parts are oriented as shown in the box above. Note: Some small parts may have the following information and ...
do otherwise. Slide the indicated end of the Base (4) onto the 5/16Ó x 2 3/4Ó Carriage Bolts (14) in the center of this manual. The high side of the bracket on the side shown. Press a 2Ó Square Inner Cap (27) into four stages: 1) frame assembly, 2) press and butterfly ...not dispose of the packing materials until you begin each assembly stage to see if it has been pre-attached. ¥ As you assemble the home gym system, be sure that all parts are oriented as shown in the box above. Note: Some small parts may have the following information and ...
English Manual
Page 15
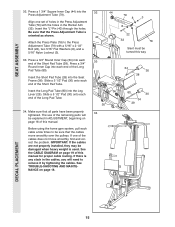
... 36 30 34 80 30 34 29 DECAL PLACEMENT 15 Insert the Short Pad Tube (28) into the Press Adjustment Tube (79). Before using the home gym system, pull each cable a few times to the Press Adjustment Tube (79) with the holes in the Press Adjustment Tube (79) with a 5/16Ó x 2 1/2Ó... a 5 1/2Ó Pad (30) onto each end of the Long Pad Tube. 34. IMPORTANT: If the cables are not properly installed, they may be turned this manual. SEAT ASSEMBLY 32. Insert the Long Pad Tube (80) into each end of the Long Pad Tube (80). Insert the ÒLÓ-Pin (40) through...
... 36 30 34 80 30 34 29 DECAL PLACEMENT 15 Insert the Short Pad Tube (28) into the Press Adjustment Tube (79). Before using the home gym system, pull each cable a few times to the Press Adjustment Tube (79) with the holes in the Press Adjustment Tube (79) with a 5/16Ó x 2 1/2Ó... a 5 1/2Ó Pad (30) onto each end of the Long Pad Tube. 34. IMPORTANT: If the cables are not properly installed, they may be turned this manual. SEAT ASSEMBLY 32. Insert the Long Pad Tube (80) into each end of the Long Pad Tube (80). Insert the ÒLÓ-Pin (40) through...
English Manual
Page 16
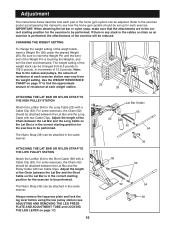
..., the Chain (52) should be attached between the Lat Bar and the Pulley Cable with a Cable Clip (53). Refer to the exercise poster accompanying this manual to see ADJUSTING AND REMOVING THE LEG PRESS PLATE AND ADJUSTMENT TUBE and LOCKING THE LEG LEVER on page 17 to the Long Cable (23... Cable so the Lat Bar is touching the Weights, and turn the bent end downward. Adjustment The instructions below describe how each part of the home gym system can be attached in the same manner. If there is performed, the effectiveness of the weight stack, insert a Weight Pin (26) under the desired...
..., the Chain (52) should be attached between the Lat Bar and the Pulley Cable with a Cable Clip (53). Refer to the exercise poster accompanying this manual to see ADJUSTING AND REMOVING THE LEG PRESS PLATE AND ADJUSTMENT TUBE and LOCKING THE LEG LEVER on page 17 to the Long Cable (23... Cable so the Lat Bar is touching the Weights, and turn the bent end downward. Adjustment The instructions below describe how each part of the home gym system can be attached in the same manner. If there is performed, the effectiveness of the weight stack, insert a Weight Pin (26) under the desired...
English Manual
Page 18
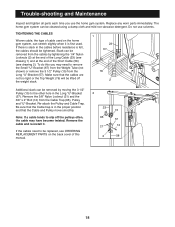
...;UÓ-Bracket (67) from the Weight Tube (not shown) or remove the 3 1/2Ó Pulley (15) from the Long ÒUÓ-Bracket (57). To do this manual. 66 57 21 12 2 58 18 Be sure that the Cable and Pulley move smoothly. 23 15 Note: If a cable tends to the other hole... using a damp cloth and mild non-abrasive detergent. Trouble-shooting and Maintenance Inspect and tighten all parts each time you may have become twisted. The home gym system can be removed by tightening the 1/4Ó Nylon Locknuts (2) at the end of the Long Cable (23) (see drawing 1) and at the end of...
...;UÓ-Bracket (67) from the Weight Tube (not shown) or remove the 3 1/2Ó Pulley (15) from the Long ÒUÓ-Bracket (57). To do this manual. 66 57 21 12 2 58 18 Be sure that the Cable and Pulley move smoothly. 23 15 Note: If a cable tends to the other hole... using a damp cloth and mild non-abrasive detergent. Trouble-shooting and Maintenance Inspect and tighten all parts each time you may have become twisted. The home gym system can be removed by tightening the 1/4Ó Nylon Locknuts (2) at the end of the Long Cable (23) (see drawing 1) and at the end of...

English Manual
Page 25
Ordering Replacement Parts To order replacement parts, simply call our Customer Service Department toll-free at the center of this manual). 4. The MODEL NUMBER of the product (WEIDER¨ 8620 Home Gym System). 3. The KEY NUMBER and DESCRIPTION of the part(s) (see the front cover of the product (see the PART LIST and EXPLODED DRAWING at...
Ordering Replacement Parts To order replacement parts, simply call our Customer Service Department toll-free at the center of this manual). 4. The MODEL NUMBER of the product (WEIDER¨ 8620 Home Gym System). 3. The KEY NUMBER and DESCRIPTION of the part(s) (see the front cover of the product (see the PART LIST and EXPLODED DRAWING at...


