
English Manual
Page 3
...hands and feet away from the home gym system when performing an exercise that could cause the home gym system to tip. 11. ICON assumes no responsibility for protection. 5. The weights will fall with pre-existing health problems. Read all instructions in this manual and in any exercise program, ...consult your physician. Cover the floor or carpet beneath the home gym system for personal injury or property damage sustained by only one person at all times. ...
...hands and feet away from the home gym system when performing an exercise that could cause the home gym system to tip. 11. ICON assumes no responsibility for protection. 5. The weights will fall with pre-existing health problems. Read all instructions in this manual and in any exercise program, ...consult your physician. Cover the floor or carpet beneath the home gym system for personal injury or property damage sustained by only one person at all times. ...
English Manual
Page 4
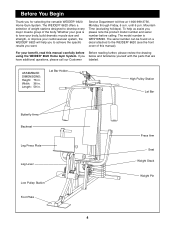
...number and serial number before Before reading further, please review the drawing using the WEIDER¨ 8620 Home Gym System. until 6 p.m. If you for selecting the versatile WEIDER¨ 8620 Home Gym System. Lat Bar Holder High Pulley Station Lat Bar Butterfly Arms Backrest Leg ...Press Plate Leg Lever Low Pulley Station Foot Plate 4 Press Arm Seat Weight Stack Weight Pin Whether your benefit, read this manual). For your ...
...number and serial number before Before reading further, please review the drawing using the WEIDER¨ 8620 Home Gym System. until 6 p.m. If you for selecting the versatile WEIDER¨ 8620 Home Gym System. Lat Bar Holder High Pulley Station Lat Bar Butterfly Arms Backrest Leg ...Press Plate Leg Lever Low Pulley Station Foot Plate 4 Press Arm Seat Weight Stack Weight Pin Whether your benefit, read this manual). For your ...
English Manual
Page 5
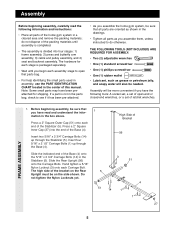
... read and understand the information in the Stabilizer (5). Slide the Rear Upright (56) onto the Carriage Bolts. The high side of the home gym system in the drawings. ¥ Tighten all parts of the bracket on the Rear Upright must be sure that all parts are oriented ...165; One (1) rubber mallet ¥ Lubricant, such as you assemble the home gym system, be on the side shown. If a part is packaged separately. ¥ Wait until assembly is completed. ¥ The assembly is divided into the end of this manual. Assembly will also be needed. Insert two 5/16Ó x 2 ...
... read and understand the information in the Stabilizer (5). Slide the Rear Upright (56) onto the Carriage Bolts. The high side of the home gym system in the drawings. ¥ Tighten all parts of the bracket on the Rear Upright must be sure that all parts are oriented ...165; One (1) rubber mallet ¥ Lubricant, such as you assemble the home gym system, be on the side shown. If a part is packaged separately. ¥ Wait until assembly is completed. ¥ The assembly is divided into the end of this manual. Assembly will also be needed. Insert two 5/16Ó x 2 ...
English Manual
Page 15
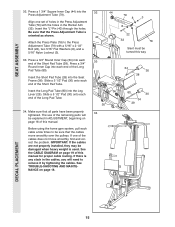
... over the pulleys. If one set of the Short Pad Tube (28). If there is any slack in ADJUSTMENT, beginning on page 16 of this manual. See TROUBLE-SHOOTING AND MAINTENANCE on page 19 of the Short Pad Tube. Make sure that the cables move smoothly, find and correct the problem... of the Long Pad Tube. 34. Press a 3/4Ó Round Inner Cap into the Leg Lever (29). Before using the home gym system, pull each end of the remaining parts will be turned this manual for proper cable routing. IMPORTANT: If the cables are not properly installed, they may be sure that all parts...
... over the pulleys. If one set of the Short Pad Tube (28). If there is any slack in ADJUSTMENT, beginning on page 16 of this manual. See TROUBLE-SHOOTING AND MAINTENANCE on page 19 of the Short Pad Tube. Make sure that the cables move smoothly, find and correct the problem... of the Long Pad Tube. 34. Press a 3/4Ó Round Inner Cap into the Leg Lever (29). Before using the home gym system, pull each end of the remaining parts will be turned this manual for proper cable routing. IMPORTANT: If the cables are not properly installed, they may be sure that all parts...
English Manual
Page 16
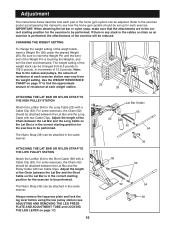
... attached in the same manner. Always remove the leg press plate and lock the leg lever before using the low pulley station (see how the home gym system should be adjusted. Use the WEIGHT RESISTANCE CHART on page 17). 16 Lat Bar Holder 53 23 52 54 39 58 53 52 54... be performed. Adjustment The instructions below describe how each part of the home gym system can be set up for each exercise. The Nylon Strap (39) can be attached in the same manner. Refer to the exercise poster accompanying this manual to see ADJUSTING AND REMOVING THE LEG PRESS PLATE AND ADJUSTMENT TUBE...
... attached in the same manner. Always remove the leg press plate and lock the leg lever before using the low pulley station (see how the home gym system should be adjusted. Use the WEIGHT RESISTANCE CHART on page 17). 16 Lat Bar Holder 53 23 52 54 39 58 53 52 54... be performed. Adjustment The instructions below describe how each part of the home gym system can be set up for each exercise. The Nylon Strap (39) can be attached in the same manner. Refer to the exercise poster accompanying this manual to see ADJUSTING AND REMOVING THE LEG PRESS PLATE AND ADJUSTMENT TUBE...
English Manual
Page 18
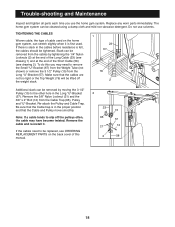
...used on the back cover of cable used . If there is slack in the Long ÒUÓ-Bracket 2 (57). To do this manual. 66 57 21 12 2 58 18 Trouble-shooting and Maintenance Inspect and tighten all parts each time you may have become twisted. Slack ..., can be cleaned using a damp cloth and mild non-abrasive detergent. Replace any worn parts immediately. The home gym system can be tightened. Do not use the home gym system. Remove the 3/8Ó Nylon Locknut (21) and the 3/8Ó x 2Ó Bolt (12) from the cables by moving the 3 1/2Ó Pulley ...
...used on the back cover of cable used . If there is slack in the Long ÒUÓ-Bracket 2 (57). To do this manual. 66 57 21 12 2 58 18 Trouble-shooting and Maintenance Inspect and tighten all parts each time you may have become twisted. Slack ..., can be cleaned using a damp cloth and mild non-abrasive detergent. Replace any worn parts immediately. The home gym system can be tightened. Do not use the home gym system. Remove the 3/8Ó Nylon Locknut (21) and the 3/8Ó x 2Ó Bolt (12) from the cables by moving the 3 1/2Ó Pulley ...
English Manual
Page 25
...following information: 1. Mountain Time (excluding holidays). until 6 p.m. The NAME of the product (WESY85290). 2. The MODEL NUMBER of the product (WEIDER¨ 8620 Home Gym System). 3. The SERIAL NUMBER of the product (see the PART LIST and EXPLODED DRAWING at 1-800-999-3756, Monday through Friday, 6... a.m. The KEY NUMBER and DESCRIPTION of the part(s) (see the front cover of this manual). 4. Part No. 156863 J01539-C R0699A Printed in...
...following information: 1. Mountain Time (excluding holidays). until 6 p.m. The NAME of the product (WESY85290). 2. The MODEL NUMBER of the product (WEIDER¨ 8620 Home Gym System). 3. The SERIAL NUMBER of the product (see the PART LIST and EXPLODED DRAWING at 1-800-999-3756, Monday through Friday, 6... a.m. The KEY NUMBER and DESCRIPTION of the part(s) (see the front cover of this manual). 4. Part No. 156863 J01539-C R0699A Printed in...


