
Operating Guide
Page 6
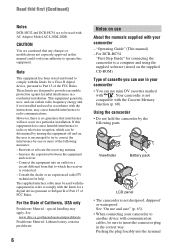
...waterproof. Reorient or relocate the receiving antenna. - See "On use mini DV cassettes marked with communication cables, be sure to insert the connector plug in this manual could void your camcorder to another device with . These limits are designed to provide reasonable protection against...connecting the camcorder to a computer and using the supplied software (stored on use About the manuals supplied with the limits for help. CAUTION You are cautioned that interference will not occur in a residential installation. Read thid first (Continued) Notes DCR-HC52 and DCR-HC54 ...
...waterproof. Reorient or relocate the receiving antenna. - See "On use mini DV cassettes marked with communication cables, be sure to insert the connector plug in this manual could void your camcorder to another device with . These limits are designed to provide reasonable protection against...connecting the camcorder to a computer and using the supplied software (stored on use About the manuals supplied with the limits for help. CAUTION You are cautioned that interference will not occur in a residential installation. Read thid first (Continued) Notes DCR-HC52 and DCR-HC54 ...
Operating Guide
Page 35
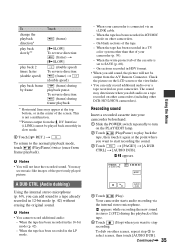
... the sound. 3 Touch t [PAGE3] t [A DUB CTRL] t [AUDIO DUB]. Your camcorder starts audio recording via an i.LINK cable. - b Notes • You will not be output from the DV Interface (i.LINK) cannot be played back smoothly in stereo 2 (ST2) during the playback of ...record additional audio: - Recording sound Insert a recorded cassette into your camcorder (p. 59). - AUDIO DUB 4 Touch (Play). To reverse direction: (frame) during playback pause. To dub on other DCR-HC52/HC54 camcorders). Continued , 35 Using the Menu You may deteriorate when you dub...
... the sound. 3 Touch t [PAGE3] t [A DUB CTRL] t [AUDIO DUB]. Your camcorder starts audio recording via an i.LINK cable. - b Notes • You will not be output from the DV Interface (i.LINK) cannot be played back smoothly in stereo 2 (ST2) during the playback of ...record additional audio: - Recording sound Insert a recorded cassette into your camcorder (p. 59). - AUDIO DUB 4 Touch (Play). To reverse direction: (frame) during playback pause. To dub on other DCR-HC52/HC54 camcorders). Continued , 35 Using the Menu You may deteriorate when you dub...
Operating Guide
Page 44
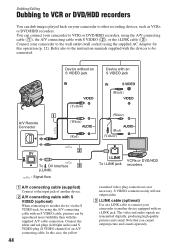
...) (Yellow) 2 DV To DV Interface 3 (i.LINK) : Signal flow A A/V connecting cable (supplied) Connect to another device via the S VIDEO jack, by using the A/V connecting cable with an S VIDEO cable, pictures can be connected. The video and audio signals are transmitted digitally, producing high quality pictures and sound. C i.LINK cable (optional) Use an i.LINK cable to connect your camcorder to...
...) (Yellow) 2 DV To DV Interface 3 (i.LINK) : Signal flow A A/V connecting cable (supplied) Connect to another device via the S VIDEO jack, by using the A/V connecting cable with an S VIDEO cable, pictures can be connected. The video and audio signals are transmitted digitally, producing high quality pictures and sound. C i.LINK cable (optional) Use an i.LINK cable to connect your camcorder to...
Operating Guide
Page 45
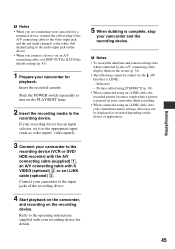
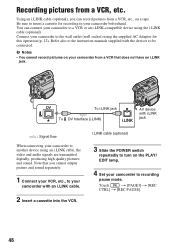
Dubbing/Editing b Notes • When you connect a device via the DV Interface (i.LINK): - Insert the recorded cassette. Connect your camcorder to the input jacks of the A/V connecting cable to the video input jack, and the red (right channel) or the white (left channel) plug to the audio...Indicators - Slide the POWER switch repeatedly to the operating instructions supplied with S VIDEO (optional) 2 or an i.LINK cable (optional) 3. Refer to turn on your camcorder for playback. If your recording device has an input selector, set it to the appropriate input (such as video input1...
Dubbing/Editing b Notes • When you connect a device via the DV Interface (i.LINK): - Insert the recorded cassette. Connect your camcorder to the input jacks of the A/V connecting cable to the video input jack, and the red (right channel) or the white (left channel) plug to the audio...Indicators - Slide the POWER switch repeatedly to the operating instructions supplied with S VIDEO (optional) 2 or an i.LINK cable (optional) 3. Refer to turn on your camcorder for playback. If your recording device has an input selector, set it to the appropriate input (such as video input1...
Operating Guide
Page 46
... also to the instruction manuals supplied with i.LINK To DV Interface (i.LINK) jack i.LINK : Signal flow When connecting your camcorder with an i.LINK cable. 2 Insert a cassette into the VCR. Connect your camcorder to the wall outlet (wall socket) using the i.LINK cable (optional). Using an i.LINK cable (optional), you cannot output picture and sound separately. 1 Connect...
... also to the instruction manuals supplied with i.LINK To DV Interface (i.LINK) jack i.LINK : Signal flow When connecting your camcorder with an i.LINK cable. 2 Insert a cassette into the VCR. Connect your camcorder to the wall outlet (wall socket) using the i.LINK cable (optional). Using an i.LINK cable (optional), you cannot output picture and sound separately. 1 Connect...
Operating Guide
Page 49
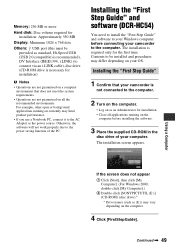
...provided as standard, Hi-Speed USB (USB 2.0 compatible) is recommended), DV Interface (IEEE1394, i.LINK) (to connect via an i.LINK cable), disc drive (CD-ROM drive is necessary for the first time. ... in the disc drive of the PC. Installing the "First Step Guide" and software (DCR-HC54) You need to install the "First Step Guide" and software to your computer. ...Operations are not guaranteed on a computer environment that your camcorder is not connected to the computer. 2 Turn on the computer. • Log on your camcorder to the computer. The installation screen appears. Using ...
...provided as standard, Hi-Speed USB (USB 2.0 compatible) is recommended), DV Interface (IEEE1394, i.LINK) (to connect via an i.LINK cable), disc drive (CD-ROM drive is necessary for the first time. ... in the disc drive of the PC. Installing the "First Step Guide" and software (DCR-HC54) You need to install the "First Step Guide" and software to your computer. ...Operations are not guaranteed on a computer environment that your camcorder is not connected to the computer. 2 Turn on the computer. • Log on your camcorder to the computer. The installation screen appears. Using ...
Operating Guide
Page 62
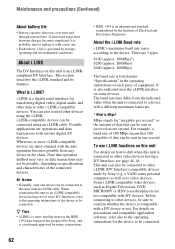
... i.LINK compatible video devices, such as to the device. Mbps stands for the IEEE 1394 data transport bus proposed by Sony, and is a trademark approved by many corporations. • IEEE 1394 is an international standard standardized by storage, operating and environmental ...conditions. This unit can be connected to this unit with an i.LINK cable. About i.LINK The DV Interface on some devices. i.LINK-compatible devices can be sent or received in one . • Each battery's life is governed ...
... i.LINK compatible video devices, such as to the device. Mbps stands for the IEEE 1394 data transport bus proposed by Sony, and is a trademark approved by many corporations. • IEEE 1394 is an international standard standardized by storage, operating and environmental ...conditions. This unit can be connected to this unit with an i.LINK cable. About i.LINK The DV Interface on some devices. i.LINK-compatible devices can be sent or received in one . • Each battery's life is governed ...
Operating Guide
Page 63
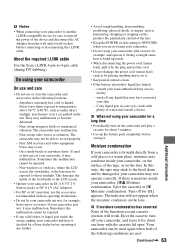
... the product. if any liquid that may malfunction or become deformed. - Turn off your camcorder, [%Z Moisture condensation. Near AM receivers and video equipment. Never leave them exposed to -4-pin cable (during DV dubbing). They may have it checked by a Sony dealer before operating it any further. • Avoid rough handling, disassembling, modifying, physical shock...
... the product. if any liquid that may malfunction or become deformed. - Turn off your camcorder, [%Z Moisture condensation. Near AM receivers and video equipment. Never leave them exposed to -4-pin cable (during DV dubbing). They may have it checked by a Sony dealer before operating it any further. • Avoid rough handling, disassembling, modifying, physical shock...


