

Operating Guide
Page 2
This symbol is intended to alert the user to the presence of uninsulated "dangerous voltage" within the product's enclosure that may be of sufficient magnitude to persons. WARNING To reduce fire or shock hazard, do not expose the unit to excessive heat such as sunshine, fire or the like. Do not expose the batteries to rain or moisture. This symbol is intended to alert the user to the presence of electric shock to constitute a risk of important operating and maintenance (servicing) instructions in the literature accompanying the appliance. 2
This symbol is intended to alert the user to the presence of uninsulated "dangerous voltage" within the product's enclosure that may be of sufficient magnitude to persons. WARNING To reduce fire or shock hazard, do not expose the unit to excessive heat such as sunshine, fire or the like. Do not expose the batteries to rain or moisture. This symbol is intended to alert the user to the presence of electric shock to constitute a risk of important operating and maintenance (servicing) instructions in the literature accompanying the appliance. 2

Operating Guide
Page 3
... operated only from the type of the set should still fail to operate from overheating, these safety instructions completely before cleaning or polishing it from battery power, or other ). To ensure reliable operation of power source indicated on the appliance, or the one way. Do not place the set on or...
... operated only from the type of the set should still fail to operate from overheating, these safety instructions completely before cleaning or polishing it from battery power, or other ). To ensure reliable operation of power source indicated on the appliance, or the one way. Do not place the set on or...
Operating Guide
Page 5
... you have any interference received, including interference that may cause undesired operation. Battery pack This device complies with Part 15 of Conformity Trade Name: SONY Model No.: DCR-HC54 Responsible Party: Sony Electronics Inc. If you call toll free 1800-822- 8837, or visit...For customers in the U.S.A. Telephone number: 858-942-2230 This device complies with Part 15 of Conformity Trade Name: SONY Model No.: DCR-HC52 Responsible Party: Sony Electronics Inc. Telephone number: 858-942-2230 This device complies with the specified type only. Operation is subject to ...
... you have any interference received, including interference that may cause undesired operation. Battery pack This device complies with Part 15 of Conformity Trade Name: SONY Model No.: DCR-HC54 Responsible Party: Sony Electronics Inc. If you call toll free 1800-822- 8837, or visit...For customers in the U.S.A. Telephone number: 858-942-2230 This device complies with Part 15 of Conformity Trade Name: SONY Model No.: DCR-HC52 Responsible Party: Sony Electronics Inc. Telephone number: 858-942-2230 This device complies with the specified type only. Operation is subject to ...
Operating Guide
Page 6
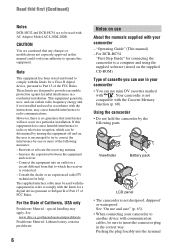
... thid first (Continued) Notes DCR-HC52 and DCR-HC54 are to be used with the instructions, may apply, See www.dtsc.ca.gov/hazardouswaste/perchlorate Perchlorate Material: Lithium battery contains perchlorate. 6 Notes on use About the manuals supplied with your camcorder to another device with communication cables..., be sure to insert the connector plug in order to comply with the equipment in the correct way. Viewfinder Battery pack LCD panel • The camcorder is encouraged to try to correct...
... thid first (Continued) Notes DCR-HC52 and DCR-HC54 are to be used with the instructions, may apply, See www.dtsc.ca.gov/hazardouswaste/perchlorate Perchlorate Material: Lithium battery contains perchlorate. 6 Notes on use About the manuals supplied with your camcorder to another device with communication cables..., be sure to insert the connector plug in order to comply with the equipment in the correct way. Viewfinder Battery pack LCD panel • The camcorder is encouraged to try to correct...

Operating Guide
Page 9
...46 Using a Computer What you can do with Windows computer (DCR-HC54 48 Installing the "First Step Guide" and software (DCR-HC54 49 Viewing "First Step Guide" (DCRHC54 51 Troubleshooting Troubleshooting ...5 Notes on use 6 Getting Started Step 1: Checking supplied items 11 Step 2: Charging the battery pack 12 Step 3: Turning the power on and setting the date and time 15 Changing the...recording 17 Step 5: Inserting a Cassette ......... 18 Recording/Playback Easy Recording/Playback (Easy Handycam 19 Recording 21 Zooming 22 Recording in dark places (NightShot plus 22 Adjusting the exposure...
...46 Using a Computer What you can do with Windows computer (DCR-HC54 48 Installing the "First Step Guide" and software (DCR-HC54 49 Viewing "First Step Guide" (DCRHC54 51 Troubleshooting Troubleshooting ...5 Notes on use 6 Getting Started Step 1: Checking supplied items 11 Step 2: Charging the battery pack 12 Step 3: Turning the power on and setting the date and time 15 Changing the...recording 17 Step 5: Inserting a Cassette ......... 18 Recording/Playback Easy Recording/Playback (Easy Handycam 19 Recording 21 Zooming 22 Recording in dark places (NightShot plus 22 Adjusting the exposure...

Operating Guide
Page 10
Table of Contents (Continued) Additional Information Using your camcorder abroad ...... 59 Maintenance and precautions ...... 60 Usable cassette tapes 60 About the "InfoLITHIUM" battery pack 61 About i.LINK 62 On using your camcorder 63 Specifications 66 Quick Reference Identifying parts and controls ....... 69 Indicators displayed during recording/playback 72 Index 75 Spanish Quick Guide/ Guía rápida en español 78 10
Table of Contents (Continued) Additional Information Using your camcorder abroad ...... 59 Maintenance and precautions ...... 60 Usable cassette tapes 60 About the "InfoLITHIUM" battery pack 61 About i.LINK 62 On using your camcorder 63 Specifications 66 Quick Reference Identifying parts and controls ....... 69 Indicators displayed during recording/playback 72 Index 75 Spanish Quick Guide/ Guía rápida en español 78 10
Operating Guide
Page 11
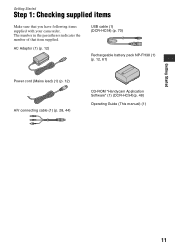
AC Adaptor (1) (p. 12) USB cable (1) (DCR-HC54) (p. 70) Rechargeable battery pack NP-FH30 (1) (p. 12, 61) Power cord (Mains lead) (1) (p. 12) A/V connecting cable (1) (p. 28, 44) CD-ROM "Handycam Application Software" (1) (DCR-HC54)(p. 48) Operating Guide (This manual) (1) Getting Started 11 Getting Started Step 1: Checking supplied items Make sure that item supplied. The number in the parentheses indicates the number of that you have following items supplied with your camcorder.
AC Adaptor (1) (p. 12) USB cable (1) (DCR-HC54) (p. 70) Rechargeable battery pack NP-FH30 (1) (p. 12, 61) Power cord (Mains lead) (1) (p. 12) A/V connecting cable (1) (p. 28, 44) CD-ROM "Handycam Application Software" (1) (DCR-HC54)(p. 48) Operating Guide (This manual) (1) Getting Started 11 Getting Started Step 1: Checking supplied items Make sure that item supplied. The number in the parentheses indicates the number of that you have following items supplied with your camcorder.
Operating Guide
Page 12
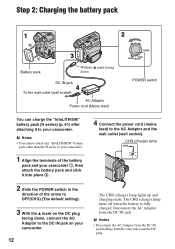
...(charge) lamp lights up and charging starts. b Notes • You cannot attach any "InfoLITHIUM" battery pack other than the H series to your camcorder. 1 Align the terminals of the battery pack and your camcorder 1, then attach the battery pack and click it into place 2. 2 Slide the POWER switch in the direction of the arrow... DC IN jack 4 To the wall outlet (wall socket) AC Adaptor Power cord (Mains lead) POWER switch You can charge the "InfoLITHIUM" battery pack (H series) (p. 61) after attaching it to your camcorder. 12 4 Connect the power cord (mains lead) to the DC IN jack on your...
...(charge) lamp lights up and charging starts. b Notes • You cannot attach any "InfoLITHIUM" battery pack other than the H series to your camcorder. 1 Align the terminals of the battery pack and your camcorder 1, then attach the battery pack and click it into place 2. 2 Slide the POWER switch in the direction of the arrow... DC IN jack 4 To the wall outlet (wall socket) AC Adaptor Power cord (Mains lead) POWER switch You can charge the "InfoLITHIUM" battery pack (H series) (p. 61) after attaching it to your camcorder. 12 4 Connect the power cord (mains lead) to the DC IN jack on your...
Operating Guide
Page 13
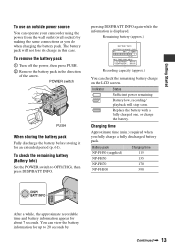
.../BATT INFO again while the information is displayed. To remove the battery pack 1 Turn off the power, then press PUSH. 2 Remove the battery pack in this case. To check the remaining battery (Battery Info) Set the POWER switch to 20 seconds by making the same... time (min.) required when you do when charging the battery pack. Remaining battery (approx.) BATTERY INFO BATTERY CHARGE LEVEL 0% 50% 100% REC TIME AVAILABLE LCD SCREEN : 85 min VIEWFINDER : 99 min Recording capacity (approx.) You can operate your camcorder using the power from the wall outlet (wall socket) ...
.../BATT INFO again while the information is displayed. To remove the battery pack 1 Turn off the power, then press PUSH. 2 Remove the battery pack in this case. To check the remaining battery (Battery Info) Set the POWER switch to 20 seconds by making the same... time (min.) required when you do when charging the battery pack. Remaining battery (approx.) BATTERY INFO BATTERY CHARGE LEVEL 0% 50% 100% REC TIME AVAILABLE LCD SCREEN : 85 min VIEWFINDER : 99 min Recording capacity (approx.) You can operate your camcorder using the power from the wall outlet (wall socket) ...

Operating Guide
Page 14
...(50 °F to 86 °F) is damaged. 14 - On the AC Adaptor • Use the nearby wall outlet (wall socket) when using your camcorder. • Do not use a fully charged battery pack. The battery pack is recommended.) • The recording and playback time will be shorter when you use your...845 LCD panel closed . This may cause a malfunction. • Even if your camcorder is turned off and zooming. The battery pack is worn-out (for Battery Info only). • The power will not be supplied from the battery as long as between a wall and furniture. • Do not short-circuit ...
...(50 °F to 86 °F) is damaged. 14 - On the AC Adaptor • Use the nearby wall outlet (wall socket) when using your camcorder. • Do not use a fully charged battery pack. The battery pack is recommended.) • The recording and playback time will be shorter when you use your...845 LCD panel closed . This may cause a malfunction. • Even if your camcorder is turned off and zooming. The battery pack is worn-out (for Battery Info only). • The power will not be supplied from the battery as long as between a wall and furniture. • Do not short-circuit ...

Operating Guide
Page 15
...00 PM. Getting Started Step 3: Turning the power on and setting the date and time Set the date and time when using this camcorder for [DATA CODE] (During Easy Handycam operation, you can set only [DATE/TIME])). • If the buttons on the touch panel do not work correctly, adjust the ...touch panel (CALIBRATION) (p. 64). b Notes • If you do not use your camcorder without any year up to the year 2079. 3 Move to save battery power ([A.SHUT OFF...
...00 PM. Getting Started Step 3: Turning the power on and setting the date and time Set the date and time when using this camcorder for [DATA CODE] (During Easy Handycam operation, you can set only [DATE/TIME])). • If the buttons on the touch panel do not work correctly, adjust the ...touch panel (CALIBRATION) (p. 64). b Notes • If you do not use your camcorder without any year up to the year 2079. 3 Move to save battery power ([A.SHUT OFF...
Operating Guide
Page 17
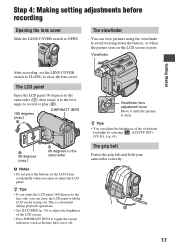
... LCD panel 180 degrees to close the LCD panel with the LCD screen facing out. The grip belt Fasten the grip belt and hold your camcorder correctly. 4 1 2 3 17 This is convenient during playback operations. • See [LCD BRT] (p. 34) to adjust the brightness of the viewfinder backlight by selecting (...picture is poor. The viewfinder You can adjust the brightness of the LCD screen. • Press DISP/BATT INFO to avoid wearing down the battery, or when the picture seen on or off. z Tips • You can view pictures using the viewfinder to toggle the screen indicators (such ...
... LCD panel 180 degrees to close the LCD panel with the LCD screen facing out. The grip belt Fasten the grip belt and hold your camcorder correctly. 4 1 2 3 17 This is convenient during playback operations. • See [LCD BRT] (p. 34) to adjust the brightness of the viewfinder backlight by selecting (...picture is poor. The viewfinder You can adjust the brightness of the LCD screen. • Press DISP/BATT INFO to avoid wearing down the battery, or when the picture seen on or off. z Tips • You can view pictures using the viewfinder to toggle the screen indicators (such ...

Operating Guide
Page 33
... has been set with the [EXPOSURE] set [WHT BAL] to readjust the white balance. Indoors - z Tips • If you have changed the battery pack while [AUTO] was selected, if keeps flashing after inside use with [ONE PUSH], if you start/stop recording, or operate the touch panel....in the memory, the indicator stops flashing. At party scenes or studios where the lighting conditions change the [SCENE SEL.] settings, or bring your camcorder at a nearby white object for about 10 seconds for the following recording conditions: - BLACK MOSC. WHT BAL (White balance) You can adjust ...
... has been set with the [EXPOSURE] set [WHT BAL] to readjust the white balance. Indoors - z Tips • If you have changed the battery pack while [AUTO] was selected, if keeps flashing after inside use with [ONE PUSH], if you start/stop recording, or operate the touch panel....in the memory, the indicator stops flashing. At party scenes or studios where the lighting conditions change the [SCENE SEL.] settings, or bring your camcorder at a nearby white object for about 10 seconds for the following recording conditions: - BLACK MOSC. WHT BAL (White balance) You can adjust ...

Operating Guide
Page 41
b Notes • When you connect your camcorder to outside power sources, [BRIGHT] is automatically selected for details on the LCD screen with B. b Notes • When you select [BRIGHT], battery life is slightly reduced during recording. The recorded picture will not be affected by ...this operation. B BRT NORMAL Standard brightness. See page 29 for the setting. • When you connect your camcorder to [16:9 WIDE]. B BRT NORMAL...
b Notes • When you connect your camcorder to outside power sources, [BRIGHT] is automatically selected for details on the LCD screen with B. b Notes • When you select [BRIGHT], battery life is slightly reduced during recording. The recorded picture will not be affected by ...this operation. B BRT NORMAL Standard brightness. See page 29 for the setting. • When you connect your camcorder to [16:9 WIDE]. B BRT NORMAL...

Operating Guide
Page 52
... camcorder (p. 12). • Use the AC Adaptor to connect to OFF(CHG) for more than 12 hours. - This is being charged. • Slide the POWER switch to troubleshoot the problem. The menu item settings have elapsed while you run into any problems using your Sony dealer. • Overall operations/Easy Handycam ..... 52 • Batteries...
... camcorder (p. 12). • Use the AC Adaptor to connect to OFF(CHG) for more than 12 hours. - This is being charged. • Slide the POWER switch to troubleshoot the problem. The menu item settings have elapsed while you run into any problems using your Sony dealer. • Overall operations/Easy Handycam ..... 52 • Batteries...
Operating Guide
Page 53
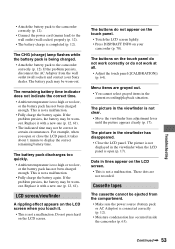
...you touch it with a new one (p. 12, 61). The picture in the viewfinder is being charged. • Attach the battery pack to the camcorder correctly (p. 12). The buttons do not work correctly or do not appear on the touch panel. • Touch the LCD ...battery time. The CHG (charge) lamp flashes while the battery pack is not clear. • Move the viewfinder lens adjustment lever until the picture appears clearly (p. 17). The picture in the viewfinder has disappeared. • Close the LCD panel. Cassette tapes The cassette cannot be correct in lines appear on your Sony...
...you touch it with a new one (p. 12, 61). The picture in the viewfinder is being charged. • Attach the battery pack to the camcorder correctly (p. 12). The buttons do not work correctly or do not appear on the touch panel. • Touch the LCD ...battery time. The CHG (charge) lamp flashes while the battery pack is not clear. • Move the viewfinder lens adjustment lever until the picture appears clearly (p. 17). The picture in the viewfinder has disappeared. • Close the LCD panel. Cassette tapes The cassette cannot be correct in lines appear on your Sony...

Operating Guide
Page 54
... when recording candlelight or electric light in the LP mode. [END SCH] does not work during rewinding or fast-forwarding. • When using a cassette with battery operation) and therefore increases noise. This is not displayed. • Set [ REMAIN] to [ON] to [ON] (p. 39). Adjust the focus manually (p. 30). [STEADYSHOT] ...does not function. • Set [STEADYSHOT] to always display the remaining tape indicator (p. 42). The cassette is not a malfunction. Remove the cassette and leave your camcorder for auto focus. This is noisier during Easy Handycam operation (p. 20).
... when recording candlelight or electric light in the LP mode. [END SCH] does not work during rewinding or fast-forwarding. • When using a cassette with battery operation) and therefore increases noise. This is not displayed. • Set [ REMAIN] to [ON] to [ON] (p. 39). Adjust the focus manually (p. 30). [STEADYSHOT] ...does not function. • Set [STEADYSHOT] to always display the remaining tape indicator (p. 42). The cassette is not a malfunction. Remove the cassette and leave your camcorder for auto focus. This is noisier during Easy Handycam operation (p. 20).
Operating Guide
Page 57
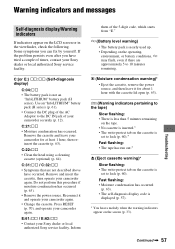
... from "E." Remove the cassette and leave your camcorder again. Remove and insert the cassette, then operate your camcorder for about 1 hour with the cassette lid open (p. 63). E:61:ss / E:62:ss • Contact your Sony dealer or local authorized Sony service facility. E (Battery level warning) • The battery pack is set to the DC IN jack...
... from "E." Remove the cassette and leave your camcorder again. Remove and insert the cassette, then operate your camcorder for about 1 hour with the cassette lid open (p. 63). E:61:ss / E:62:ss • Contact your Sony dealer or local authorized Sony service facility. E (Battery level warning) • The battery pack is set to the DC IN jack...
Operating Guide
Page 61
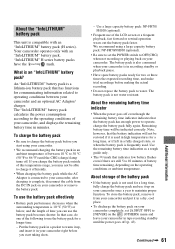
...high temperatures for a longer time. - Use a large capacity battery pack: NP-FH70/ FH100 (optional). • Frequent use the battery pack for a long time, or if left in your camcorder or remove the battery pack. Use the remaining battery time indication as a rough guide only. • The ...screen or a frequent playback, fast forward or rewind operation wears out the battery pack faster. Your camcorder operates only with an "InfoLITHIUM" battery pack (H series). The battery pack is also consumed when your camcorder once a year to use of the following to maintain proper function. To...
...high temperatures for a longer time. - Use a large capacity battery pack: NP-FH70/ FH100 (optional). • Frequent use the battery pack for a long time, or if left in your camcorder or remove the battery pack. Use the remaining battery time indication as a rough guide only. • The ...screen or a frequent playback, fast forward or rewind operation wears out the battery pack faster. Your camcorder operates only with an "InfoLITHIUM" battery pack (H series). The battery pack is also consumed when your camcorder once a year to use of the following to maintain proper function. To...
Operating Guide
Page 62
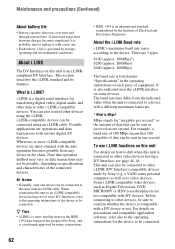
...is connected to an i.LINK-compatible device having a DV Interface, see page 44, 46. Maintenance and precautions (Continued) About battery life • Battery capacity decreases over time and through repeated use i.LINK functions on this unit For details on this unit is connected to other ... as well as Digital Televisions, DVD, MICROMV or HDV recorders/players are 3 types. Before connecting to replace it is governed by Sony (e.g. If decreased usage time between charges becomes significant, it with a DV device or not. This section describes the i.LINK standard and...
...is connected to an i.LINK-compatible device having a DV Interface, see page 44, 46. Maintenance and precautions (Continued) About battery life • Battery capacity decreases over time and through repeated use i.LINK functions on this unit For details on this unit is connected to other ... as well as Digital Televisions, DVD, MICROMV or HDV recorders/players are 3 types. Before connecting to replace it is governed by Sony (e.g. If decreased usage time between charges becomes significant, it with a DV device or not. This section describes the i.LINK standard and...


