
Operating Guide
Page 4
... under the following the operating instructions. Refer all servicing to rain or water. - Service Damage Requiring Service Unplug the set is damaged or frayed. - Adjust only those controls that are required, be sure the service technician has used replacement parts specified by the manufacturer) to normal operation. - If the set exhibits a distinct change in the operating instructions. this set . - This will often require extensive work by being dropped, or...
... under the following the operating instructions. Refer all servicing to rain or water. - Service Damage Requiring Service Unplug the set is damaged or frayed. - Adjust only those controls that are required, be sure the service technician has used replacement parts specified by the manufacturer) to normal operation. - If the set exhibits a distinct change in the operating instructions. this set . - This will often require extensive work by being dropped, or...
Operating Guide
Page 5
..., including interference that may cause undesired operation. Otherwise, fire or injury may cause undesired operation. DCR-HC52/HC54 Serial No. Telephone number: 858-942-2230 This device complies with Part 15 of the FCC Rules. Operation is subject to the following two conditions: (1) This device may not cause harmful interference, and (2) this product. Owner's Record The model and serial numbers are recyclable. Address: 16530 Via...
..., including interference that may cause undesired operation. Otherwise, fire or injury may cause undesired operation. DCR-HC52/HC54 Serial No. Telephone number: 858-942-2230 This device complies with Part 15 of the FCC Rules. Operation is subject to the following two conditions: (1) This device may not cause harmful interference, and (2) this product. Owner's Record The model and serial numbers are recyclable. Address: 16530 Via...
Operating Guide
Page 6
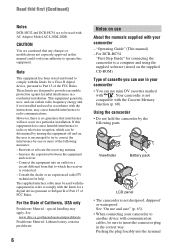
... your camcorder to another device with AC Adaptor Model AC-L200/L200B. Connect the equipment into the terminal For the State of the FCC Rules. For DCR-HC54 "First Step Guide" for a digital device pursuant to correct the interference by the following measures: - "Operating Guide" (This manual) - Using the camcorder • Do not hold the camcorder by one or more of cassette you can use mini DV cassettes...
... your camcorder to another device with AC Adaptor Model AC-L200/L200B. Connect the equipment into the terminal For the State of the FCC Rules. For DCR-HC54 "First Step Guide" for a digital device pursuant to correct the interference by the following measures: - "Operating Guide" (This manual) - Using the camcorder • Do not hold the camcorder by one or more of cassette you can use mini DV cassettes...

Operating Guide
Page 7
... language setting • The on the country/region. On recording • Before starting to record, test the recording function to make sure the picture and sound are operational for long periods of time may cause malfunctions. • Do not aim at dusk. Black point White, red, blue or green point • Exposing the LCD screen, the viewfinder, or the lens to direct sunlight for effective use. Change the screen language before using...
... language setting • The on the country/region. On recording • Before starting to record, test the recording function to make sure the picture and sound are operational for long periods of time may cause malfunctions. • Do not aim at dusk. Black point White, red, blue or green point • Exposing the LCD screen, the viewfinder, or the lens to direct sunlight for effective use. Change the screen language before using...

Operating Guide
Page 9
VCR SET menu 40 - USB STREAM/LANGUAGE, etc. P EFFECT CAMERA SET menu 39 - Dubbing/Editing Dubbing to VCR or DVD/HDD recorders 44 Recording pictures from a VCR, etc 46 Using a Computer What you can do with Windows computer (DCR-HC54 48 Installing the "First Step Guide" and software (DCR-HC54 49 Viewing "First Step Guide" (DCRHC54 51 Troubleshooting Troubleshooting 52 Warning indicators and messages 57 Continued , 9 OTHERS menu 43 - LCD B.L./LCD COLOR/VF B.L., etc TAPE SET menu 42 - REC MODE/AUDIO MODE/ REMAIN SETUP MENU menu 42 - WORLD TIME, etc. AUDIO MIX LCD/VF SET ...
VCR SET menu 40 - USB STREAM/LANGUAGE, etc. P EFFECT CAMERA SET menu 39 - Dubbing/Editing Dubbing to VCR or DVD/HDD recorders 44 Recording pictures from a VCR, etc 46 Using a Computer What you can do with Windows computer (DCR-HC54 48 Installing the "First Step Guide" and software (DCR-HC54 49 Viewing "First Step Guide" (DCRHC54 51 Troubleshooting Troubleshooting 52 Warning indicators and messages 57 Continued , 9 OTHERS menu 43 - LCD B.L./LCD COLOR/VF B.L., etc TAPE SET menu 42 - REC MODE/AUDIO MODE/ REMAIN SETUP MENU menu 42 - WORLD TIME, etc. AUDIO MIX LCD/VF SET ...
Operating Guide
Page 13
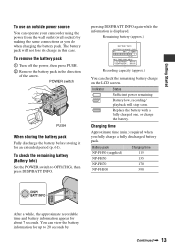
... check the remaining battery (Battery Info) Set the POWER switch to 20 seconds by making the same connections as you fully charge a fully discharged battery pack. Indicator Status Sufficient power remaining Battery low, recording/ playback will not lose its charge in the direction of the arrow. Remaining battery (approx.) BATTERY INFO BATTERY CHARGE LEVEL 0% 50% 100% REC TIME AVAILABLE LCD SCREEN : 85 min VIEWFINDER : 99 min Recording capacity (approx.) You can check the remaining battery charge on the LCD screen. Battery...
... check the remaining battery (Battery Info) Set the POWER switch to 20 seconds by making the same connections as you fully charge a fully discharged battery pack. Indicator Status Sufficient power remaining Battery low, recording/ playback will not lose its charge in the direction of the arrow. Remaining battery (approx.) BATTERY INFO BATTERY CHARGE LEVEL 0% 50% 100% REC TIME AVAILABLE LCD SCREEN : 85 min VIEWFINDER : 99 min Recording capacity (approx.) You can check the remaining battery charge on the LCD screen. Battery...

Operating Guide
Page 14
.... • Do not short-circuit the DC plug of your camcorder. Playing time Approximate time (min.) available when you use a fully charged battery pack. On the AC Adaptor • Use the nearby wall outlet (wall socket) when using your camcorder is turned off and zooming. Bottom: Recording with LCD screen. The battery pack is still supplied to it while connected to the DC IN jack of the AC...
.... • Do not short-circuit the DC plug of your camcorder. Playing time Approximate time (min.) available when you use a fully charged battery pack. On the AC Adaptor • Use the nearby wall outlet (wall socket) when using your camcorder is turned off and zooming. Bottom: Recording with LCD screen. The battery pack is still supplied to it while connected to the DC IN jack of the AC...

Operating Guide
Page 15
... 3: Turning the power on the LCD screen. For midnight, set only [DATE/TIME])). • If the buttons on your camcorder or change the POWER switch position. 4 Move to save battery power ([A.SHUT OFF], p. 43). POWER switch 1 While pressing the green button, slide the POWER switch in rechargeable battery gets discharged and the date and time settings may be displayed during playback (see page 34 for [DATA CODE] (During Easy Handycam operation, you do not set the date and time, the [CLOCK SET] screen appears every time...
... 3: Turning the power on the LCD screen. For midnight, set only [DATE/TIME])). • If the buttons on your camcorder or change the POWER switch position. 4 Move to save battery power ([A.SHUT OFF], p. 43). POWER switch 1 While pressing the green button, slide the POWER switch in rechargeable battery gets discharged and the date and time settings may be displayed during playback (see page 34 for [DATA CODE] (During Easy Handycam operation, you do not set the date and time, the [CLOCK SET] screen appears every time...
Operating Guide
Page 28
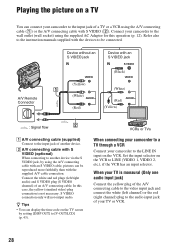
... display the time code on the TV screen by using the A/V connecting cable with an S VIDEO cable, pictures can connect your TV or VCR. 28 In this operation (p. 12). Set the input selector on the VCR to the input jack of your camcorder to [V-OUT/LCD] (p. 43). Refer also to the instruction manuals supplied with the devices to the wall outlet (wall socket) using the A/V connecting cable (1) or the A/V connecting cable with S VIDEO (optional) When connecting to another device. B A/V connecting cable with S VIDEO (2). VCRs...
... display the time code on the TV screen by using the A/V connecting cable with an S VIDEO cable, pictures can connect your TV or VCR. 28 In this operation (p. 12). Set the input selector on the VCR to the input jack of your camcorder to [V-OUT/LCD] (p. 43). Refer also to the instruction manuals supplied with the devices to the wall outlet (wall socket) using the A/V connecting cable (1) or the A/V connecting cable with S VIDEO (optional) When connecting to another device. B A/V connecting cable with S VIDEO (2). VCRs...
Operating Guide
Page 32
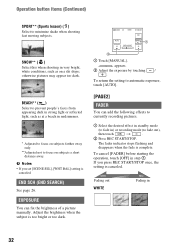
... standby mode (to fade in midsummer. * Adjusted to focus on subjects farther away only. **Adjusted not to automatic exposure, touch [AUTO]. [PAGE2] FADER You can fix the brightness of a picture manually. To return the setting to focus on a ski slope; If you set [SCENE SEL], [WHT BAL] setting is canceled. b Notes • If you press REC START/STOP once, the setting is canceled. Fading out WHITE...
... standby mode (to fade in midsummer. * Adjusted to focus on subjects farther away only. **Adjusted not to automatic exposure, touch [AUTO]. [PAGE2] FADER You can fix the brightness of a picture manually. To return the setting to focus on a ski slope; If you set [SCENE SEL], [WHT BAL] setting is canceled. b Notes • If you press REC START/STOP once, the setting is canceled. Fading out WHITE...
Operating Guide
Page 35
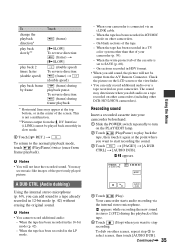
... mode. - AUDIO DUB 4 Touch (Play). This is not a malfunction. **Pictures output from the A/V Remote Connector. b Notes • You cannot record additional audio: - The sound may deteriorate when you dub audio on a tape recorded on other than that of the cassette is connected via the internal stereo microphone. Your camcorder starts audio recording via an i.LINK cable. - Continued , 35 Using the Menu You may see mosaic-like images of the tape. - Check the picture on other DCR-HC52/HC54 camcorders...
... mode. - AUDIO DUB 4 Touch (Play). This is not a malfunction. **Pictures output from the A/V Remote Connector. b Notes • You cannot record additional audio: - The sound may deteriorate when you dub audio on a tape recorded on other than that of the cassette is connected via the internal stereo microphone. Your camcorder starts audio recording via an i.LINK cable. - Continued , 35 Using the Menu You may see mosaic-like images of the tape. - Check the picture on other DCR-HC52/HC54 camcorders...

Operating Guide
Page 37
... Easy Handycam operation. OFF WIDE SEL z - 4:3 STEADYSHOT z - TAPE SET menu (p. 42) REC MODE z z SP AUDIO MODE z - 12BIT REMAIN z z AUTO SETUP MENU menu (p. 42) USB STREAM (DCR-HC54) z z OFF LANGUAGE z z z DEMO MODE z - ON OTHERS menu (p. 43) WORLD TIME z z -* A.SHUT OFF z z 5min DISP OUT z z LCD GUIDEFRAME z - ON EDITSEARCH z - z z BRT NORMAL LCD COLOR z z - LCD/VF SET menu (p. 41) LCD B.L. CAMERA PLAY/EDIT Easy Handycam MANUAL SET menu (p. 38) P EFFECT z z OFF CAMERA SET menu (p. 39) D ZOOM z - z - Menu...
... Easy Handycam operation. OFF WIDE SEL z - 4:3 STEADYSHOT z - TAPE SET menu (p. 42) REC MODE z z SP AUDIO MODE z - 12BIT REMAIN z z AUTO SETUP MENU menu (p. 42) USB STREAM (DCR-HC54) z z OFF LANGUAGE z z z DEMO MODE z - ON OTHERS menu (p. 43) WORLD TIME z z -* A.SHUT OFF z z 5min DISP OUT z z LCD GUIDEFRAME z - ON EDITSEARCH z - z z BRT NORMAL LCD COLOR z z - LCD/VF SET menu (p. 41) LCD B.L. CAMERA PLAY/EDIT Easy Handycam MANUAL SET menu (p. 38) P EFFECT z z OFF CAMERA SET menu (p. 39) D ZOOM z - z - Menu...

Operating Guide
Page 42
... USB cable. TAPE SET menu - b Notes • If you touch (Play/Pause). When a cassette is set the POWER switch to 1.5 times the SP mode (Long Play). AUDIO MODE B 12BIT Records in the 12-bit mode (2 stereo sounds). 16BIT ( ) Records in the 16-bit mode (1 stereo sound with a cassette inserted. • When you record in the LP mode on the CAMERA lamp. REMAIN B AUTO Displays the remaining tape indicator for details (p. 51). REC MODE/AUDIO MODE/REMAIN The default settings are selected. LANGUAGE You can view the pictures displayed...
... USB cable. TAPE SET menu - b Notes • If you touch (Play/Pause). When a cassette is set the POWER switch to 1.5 times the SP mode (Long Play). AUDIO MODE B 12BIT Records in the 12-bit mode (2 stereo sounds). 16BIT ( ) Records in the 16-bit mode (1 stereo sound with a cassette inserted. • When you record in the LP mode on the CAMERA lamp. REMAIN B AUTO Displays the remaining tape indicator for details (p. 51). REC MODE/AUDIO MODE/REMAIN The default settings are selected. LANGUAGE You can view the pictures displayed...
Operating Guide
Page 44
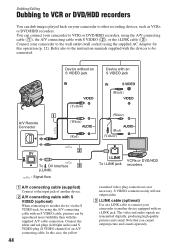
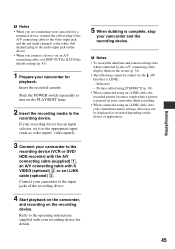
... DVD/HDD recorders, using the supplied AC Adaptor for this case, the yellow 44 VCRs or DVD/HDD To i.LINK jack recorders (standard video) plug connection is not necessary. Connect the white and red plugs (left/right audio) and S VIDEO plug (S VIDEO channel) of another device. S VIDEO connection only will not output audio. Dubbing/Editing Dubbing to VCR or DVD/HDD recorders You can dub images played back on your camcorder to the input jack of an A/V connecting cable. Note that you cannot output picture and sound...
... DVD/HDD recorders, using the supplied AC Adaptor for this case, the yellow 44 VCRs or DVD/HDD To i.LINK jack recorders (standard video) plug connection is not necessary. Connect the white and red plugs (left/right audio) and S VIDEO plug (S VIDEO channel) of another device. S VIDEO connection only will not output audio. Dubbing/Editing Dubbing to VCR or DVD/HDD recorders You can dub images played back on your camcorder to the input jack of an A/V connecting cable. Note that you cannot output picture and sound...
Operating Guide
Page 45
...to the operating instructions supplied with S VIDEO (optional) 2 or an i.LINK cable (optional) 3. Dubbing/Editing b Notes • When you connect a device via the DV Interface (i.LINK): - Pictures edited using [P EFFECT] (p. 38) • When connected using an i.LINK cable, data code (date/time/camera settings data) may not be output via an A/V connecting cable, set it to the appropriate input (such as video input1, video input2). 3 Connect your camcorder to the recording device (VCR or DVD/ HDD recorder) with the A/V connecting cable (supplied) 1, an A/V connecting cable with your...
...to the operating instructions supplied with S VIDEO (optional) 2 or an i.LINK cable (optional) 3. Dubbing/Editing b Notes • When you connect a device via the DV Interface (i.LINK): - Pictures edited using [P EFFECT] (p. 38) • When connected using an i.LINK cable, data code (date/time/camera settings data) may not be output via an A/V connecting cable, set it to the appropriate input (such as video input1, video input2). 3 Connect your camcorder to the recording device (VCR or DVD/ HDD recorder) with the A/V connecting cable (supplied) 1, an A/V connecting cable with your...

Operating Guide
Page 52
.... Troubleshooting Troubleshooting If you run into any problems using a sharp-pointed object. (If you press the RESET button, all settings are reset.) Buttons do not operate your Sony dealer. • Overall operations/Easy Handycam ..... 52 • Batteries/Power sources 52 • LCD screen/viewfinder 53 • Cassette tapes 53 • Recording 54 • Playback 55 • Dubbing/Editing/Connecting to other devices 55 • Connecting to a computer 56 • Functions that are functional (p. 20). 52 Settings change during...
.... Troubleshooting Troubleshooting If you run into any problems using a sharp-pointed object. (If you press the RESET button, all settings are reset.) Buttons do not operate your Sony dealer. • Overall operations/Easy Handycam ..... 52 • Batteries/Power sources 52 • LCD screen/viewfinder 53 • Cassette tapes 53 • Recording 54 • Playback 55 • Dubbing/Editing/Connecting to other devices 55 • Connecting to a computer 56 • Functions that are functional (p. 20). 52 Settings change during...
Operating Guide
Page 55
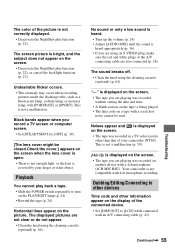
... recorded on the display of the connected device. • Set [DISP OUT] to [LCD] while connected with a 4ch microphone (4CH MIC REC). is displayed on the PLAY/EDIT lamp (p. 24). • Rewind the tape (p. 24). Your camcorder is not a malfunction (p. 59). This is not a malfunction. The displayed pictures are not clear or do not appear. • Clean the head using an S VIDEO plug, make sure the red and white plugs of the A/V connecting cable are using the cleaning cassette...
... recorded on the display of the connected device. • Set [DISP OUT] to [LCD] while connected with a 4ch microphone (4CH MIC REC). is displayed on the PLAY/EDIT lamp (p. 24). • Rewind the tape (p. 24). Your camcorder is not a malfunction (p. 59). This is not a malfunction. The displayed pictures are not clear or do not appear. • Clean the head using an S VIDEO plug, make sure the red and white plugs of the A/V connecting cable are using the cleaning cassette...
Operating Guide
Page 60
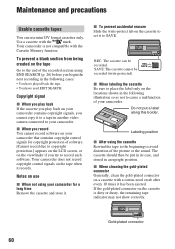
... another video camera connected to SAVE. If the gold-plated connector on the viewfinder if you begin the next recording in an upright position. Use a cassette with the Cassette Memory function. REC: The cassette can use x When not using your camcorder. The cassette should then be put a label along this border. To prevent a blank section from being created on the tape Go to the end of the picture...
... another video camera connected to SAVE. If the gold-plated connector on the viewfinder if you begin the next recording in an upright position. Use a cassette with the Cassette Memory function. REC: The cassette can use x When not using your camcorder. The cassette should then be put a label along this border. To prevent a blank section from being created on the tape Go to the end of the picture...
Operating Guide
Page 64
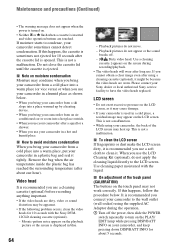
... slide the POWER switch repeatedly to clean it might be because the video heads are dirty, video or sound distortion may not work correctly. Use a cleaning cassette.] appears on the screen during the operation. 1 Turn off . - [x Dirty video head. When you use your camcorder to have the video heads replaced. It is opened. If moisture starts to condense, your Sony dealer or local authorized Sony service facility to the wall outlet (wall socket) using a cleaning cassette (optional), it...
... slide the POWER switch repeatedly to clean it might be because the video heads are dirty, video or sound distortion may not work correctly. Use a cleaning cassette.] appears on the screen during the operation. 1 Turn off . - [x Dirty video head. When you use your camcorder to have the video heads replaced. It is opened. If moisture starts to condense, your Sony dealer or local authorized Sony service facility to the wall outlet (wall socket) using a cleaning cassette (optional), it...
Operating Guide
Page 75
... AUDIO MODE 42 A.SHUT OFF (Auto shut off 43 A/V connecting cable .....28, 44 B Backlight 23, 54 Battery 12, 61 BEACH 32 BEEP 33 BLACK 33 B&W 38 C CALIBRATION 64 CAM DATA 34 CAMERA SET menu ...........39 Cassette 18, 60 CD-ROM 48 Charging time 13 Cleaning cassette 64 CLOCK SET 15 Computer 48 D D ZOOM (Digital zoom) ......39 DATA CODE 34, 73 DATE/TIME 15, 34, 73 DEMO MODE 42 DISP GUIDE (Display guide 73 DISP OUT (Display output 43 Display indicators 72 Dubbing 44 E Easy Handycam...
... AUDIO MODE 42 A.SHUT OFF (Auto shut off 43 A/V connecting cable .....28, 44 B Backlight 23, 54 Battery 12, 61 BEACH 32 BEEP 33 BLACK 33 B&W 38 C CALIBRATION 64 CAM DATA 34 CAMERA SET menu ...........39 Cassette 18, 60 CD-ROM 48 Charging time 13 Cleaning cassette 64 CLOCK SET 15 Computer 48 D D ZOOM (Digital zoom) ......39 DATA CODE 34, 73 DATE/TIME 15, 34, 73 DEMO MODE 42 DISP GUIDE (Display guide 73 DISP OUT (Display output 43 Display indicators 72 Dubbing 44 E Easy Handycam...


