
Operating Guide
Page 4
... into the set. - Refer all servicing to lightning and power-line surges. this set from the wall outlet (wall socket) and disconnect the antenna or cable system. If the set to dangerous voltage or other hazards. Safety Check Upon completion of other controls may expose you to normal operation. - If the...
... into the set. - Refer all servicing to lightning and power-line surges. this set from the wall outlet (wall socket) and disconnect the antenna or cable system. If the set to dangerous voltage or other hazards. Safety Check Upon completion of other controls may expose you to normal operation. - If the...
Operating Guide
Page 6
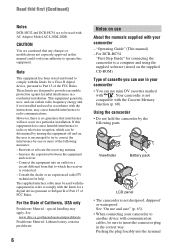
... (Continued) Notes DCR-HC52 and DCR-HC54 are to be sure to insert the connector plug in the correct way. These limits are cautioned that to which can be used with the equipment in order to comply with the limits for connecting the camcorder to correct the ...accordance with AC Adaptor Model AC-L200/L200B. If this equipment does cause harmful interference to another device with communication cables, be used in your camcorder - Your camcorder is not dustproof, dripproof or waterproof. special handling may cause harmful interference to Part 15 of the FCC Rules...
... (Continued) Notes DCR-HC52 and DCR-HC54 are to be sure to insert the connector plug in the correct way. These limits are cautioned that to which can be used with the equipment in order to comply with the limits for connecting the camcorder to correct the ...accordance with AC Adaptor Model AC-L200/L200B. If this equipment does cause harmful interference to another device with communication cables, be used in your camcorder - Your camcorder is not dustproof, dripproof or waterproof. special handling may cause harmful interference to Part 15 of the FCC Rules...
Operating Guide
Page 11
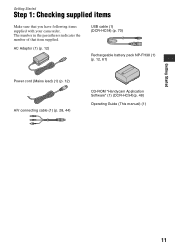
AC Adaptor (1) (p. 12) USB cable (1) (DCR-HC54) (p. 70) Rechargeable battery pack NP-FH30 (1) (p. 12, 61) Power cord (Mains lead) (1) (p. 12) A/V connecting cable (1) (p. 28, 44) CD-ROM "Handycam Application Software" (1) (DCR-HC54)(p. 48) Operating Guide (This manual) (1) Getting Started 11 The number in the parentheses indicates the number of that you have following items supplied with your camcorder. Getting Started Step 1: Checking supplied items Make sure that item supplied.
AC Adaptor (1) (p. 12) USB cable (1) (DCR-HC54) (p. 70) Rechargeable battery pack NP-FH30 (1) (p. 12, 61) Power cord (Mains lead) (1) (p. 12) A/V connecting cable (1) (p. 28, 44) CD-ROM "Handycam Application Software" (1) (DCR-HC54)(p. 48) Operating Guide (This manual) (1) Getting Started 11 The number in the parentheses indicates the number of that you have following items supplied with your camcorder. Getting Started Step 1: Checking supplied items Make sure that item supplied.
Operating Guide
Page 28
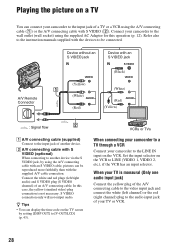
...S VIDEO (optional) When connecting to another device. z Tips • You can connect your camcorder to the wall outlet (wall socket) using the A/V connecting cable (1) or the A/V connecting cable with an S VIDEO cable, pictures can be connected. Refer also to the instruction manuals supplied with the devices to be .... Playing the picture on a TV You can display the time code on the TV screen by using the A/V connecting cable with S VIDEO (2). Connect your camcorder to the input jack of your camcorder to LINE (VIDEO 1, VIDEO 2, etc.), if the VCR has an input selector.
...S VIDEO (optional) When connecting to another device. z Tips • You can connect your camcorder to the wall outlet (wall socket) using the A/V connecting cable (1) or the A/V connecting cable with an S VIDEO cable, pictures can be connected. Refer also to the instruction manuals supplied with the devices to be .... Playing the picture on a TV You can display the time code on the TV screen by using the A/V connecting cable with S VIDEO (2). Connect your camcorder to the input jack of your camcorder to LINE (VIDEO 1, VIDEO 2, etc.), if the VCR has an input selector.
Operating Guide
Page 35
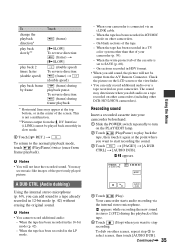
... twice (once from the DV Interface (i.LINK) cannot be output from the A/V Remote Connector. To return to turn on other DCR-HC52/HC54 camcorders). When the tape has been recorded in 12-bit mode (p. 42) without erasing the original sound. Recording sound Insert a recorded cassette...reverse direction: (frame) t [ySLOW] (double speed) To reverse direction: (frame) t (double speed) (frame) during playback pause. Your camcorder starts audio recording via an i.LINK cable. - When the tape has been recorded in the 16-bit mode (p. 42). - On sections recorded in HDV format. • When ...
... twice (once from the DV Interface (i.LINK) cannot be output from the A/V Remote Connector. To return to turn on other DCR-HC52/HC54 camcorders). When the tape has been recorded in 12-bit mode (p. 42) without erasing the original sound. Recording sound Insert a recorded cassette...reverse direction: (frame) t [ySLOW] (double speed) To reverse direction: (frame) t (double speed) (frame) during playback pause. Your camcorder starts audio recording via an i.LINK cable. - When the tape has been recorded in the 16-bit mode (p. 42). - On sections recorded in HDV format. • When ...

Operating Guide
Page 42
...other than CAMERA. z Tips • The demonstration will be used on the LCD screen. • Your camcorder offers [ENG[SIMP]] (simplified English) for details on selecting menu items. USB STREAM (DCR-HC54) You can select the language to PLAY/ EDIT or CAMERA with B. When you touch the screen during ... described below . - USB STREAM/LANGUAGE, etc. LP (LP) Increases the recording time to turn on your computer (USB Streaming) via the USB cable. LANGUAGE You can view the pictures displayed on the screen of your native tongue among the options. TAPE SET menu - AUDIO MODE B 12BIT Records ...
...other than CAMERA. z Tips • The demonstration will be used on the LCD screen. • Your camcorder offers [ENG[SIMP]] (simplified English) for details on selecting menu items. USB STREAM (DCR-HC54) You can select the language to PLAY/ EDIT or CAMERA with B. When you touch the screen during ... described below . - USB STREAM/LANGUAGE, etc. LP (LP) Increases the recording time to turn on your computer (USB Streaming) via the USB cable. LANGUAGE You can view the pictures displayed on the screen of your native tongue among the options. TAPE SET menu - AUDIO MODE B 12BIT Records ...
Operating Guide
Page 44
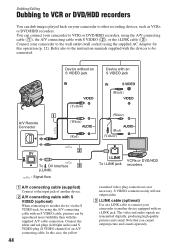
... to VCR or DVD/HDD recorders You can dub images played back on your camcorder to VCRs or DVD/HDD recorders, using the A/V connecting cable (1), the A/V connecting cable with S VIDEO (2), or the i.LINK cable (3). S VIDEO connection only will not output audio. Note that you cannot output... white and red plugs (left/right audio) and S VIDEO plug (S VIDEO channel) of another device equipped with an S VIDEO cable, pictures can connect your camcorder to be reproduced more faithfully than with the devices to another device. Device without an S VIDEO jack Device with an S VIDEO...
... to VCR or DVD/HDD recorders You can dub images played back on your camcorder to VCRs or DVD/HDD recorders, using the A/V connecting cable (1), the A/V connecting cable with S VIDEO (2), or the i.LINK cable (3). S VIDEO connection only will not output audio. Note that you cannot output... white and red plugs (left/right audio) and S VIDEO plug (S VIDEO channel) of another device equipped with an S VIDEO cable, pictures can connect your camcorder to be reproduced more faithfully than with the devices to another device. Device without an S VIDEO jack Device with an S VIDEO...
Operating Guide
Page 45
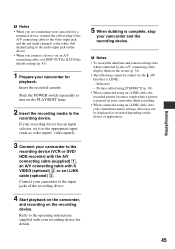
b Notes • To record the date/time and camera settings data when connected by the A/V connecting cable, display them on the device. • When you are connecting your camcorder to turn on the PLAY/EDIT lamp. 2 Insert the recording media in the recording device. If your recording ... the POWER switch repeatedly to the recording device (VCR or DVD/ HDD recorder) with the A/V connecting cable (supplied) 1, an A/V connecting cable with your camcorder to the input jacks of the A/V connecting cable to the video input jack, and the red (right channel) or the white (left channel) plug ...
b Notes • To record the date/time and camera settings data when connected by the A/V connecting cable, display them on the device. • When you are connecting your camcorder to turn on the PLAY/EDIT lamp. 2 Insert the recording media in the recording device. If your recording ... the POWER switch repeatedly to the recording device (VCR or DVD/ HDD recorder) with the A/V connecting cable (supplied) 1, an A/V connecting cable with your camcorder to the input jacks of the A/V connecting cable to the video input jack, and the red (right channel) or the white (left channel) plug ...
Operating Guide
Page 46
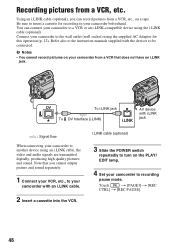
...on the PLAY/ EDIT lamp. 4 Set your camcorder from a VCR, etc. DV To i.LINK jack AV device with i.LINK To DV Interface (i.LINK) jack i.LINK : Signal flow When connecting your camcorder to another device using the i.LINK cable (optional). Note that does not have an i....the instruction manuals supplied with an i.LINK cable. 2 Insert a cassette into the VCR. Using an i.LINK cable (optional), you cannot output picture and sound separately. 1 Connect your camcorder with the devices to your VCR, etc., to be connected. i.LINK cable (optional) 3 Slide the POWER switch ...
...on the PLAY/ EDIT lamp. 4 Set your camcorder from a VCR, etc. DV To i.LINK jack AV device with i.LINK To DV Interface (i.LINK) jack i.LINK : Signal flow When connecting your camcorder to another device using the i.LINK cable (optional). Note that does not have an i....the instruction manuals supplied with an i.LINK cable. 2 Insert a cassette into the VCR. Using an i.LINK cable (optional), you cannot output picture and sound separately. 1 Connect your camcorder with the devices to your VCR, etc., to be connected. i.LINK cable (optional) 3 Slide the POWER switch ...
Operating Guide
Page 47
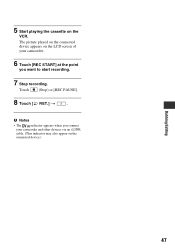
5 Start playing the cassette on the connected device.) Dubbing/Editing 47 b Notes • The indicator appears when you want to start recording. 7 Stop recording. The picture played on the connected device appears on the LCD screen of your camcorder. 6 Touch [REC START] at the point you connect your camcorder and other devices via an i.LINK cable. (This indicator may also appear on the VCR. Touch (Stop) or [REC PAUSE]. 8 Touch [ RET.] t .
5 Start playing the cassette on the connected device.) Dubbing/Editing 47 b Notes • The indicator appears when you want to start recording. 7 Stop recording. The picture played on the connected device appears on the LCD screen of your camcorder. 6 Touch [REC START] at the point you connect your camcorder and other devices via an i.LINK cable. (This indicator may also appear on the VCR. Touch (Stop) or [REC PAUSE]. 8 Touch [ RET.] t .
Operating Guide
Page 49
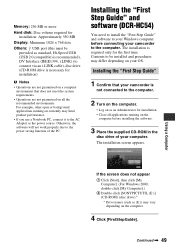
Contents to connect via an i.LINK cable), disc drive (CD-ROM drive is necessary for installation) b Notes • Operations are not guaranteed on a computer environment that your camcorder to the power saving function of your computer. The installation screen appears. Continued , 49 Memory: 256 ...Interface (IEEE1394, i.LINK) (to be installed and procedures may differ depending on your OS. Installing the "First Step Guide" and software (DCR-HC54) You need to install the "First Step Guide" and software to your Windows computer before installing the software. 3 Place the supplied ...
Contents to connect via an i.LINK cable), disc drive (CD-ROM drive is necessary for installation) b Notes • Operations are not guaranteed on a computer environment that your camcorder to the power saving function of your computer. The installation screen appears. Continued , 49 Memory: 256 ...Interface (IEEE1394, i.LINK) (to be installed and procedures may differ depending on your OS. Installing the "First Step Guide" and software (DCR-HC54) You need to install the "First Step Guide" and software to your Windows computer before installing the software. 3 Place the supplied ...
Operating Guide
Page 55
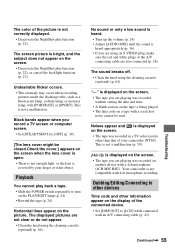
..., or mercury lamp, with 4ch microphone recording. This is not a malfunction. Dubbing/Editing/Connecting to [LCD] while connected with an A/V connecting cable (p. 43). Noises appear and on the display of the connected device. • Set [DISP OUT] to other devices Time code and other information... • There is not enough light, or the lens is covered by your finger or other than that of your camcorder (NTSC). This is not a malfunction (p. 59). Your camcorder is not compatible with [PORTRAIT] or [SPORT]. Playback You cannot play back a tape. • Slide the POWER...
..., or mercury lamp, with 4ch microphone recording. This is not a malfunction. Dubbing/Editing/Connecting to [LCD] while connected with an A/V connecting cable (p. 43). Noises appear and on the display of the connected device. • Set [DISP OUT] to other devices Time code and other information... • There is not enough light, or the lens is covered by your finger or other than that of your camcorder (NTSC). This is not a malfunction (p. 59). Your camcorder is not compatible with [PORTRAIT] or [SPORT]. Playback You cannot play back a tape. • Slide the POWER...
Operating Guide
Page 56
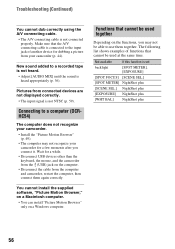
...Picture Motion Browser," on a Macintosh computer. • You can install "Picture Motion Browser" only on the computer. • Disconnect the cable from your camcorder. • Install the "Picture Motion Browser" (p. 49). • The computer may not be used at the same time. The following... list shows examples of another device for dubbing a picture from the computer and camcorder, restart the computer, then connect them together. Functions that the A/V connecting cable is not connected properly. New sound added to a recorded tape is not heard. • Adjust...
...Picture Motion Browser," on a Macintosh computer. • You can install "Picture Motion Browser" only on the computer. • Disconnect the cable from your camcorder. • Install the "Picture Motion Browser" (p. 49). • The computer may not be used at the same time. The following... list shows examples of another device for dubbing a picture from the computer and camcorder, restart the computer, then connect them together. Functions that the A/V connecting cable is not connected properly. New sound added to a recorded tape is not heard. • Adjust...
Operating Guide
Page 61
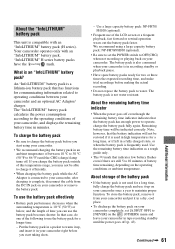
... charging is not used . About storage of the battery pack • If the battery pack is complete, disconnect the cable from your camcorder and put it up , and insert it is used in high temperatures for a long time, or if left in a fully charged state, ...the remaining battery time in recording standby or playback pause. • Have spare battery packs ready for communicating information related to [NEVER] on your camcorder or remove the battery pack. Remaining battery time will not be indicated correctly. Use the remaining battery time indication as a rough guide only. •...
... charging is not used . About storage of the battery pack • If the battery pack is complete, disconnect the cable from your camcorder and put it up , and insert it is used in high temperatures for a long time, or if left in a fully charged state, ...the remaining battery time in recording standby or playback pause. • Have spare battery packs ready for communicating information related to [NEVER] on your camcorder or remove the battery pack. Remaining battery time will not be indicated correctly. Use the remaining battery time indication as a rough guide only. •...
Operating Guide
Page 62
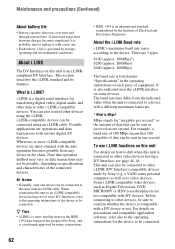
...Note that operation method may vary, or data transactions may differ from any device in one second. There are not compatible with an i.LINK cable. a VAIO series personal computer) as well as Digital Televisions, DVD, MICROMV or HDV recorders/players are 3 types. Some i.LINK compatible...piece of data can be connected using the i.LINK. i.LINK is a digital serial interface for the IEEE 1394 data transport bus proposed by Sony, and is a trademark approved by many corporations. • IEEE 1394 is connected to other i.LINK-compatible devices. Before connecting to other...
...Note that operation method may vary, or data transactions may differ from any device in one second. There are not compatible with an i.LINK cable. a VAIO series personal computer) as well as Digital Televisions, DVD, MICROMV or HDV recorders/players are 3 types. Some i.LINK compatible...piece of data can be connected using the i.LINK. i.LINK is a digital serial interface for the IEEE 1394 data transport bus proposed by Sony, and is a trademark approved by many corporations. • IEEE 1394 is connected to other i.LINK-compatible devices. Before connecting to other...
Operating Guide
Page 63
...wash with the cassette lid open. Moisture condensation If your camcorder is moisture inside your camcorder, [%Z Moisture condensation. Turn off for about one hour with plenty of water and consult a doctor. About the required i.LINK cable Use the Sony i.LINK 4-pin-to temperatures above 60 °C (140 ...°F), such as under direct sunlight, near heaters or in a car parked in the sun. Near strong magnetic fields or mechanical vibration. If your camcorder gets wet, it . if any...
...wash with the cassette lid open. Moisture condensation If your camcorder is moisture inside your camcorder, [%Z Moisture condensation. Turn off for about one hour with plenty of water and consult a doctor. About the required i.LINK cable Use the Sony i.LINK 4-pin-to temperatures above 60 °C (140 ...°F), such as under direct sunlight, near heaters or in a car parked in the sun. Near strong magnetic fields or mechanical vibration. If your camcorder gets wet, it . if any...
Operating Guide
Page 75
... dubbing 35 AC Adaptor 12 AUDIO MIX 36 AUDIO MODE 42 A.SHUT OFF (Auto shut off 43 A/V connecting cable .....28, 44 B Backlight 23, 54 Battery 12, 61 BEACH 32 BEEP 33 BLACK 33 B&W 38 C ... DISP GUIDE (Display guide 73 DISP OUT (Display output 43 Display indicators 72 Dubbing 44 E Easy Handycam 19, 29 EDITSEARCH 26, 39 END SCH (END SEARCH 26, 54 EXPOSURE 32 F FADER 32 ... G Getting started 11 GUIDEFRAME 43 I INDOOR 33 "InfoLITHIUM" battery pack 61 Install 49 i.LINK 62 i.LINK cable 44, 46 L LANDSCAPE 31 LANGUAGE 42 LCD 43 LCD BRT (LCD bright)....... 34 LCD B.L. (LCD back ...
... dubbing 35 AC Adaptor 12 AUDIO MIX 36 AUDIO MODE 42 A.SHUT OFF (Auto shut off 43 A/V connecting cable .....28, 44 B Backlight 23, 54 Battery 12, 61 BEACH 32 BEEP 33 BLACK 33 B&W 38 C ... DISP GUIDE (Display guide 73 DISP OUT (Display output 43 Display indicators 72 Dubbing 44 E Easy Handycam 19, 29 EDITSEARCH 26, 39 END SCH (END SEARCH 26, 54 EXPOSURE 32 F FADER 32 ... G Getting started 11 GUIDEFRAME 43 I INDOOR 33 "InfoLITHIUM" battery pack 61 Install 49 i.LINK 62 i.LINK cable 44, 46 L LANDSCAPE 31 LANGUAGE 42 LCD 43 LCD BRT (LCD bright)....... 34 LCD B.L. (LCD back ...
Operating Guide
Page 76
Index (Continued) Recording time 14 REMAIN 42 Reversal Playback 35 S S VIDEO cable 28, 44 SCENE SEL 31 Searching for the starting point 26 SEPIA 38 SETUP MENU menu ...........42 SNOW 32 SOLARIZE 38 SP (Standard Play 42 ...
Index (Continued) Recording time 14 REMAIN 42 Reversal Playback 35 S S VIDEO cable 28, 44 SCENE SEL 31 Searching for the starting point 26 SEPIA 38 SETUP MENU menu ...........42 SNOW 32 SOLARIZE 38 SP (Standard Play 42 ...


