

Operating Guide
Page 9
... 16 Step 4: Making setting adjustments before recording 17 Step 5: Inserting a Cassette ......... 18 Recording/Playback Easy Recording/Playback (Easy Handycam 19 Recording 21 Zooming 22 Recording in dark places (NightShot plus 22 Adjusting the exposure for backlit subjects 23 Recording in mirror...44 Recording pictures from a VCR, etc 46 Using a Computer What you can do with Windows computer (DCR-HC54 48 Installing the "First Step Guide" and software (DCR-HC54 49 Viewing "First Step Guide" (DCRHC54 51 Troubleshooting Troubleshooting 52 Warning indicators and messages 57 Continued ,...
... 16 Step 4: Making setting adjustments before recording 17 Step 5: Inserting a Cassette ......... 18 Recording/Playback Easy Recording/Playback (Easy Handycam 19 Recording 21 Zooming 22 Recording in dark places (NightShot plus 22 Adjusting the exposure for backlit subjects 23 Recording in mirror...44 Recording pictures from a VCR, etc 46 Using a Computer What you can do with Windows computer (DCR-HC54 48 Installing the "First Step Guide" and software (DCR-HC54 49 Viewing "First Step Guide" (DCRHC54 51 Troubleshooting Troubleshooting 52 Warning indicators and messages 57 Continued ,...
Operating Guide
Page 11
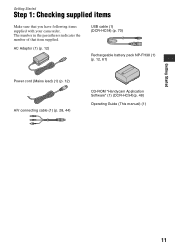
AC Adaptor (1) (p. 12) USB cable (1) (DCR-HC54) (p. 70) Rechargeable battery pack NP-FH30 (1) (p. 12, 61) Power cord (Mains lead) (1) (p. 12) A/V connecting cable (1) (p. 28, 44) CD-ROM "Handycam Application Software" (1) (DCR-HC54)(p. 48) Operating Guide (This manual) (1) Getting Started 11 The number in the parentheses indicates the number of that you have following items supplied with your camcorder. Getting Started Step 1: Checking supplied items Make sure that item supplied.
AC Adaptor (1) (p. 12) USB cable (1) (DCR-HC54) (p. 70) Rechargeable battery pack NP-FH30 (1) (p. 12, 61) Power cord (Mains lead) (1) (p. 12) A/V connecting cable (1) (p. 28, 44) CD-ROM "Handycam Application Software" (1) (DCR-HC54)(p. 48) Operating Guide (This manual) (1) Getting Started 11 The number in the parentheses indicates the number of that you have following items supplied with your camcorder. Getting Started Step 1: Checking supplied items Make sure that item supplied.

Operating Guide
Page 37
... SET menu (p. 41) LCD B.L. TAPE SET menu (p. 42) REC MODE z z SP AUDIO MODE z - 12BIT REMAIN z z AUTO SETUP MENU menu (p. 42) USB STREAM (DCR-HC54) z z OFF LANGUAGE z z z DEMO MODE z - CAMERA PLAY/EDIT Easy Handycam MANUAL SET menu (p. 38) P EFFECT z z OFF CAMERA SET menu (p. 39) D ZOOM z - VF B.L. OFF WIDE SEL z - 4:3 STEADYSHOT z - ON EDITSEARCH z - z z BRT NORMAL...
... SET menu (p. 41) LCD B.L. TAPE SET menu (p. 42) REC MODE z z SP AUDIO MODE z - 12BIT REMAIN z z AUTO SETUP MENU menu (p. 42) USB STREAM (DCR-HC54) z z OFF LANGUAGE z z z DEMO MODE z - CAMERA PLAY/EDIT Easy Handycam MANUAL SET menu (p. 38) P EFFECT z z OFF CAMERA SET menu (p. 39) D ZOOM z - VF B.L. OFF WIDE SEL z - 4:3 STEADYSHOT z - ON EDITSEARCH z - z z BRT NORMAL...

Operating Guide
Page 42
... the LCD screen. • Your camcorder offers [ENG[SIMP]] (simplified English) for details on your computer (USB Streaming) via the USB cable. LANGUAGE You can view the pictures displayed on the screen of your camcorder on selecting menu items. USB STREAM (DCR-HC54) You can select the language ...When a cassette is set the POWER switch to PLAY/ EDIT or CAMERA with a cassette inserted. • When you cannot find your camcorder, and slide the POWER switch repeatedly to view the demonstration about 10 minutes after you touch the screen during the demonstration. (The demonstration...
... the LCD screen. • Your camcorder offers [ENG[SIMP]] (simplified English) for details on your computer (USB Streaming) via the USB cable. LANGUAGE You can view the pictures displayed on the screen of your camcorder on selecting menu items. USB STREAM (DCR-HC54) You can select the language ...When a cassette is set the POWER switch to PLAY/ EDIT or CAMERA with a cassette inserted. • When you cannot find your camcorder, and slide the POWER switch repeatedly to view the demonstration about 10 minutes after you touch the screen during the demonstration. (The demonstration...
Operating Guide
Page 49
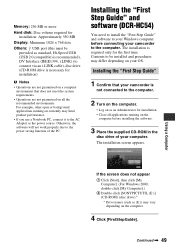
Installing the "First Step Guide" and software (DCR-HC54) You need to install the "First Step ... as standard, Hi-Speed USB (USB 2.0 compatible) is recommended), DV Interface (IEEE1394, i.LINK) (to the computer. For example, other open or background applications running on the computer before connecting your camcorder to connect via an i....that does not meet the system requirements. • Operations are not guaranteed on a computer environment that your camcorder is required only for the first time. Contents to the power saving function of your computer. Continued , 49...
Installing the "First Step Guide" and software (DCR-HC54) You need to install the "First Step ... as standard, Hi-Speed USB (USB 2.0 compatible) is recommended), DV Interface (IEEE1394, i.LINK) (to the computer. For example, other open or background applications running on the computer before connecting your camcorder to connect via an i....that does not meet the system requirements. • Operations are not guaranteed on a computer environment that your camcorder is required only for the first time. Contents to the power saving function of your computer. Continued , 49...
Operating Guide
Page 56
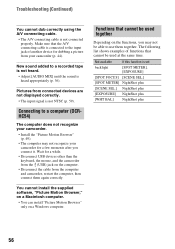
... "Picture Motion Browser" only on the computer. • Disconnect the cable from the (USB) jack on a Windows computer. Connecting to a computer (DCRHC54) The computer does not recognize your camcorder. • Install the "Picture Motion Browser" (p. 49). • The computer may ...following list shows examples of another device for dubbing a picture from your camcorder for a while. • Disconnect USB devices other than the keyboard, the mouse, and the camcorder from the computer and camcorder, restart the computer, then connect them together. Troubleshooting (Continued) You ...
... "Picture Motion Browser" only on the computer. • Disconnect the cable from the (USB) jack on a Windows computer. Connecting to a computer (DCRHC54) The computer does not recognize your camcorder. • Install the "Picture Motion Browser" (p. 49). • The computer may ...following list shows examples of another device for dubbing a picture from your camcorder for a while. • Disconnect USB devices other than the keyboard, the mouse, and the camcorder from the computer and camcorder, restart the computer, then connect them together. Troubleshooting (Continued) You ...
Operating Guide
Page 67
...; 3 3/8 × 4 1/2 in.) (w/h/d) including the projecting parts 63 × 85 × 115 mm (2 1/2 × 3 3/8 × 4 5/8 in.) (w/h/d) including the projecting parts with less than 2.2 kΩ (kilohms) USB jack (DCR-HC54) mini-B DV input/output jack i.LINK Interface (IEEE1394, 4-pin connector S100) LCD screen Picture 6.2 cm (2.5 type) Total dot number 123 200 (560 × 220...
...; 3 3/8 × 4 1/2 in.) (w/h/d) including the projecting parts 63 × 85 × 115 mm (2 1/2 × 3 3/8 × 4 5/8 in.) (w/h/d) including the projecting parts with less than 2.2 kΩ (kilohms) USB jack (DCR-HC54) mini-B DV input/output jack i.LINK Interface (IEEE1394, 4-pin connector S100) LCD screen Picture 6.2 cm (2.5 type) Total dot number 123 200 (560 × 220...

Operating Guide
Page 70
Identifying parts and controls (Continued) A DISP/BATT INFO button (13, 17) B EASY button (19) C RESET button Initializes all the settings, including the setting of the date and time. D LCD screen/touch panel (17, 72) E Zoom buttons (22) F REC START/STOP button (19, 21) G Speaker Playback sounds comes out from the speaker. H BATT (battery release) PUSH button (13) I CHG (charge) lamp (12) J For DCR-HC54: (USB) jack K . (back light) button (23) 70 For how to adjust the volume, see page 24.
Identifying parts and controls (Continued) A DISP/BATT INFO button (13, 17) B EASY button (19) C RESET button Initializes all the settings, including the setting of the date and time. D LCD screen/touch panel (17, 72) E Zoom buttons (22) F REC START/STOP button (19, 21) G Speaker Playback sounds comes out from the speaker. H BATT (battery release) PUSH button (13) I CHG (charge) lamp (12) J For DCR-HC54: (USB) jack K . (back light) button (23) 70 For how to adjust the volume, see page 24.
Operating Guide
Page 76
... & Sunset 31 T Tape counter 72 TAPE SET menu 42 Time code 72 Tripod 71 TV 28 TV color systems 59 TWILIGHT 31 U USAGE GUIDE 25 USB STREAM 42 Using abroad 59 V V SPD PLAY (Various speed playback) .....34 76 VCR SET menu 40 VF B.L. (Viewfinder back light)........ 41 VOL (Volume 24 V-OUT...
... & Sunset 31 T Tape counter 72 TAPE SET menu 42 Time code 72 Tripod 71 TV 28 TV color systems 59 TWILIGHT 31 U USAGE GUIDE 25 USB STREAM 42 Using abroad 59 V V SPD PLAY (Various speed playback) .....34 76 VCR SET menu 40 VF B.L. (Viewfinder back light)........ 41 VOL (Volume 24 V-OUT...


