

Operating Guide
Page 3
... should be equipped with a cloth or other ). Overloading Do not overload wall outlets (wall sockets), extension cords or convenience receptacles beyond their capacity, since this manual for cleaning the exterior of power source indicated on the set through openings as they may fall, causing serious injury to a child or an adult...
... should be equipped with a cloth or other ). Overloading Do not overload wall outlets (wall sockets), extension cords or convenience receptacles beyond their capacity, since this manual for cleaning the exterior of power source indicated on the set through openings as they may fall, causing serious injury to a child or an adult...
Operating Guide
Page 5
...device may not cause harmful interference, and (2) this manual thoroughly, and retain it for the FCC related matters only. The number below . Regulatory Information Declaration of Conformity Trade Name: SONY Model No.: DCR-HC54 Responsible Party: Sony Electronics Inc. Record the serial number in the ... Caution: Do not handle damaged or leaking Lithium-Ion batteries. Model No. Declaration of Conformity Trade Name: SONY Model No.: DCR-HC52 Responsible Party: Sony Electronics Inc. and CANADA RECYCLING LITHIUM-ION BATTERIES Lithium-Ion batteries are located on the bottom. ACSerial No....
...device may not cause harmful interference, and (2) this manual thoroughly, and retain it for the FCC related matters only. The number below . Regulatory Information Declaration of Conformity Trade Name: SONY Model No.: DCR-HC54 Responsible Party: Sony Electronics Inc. Record the serial number in the ... Caution: Do not handle damaged or leaking Lithium-Ion batteries. Model No. Declaration of Conformity Trade Name: SONY Model No.: DCR-HC52 Responsible Party: Sony Electronics Inc. and CANADA RECYCLING LITHIUM-ION BATTERIES Lithium-Ion batteries are located on the bottom. ACSerial No....
Operating Guide
Page 6
Read thid first (Continued) Notes DCR-HC52 and DCR-HC54 are to be used with the equipment in order ...of California, USA only Perchlorate Material - Consult the dealer or an experienced radio/TV technician for connecting the camcorder to a computer and using the supplied software (stored on , the user is not dustproof, dripproof or ...approved in a particular installation. For DCR-HC54 "First Step Guide" for help. "Operating Guide" (This manual) - These limits are cautioned that interference will not occur in this manual could void your camcorder to radio or television reception, ...
Read thid first (Continued) Notes DCR-HC52 and DCR-HC54 are to be used with the equipment in order ...of California, USA only Perchlorate Material - Consult the dealer or an experienced radio/TV technician for connecting the camcorder to a computer and using the supplied software (stored on , the user is not dustproof, dripproof or ...approved in a particular installation. For DCR-HC54 "First Step Guide" for help. "Operating Guide" (This manual) - These limits are cautioned that interference will not occur in this manual could void your camcorder to radio or television reception, ...

Operating Guide
Page 7
.... • TV color systems differ depending on the country/region. About this manual are manufactured using a digital still camera, and therefore may appear different. • The illustrations used on the model DCR-HC54. It adopts the MTF* measurement system for long periods of time may... screen and the viewfinder are based on this manual • The images of the LCD screen and the viewfinder used for effective use. About the Carl Zeiss lens Your camcorder is indicated on -screen displays in Germany, and Sony Corporation, and produces superior images. About the ...
.... • TV color systems differ depending on the country/region. About this manual are manufactured using a digital still camera, and therefore may appear different. • The illustrations used on the model DCR-HC54. It adopts the MTF* measurement system for long periods of time may... screen and the viewfinder are based on this manual • The images of the LCD screen and the viewfinder used for effective use. About the Carl Zeiss lens Your camcorder is indicated on -screen displays in Germany, and Sony Corporation, and produces superior images. About the ...

Operating Guide
Page 9
...46 Using a Computer What you can do with Windows computer (DCR-HC54 48 Installing the "First Step Guide" and software (DCR-HC54 49 Viewing "First Step Guide" (DCRHC54 51 Troubleshooting Troubleshooting...recording 17 Step 5: Inserting a Cassette ......... 18 Recording/Playback Easy Recording/Playback (Easy Handycam 19 Recording 21 Zooming 22 Recording in dark places (NightShot plus 22 Adjusting the exposure...26 Searching for the last scene of the most recent recording (END SEARCH 26 Searching manually (EDIT SEARCH 26 Reviewing the most recently recorded scenes (Rec review 26 Playing the ...
...46 Using a Computer What you can do with Windows computer (DCR-HC54 48 Installing the "First Step Guide" and software (DCR-HC54 49 Viewing "First Step Guide" (DCRHC54 51 Troubleshooting Troubleshooting...recording 17 Step 5: Inserting a Cassette ......... 18 Recording/Playback Easy Recording/Playback (Easy Handycam 19 Recording 21 Zooming 22 Recording in dark places (NightShot plus 22 Adjusting the exposure...26 Searching for the last scene of the most recent recording (END SEARCH 26 Searching manually (EDIT SEARCH 26 Reviewing the most recently recorded scenes (Rec review 26 Playing the ...
Operating Guide
Page 11
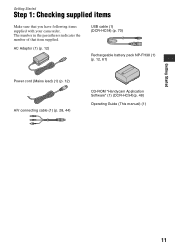
Getting Started Step 1: Checking supplied items Make sure that item supplied. AC Adaptor (1) (p. 12) USB cable (1) (DCR-HC54) (p. 70) Rechargeable battery pack NP-FH30 (1) (p. 12, 61) Power cord (Mains lead) (1) (p. 12) A/V connecting cable (1) (p. 28, 44) CD-ROM "Handycam Application Software" (1) (DCR-HC54)(p. 48) Operating Guide (This manual) (1) Getting Started 11 The number in the parentheses indicates the number of that you have following items supplied with your camcorder.
Getting Started Step 1: Checking supplied items Make sure that item supplied. AC Adaptor (1) (p. 12) USB cable (1) (DCR-HC54) (p. 70) Rechargeable battery pack NP-FH30 (1) (p. 12, 61) Power cord (Mains lead) (1) (p. 12) A/V connecting cable (1) (p. 28, 44) CD-ROM "Handycam Application Software" (1) (DCR-HC54)(p. 48) Operating Guide (This manual) (1) Getting Started 11 The number in the parentheses indicates the number of that you have following items supplied with your camcorder.

Operating Guide
Page 22
Remove the conversion lens (optional) if it is attached. • Adjust the focus manually ([FOCUS], p. 30) when it further for telephoto. 22 Infrared port Set the NIGHTSHOT PLUS switch to a level greater than 40 ×. b Notes • [STEADYSHOT] may ... may also be recorded. • You cannot change the zoom speed with the zoom buttons on the LCD frame. • The minimum possible distance between camcorder and subject while maintaining sharp focus is hard to focus automatically. • Do not use the NightShot plus ) Wider range of view: (Wide angle) Close...
Remove the conversion lens (optional) if it is attached. • Adjust the focus manually ([FOCUS], p. 30) when it further for telephoto. 22 Infrared port Set the NIGHTSHOT PLUS switch to a level greater than 40 ×. b Notes • [STEADYSHOT] may ... may also be recorded. • You cannot change the zoom speed with the zoom buttons on the LCD frame. • The minimum possible distance between camcorder and subject while maintaining sharp focus is hard to focus automatically. • Do not use the NightShot plus ) Wider range of view: (Wide angle) Close...
Operating Guide
Page 26
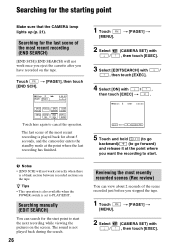
Searching manually (EDIT SEARCH) You can view about 5 seconds, and the camcorder enters the standby mode at the point where you want the recording to start the next recording while viewing the pictures on the screen. Searching ...
Searching manually (EDIT SEARCH) You can view about 5 seconds, and the camcorder enters the standby mode at the point where you want the recording to start the next recording while viewing the pictures on the screen. Searching ...
Operating Guide
Page 28
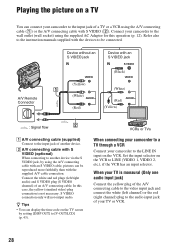
... (p. 12). z Tips • You can display the time code on the VCR. VCRs or TVs When connecting your camcorder to a TV through a VCR Connect your camcorder to the LINE IN input on the TV screen by using the supplied AC Adaptor for this case, the yellow (standard video... connecting cable with an S VIDEO cable, pictures can be connected. Refer also to the instruction manuals supplied with S VIDEO (2). S VIDEO connection only will not output audio. Playing the picture on a TV You can connect your camcorder to the input jack of a TV or a VCR using the A/V connecting cable (1) or the...
... (p. 12). z Tips • You can display the time code on the VCR. VCRs or TVs When connecting your camcorder to a TV through a VCR Connect your camcorder to the LINE IN input on the TV screen by using the supplied AC Adaptor for this case, the yellow (standard video... connecting cable with an S VIDEO cable, pictures can be connected. Refer also to the instruction manuals supplied with S VIDEO (2). S VIDEO connection only will not output audio. Playing the picture on a TV You can connect your camcorder to the input jack of a TV or a VCR using the A/V connecting cable (1) or the...

Operating Guide
Page 30
...telephoto. b Notes • If you want to focus on a certain subject intentionally. 1 Touch [MANUAL]. 9 appears. 2 Touch (focusing on close range, move the power zoom lever to W (wide angle),... then adjust the focus. 30 The available functions during Easy Handycam operation are selected. When you want to record a subject at close subjects)/ (focusing on...be adjusted farther away. 3 Touch . b Notes • The minimum possible distance between camcorder and subject while maintaining sharp focus is about 1 cm (about 13/32 in the center...
...telephoto. b Notes • If you want to focus on a certain subject intentionally. 1 Touch [MANUAL]. 9 appears. 2 Touch (focusing on close range, move the power zoom lever to W (wide angle),... then adjust the focus. 30 The available functions during Easy Handycam operation are selected. When you want to record a subject at close subjects)/ (focusing on...be adjusted farther away. 3 Touch . b Notes • The minimum possible distance between camcorder and subject while maintaining sharp focus is about 1 cm (about 13/32 in the center...

Operating Guide
Page 31
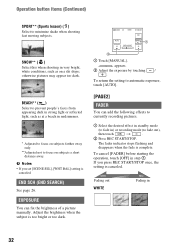
... as subjects in the spotlight on stage. 60min STBY SPOT METER 0:00:00 1 AUTO END 2 1 Touch the point where you set to [MANUAL]. Continued , 31 Using the Menu function. SPOT METER (Flexible spot meter) You can record pictures effectively in twilight scenes. MENU See page 37.... the subject, so that it is recorded in suitable brightness even when there is automatically set [SPOT METER], [EXPOSURE] is strong contrast between the camcorder and the subject. PORTRAIT (Soft portrait) ( ) Select to prevent people's faces from focusing on the screen. LANDSCAPE* ( ) Select to fix...
... as subjects in the spotlight on stage. 60min STBY SPOT METER 0:00:00 1 AUTO END 2 1 Touch the point where you set to [MANUAL]. Continued , 31 Using the Menu function. SPOT METER (Flexible spot meter) You can record pictures effectively in twilight scenes. MENU See page 37.... the subject, so that it is recorded in suitable brightness even when there is automatically set [SPOT METER], [EXPOSURE] is strong contrast between the camcorder and the subject. PORTRAIT (Soft portrait) ( ) Select to prevent people's faces from focusing on the screen. LANDSCAPE* ( ) Select to fix...
Operating Guide
Page 32
...** ( ) Select to prevent people's faces from appearing dark in strong light or reflected light, such as on a ski slope; AL 2 1 Touch [MANUAL]. To cancel [FADER] before starting the operation, touch [OFF] in 32 SNOW** ( ) Select this when shooting in very bright, white conditions, such as...on subjects farther away only. **Adjusted not to automatic exposure, touch [AUTO]. [PAGE2] FADER You can fix the brightness of a picture manually. EXPOSURE You can add the following effects to currently recording pictures. 1 Select the desired effect in standby mode (to fade in midsummer. *...
...** ( ) Select to prevent people's faces from appearing dark in strong light or reflected light, such as on a ski slope; AL 2 1 Touch [MANUAL]. To cancel [FADER] before starting the operation, touch [OFF] in 32 SNOW** ( ) Select this when shooting in very bright, white conditions, such as...on subjects farther away only. **Adjusted not to automatic exposure, touch [AUTO]. [PAGE2] FADER You can fix the brightness of a picture manually. EXPOSURE You can add the following effects to currently recording pictures. 1 Select the desired effect in standby mode (to fade in midsummer. *...

Operating Guide
Page 37
...(z) vary depending on which lamp is lit. • During Easy Handycam operation, the following settings are automatically applied (p. 19). CAMERA PLAY/EDIT Easy Handycam MANUAL SET menu (p. 38) P EFFECT z z OFF CAMERA SET menu... (p. 39) D ZOOM z - VF B.L. ON EDITSEARCH z - z - ON OTHERS menu (p. 43) WORLD TIME z z -* A.SHUT OFF z z 5min DISP OUT z z LCD GUIDEFRAME z - TAPE SET menu (p. 42) REC MODE z z SP AUDIO MODE z - 12BIT REMAIN z z AUTO SETUP MENU menu (p. 42) USB STREAM (DCR...
...(z) vary depending on which lamp is lit. • During Easy Handycam operation, the following settings are automatically applied (p. 19). CAMERA PLAY/EDIT Easy Handycam MANUAL SET menu (p. 38) P EFFECT z z OFF CAMERA SET menu... (p. 39) D ZOOM z - VF B.L. ON EDITSEARCH z - z - ON OTHERS menu (p. 43) WORLD TIME z z -* A.SHUT OFF z z 5min DISP OUT z z LCD GUIDEFRAME z - TAPE SET menu (p. 42) REC MODE z z SP AUDIO MODE z - 12BIT REMAIN z z AUTO SETUP MENU menu (p. 42) USB STREAM (DCR...
Operating Guide
Page 38
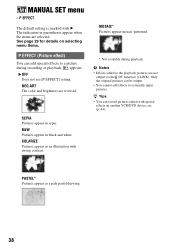
... (i.LINK). Only the original pictures can add special effects to a picture during playback. See page 29 for details on another VCR/DVD device, etc. (p. 44). MANUAL SET menu - B OFF Does not use [P EFFECT] setting. SEPIA Pictures appear in parentheses appear when the items are selected. MOSAIC* Pictures appear mosaic-patterned. * Not...
... (i.LINK). Only the original pictures can add special effects to a picture during playback. See page 29 for details on another VCR/DVD device, etc. (p. 44). MANUAL SET menu - B OFF Does not use [P EFFECT] setting. SEPIA Pictures appear in parentheses appear when the items are selected. MOSAIC* Pictures appear mosaic-patterned. * Not...
Operating Guide
Page 44
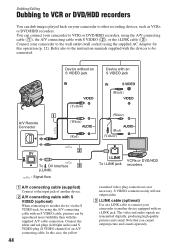
Refer also to the instruction manuals supplied with S VIDEO (2), or the i.LINK cable (3). Connect the white and red plugs (left/right audio) and S VIDEO plug (S VIDEO channel) of another device via ... recorders (standard video) plug connection is not necessary. Dubbing/Editing Dubbing to VCR or DVD/HDD recorders You can be connected. You can connect your camcorder to VCRs or DVD/HDD recorders, using the A/V connecting cable (1), the A/V connecting cable with the devices to be reproduced more faithfully than with an i.LINK...
Refer also to the instruction manuals supplied with S VIDEO (2), or the i.LINK cable (3). Connect the white and red plugs (left/right audio) and S VIDEO plug (S VIDEO channel) of another device via ... recorders (standard video) plug connection is not necessary. Dubbing/Editing Dubbing to VCR or DVD/HDD recorders You can be connected. You can connect your camcorder to VCRs or DVD/HDD recorders, using the A/V connecting cable (1), the A/V connecting cable with the devices to be reproduced more faithfully than with an i.LINK...
Operating Guide
Page 46
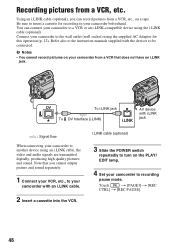
.... b Notes • You cannot record pictures on your camcorder from a VCR, etc., on the PLAY/ EDIT lamp. 4 Set your camcorder beforehand. Touch t [PAGE3] t [REC CTRL] t [REC PAUSE]. 46 Refer also to the instruction manuals supplied with i.LINK To DV Interface (i.LINK) jack i.LINK... : Signal flow When connecting your camcorder to recording pause mode. i.LINK cable (optional) 3 Slide the POWER switch repeatedly to be connected...
.... b Notes • You cannot record pictures on your camcorder from a VCR, etc., on the PLAY/ EDIT lamp. 4 Set your camcorder beforehand. Touch t [PAGE3] t [REC CTRL] t [REC PAUSE]. 46 Refer also to the instruction manuals supplied with i.LINK To DV Interface (i.LINK) jack i.LINK... : Signal flow When connecting your camcorder to recording pause mode. i.LINK cable (optional) 3 Slide the POWER switch repeatedly to be connected...
Operating Guide
Page 48
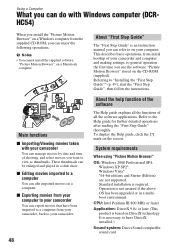
... XP SP2*, Windows Vista* *64-bit editions and Starter (Edition) are not supported. x Exporting movies from initial hookup of your camcorder You can manage movies by date and time of all the software applications. Standard installation is based on DirectX technology. Using a Computer... Refer to "Installing the "First Step Guide"" (p. 49), start the "First Step Guide", then follow the instructions. Operation is an instruction manual you want to your computer. This describes basic operations, from your computer to view as thumbnails. b Notes • You cannot install the...
... XP SP2*, Windows Vista* *64-bit editions and Starter (Edition) are not supported. x Exporting movies from initial hookup of your camcorder You can manage movies by date and time of all the software applications. Standard installation is based on DirectX technology. Using a Computer... Refer to "Installing the "First Step Guide"" (p. 49), start the "First Step Guide", then follow the instructions. Operation is an instruction manual you want to your computer. This describes basic operations, from your computer to view as thumbnails. b Notes • You cannot install the...

Operating Guide
Page 54
... or fast-forwarding. • When using a cassette with battery operation) and therefore increases noise. The cassette is canceled. - [MANUAL] of the tape. Adjust the focus manually (p. 30). [STEADYSHOT] does not function. • Set [STEADYSHOT] to the next. • Perform [END SCH] (p. ... not function. • In the following settings, the backlight function is noisier during Easy Handycam operation (p. 20). This is called the smear effect. Remove the cassette and leave your camcorder for auto focus. A vertical band appears when recording a bright subject. • This ...
... or fast-forwarding. • When using a cassette with battery operation) and therefore increases noise. The cassette is canceled. - [MANUAL] of the tape. Adjust the focus manually (p. 30). [STEADYSHOT] does not function. • Set [STEADYSHOT] to the next. • Perform [END SCH] (p. ... not function. • In the following settings, the backlight function is noisier during Easy Handycam operation (p. 20). This is called the smear effect. Remove the cassette and leave your camcorder for auto focus. A vertical band appears when recording a bright subject. • This ...
Operating Guide
Page 68
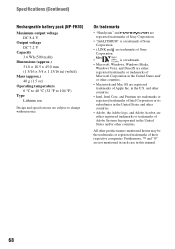
...176;C (32 °F to 104 °F) Type Lithium ion Design and specifications are registered trademarks of Apple Inc. in this manual. 68 and other countries. • Intel, Intel Core, and Pentium are trademarks or registered trademarks of Intel Corporation or its ... and Mac OS are subject to change without notice. On trademarks • "Handycam" and are registered trademarks of Sony Corporation. • "InfoLITHIUM" is a trademark of Sony Corporation. • i.LINK and are trademarks of Sony Corporation. • is a trademark. • Microsoft, Windows, Windows Media,...
...176;C (32 °F to 104 °F) Type Lithium ion Design and specifications are registered trademarks of Apple Inc. in this manual. 68 and other countries. • Intel, Intel Core, and Pentium are trademarks or registered trademarks of Intel Corporation or its ... and Mac OS are subject to change without notice. On trademarks • "Handycam" and are registered trademarks of Sony Corporation. • "InfoLITHIUM" is a trademark of Sony Corporation. • i.LINK and are trademarks of Sony Corporation. • is a trademark. • Microsoft, Windows, Windows Media,...

Operating Guide
Page 73
... MODE (42) Upper right Indicator Meaning DV input (46) Center Indicator % Z Meaning NightShot plus (22) Warning (57) Bottom Indicator 9 . Meaning Flexible spot meter (31)/ Manual exposure (32) Manual focus (30) Backlight (23) Indicator Meaning SCENE SEL. (31) n / EDIT + Picture effect (38) White balance (33) Wide select (39) SteadyShot off (39) EDITSEARCH (39...
... MODE (42) Upper right Indicator Meaning DV input (46) Center Indicator % Z Meaning NightShot plus (22) Warning (57) Bottom Indicator 9 . Meaning Flexible spot meter (31)/ Manual exposure (32) Manual focus (30) Backlight (23) Indicator Meaning SCENE SEL. (31) n / EDIT + Picture effect (38) White balance (33) Wide select (39) SteadyShot off (39) EDITSEARCH (39...


