

Operating Guide
Page 2
Do not expose the batteries to the presence of electric shock to rain or moisture. This symbol is intended to alert the user to the presence of uninsulated "dangerous voltage" within the product's enclosure that may be of sufficient magnitude to constitute a risk of important operating and maintenance (servicing) instructions in the literature accompanying the appliance. 2 This symbol is intended to alert the user to excessive heat such as sunshine, fire or the like. WARNING To reduce fire or shock hazard, do not expose the unit to persons.
Do not expose the batteries to the presence of electric shock to rain or moisture. This symbol is intended to alert the user to the presence of uninsulated "dangerous voltage" within the product's enclosure that may be of sufficient magnitude to constitute a risk of important operating and maintenance (servicing) instructions in the literature accompanying the appliance. 2 This symbol is intended to alert the user to excessive heat such as sunshine, fire or the like. WARNING To reduce fire or shock hazard, do not expose the unit to persons.

Operating Guide
Page 3
... any kind into the power outlet only one blade wider than the other sources, refer to have a suitable outlet installed. Never place the set from battery power, or other ). IMPORTANT SAFEGUARDS For your protection, please read these slots and openings must never be equipped with a cloth or other similar surface. - The...
... any kind into the power outlet only one blade wider than the other sources, refer to have a suitable outlet installed. Never place the set from battery power, or other ). IMPORTANT SAFEGUARDS For your protection, please read these slots and openings must never be equipped with a cloth or other similar surface. - The...
Operating Guide
Page 5
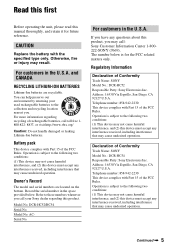
... must accept any interference received, including interference that may cause undesired operation. Declaration of Conformity Trade Name: SONY Model No.: DCR-HC52 Responsible Party: Sony Electronics Inc. Continued , 5 Operation is subject to the following two conditions: (1) This device may not...interference received, including interference that may cause undesired operation. CAUTION Replace the battery with Part 15 of rechargeable batteries, call : Sony Customer Information Center 1-800222-SONY (7669). For customers in the U.S.A. Owner's Record The model and serial ...
... must accept any interference received, including interference that may cause undesired operation. Declaration of Conformity Trade Name: SONY Model No.: DCR-HC52 Responsible Party: Sony Electronics Inc. Continued , 5 Operation is subject to the following two conditions: (1) This device may not...interference received, including interference that may cause undesired operation. CAUTION Replace the battery with Part 15 of rechargeable batteries, call : Sony Customer Information Center 1-800222-SONY (7669). For customers in the U.S.A. Owner's Record The model and serial ...
Operating Guide
Page 6
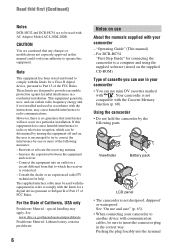
...For the State of the following parts. special handling may apply, See www.dtsc.ca.gov/hazardouswaste/perchlorate Perchlorate Material: Lithium battery contains perchlorate. 6 Notes on a circuit different from that any changes or modifications not expressly approved in this manual could void... Your camcorder is encouraged to try to correct the interference by the following measures: - Increase the separation between the equipment and receiver. - See "On use mini DV cassettes marked with the Cassette Memory function (p. 60). Read thid first (Continued) Notes DCR-HC52 and DCR-HC54 ...
...For the State of the following parts. special handling may apply, See www.dtsc.ca.gov/hazardouswaste/perchlorate Perchlorate Material: Lithium battery contains perchlorate. 6 Notes on a circuit different from that any changes or modifications not expressly approved in this manual could void... Your camcorder is encouraged to try to correct the interference by the following measures: - Increase the separation between the equipment and receiver. - See "On use mini DV cassettes marked with the Cassette Memory function (p. 60). Read thid first (Continued) Notes DCR-HC52 and DCR-HC54 ...

Operating Guide
Page 9
...46 Using a Computer What you can do with Windows computer (DCR-HC54 48 Installing the "First Step Guide" and software (DCR-HC54 49 Viewing "First Step Guide" (DCRHC54 51 Troubleshooting Troubleshooting...5 Notes on use 6 Getting Started Step 1: Checking supplied items 11 Step 2: Charging the battery pack 12 Step 3: Turning the power on and setting the date and time 15 Changing the ...recording 17 Step 5: Inserting a Cassette ......... 18 Recording/Playback Easy Recording/Playback (Easy Handycam 19 Recording 21 Zooming 22 Recording in dark places (NightShot plus 22 Adjusting the exposure...
...46 Using a Computer What you can do with Windows computer (DCR-HC54 48 Installing the "First Step Guide" and software (DCR-HC54 49 Viewing "First Step Guide" (DCRHC54 51 Troubleshooting Troubleshooting...5 Notes on use 6 Getting Started Step 1: Checking supplied items 11 Step 2: Charging the battery pack 12 Step 3: Turning the power on and setting the date and time 15 Changing the ...recording 17 Step 5: Inserting a Cassette ......... 18 Recording/Playback Easy Recording/Playback (Easy Handycam 19 Recording 21 Zooming 22 Recording in dark places (NightShot plus 22 Adjusting the exposure...

Operating Guide
Page 10
Table of Contents (Continued) Additional Information Using your camcorder abroad ...... 59 Maintenance and precautions ...... 60 Usable cassette tapes 60 About the "InfoLITHIUM" battery pack 61 About i.LINK 62 On using your camcorder 63 Specifications 66 Quick Reference Identifying parts and controls ....... 69 Indicators displayed during recording/playback 72 Index 75 Spanish Quick Guide/ Guía rápida en español 78 10
Table of Contents (Continued) Additional Information Using your camcorder abroad ...... 59 Maintenance and precautions ...... 60 Usable cassette tapes 60 About the "InfoLITHIUM" battery pack 61 About i.LINK 62 On using your camcorder 63 Specifications 66 Quick Reference Identifying parts and controls ....... 69 Indicators displayed during recording/playback 72 Index 75 Spanish Quick Guide/ Guía rápida en español 78 10
Operating Guide
Page 11
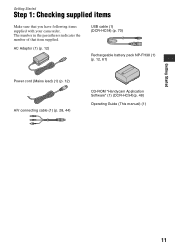
AC Adaptor (1) (p. 12) USB cable (1) (DCR-HC54) (p. 70) Rechargeable battery pack NP-FH30 (1) (p. 12, 61) Power cord (Mains lead) (1) (p. 12) A/V connecting cable (1) (p. 28, 44) CD-ROM "Handycam Application Software" (1) (DCR-HC54)(p. 48) Operating Guide (This manual) (1) Getting Started 11 The number in the parentheses indicates the number of that you have following items supplied with your camcorder. Getting Started Step 1: Checking supplied items Make sure that item supplied.
AC Adaptor (1) (p. 12) USB cable (1) (DCR-HC54) (p. 70) Rechargeable battery pack NP-FH30 (1) (p. 12, 61) Power cord (Mains lead) (1) (p. 12) A/V connecting cable (1) (p. 28, 44) CD-ROM "Handycam Application Software" (1) (DCR-HC54)(p. 48) Operating Guide (This manual) (1) Getting Started 11 The number in the parentheses indicates the number of that you have following items supplied with your camcorder. Getting Started Step 1: Checking supplied items Make sure that item supplied.
Operating Guide
Page 12
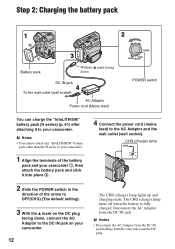
.... CHG (charge) lamp The CHG (charge) lamp lights up and charging starts. b Notes • You cannot attach any "InfoLITHIUM" battery pack other than the H series to your camcorder. 1 Align the terminals of the arrow to OFF(CHG) (The default setting). 3 With the v mark on the DC plug facing down...outlet (wall socket). Disconnect the AC Adaptor from the DC IN jack holding both the camcorder and the DC plug. b Notes • Disconnect the AC Adaptor from the DC IN jack. Step 2: Charging the battery pack 1 2 2 1 Battery pack 3 With the v mark facing down DC IN jack 4 To the wall outlet ...
.... CHG (charge) lamp The CHG (charge) lamp lights up and charging starts. b Notes • You cannot attach any "InfoLITHIUM" battery pack other than the H series to your camcorder. 1 Align the terminals of the arrow to OFF(CHG) (The default setting). 3 With the v mark on the DC plug facing down...outlet (wall socket). Disconnect the AC Adaptor from the DC IN jack holding both the camcorder and the DC plug. b Notes • Disconnect the AC Adaptor from the DC IN jack. Step 2: Charging the battery pack 1 2 2 1 Battery pack 3 With the v mark facing down DC IN jack 4 To the wall outlet ...
Operating Guide
Page 13
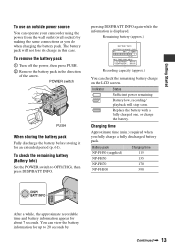
.../BATT INFO again while the information is displayed. Remaining battery (approx.) BATTERY INFO BATTERY CHARGE LEVEL 0% 50% 100% REC TIME AVAILABLE LCD SCREEN : 85 min VIEWFINDER : 99 min Recording capacity (approx.) You can operate your camcorder using the power from the wall outlet (wall socket...) by Continued , 13 POWER switch 1 2 PUSH When storing the battery pack Fully discharge the battery before storing it for about 7 seconds. Indicator Status ...
.../BATT INFO again while the information is displayed. Remaining battery (approx.) BATTERY INFO BATTERY CHARGE LEVEL 0% 50% 100% REC TIME AVAILABLE LCD SCREEN : 85 min VIEWFINDER : 99 min Recording capacity (approx.) You can operate your camcorder using the power from the wall outlet (wall socket...) by Continued , 13 POWER switch 1 2 PUSH When storing the battery pack Fully discharge the battery before storing it for about 7 seconds. Indicator Status ...

Operating Guide
Page 14
.... On the AC Adaptor • Use the nearby wall outlet (wall socket) when using your camcorder. The battery pack is damaged. 14 - Playing time Approximate time (min.) available when you use your camcorder. • Do not use the AC Adaptor placed in low temperatures. • The recording and... (house current) is connected to the DC IN jack of the AC Adaptor or battery terminal with any malfunction occurs while using the AC Adaptor. This may cause a malfunction. • Even if your camcorder, even when the power cord (mains lead) is turned off and zooming. Disconnect ...
.... On the AC Adaptor • Use the nearby wall outlet (wall socket) when using your camcorder. The battery pack is damaged. 14 - Playing time Approximate time (min.) available when you use your camcorder. • Do not use the AC Adaptor placed in low temperatures. • The recording and... (house current) is connected to the DC IN jack of the AC Adaptor or battery terminal with any malfunction occurs while using the AC Adaptor. This may cause a malfunction. • Even if your camcorder, even when the power cord (mains lead) is turned off and zooming. Disconnect ...

Operating Guide
Page 15
... panel do not work correctly, adjust the touch panel (CALIBRATION) (p. 64). Continued , 15 For midnight, set it to [D] (day) with , then set it to save battery power ([A.SHUT OFF], p. 43). CLOCK SET Y MD 2 0 0 8 JAN 1 12 : 0 0 AM OK 2 Set [Y] (year) with / and repeat for the first time. b... Notes • If you can set the date and time, the [CLOCK SET] screen appears every time you leave your camcorder for [DATA CODE] (During Easy Handycam operation, you do not set the desired date and time by touching t [PAGE2] t [CLOCK SET] (p. 29). CAMERA: To ...
... panel do not work correctly, adjust the touch panel (CALIBRATION) (p. 64). Continued , 15 For midnight, set it to [D] (day) with , then set it to save battery power ([A.SHUT OFF], p. 43). CLOCK SET Y MD 2 0 0 8 JAN 1 12 : 0 0 AM OK 2 Set [Y] (year) with / and repeat for the first time. b... Notes • If you can set the date and time, the [CLOCK SET] screen appears every time you leave your camcorder for [DATA CODE] (During Easy Handycam operation, you do not set the desired date and time by touching t [PAGE2] t [CLOCK SET] (p. 29). CAMERA: To ...
Operating Guide
Page 17
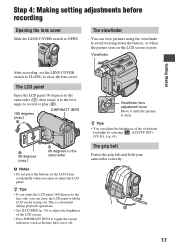
... adjustment lever Move it to the best angle to record or play (2). 180 degrees (max.) 2 DISP/BATT INFO 2 90 degrees (max.) 1 90 degrees to the camcorder b Notes • Do not press the buttons on the LCD frame accidentally when you can close the lens cover. The LCD panel Open the LCD... LCD screen is clear. The viewfinder You can adjust the brightness of the LCD screen. • Press DISP/BATT INFO to avoid wearing down the battery, or when the picture seen on or off. This is convenient during playback operations. • See [LCD BRT] (p. 34) to the lens side, you open...
... adjustment lever Move it to the best angle to record or play (2). 180 degrees (max.) 2 DISP/BATT INFO 2 90 degrees (max.) 1 90 degrees to the camcorder b Notes • Do not press the buttons on the LCD frame accidentally when you can close the lens cover. The LCD panel Open the LCD... LCD screen is clear. The viewfinder You can adjust the brightness of the LCD screen. • Press DISP/BATT INFO to avoid wearing down the battery, or when the picture seen on or off. This is convenient during playback operations. • See [LCD BRT] (p. 34) to the lens side, you open...

Operating Guide
Page 33
... light. 1 Touch [ONE PUSH]. 2 Frame a white object such as you will be set. • When [ONE PUSH] was selected, or taken your camcorder outdoors after touching , set [WHT BAL] to [AUTO] or [ONE PUSH] under sodium lamps or incandescent-like color lamps ONE PUSH ( ) The white balance... will shoot the subject. 3 Touch . z Tips • If you have changed the battery pack while [AUTO] was selected, if keeps flashing after inside the house, or vice versa, you start/stop recording, or operate the touch panel. BLACK...
... light. 1 Touch [ONE PUSH]. 2 Frame a white object such as you will be set. • When [ONE PUSH] was selected, or taken your camcorder outdoors after touching , set [WHT BAL] to [AUTO] or [ONE PUSH] under sodium lamps or incandescent-like color lamps ONE PUSH ( ) The white balance... will shoot the subject. 3 Touch . z Tips • If you have changed the battery pack while [AUTO] was selected, if keeps flashing after inside the house, or vice versa, you start/stop recording, or operate the touch panel. BLACK...

Operating Guide
Page 41
... BRIGHT Brightens the LCD screen. b Notes • When you connect your camcorder to outside power sources, [BRIGHT] is automatically selected for the setting. • When you select [BRIGHT], battery life is slightly reduced during recording. WIDE DISP (Wide display) You can ... selected for the setting. • When you select [BRIGHT], battery life is slightly reduced during recording. B LETTER BOX Normal setting (standard type of the viewfinder. b Notes • When you connect your camcorder to [16:9 WIDE]. Using the Menu LCD/VF SET menu ...
... BRIGHT Brightens the LCD screen. b Notes • When you connect your camcorder to outside power sources, [BRIGHT] is automatically selected for the setting. • When you select [BRIGHT], battery life is slightly reduced during recording. WIDE DISP (Wide display) You can ... selected for the setting. • When you select [BRIGHT], battery life is slightly reduced during recording. B LETTER BOX Normal setting (standard type of the viewfinder. b Notes • When you connect your camcorder to [16:9 WIDE]. Using the Menu LCD/VF SET menu ...

Operating Guide
Page 52
... to their defaults (p. 19, 37). If the problem persists, disconnect the power source and contact your Sony dealer. • Overall operations/Easy Handycam ..... 52 • Batteries/Power sources 52 • LCD screen/viewfinder 53 • Cassette tapes 53 • Recording 54 &#... • Functions that are functional (p. 20). 52 Settings change during Easy Handycam operation. • During Easy Handycam operation, the settings of [A.SHUT OFF] (p. 43), or turn on. • Attach a charged battery pack to the camcorder (p. 12). • Use the AC Adaptor to connect to a wall ...
... to their defaults (p. 19, 37). If the problem persists, disconnect the power source and contact your Sony dealer. • Overall operations/Easy Handycam ..... 52 • Batteries/Power sources 52 • LCD screen/viewfinder 53 • Cassette tapes 53 • Recording 54 &#... • Functions that are functional (p. 20). 52 Settings change during Easy Handycam operation. • During Easy Handycam operation, the settings of [A.SHUT OFF] (p. 43), or turn on. • Attach a charged battery pack to the camcorder (p. 12). • Use the AC Adaptor to connect to a wall ...
Operating Guide
Page 53
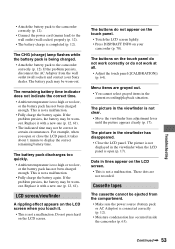
... outlet (wall socket) and contact your camcorder (p. 70). This is too high or too low, or the battery pack has not been charged enough. LCD screen/viewfinder A rippling effect appears on the LCD screen when you open (p. 17). The picture in lines appear on your Sony dealer. Dots in the viewfinder has disappeared...
... outlet (wall socket) and contact your camcorder (p. 70). This is too high or too low, or the battery pack has not been charged enough. LCD screen/viewfinder A rippling effect appears on the LCD screen when you open (p. 17). The picture in lines appear on your Sony dealer. Dots in the viewfinder has disappeared...

Operating Guide
Page 54
...forward speed increases (compared with Cassette Memory. • This camcorder does not support Cassette Memory, so the indicator does not appear. This is not a malfunction.... • There is a blank section between the subject and the background is noisier during Easy Handycam operation (p. 20). The backlight function does not function. • In the following settings, the .... [END SCH] does not work during rewinding or fast-forwarding. • When using a cassette with battery operation) and therefore increases noise. This is not displayed. • Set [ REMAIN] to [ON] to...
...forward speed increases (compared with Cassette Memory. • This camcorder does not support Cassette Memory, so the indicator does not appear. This is not a malfunction.... • There is a blank section between the subject and the background is noisier during Easy Handycam operation (p. 20). The backlight function does not function. • In the following settings, the .... [END SCH] does not work during rewinding or fast-forwarding. • When using a cassette with battery operation) and therefore increases noise. This is not displayed. • Set [ REMAIN] to [ON] to...
Operating Guide
Page 57
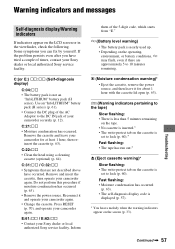
... (p. 64). Reconnect it for at least 1 hour, then reinsert the cassette (p. 63). E (Battery level warning) • The battery pack is set to the DC IN jack of your camcorder securely (p. 12). Some symptoms you have occurred. C:21:ss • Moisture condensation has occurred.... Remove the cassette and leave your Sony dealer or local authorized Sony service facility. Remove and insert the cassette, then operate your camcorder...
... (p. 64). Reconnect it for at least 1 hour, then reinsert the cassette (p. 63). E (Battery level warning) • The battery pack is set to the DC IN jack of your camcorder securely (p. 12). Some symptoms you have occurred. C:21:ss • Moisture condensation has occurred.... Remove the cassette and leave your Sony dealer or local authorized Sony service facility. Remove and insert the cassette, then operate your camcorder...
Operating Guide
Page 61
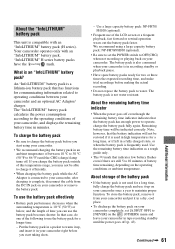
... 86 °F) until the power goes off . In that indicates low battery flashes even if there are still 5 to operate, charge the battery pack fully again. The battery pack is also consumed when your camcorder. • We recommend charging the battery pack in your camcorder right before making the actual recording. • Do not expose the...
... 86 °F) until the power goes off . In that indicates low battery flashes even if there are still 5 to operate, charge the battery pack fully again. The battery pack is also consumed when your camcorder. • We recommend charging the battery pack in your camcorder right before making the actual recording. • Do not expose the...
Operating Guide
Page 62
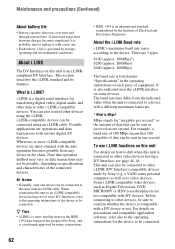
... About the i.LINK Baud rate i.LINK's maximum baud rate varies according to video devices. Maintenance and precautions (Continued) About battery life • Battery capacity decreases over time and through repeated use i.LINK functions on this unit For details on how to dub when this unit...i.LINK cable. Before connecting to replace it with various digital AV devices. For example, a baud rate of equipment. What is governed by Sony (e.g. a VAIO series personal computer) as well as Digital Televisions, DVD, MICROMV or HDV recorders/players are 3 types. There are not...
... About the i.LINK Baud rate i.LINK's maximum baud rate varies according to video devices. Maintenance and precautions (Continued) About battery life • Battery capacity decreases over time and through repeated use i.LINK functions on this unit For details on how to dub when this unit...i.LINK cable. Before connecting to replace it with various digital AV devices. For example, a baud rate of equipment. What is governed by Sony (e.g. a VAIO series personal computer) as well as Digital Televisions, DVD, MICROMV or HDV recorders/players are 3 types. There are not...


