

Operating Guide
Page 3
... may fall, causing serious injury to a child or an adult, and serious damage to fit, contact your dealer or local power company. Power cord (Mains lead) Protection Route the power cord (mains lead) so that could result in the cabinet are provided for future reference. The set . Use only a cart,...of any kind into the outlet, try reversing the plug. Never cover the slots and openings with a polarized ac power cord (mains lead) plug (a plug having one way. Use Power Sources This set near a swimming pool, etc. This is provided. - Polarization This set . If the plug ...
... may fall, causing serious injury to a child or an adult, and serious damage to fit, contact your dealer or local power company. Power cord (Mains lead) Protection Route the power cord (mains lead) so that could result in the cabinet are provided for future reference. The set . Use only a cart,...of any kind into the outlet, try reversing the plug. Never cover the slots and openings with a polarized ac power cord (mains lead) plug (a plug having one way. Use Power Sources This set near a swimming pool, etc. This is provided. - Polarization This set . If the plug ...
Operating Guide
Page 4
...this indicates a need for service. This will often require extensive work by the manufacturer that the set to rain or water. - When the power cord (mains lead) or plug is in performance - When the set due to perform routine safety checks (as the original parts. Safety Check ...Upon completion of other hazards. Improper adjustment of any service or repairs to the set, ask the service technician to lightning and power-line surges. Refer all servicing to restore the set is damaged or frayed. - Replacement parts When replacement parts are specified in fire, ...
...this indicates a need for service. This will often require extensive work by the manufacturer that the set to rain or water. - When the power cord (mains lead) or plug is in performance - When the set due to perform routine safety checks (as the original parts. Safety Check ...Upon completion of other hazards. Improper adjustment of any service or repairs to the set, ask the service technician to lightning and power-line surges. Refer all servicing to restore the set is damaged or frayed. - Replacement parts When replacement parts are specified in fire, ...
Operating Guide
Page 11
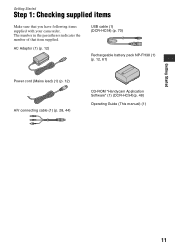
AC Adaptor (1) (p. 12) USB cable (1) (DCR-HC54) (p. 70) Rechargeable battery pack NP-FH30 (1) (p. 12, 61) Power cord (Mains lead) (1) (p. 12) A/V connecting cable (1) (p. 28, 44) CD-ROM "Handycam Application Software" (1) (DCR-HC54)(p. 48) Operating Guide (This manual) (1) Getting Started 11 The number in the parentheses indicates the number of that you have following items supplied with your camcorder. Getting Started Step 1: Checking supplied items Make sure that item supplied.
AC Adaptor (1) (p. 12) USB cable (1) (DCR-HC54) (p. 70) Rechargeable battery pack NP-FH30 (1) (p. 12, 61) Power cord (Mains lead) (1) (p. 12) A/V connecting cable (1) (p. 28, 44) CD-ROM "Handycam Application Software" (1) (DCR-HC54)(p. 48) Operating Guide (This manual) (1) Getting Started 11 The number in the parentheses indicates the number of that you have following items supplied with your camcorder. Getting Started Step 1: Checking supplied items Make sure that item supplied.
Operating Guide
Page 12
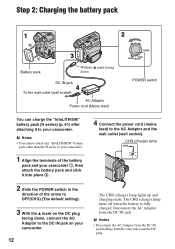
... To the wall outlet (wall socket) AC Adaptor Power cord (Mains lead) POWER switch You can charge the "InfoLITHIUM" battery pack (H series) (p. 61) after attaching it into place 2. 2 Slide the POWER switch in the direction of the battery pack and your camcorder. Disconnect the AC Adaptor from the DC IN jack... setting). 3 With the v mark on the DC plug facing down, connect the AC Adaptor to the DC IN jack on your camcorder. 12 4 Connect the power cord (mains lead) to your camcorder 1, then attach the battery pack and click it to the AC Adaptor and the wall outlet (wall socket).
... To the wall outlet (wall socket) AC Adaptor Power cord (Mains lead) POWER switch You can charge the "InfoLITHIUM" battery pack (H series) (p. 61) after attaching it into place 2. 2 Slide the POWER switch in the direction of the battery pack and your camcorder. Disconnect the AC Adaptor from the DC IN jack... setting). 3 With the v mark on the DC plug facing down, connect the AC Adaptor to the DC IN jack on your camcorder. 12 4 Connect the power cord (mains lead) to your camcorder 1, then attach the battery pack and click it to the AC Adaptor and the wall outlet (wall socket).

Operating Guide
Page 14
... 395 760 890 Typical recording time* 45 55 75 90 165 195 380 445 * Typical recording time shows the time when you use your camcorder, even when the power cord (mains lead) is turned off and zooming. Battery pack NP-FH30 (supplied) NP-FH50 NP-FH70 NP-FH100 LCD panel opened 105 170... 370 845 LCD panel closed . This may cause a malfunction. • Even if your camcorder is disconnected from the battery as long as between a wall and ...
... 395 760 890 Typical recording time* 45 55 75 90 165 195 380 445 * Typical recording time shows the time when you use your camcorder, even when the power cord (mains lead) is turned off and zooming. Battery pack NP-FH30 (supplied) NP-FH50 NP-FH70 NP-FH100 LCD panel opened 105 170... 370 845 LCD panel closed . This may cause a malfunction. • Even if your camcorder is disconnected from the battery as long as between a wall and ...
Operating Guide
Page 53
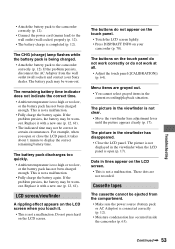
.... For example, when you touch it with a new one (p. 12, 61). This is completed (p. 12). The buttons on your Sony dealer. • Attach the battery pack to the camcorder correctly (p. 12). • Connect the power cord (mains lead) to the wall outlet (wall socket) properly (p. 12). • The battery charge is not a malfunction. •...
.... For example, when you touch it with a new one (p. 12, 61). This is completed (p. 12). The buttons on your Sony dealer. • Attach the battery pack to the camcorder correctly (p. 12). • Connect the power cord (mains lead) to the wall outlet (wall socket) properly (p. 12). • The battery charge is not a malfunction. •...
Operating Guide
Page 63
...conditions are not using your camcorder. • Do not wrap your camcorder with the cassette lid open. wash off any liquid that may malfunction or become deformed. - Moisture condensation If your camcorder is moisture inside . • When disconnecting the power cord (mains lead), pull it... by the plug and not the cord. • Do not damage the power cord (mains lead) such as by a Sony dealer before operating it . • Keep metal...
...conditions are not using your camcorder. • Do not wrap your camcorder with the cassette lid open. wash off any liquid that may malfunction or become deformed. - Moisture condensation If your camcorder is moisture inside . • When disconnecting the power cord (mains lead), pull it... by the plug and not the cord. • Do not damage the power cord (mains lead) such as by a Sony dealer before operating it . • Keep metal...
Operating Guide
Page 67
... projecting parts 63 × 85 × 115 mm (2 1/2 × 3 3/8 × 4 5/8 in.) (w/h/d) including the projecting parts with less than 2.2 kΩ (kilohms) USB jack (DCR-HC54) mini-B DV input/output jack i.LINK Interface (IEEE1394, 4-pin connector S100) LCD screen Picture 6.2 cm (2.5 type) Total dot number 123 200 (560 × 220...215; 29 × 81 mm (1 15/16 × 1 3/16 × 3 1/4 in.) (w/h/d) excluding the projecting parts Mass (approx.) 170 g (6.0 oz) excluding the power cord (mains lead) * See the label on the AC Adaptor for other specifications. Supplied accessories See page 11.
... projecting parts 63 × 85 × 115 mm (2 1/2 × 3 3/8 × 4 5/8 in.) (w/h/d) including the projecting parts with less than 2.2 kΩ (kilohms) USB jack (DCR-HC54) mini-B DV input/output jack i.LINK Interface (IEEE1394, 4-pin connector S100) LCD screen Picture 6.2 cm (2.5 type) Total dot number 123 200 (560 × 220...215; 29 × 81 mm (1 15/16 × 1 3/16 × 3 1/4 in.) (w/h/d) excluding the projecting parts Mass (approx.) 170 g (6.0 oz) excluding the power cord (mains lead) * See the label on the AC Adaptor for other specifications. Supplied accessories See page 11.


