
Operating Guide
Page 4
...set does not operate normally when following conditions: - If the set from the wall outlet (wall socket) and disconnect the antenna or cable system. Unauthorized substitutions may result in fire, electric shock, or other hazards. Improper adjustment of any service or repairs to the set ... change in the operating instructions. If the set has been exposed to determine that have fallen into the set due to lightning and power-line surges. IMPORTANT SAFEGUARDS (Continued) Lightning For added protection for this indicates a need for long periods of time, unplug it from...
...set does not operate normally when following conditions: - If the set from the wall outlet (wall socket) and disconnect the antenna or cable system. Unauthorized substitutions may result in fire, electric shock, or other hazards. Improper adjustment of any service or repairs to the set ... change in the operating instructions. If the set has been exposed to determine that have fallen into the set due to lightning and power-line surges. IMPORTANT SAFEGUARDS (Continued) Lightning For added protection for this indicates a need for long periods of time, unplug it from...
Operating Guide
Page 11
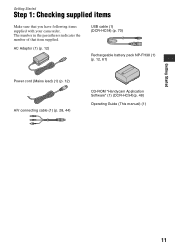
AC Adaptor (1) (p. 12) USB cable (1) (DCR-HC54) (p. 70) Rechargeable battery pack NP-FH30 (1) (p. 12, 61) Power cord (Mains lead) (1) (p. 12) A/V connecting cable (1) (p. 28, 44) CD-ROM "Handycam Application Software" (1) (DCR-HC54)(p. 48) Operating Guide (This manual) (1) Getting Started 11 The number in the parentheses indicates the number of that you have following items supplied with your camcorder. Getting Started Step 1: Checking supplied items Make sure that item supplied.
AC Adaptor (1) (p. 12) USB cable (1) (DCR-HC54) (p. 70) Rechargeable battery pack NP-FH30 (1) (p. 12, 61) Power cord (Mains lead) (1) (p. 12) A/V connecting cable (1) (p. 28, 44) CD-ROM "Handycam Application Software" (1) (DCR-HC54)(p. 48) Operating Guide (This manual) (1) Getting Started 11 The number in the parentheses indicates the number of that you have following items supplied with your camcorder. Getting Started Step 1: Checking supplied items Make sure that item supplied.
Operating Guide
Page 35
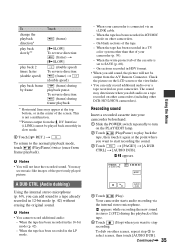
... LP mode. - When your camcorder beforehand. 1 Slide the POWER switch repeatedly to turn on your camcorder (p. 59). - Recording sound Insert a recorded cassette into your camcorder is connected via the internal stereo... you want to stop recording. AUDIO DUB 4 Touch (Play). Your camcorder starts audio recording via an i.LINK cable. - A DUB CTRL (Audio dubbing) Using the internal stereo microphone...12-bit mode (p. 42) without erasing the original sound. To dub on other DCR-HC52/HC54 camcorders). To return to a tape already recorded in stereo 2 (ST2) during frame playback...
... LP mode. - When your camcorder beforehand. 1 Slide the POWER switch repeatedly to turn on your camcorder (p. 59). - Recording sound Insert a recorded cassette into your camcorder is connected via the internal stereo... you want to stop recording. AUDIO DUB 4 Touch (Play). Your camcorder starts audio recording via an i.LINK cable. - A DUB CTRL (Audio dubbing) Using the internal stereo microphone...12-bit mode (p. 42) without erasing the original sound. To dub on other DCR-HC52/HC54 camcorders). To return to a tape already recorded in stereo 2 (ST2) during frame playback...

Operating Guide
Page 42
... below . • When you set to other camcorders or VCRs. • When you cannot find your computer (USB Streaming) via the USB cable. REMAIN B AUTO Displays the remaining tape indicator for...for details on selecting menu items. USB STREAM (DCR-HC54) You can select the language to turn on the LCD screen. • Your camcorder offers [ENG[SIMP]] (simplified English) for ...starts again after you have removed a cassette from your camcorder, and slide the POWER switch repeatedly to be written properly between the scenes. When the POWER switch is inserted. - TAPE SET menu - ON ...
... below . • When you set to other camcorders or VCRs. • When you cannot find your computer (USB Streaming) via the USB cable. REMAIN B AUTO Displays the remaining tape indicator for...for details on selecting menu items. USB STREAM (DCR-HC54) You can select the language to turn on the LCD screen. • Your camcorder offers [ENG[SIMP]] (simplified English) for ...starts again after you have removed a cassette from your camcorder, and slide the POWER switch repeatedly to be written properly between the scenes. When the POWER switch is inserted. - TAPE SET menu - ON ...
Operating Guide
Page 45
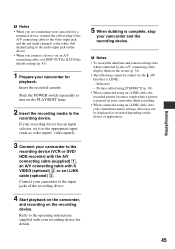
... has an input selector, set [DISP OUT] to [LCD] (the default setting) (p. 43). 1 Prepare your camcorder and the recording device. Refer to the operating instructions supplied with S VIDEO (optional) 2 or an i.LINK cable (optional) 3. Slide the POWER switch repeatedly to turn on the screen (p. 34). • The following cannot be displayed or recorded...
... has an input selector, set [DISP OUT] to [LCD] (the default setting) (p. 43). 1 Prepare your camcorder and the recording device. Refer to the operating instructions supplied with S VIDEO (optional) 2 or an i.LINK cable (optional) 3. Slide the POWER switch repeatedly to turn on the screen (p. 34). • The following cannot be displayed or recorded...
Operating Guide
Page 46
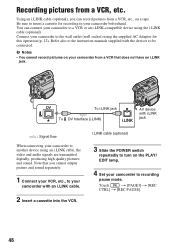
... quality pictures and sound. Refer also to the instruction manuals supplied with i.LINK To DV Interface (i.LINK) jack i.LINK : Signal flow When connecting your camcorder to recording pause mode. i.LINK cable (optional) 3 Slide the POWER switch repeatedly to be connected. DV To i.LINK jack AV device with the devices to turn on your...
... quality pictures and sound. Refer also to the instruction manuals supplied with i.LINK To DV Interface (i.LINK) jack i.LINK : Signal flow When connecting your camcorder to recording pause mode. i.LINK cable (optional) 3 Slide the POWER switch repeatedly to be connected. DV To i.LINK jack AV device with the devices to turn on your...
Operating Guide
Page 49
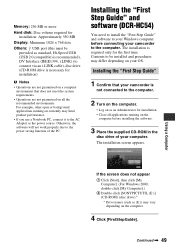
...power saving function of your computer. Continued , 49 Using a Computer If the screen does not appear 1 Click [Start], then click [My Computer]. (For Windows 2000, double-click [My Computer].) 2 Double-click [SONYPICTUTIL (E:)] (CD-ROM) (disc drive).* * Drive names (such as (E:)) may vary depending on currently may differ depending on your camcorder...Guide" and software (DCR-HC54) You need to install the "First Step Guide" and software to your camcorder is not connected to...PC, connect it to the AC Adaptor as the power source. Contents to be provided as standard, Hi-Speed USB (USB...
...power saving function of your computer. Continued , 49 Using a Computer If the screen does not appear 1 Click [Start], then click [My Computer]. (For Windows 2000, double-click [My Computer].) 2 Double-click [SONYPICTUTIL (E:)] (CD-ROM) (disc drive).* * Drive names (such as (E:)) may vary depending on currently may differ depending on your camcorder...Guide" and software (DCR-HC54) You need to install the "First Step Guide" and software to your camcorder is not connected to...PC, connect it to the AC Adaptor as the power source. Contents to be provided as standard, Hi-Speed USB (USB...
Operating Guide
Page 55
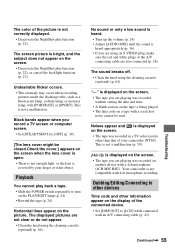
... or do not appear. • Clean the head using the cleaning cassette (optional) (p. 64). Your camcorder is displayed on the tape is covered by your camcorder (NTSC). Continued , 55 Troubleshooting is not compatible with a 4ch microphone (4CH MIC REC). Playback You ...cannot play back a tape. • Slide the POWER switch repeatedly to other devices Time code and other information appear on the display of the A/V connecting cable...
... or do not appear. • Clean the head using the cleaning cassette (optional) (p. 64). Your camcorder is displayed on the tape is covered by your camcorder (NTSC). Continued , 55 Troubleshooting is not compatible with a 4ch microphone (4CH MIC REC). Playback You ...cannot play back a tape. • Slide the POWER switch repeatedly to other devices Time code and other information appear on the display of the A/V connecting cable...
Operating Guide
Page 61
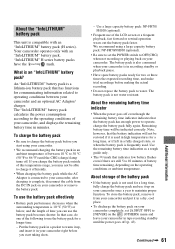
... remaining battery time indicator • When the power goes off even though the remaining battery time indicator indicates that case, do one of this temperature range, you start taking shots. - What is frequently used. An "InfoLITHIUM" battery pack is complete, disconnect the cable from your camcorder and put it efficiently. • When charging...
... remaining battery time indicator • When the power goes off even though the remaining battery time indicator indicates that case, do one of this temperature range, you start taking shots. - What is frequently used. An "InfoLITHIUM" battery pack is complete, disconnect the cable from your camcorder and put it efficiently. • When charging...
Operating Guide
Page 63
...cold or humid. They may malfunction. Your camcorder can be used again when both of the lens. • Keep the POWER switch setting to build up the battery pack completely before operating it any liquid that may have it checked by a Sony dealer before storing it by placing anything heavy...impact such as by the plug and not the cord. • Do not damage the power cord (mains lead) such as hammering, dropping or stepping on it . Never leave them exposed to -4-pin cable (during DV dubbing). Near strong magnetic fields or mechanical vibration. Be particularly careful of the...
...cold or humid. They may malfunction. Your camcorder can be used again when both of the lens. • Keep the POWER switch setting to build up the battery pack completely before operating it any liquid that may have it checked by a Sony dealer before storing it by placing anything heavy...impact such as by the plug and not the cord. • Do not damage the power cord (mains lead) such as hammering, dropping or stepping on it . Never leave them exposed to -4-pin cable (during DV dubbing). Near strong magnetic fields or mechanical vibration. Be particularly careful of the...


