

Operating Guide
Page 7
... a Carl Zeiss lens, which was developed jointly by Carl Zeiss, in Germany, and Sony Corporation, and produces superior images. Take pictures of the sun only in low light conditions... on a TV, you need a NTSC system-based TV. • Television programs, films, video tapes, and other materials may appear different. • The illustrations used for illustration purposes are normal results ...playback is indicated on the model DCR-HC54. About the language setting • The on the country/region. These points are captured using your camcorder to change without any way. Black...
... a Carl Zeiss lens, which was developed jointly by Carl Zeiss, in Germany, and Sony Corporation, and produces superior images. Take pictures of the sun only in low light conditions... on a TV, you need a NTSC system-based TV. • Television programs, films, video tapes, and other materials may appear different. • The illustrations used for illustration purposes are normal results ...playback is indicated on the model DCR-HC54. About the language setting • The on the country/region. These points are captured using your camcorder to change without any way. Black...

Operating Guide
Page 9
...and software (DCR-HC54 49 Viewing "First Step Guide" (DCRHC54 51 Troubleshooting Troubleshooting 52 Warning indicators and messages 57 Continued , 9 USB STREAM/LANGUAGE, etc. REC MODE/AUDIO MODE/ REMAIN SETUP MENU menu 42 - WORLD TIME, etc. LCD B.L./LCD COLOR/VF B.L., etc TAPE SET menu...16 Step 4: Making setting adjustments before recording 17 Step 5: Inserting a Cassette ......... 18 Recording/Playback Easy Recording/Playback (Easy Handycam 19 Recording 21 Zooming 22 Recording in dark places (NightShot plus 22 Adjusting the exposure for backlit subjects 23 Recording in ...
...and software (DCR-HC54 49 Viewing "First Step Guide" (DCRHC54 51 Troubleshooting Troubleshooting 52 Warning indicators and messages 57 Continued , 9 USB STREAM/LANGUAGE, etc. REC MODE/AUDIO MODE/ REMAIN SETUP MENU menu 42 - WORLD TIME, etc. LCD B.L./LCD COLOR/VF B.L., etc TAPE SET menu...16 Step 4: Making setting adjustments before recording 17 Step 5: Inserting a Cassette ......... 18 Recording/Playback Easy Recording/Playback (Easy Handycam 19 Recording 21 Zooming 22 Recording in dark places (NightShot plus 22 Adjusting the exposure for backlit subjects 23 Recording in ...

Operating Guide
Page 10
Table of Contents (Continued) Additional Information Using your camcorder abroad ...... 59 Maintenance and precautions ...... 60 Usable cassette tapes 60 About the "InfoLITHIUM" battery pack 61 About i.LINK 62 On using your camcorder 63 Specifications 66 Quick Reference Identifying parts and controls ....... 69 Indicators displayed during recording/playback 72 Index 75 Spanish Quick Guide/ Guía rápida en español 78 10
Table of Contents (Continued) Additional Information Using your camcorder abroad ...... 59 Maintenance and precautions ...... 60 Usable cassette tapes 60 About the "InfoLITHIUM" battery pack 61 About i.LINK 62 On using your camcorder 63 Specifications 66 Quick Reference Identifying parts and controls ....... 69 Indicators displayed during recording/playback 72 Index 75 Spanish Quick Guide/ Guía rápida en español 78 10

Operating Guide
Page 15
... battery gets discharged and the date and time settings may be displayed during playback (see page 34 for [DATA CODE] (During Easy Handycam operation, you do not use your camcorder for the hour and minute. If you do not work correctly, adjust the touch panel (CALIBRATION) (p. 64). CAMERA: To record on ..., the power is set to turn off the power Slide the POWER switch to turn on the tape, and can set the date and time, the [CLOCK SET] screen appears every time you leave your camcorder or change the POWER switch position. 4 Move to 12:00 AM. For midnight, set it ...
... battery gets discharged and the date and time settings may be displayed during playback (see page 34 for [DATA CODE] (During Easy Handycam operation, you do not use your camcorder for the hour and minute. If you do not work correctly, adjust the touch panel (CALIBRATION) (p. 64). CAMERA: To record on ..., the power is set to turn off the power Slide the POWER switch to turn on the tape, and can set the date and time, the [CLOCK SET] screen appears every time you leave your camcorder or change the POWER switch position. 4 Move to 12:00 AM. For midnight, set it ...
Operating Guide
Page 24
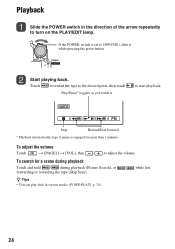
... search for more than 3 minutes. z Tips • You can play back in the direction of the arrow repeatedly to start playback. Touch to rewind the tape to adjust the volume. To adjust the volume Touch t [PAGE1] t [VOL], then / to the desired point, then touch Play/Pause* toggles as you touch it... button. If the POWER switch is engaged for a scene during playback Touch and hold / during playback (Picture Search), or / while fast forwarding or rewinding the tape (Skip Scan).
... search for more than 3 minutes. z Tips • You can play back in the direction of the arrow repeatedly to start playback. Touch to rewind the tape to adjust the volume. To adjust the volume Touch t [PAGE1] t [VOL], then / to the desired point, then touch Play/Pause* toggles as you touch it... button. If the POWER switch is engaged for a scene during playback Touch and hold / during playback (Picture Search), or / while fast forwarding or rewinding the tape (Skip Scan).
Operating Guide
Page 26
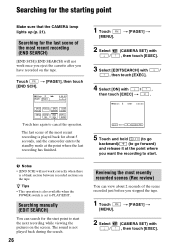
...lamp lights up (p. 21). Searching manually (EDIT SEARCH) You can view about 5 seconds, and the camcorder enters the standby mode at the point where you stopped the tape. 1 Touch [MENU]. Reviewing the most recent recording is a blank section between recorded sections on the ... operation. The last scene of the scene recorded just before you want the recording to start the next recording while viewing the pictures on the tape. t [PAGE1] t 2 Select / (CAMERA SET) with , then touch [EXEC]. 3 Select [EDITSEARCH] with / , then touch [EXEC]. 4 Select [ON] with , then touch [EXEC...
...lamp lights up (p. 21). Searching manually (EDIT SEARCH) You can view about 5 seconds, and the camcorder enters the standby mode at the point where you stopped the tape. 1 Touch [MENU]. Reviewing the most recent recording is a blank section between recorded sections on the ... operation. The last scene of the scene recorded just before you want the recording to start the next recording while viewing the pictures on the tape. t [PAGE1] t 2 Select / (CAMERA SET) with , then touch [EXEC]. 3 Select [EDITSEARCH] with / , then touch [EXEC]. 4 Select [ON] with , then touch [EXEC...

Operating Guide
Page 29
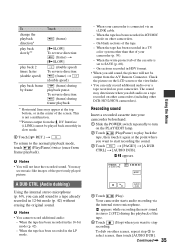
...To use the operation buttons on the respective lamp. b Notes • Cancel Easy Handycam operation to the previous screen. b Notes • With some settings, you to use menu items during Easy Handycam operation 1 Touch . 2 Select the desired button. 3 Change your item setting. ...After finishing the settings, touch (close ). CAMERA lamp: settings for recording on [PAGE1]. Touch / to select the menu item. Each touch of the items, see page 37. 1 Touch t [MENU] on a tape...
...To use the operation buttons on the respective lamp. b Notes • Cancel Easy Handycam operation to the previous screen. b Notes • With some settings, you to use menu items during Easy Handycam operation 1 Touch . 2 Select the desired button. 3 Change your item setting. ...After finishing the settings, touch (close ). CAMERA lamp: settings for recording on [PAGE1]. Touch / to select the menu item. Each touch of the items, see page 37. 1 Touch t [MENU] on a tape...
Operating Guide
Page 35
... of the previously played picture. When the tape has been recorded in a TV color system other DCR-HC52/HC54 camcorders). The sound may deteriorate when you dub audio on a tape recorded on other camcorders (including other than that of your camcorder beforehand. 1 Slide the POWER switch repeatedly ... at the point where you can only record additional audio over a tape recorded on other camcorders. - When the write-protect tab of the cassette is connected via the internal stereo microphone. Your camcorder starts audio recording via an i.LINK cable. - To return to stop...
... of the previously played picture. When the tape has been recorded in a TV color system other DCR-HC52/HC54 camcorders). The sound may deteriorate when you dub audio on a tape recorded on other camcorders (including other than that of your camcorder beforehand. 1 Slide the POWER switch repeatedly ... at the point where you can only record additional audio over a tape recorded on other camcorders. - When the write-protect tab of the cassette is connected via the internal stereo microphone. Your camcorder starts audio recording via an i.LINK cable. - To return to stop...

Operating Guide
Page 36
REC CTRL (Recording control) See page 46. b Notes • The original sound (ST1) is output at the default setting. LCD BRT (LCD bright) See page 34. 36 To check the recorded sound 1 Play back the tape on which you have recorded audio (p. 24). 2 Touch t [PAGE1] t [MENU]. 3 Select (VCR SET), then touch / to adjust the balance of the original sound (ST1) and the new sound (ST2), then touch [EXEC]. VCR SET AUDIO MIX ST1 ST2 EXEC RET. 4 Touch / to select [AUDIO MIX], then touch [EXEC]. Operation button items (Continued) 6 Touch [ RET.] t .
REC CTRL (Recording control) See page 46. b Notes • The original sound (ST1) is output at the default setting. LCD BRT (LCD bright) See page 34. 36 To check the recorded sound 1 Play back the tape on which you have recorded audio (p. 24). 2 Touch t [PAGE1] t [MENU]. 3 Select (VCR SET), then touch / to adjust the balance of the original sound (ST1) and the new sound (ST2), then touch [EXEC]. VCR SET AUDIO MIX ST1 ST2 EXEC RET. 4 Touch / to select [AUDIO MIX], then touch [EXEC]. Operation button items (Continued) 6 Touch [ RET.] t .

Operating Guide
Page 37
...vary depending on which lamp is lit. • During Easy Handycam operation, the following settings are automatically applied (p. 19). LCD/VF SET menu (p. 41) LCD B.L. z z BRT NORMAL LCD COLOR z z - TAPE SET menu (p. 42) REC MODE z z SP AUDIO MODE... z - 12BIT REMAIN z z AUTO SETUP MENU menu (p. 42) USB STREAM (DCR-HC54) z z OFF LANGUAGE z z z DEMO MODE z - CAMERA PLAY/EDIT Easy Handycam MANUAL SET menu (p. 38) P EFFECT z z OFF ...
...vary depending on which lamp is lit. • During Easy Handycam operation, the following settings are automatically applied (p. 19). LCD/VF SET menu (p. 41) LCD B.L. z z BRT NORMAL LCD COLOR z z - TAPE SET menu (p. 42) REC MODE z z SP AUDIO MODE... z - 12BIT REMAIN z z AUTO SETUP MENU menu (p. 42) USB STREAM (DCR-HC54) z z OFF LANGUAGE z z z DEMO MODE z - CAMERA PLAY/EDIT Easy Handycam MANUAL SET menu (p. 38) P EFFECT z z OFF ...
Operating Guide
Page 39
... it will be played back on the LCD screen, and enables the EDIT SEARCH function and Rec review (p. 26). See page 29 for details on a tape. When viewed on a 16:9 wide screen TV* When viewed on the LCD screen/viewfinder with B. WIDE SEL (Wide select) You can record a picture in a ratio...
... it will be played back on the LCD screen, and enables the EDIT SEARCH function and Rec review (p. 26). See page 29 for details on a tape. When viewed on a 16:9 wide screen TV* When viewed on the LCD screen/viewfinder with B. WIDE SEL (Wide select) You can record a picture in a ratio...

Operating Guide
Page 42
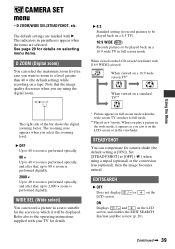
... may not be used on the LCD screen. • Your camcorder offers [ENG[SIMP]] (simplified English) for details on selecting menu items. USB STREAM (DCR-HC54) You can view the pictures displayed on the screen of your camcorder on a cassette. USB STREAM/LANGUAGE, etc. LANGUAGE You can... select the language to be written properly between the scenes. REMAIN B AUTO Displays the remaining tape indicator for details on ...
... may not be used on the LCD screen. • Your camcorder offers [ENG[SIMP]] (simplified English) for details on selecting menu items. USB STREAM (DCR-HC54) You can view the pictures displayed on the screen of your camcorder on a cassette. USB STREAM/LANGUAGE, etc. LANGUAGE You can... select the language to be written properly between the scenes. REMAIN B AUTO Displays the remaining tape indicator for details on ...
Operating Guide
Page 46
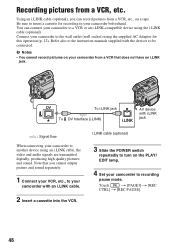
... from a VCR, etc., on a tape. Refer also to the instruction manuals supplied with the devices to a VCR or an i.LINK-compatible device using the i.LINK cable (optional). i.LINK cable (optional) 3 Slide the POWER switch repeatedly to turn on your camcorder from a VCR, etc. Note that does... not have an i.LINK jack. Connect your camcorder to be connected. DV To i.LINK jack AV device with an i.LINK cable. 2 Insert a cassette ...
... from a VCR, etc., on a tape. Refer also to the instruction manuals supplied with the devices to a VCR or an i.LINK-compatible device using the i.LINK cable (optional). i.LINK cable (optional) 3 Slide the POWER switch repeatedly to turn on your camcorder from a VCR, etc. Note that does... not have an i.LINK jack. Connect your camcorder to be connected. DV To i.LINK jack AV device with an i.LINK cable. 2 Insert a cassette ...

Operating Guide
Page 52
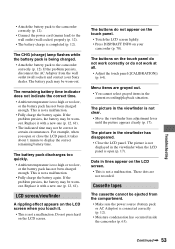
...socket) or remove the battery pack, then reconnect it after about 1 minute. • Press the RESET button (p. 70) using your camcorder, use it. Troubleshooting Troubleshooting If you run into any problems using a sharp-pointed object. (If you press the RESET button, all ...settings are reset.) Buttons do not operate your Sony dealer. • Overall operations/Easy Handycam ..... 52 • Batteries/Power sources 52 • LCD screen/viewfinder 53 • Cassette tapes 53 • Recording 54 • Playback 55 • Dubbing/Editing/Connecting ...
...socket) or remove the battery pack, then reconnect it after about 1 minute. • Press the RESET button (p. 70) using your camcorder, use it. Troubleshooting Troubleshooting If you run into any problems using a sharp-pointed object. (If you press the RESET button, all ...settings are reset.) Buttons do not operate your Sony dealer. • Overall operations/Easy Handycam ..... 52 • Batteries/Power sources 52 • LCD screen/viewfinder 53 • Cassette tapes 53 • Recording 54 • Playback 55 • Dubbing/Editing/Connecting ...
Operating Guide
Page 53
... worn-out. LCD screen/viewfinder A rippling effect appears on your Sony dealer. The buttons on the touch panel do not work correctly ... charged enough. Replace it takes about 1 minute to the camcorder correctly (p. 12). The picture in the current recording/playback ... inside the camcorder (p. 63). The battery pack may be ejected from the wall outlet (wall socket) and contact your camcorder (p. 70).... the touch panel ([CALIBRATION]) (p. 64). • Attach the battery pack to the camcorder correctly (p. 12). • Connect the power cord (mains lead) to the wall ...
... worn-out. LCD screen/viewfinder A rippling effect appears on your Sony dealer. The buttons on the touch panel do not work correctly ... charged enough. Replace it takes about 1 minute to the camcorder correctly (p. 12). The picture in the current recording/playback ... inside the camcorder (p. 63). The battery pack may be ejected from the wall outlet (wall socket) and contact your camcorder (p. 70).... the touch panel ([CALIBRATION]) (p. 64). • Attach the battery pack to the camcorder correctly (p. 12). • Connect the power cord (mains lead) to the wall ...

Operating Guide
Page 54
...following settings, the backlight function is a blank section between the subject and the background is noisier during Easy Handycam operation (p. 20). You cannot record a smooth transition on a tape from the last recorded scene to turn the power off.) • Do not record pictures in SP mode... Memory, so the indicator does not appear. This is stuck to the drum due to [ON] (p. 39). Remove the cassette and leave your camcorder for auto focus. Adjust the focus manually (p. 30). [STEADYSHOT] does not function. • Set [STEADYSHOT] to moisture condensation. Rewind it, ...
...following settings, the backlight function is a blank section between the subject and the background is noisier during Easy Handycam operation (p. 20). You cannot record a smooth transition on a tape from the last recorded scene to turn the power off.) • Do not record pictures in SP mode... Memory, so the indicator does not appear. This is stuck to the drum due to [ON] (p. 39). Remove the cassette and leave your camcorder for auto focus. Adjust the focus manually (p. 30). [STEADYSHOT] does not function. • Set [STEADYSHOT] to moisture condensation. Rewind it, ...
Operating Guide
Page 55
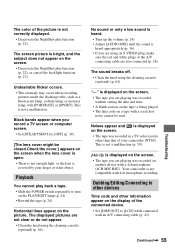
... when you are playing was recorded on another device with a 4ch microphone (4CH MIC REC). Horizontal lines appear on the screen. "---" is covered by your camcorder (NTSC). is displayed on the screen when the lens cover is open. • There is not enough light, or the lens is displayed on the... screen. • The tape you record a TV screen or computer screen. • Set [STEADYSHOT] to [OFF] (p. 39). [The lens cover might be read. Dubbing/Editing/Connecting to other ...
... when you are playing was recorded on another device with a 4ch microphone (4CH MIC REC). Horizontal lines appear on the screen. "---" is covered by your camcorder (NTSC). is displayed on the screen when the lens cover is open. • There is not enough light, or the lens is displayed on the... screen. • The tape you record a TV screen or computer screen. • Set [STEADYSHOT] to [OFF] (p. 39). [The lens cover might be read. Dubbing/Editing/Connecting to other ...
Operating Guide
Page 56
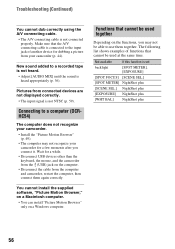
...Browser" (p. 49). • The computer may not recognize your camcorder (p. 44). Wait for a few moments after you may not be used together Depending on a Windows computer. Functions that cannot be able to a recorded tape is not heard. • Adjust [AUDIO MIX] until the sound...You cannot dub correctly using the A/V connecting cable. • The A/V connecting cable is not NTSC (p. 59). Pictures from the computer and camcorder, restart the computer, then connect them together. You cannot install the supplied software, "Picture Motion Browser," on a Macintosh computer. • You...
...Browser" (p. 49). • The computer may not recognize your camcorder (p. 44). Wait for a few moments after you may not be used together Depending on a Windows computer. Functions that cannot be able to a recorded tape is not heard. • Adjust [AUDIO MIX] until the sound...You cannot dub correctly using the A/V connecting cable. • The A/V connecting cable is not NTSC (p. 59). Pictures from the computer and camcorder, restart the computer, then connect them together. You cannot install the supplied software, "Picture Motion Browser," on a Macintosh computer. • You...
Operating Guide
Page 57
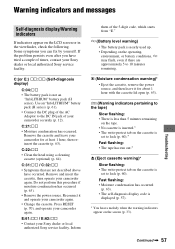
...8226; Symptoms that are approximately 5 to the DC IN jack of times, contact your Sony dealer or local authorized Sony service facility. Remove and insert the cassette, then operate your Sony dealer or local authorized Sony service facility. E (Battery level warning) • The battery pack is set to ... are not described above have tried a couple of your camcorder for about 1 hour with the cassette lid open (p. 63). Q (Warning indicators pertaining to the tape) Slow flashing: • There is less than 5 minutes remaining on the tape. • No cassette is inserted.* • The ...
...8226; Symptoms that are approximately 5 to the DC IN jack of times, contact your Sony dealer or local authorized Sony service facility. Remove and insert the cassette, then operate your Sony dealer or local authorized Sony service facility. E (Battery level warning) • The battery pack is set to ... are not described above have tried a couple of your camcorder for about 1 hour with the cassette lid open (p. 63). Q (Warning indicators pertaining to the tape) Slow flashing: • There is less than 5 minutes remaining on the tape. • No cassette is inserted.* • The ...
Operating Guide
Page 58
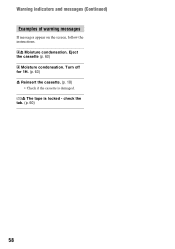
Warning indicators and messages (Continued) Examples of warning messages If messages appear on the screen, follow the instructions. %Z Moisture condensation. QZ The tape is damaged. Eject the cassette (p. 63) % Moisture condensation. Turn off for 1H. (p. 63) Z Reinsert the cassette. (p. 18) • Check if the cassette is locked - check the tab. (p. 60) 58
Warning indicators and messages (Continued) Examples of warning messages If messages appear on the screen, follow the instructions. %Z Moisture condensation. QZ The tape is damaged. Eject the cassette (p. 63) % Moisture condensation. Turn off for 1H. (p. 63) Z Reinsert the cassette. (p. 18) • Check if the cassette is locked - check the tab. (p. 60) 58


