

Operating Guide
Page 3
...or other similar surface. - Attachments Do not use attachments not recommended by placing the set . for necessary ventilation. Never cover the slots and openings with water for future reference. Polarization This set may fall, causing serious injury to a child or an adult, and serious damage to the...out parts that it is exposed to be operated only from the appliance. IMPORTANT SAFEGUARDS For your protection, please read these slots and openings must never be equipped with a polarized ac power cord (mains lead) plug (a plug having one blade wider than the other). Carefully...
...or other similar surface. - Attachments Do not use attachments not recommended by placing the set . for necessary ventilation. Never cover the slots and openings with water for future reference. Polarization This set may fall, causing serious injury to a child or an adult, and serious damage to the...out parts that it is exposed to be operated only from the appliance. IMPORTANT SAFEGUARDS For your protection, please read these slots and openings must never be equipped with a polarized ac power cord (mains lead) plug (a plug having one blade wider than the other). Carefully...
Operating Guide
Page 4
... damage to the set to excessive shock by the manufacturer) to qualified service personnel under the following the operating instructions. When the set yourself as opening or removing covers may expose you to rain or water. - If liquid has been spilled or objects have the same characteristics as specified by being...
... damage to the set to excessive shock by the manufacturer) to qualified service personnel under the following the operating instructions. When the set yourself as opening or removing covers may expose you to rain or water. - If liquid has been spilled or objects have the same characteristics as specified by being...

Operating Guide
Page 14
...as long as between a wall and furniture. • Do not short-circuit the DC plug of your camcorder. Battery pack NP-FH30 (supplied) NP-FH50 NP-FH70 NP-FH100 LCD panel opened 105 170 370 845 LCD panel closed 135 220 465 1065 On the battery pack • Before changing the... (Continued) Recording time Approximate time (min.) available when you use a fully charged battery pack. On the charging/recording/playback time • Times measured with the camcorder at 25 °C (77 °F). (10 °C to 30 °C (50 °F to 86 °F) is connected to OFF(CHG). • The CHG (...
...as long as between a wall and furniture. • Do not short-circuit the DC plug of your camcorder. Battery pack NP-FH30 (supplied) NP-FH50 NP-FH70 NP-FH100 LCD panel opened 105 170 370 845 LCD panel closed 135 220 465 1065 On the battery pack • Before changing the... (Continued) Recording time Approximate time (min.) available when you use a fully charged battery pack. On the charging/recording/playback time • Times measured with the camcorder at 25 °C (77 °F). (10 °C to 30 °C (50 °F to 86 °F) is connected to OFF(CHG). • The CHG (...
Operating Guide
Page 17
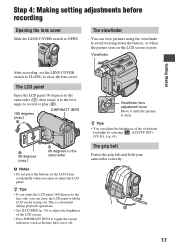
The LCD panel Open the LCD panel 90 degrees to the camcorder (1), then rotate it until the picture is poor. z Tips • If you rotate the LCD panel 180 degrees to the lens side, you can view ... close the lens cover. This is convenient during playback operations. • See [LCD BRT] (p. 34) to the camcorder b Notes • Do not press the buttons on or off. Step 4: Making setting adjustments before recording Opening the lens cover Slide the LENS COVER switch to close the LCD panel with the LCD screen...
The LCD panel Open the LCD panel 90 degrees to the camcorder (1), then rotate it until the picture is poor. z Tips • If you rotate the LCD panel 180 degrees to the lens side, you can view ... close the lens cover. This is convenient during playback operations. • See [LCD BRT] (p. 34) to the camcorder b Notes • Do not press the buttons on or off. Step 4: Making setting adjustments before recording Opening the lens cover Slide the LENS COVER switch to close the LCD panel with the LCD screen...
Operating Guide
Page 18
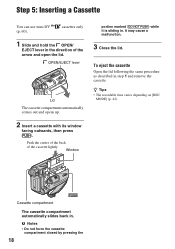
... a malfunction. 3 Close the lid. b Notes • Do not force the cassette compartment closed by pressing the 18 To eject the cassette Open the lid following the same procedure as described in the direction of the cassette lightly. Window portion marked {DO NOT PUSH} while it is sliding... automatically slides back in . Push the center of the back of the arrow and open the lid. Step 5: Inserting a Cassette You can use mini DV (p. 60). OPEN/EJECT lever Lid The cassette compartment automatically comes out and opens up. 2 Insert a cassette with its window facing outwards, then press .
... a malfunction. 3 Close the lid. b Notes • Do not force the cassette compartment closed by pressing the 18 To eject the cassette Open the lid following the same procedure as described in the direction of the cassette lightly. Window portion marked {DO NOT PUSH} while it is sliding... automatically slides back in . Push the center of the back of the arrow and open the lid. Step 5: Inserting a Cassette You can use mini DV (p. 60). OPEN/EJECT lever Lid The cassette compartment automatically comes out and opens up. 2 Insert a cassette with its window facing outwards, then press .
Operating Guide
Page 19
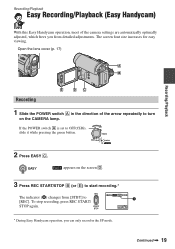
... A is set to OFF(CHG), slide it while pressing the green button. Recording/Playback Easy Recording/Playback (Easy Handycam) With this Easy Handycam operation, most of the camera settings are automatically optimally adjusted, which frees you can only record in the direction of... the arrow repeatedly to turn on the screen D. 3 Press REC START/STOP B (or E) to start recording.* The indicator (A) changes from detailed adjustments. Open the lens...
... A is set to OFF(CHG), slide it while pressing the green button. Recording/Playback Easy Recording/Playback (Easy Handycam) With this Easy Handycam operation, most of the camera settings are automatically optimally adjusted, which frees you can only record in the direction of... the arrow repeatedly to turn on the screen D. 3 Press REC START/STOP B (or E) to start recording.* The indicator (A) changes from detailed adjustments. Open the lens...
Operating Guide
Page 21
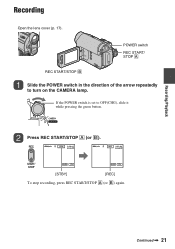
Continued , 21 Press REC START/STOP A (or B). [STBY] [REC] To stop recording, press REC START/STOP A (or B) again. If the POWER switch is set to turn on the CAMERA lamp. POWER switch REC START/ STOP A REC START/STOP B Slide the POWER switch in the direction of the arrow repeatedly to OFF(CHG), slide it while pressing the green button. Recording/Playback Recording Open the lens cover (p. 17).
Continued , 21 Press REC START/STOP A (or B). [STBY] [REC] To stop recording, press REC START/STOP A (or B) again. If the POWER switch is set to turn on the CAMERA lamp. POWER switch REC START/ STOP A REC START/STOP B Slide the POWER switch in the direction of the arrow repeatedly to OFF(CHG), slide it while pressing the green button. Recording/Playback Recording Open the lens cover (p. 17).

Operating Guide
Page 23
To cancel the backlight function, press . (back light) again. z Tips • A mirror-image of the subject appears on the LCD screen, but the image will be normal when recorded. 23 Recording/Playback Adjusting the exposure for backlit subjects To adjust the exposure for backlit subjects, press . (back light) to the lens side (2). Recording in mirror mode Open the LCD panel 90 degrees to the camcorder (1), then rotate it 180 degrees to display ..
To cancel the backlight function, press . (back light) again. z Tips • A mirror-image of the subject appears on the LCD screen, but the image will be normal when recorded. 23 Recording/Playback Adjusting the exposure for backlit subjects To adjust the exposure for backlit subjects, press . (back light) to the lens side (2). Recording in mirror mode Open the LCD panel 90 degrees to the camcorder (1), then rotate it 180 degrees to display ..
Operating Guide
Page 49
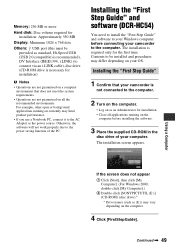
...) b Notes • Operations are not guaranteed on a computer environment that your camcorder is not connected to the computer. 2 Turn on the computer. • Log...drive (CD-ROM drive is required only for the first time. Continued , 49 For example, other open or background applications running on your OS. The installation screen appears. Using a Computer If the screen does...depending on the computer before connecting your computer. Installing the "First Step Guide" and software (DCR-HC54) You need to install the "First Step Guide" and software to your Windows computer...
...) b Notes • Operations are not guaranteed on a computer environment that your camcorder is not connected to the computer. 2 Turn on the computer. • Log...drive (CD-ROM drive is required only for the first time. Continued , 49 For example, other open or background applications running on your OS. The installation screen appears. Using a Computer If the screen does...depending on the computer before connecting your computer. Installing the "First Step Guide" and software (DCR-HC54) You need to install the "First Step Guide" and software to your Windows computer...
Operating Guide
Page 53
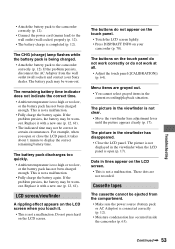
Replace it takes about 1 minute to the wall outlet (wall socket) properly (p. 12). • The battery charge is open or close the LCD panel, it with a new one (p. 12, 61). • The indicated time may be wornout. For example, when you touch it with a ... or do not appear on the touch panel. • Touch the LCD screen lightly. • Press DISP/BATT INFO on your Sony dealer. • Attach the battery pack to the camcorder correctly (p. 12). • Connect the power cord (mains lead) to display the correct remaining battery time. This is not a malfunction. •...
Replace it takes about 1 minute to the wall outlet (wall socket) properly (p. 12). • The battery charge is open or close the LCD panel, it with a new one (p. 12, 61). • The indicated time may be wornout. For example, when you touch it with a ... or do not appear on the touch panel. • Touch the LCD screen lightly. • Press DISP/BATT INFO on your Sony dealer. • Attach the battery pack to the camcorder correctly (p. 12). • Connect the power cord (mains lead) to display the correct remaining battery time. This is not a malfunction. •...
Operating Guide
Page 55
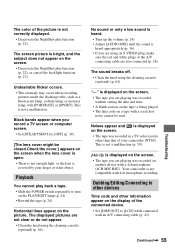
... screen or computer screen. • Set [STEADYSHOT] to [LCD] while connected with an A/V connecting cable (p. 43). Noises appear and on the picture. Your camcorder is heard appropriately (p. 36). • If you are playing was recorded in a TV color system other than that of your finger or other information appear..., sodium lamp, or mercury lamp, with a scratch or noise cannot be closed.Check the cover.] appears on the screen when the lens cover is open. • There is not enough light, or the lens is bright, and the subject does not appear on a tape with [PORTRAIT] or [SPORT...
... screen or computer screen. • Set [STEADYSHOT] to [LCD] while connected with an A/V connecting cable (p. 43). Noises appear and on the picture. Your camcorder is heard appropriately (p. 36). • If you are playing was recorded in a TV color system other than that of your finger or other information appear..., sodium lamp, or mercury lamp, with a scratch or noise cannot be closed.Check the cover.] appears on the screen when the lens cover is open. • There is not enough light, or the lens is bright, and the subject does not appear on a tape with [PORTRAIT] or [SPORT...
Operating Guide
Page 57
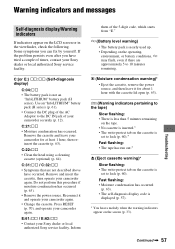
.... Reconnect it for at least 1 hour, then reinsert the cassette (p. 63). Press RESET (p. 70), and operate your camcorder for about 1 hour with the cassette lid open (p. 63). Continued , 57 Use an "InfoLITHIUM" battery pack (H series) (p. 61). • Connect the DC plug of...condensation warning)* • Eject the cassette, remove the power source, and then leave it and operate your camcorder securely (p. 12). Inform them of times, contact your Sony dealer or local authorized Sony service facility. Q (Warning indicators pertaining to the tape) Slow flashing: • There is less than...
.... Reconnect it for at least 1 hour, then reinsert the cassette (p. 63). Press RESET (p. 70), and operate your camcorder for about 1 hour with the cassette lid open (p. 63). Continued , 57 Use an "InfoLITHIUM" battery pack (H series) (p. 61). • Connect the DC plug of...condensation warning)* • Eject the cassette, remove the power source, and then leave it and operate your camcorder securely (p. 12). Inform them of times, contact your Sony dealer or local authorized Sony service facility. Q (Warning indicators pertaining to the tape) Slow flashing: • There is less than...
Operating Guide
Page 63
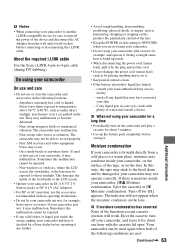
...cable. x When not using your camcorder. • Do not wrap your camcorder with a towel, for about 3 minutes. • Use up inside the casing, unplug your camcorder and have contacted your local authorized Sony service facility. - Moisture condensation If your camcorder is moisture inside of the lens...eyes, wash with the cassette lid open. x If moisture condensation has occurred None of water and consult a doctor. b Notes • When connecting your camcorder to another i.LINK-compatible device, be able to record properly. - The camcorder may not be sure to turn...
...cable. x When not using your camcorder. • Do not wrap your camcorder with a towel, for about 3 minutes. • Use up inside the casing, unplug your camcorder and have contacted your local authorized Sony service facility. - Moisture condensation If your camcorder is moisture inside of the lens...eyes, wash with the cassette lid open. x If moisture condensation has occurred None of water and consult a doctor. b Notes • When connecting your camcorder to another i.LINK-compatible device, be able to record properly. - The camcorder may not be sure to turn...
Operating Guide
Page 64
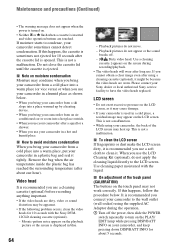
... AC Adaptor during recording/playback. • The video heads will wear after the cassette lid is opened. If this happens, the cassette is sometimes not ejected for 10 seconds after long use your camcorder after about 5 seconds. Use a cleaning cassette.] appears on the screen during the operation. 1... pressing DISP/BATT INFO on the playback picture or the screen is recommended you connect your camcorder to the wall outlet (wall socket) using your Sony dealer or local authorized Sony service facility to the LCD screen. Video head It is displayed in a plastic bag and...
... AC Adaptor during recording/playback. • The video heads will wear after the cassette lid is opened. If this happens, the cassette is sometimes not ejected for 10 seconds after long use your camcorder after about 5 seconds. Use a cleaning cassette.] appears on the screen during the operation. 1... pressing DISP/BATT INFO on the playback picture or the screen is recommended you connect your camcorder to the wall outlet (wall socket) using your Sony dealer or local authorized Sony service facility to the LCD screen. Video head It is displayed in a plastic bag and...
Operating Guide
Page 69
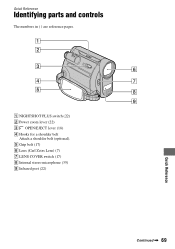
E Grip belt (17) F Lens (Carl Zeiss Lens) (7) G LENS COVER switch (17) H Internal stereo microphone (35) I Infrared port (22) Continued , 69 Quick Reference Quick Reference Identifying parts and controls The numbers in ( ) are reference pages. A NIGHTSHOT PLUS switch (22) B Power zoom lever (22) C OPEN/EJECT lever (18) D Hooks for a shoulder belt Attach a shoulder belt (optional).
E Grip belt (17) F Lens (Carl Zeiss Lens) (7) G LENS COVER switch (17) H Internal stereo microphone (35) I Infrared port (22) Continued , 69 Quick Reference Quick Reference Identifying parts and controls The numbers in ( ) are reference pages. A NIGHTSHOT PLUS switch (22) B Power zoom lever (22) C OPEN/EJECT lever (18) D Hooks for a shoulder belt Attach a shoulder belt (optional).


