
Operating Guide
Page 6
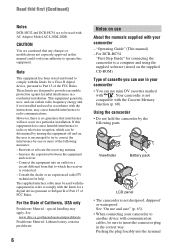
...the separation between the equipment and receiver. - For the State of California, USA only Perchlorate Material - Viewfinder Battery pack LCD panel • The camcorder is not compatible with the Cassette Memory function (p. 60). These limits are designed to correct the interference by one or .... However, there is connected. - Read thid first (Continued) Notes DCR-HC52 and DCR-HC54 are to a computer and using the supplied software (stored on the supplied CD-ROM) Type of cassette you can use in your camcorder • You can use mini DV cassettes marked with . This equipment...
...the separation between the equipment and receiver. - For the State of California, USA only Perchlorate Material - Viewfinder Battery pack LCD panel • The camcorder is not compatible with the Cassette Memory function (p. 60). These limits are designed to correct the interference by one or .... However, there is connected. - Read thid first (Continued) Notes DCR-HC52 and DCR-HC54 are to a computer and using the supplied software (stored on the supplied CD-ROM) Type of cassette you can use in your camcorder • You can use mini DV cassettes marked with . This equipment...

Operating Guide
Page 7
...materials may appear different. • The illustrations used on -screen displays in Germany, and Sony Corporation, and produces superior images. About this manual for illustration purposes are operational for illustrating ... highprecision technology, so over 99.99% of the camcorder, storage media, etc. • TV color systems differ depending on the model DCR-HC54. The model name is not possible due to...the sun. About the Carl Zeiss lens Your camcorder is not available under the current recording or playback conditions. • The LCD screen and the viewfinder are normal results of...
...materials may appear different. • The illustrations used on -screen displays in Germany, and Sony Corporation, and produces superior images. About this manual for illustration purposes are operational for illustrating ... highprecision technology, so over 99.99% of the camcorder, storage media, etc. • TV color systems differ depending on the model DCR-HC54. The model name is not possible due to...the sun. About the Carl Zeiss lens Your camcorder is not available under the current recording or playback conditions. • The LCD screen and the viewfinder are normal results of...

Operating Guide
Page 9
...46 Using a Computer What you can do with Windows computer (DCR-HC54 48 Installing the "First Step Guide" and software (DCR-HC54 49 Viewing "First Step Guide" (DCRHC54 51 Troubleshooting Troubleshooting...recording 17 Step 5: Inserting a Cassette ......... 18 Recording/Playback Easy Recording/Playback (Easy Handycam 19 Recording 21 Zooming 22 Recording in dark places (NightShot plus 22 Adjusting the exposure... menu items .......... 29 Operation button items 30 Menu items 37 MANUAL SET menu 38 - AUDIO MIX LCD/VF SET menu 41 - REC MODE/AUDIO MODE/ REMAIN SETUP MENU menu 42 - D ZOOM/WIDE...
...46 Using a Computer What you can do with Windows computer (DCR-HC54 48 Installing the "First Step Guide" and software (DCR-HC54 49 Viewing "First Step Guide" (DCRHC54 51 Troubleshooting Troubleshooting...recording 17 Step 5: Inserting a Cassette ......... 18 Recording/Playback Easy Recording/Playback (Easy Handycam 19 Recording 21 Zooming 22 Recording in dark places (NightShot plus 22 Adjusting the exposure... menu items .......... 29 Operation button items 30 Menu items 37 MANUAL SET menu 38 - AUDIO MIX LCD/VF SET menu 41 - REC MODE/AUDIO MODE/ REMAIN SETUP MENU menu 42 - D ZOOM/WIDE...
Operating Guide
Page 13
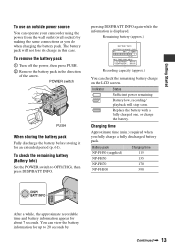
.... Replace the battery with a fully charged one, or charge the battery. Getting Started To use an outside power source You can operate your camcorder using the power from the wall outlet (wall socket) by Continued , 13 POWER switch 1 2 PUSH When storing the battery pack Fully discharge...connections as you fully charge a fully discharged battery pack. Remaining battery (approx.) BATTERY INFO BATTERY CHARGE LEVEL 0% 50% 100% REC TIME AVAILABLE LCD SCREEN : 85 min VIEWFINDER : 99 min Recording capacity (approx.) You can view the battery information for up to OFF(CHG), then press DISP...
.... Replace the battery with a fully charged one, or charge the battery. Getting Started To use an outside power source You can operate your camcorder using the power from the wall outlet (wall socket) by Continued , 13 POWER switch 1 2 PUSH When storing the battery pack Fully discharge...connections as you fully charge a fully discharged battery pack. Remaining battery (approx.) BATTERY INFO BATTERY CHARGE LEVEL 0% 50% 100% REC TIME AVAILABLE LCD SCREEN : 85 min VIEWFINDER : 99 min Recording capacity (approx.) You can view the battery information for up to OFF(CHG), then press DISP...

Operating Guide
Page 14
...On the AC Adaptor • Use the nearby wall outlet (wall socket) when using your camcorder. • Do not use your camcorder is turned off and zooming. Bottom: Recording with viewfinder while the LCD panel closed 135 220 465 1065 On the battery pack • Before changing the battery ...wall outlet (wall socket) immediately if any metallic objects. Battery pack NP-FH30 (supplied) NP-FH50 NP-FH70 NP-FH100 LCD panel opened 105 170 370 845 LCD panel closed . This may cause a malfunction. • Even if your camcorder. On the charging/recording/playback time • Times measured with...
...On the AC Adaptor • Use the nearby wall outlet (wall socket) when using your camcorder. • Do not use your camcorder is turned off and zooming. Bottom: Recording with viewfinder while the LCD panel closed 135 220 465 1065 On the battery pack • Before changing the battery ...wall outlet (wall socket) immediately if any metallic objects. Battery pack NP-FH30 (supplied) NP-FH50 NP-FH70 NP-FH100 LCD panel opened 105 170 370 845 LCD panel closed . This may cause a malfunction. • Even if your camcorder. On the charging/recording/playback time • Times measured with...

Operating Guide
Page 15
...SET] screen appears every time you can be cleared from the memory. For midday, set it to 12:00 PM. CAMERA: To record on the LCD screen. The clock starts. The [CLOCK SET] screen appears. z Tips • The date and time are not displayed while recording, but they... rechargeable battery gets discharged and the date and time settings may be displayed during playback (see page 34 for [DATA CODE] (During Easy Handycam operation, you turn on your camcorder or change the POWER switch position. 4 Move to [D] (day) with , then set the desired date and time by touching t [PAGE2...
...SET] screen appears every time you can be cleared from the memory. For midday, set it to 12:00 PM. CAMERA: To record on the LCD screen. The clock starts. The [CLOCK SET] screen appears. z Tips • The date and time are not displayed while recording, but they... rechargeable battery gets discharged and the date and time settings may be displayed during playback (see page 34 for [DATA CODE] (During Easy Handycam operation, you turn on your camcorder or change the POWER switch position. 4 Move to [D] (day) with , then set the desired date and time by touching t [PAGE2...
Operating Guide
Page 17
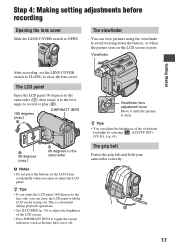
...8226; If you open or adjust the LCD panel. z Tips • You can view pictures using the viewfinder to close the LCD panel with the LCD screen facing out. This is convenient during playback operations. • See [LCD BRT] (p. 34) to the camcorder b Notes • Do not press... the buttons on the LCD screen is clear. Viewfinder Getting Started After ...
...8226; If you open or adjust the LCD panel. z Tips • You can view pictures using the viewfinder to close the LCD panel with the LCD screen facing out. This is convenient during playback operations. • See [LCD BRT] (p. 34) to the camcorder b Notes • Do not press... the buttons on the LCD screen is clear. Viewfinder Getting Started After ...

Operating Guide
Page 22
... lever. This may also be recorded. • You cannot change the zoom speed with the zoom buttons on the LCD frame. • The minimum possible distance between camcorder and subject while maintaining sharp focus is attached. • Adjust the focus manually ([FOCUS], p. 30) when it ...further for telephoto. 22 Infrared port Set the NIGHTSHOT PLUS switch to 40 times the original size with your finger on the LCD frame. Recording (...
... lever. This may also be recorded. • You cannot change the zoom speed with the zoom buttons on the LCD frame. • The minimum possible distance between camcorder and subject while maintaining sharp focus is attached. • Adjust the focus manually ([FOCUS], p. 30) when it ...further for telephoto. 22 Infrared port Set the NIGHTSHOT PLUS switch to 40 times the original size with your finger on the LCD frame. Recording (...

Operating Guide
Page 23
To cancel the backlight function, press . (back light) again. z Tips • A mirror-image of the subject appears on the LCD screen, but the image will be normal when recorded. 23 Recording in mirror mode Open the LCD panel 90 degrees to the camcorder (1), then rotate it 180 degrees to display .. Recording/Playback Adjusting the exposure for backlit subjects To adjust the exposure for backlit subjects, press . (back light) to the lens side (2).
To cancel the backlight function, press . (back light) again. z Tips • A mirror-image of the subject appears on the LCD screen, but the image will be normal when recorded. 23 Recording in mirror mode Open the LCD panel 90 degrees to the camcorder (1), then rotate it 180 degrees to display .. Recording/Playback Adjusting the exposure for backlit subjects To adjust the exposure for backlit subjects, press . (back light) to the lens side (2).

Operating Guide
Page 25
... related to display an on-screen instruction. Follow the instruction to your purpose. Your camcorder has 2 guide functions as shown below. See page 73 for details. 1 Touch ...] to recording. The desired setting screen appears. Adjust the settings according to cancel Easy Handycam operation and then select the setting. Recording/Playback Using the guide functions (USAGE GUIDE) You... the screen. 25 If an attempted setting is not displayed in step 3, follow the instruction on the LCD screen. e.g., to record night views Touch [SHOOT GUIDE] t [SELCT SCENE] t [PAGE r]/[PAGE ...
... related to display an on-screen instruction. Follow the instruction to your purpose. Your camcorder has 2 guide functions as shown below. See page 73 for details. 1 Touch ...] to recording. The desired setting screen appears. Adjust the settings according to cancel Easy Handycam operation and then select the setting. Recording/Playback Using the guide functions (USAGE GUIDE) You... the screen. 25 If an attempted setting is not displayed in step 3, follow the instruction on the LCD screen. e.g., to record night views Touch [SHOOT GUIDE] t [SELCT SCENE] t [PAGE r]/[PAGE ...
Operating Guide
Page 28
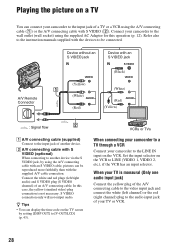
...can display the time code on the TV screen by using the A/V connecting cable with an S VIDEO cable, pictures can connect your camcorder to be reproduced more faithfully than with S VIDEO (optional) When connecting to the wall outlet (wall socket) using the A/V connecting cable...(Black) (White) (Red) (Yellow) : Signal flow 2 A A/V connecting cable (supplied) Connect to [V-OUT/LCD] (p. 43). VCRs or TVs When connecting your camcorder to a TV through a VCR Connect your camcorder to the input jack of an A/V connecting cable. Playing the picture on a TV You can be connected. In this...
...can display the time code on the TV screen by using the A/V connecting cable with an S VIDEO cable, pictures can connect your camcorder to be reproduced more faithfully than with S VIDEO (optional) When connecting to the wall outlet (wall socket) using the A/V connecting cable...(Black) (White) (Red) (Yellow) : Signal flow 2 A A/V connecting cable (supplied) Connect to [V-OUT/LCD] (p. 43). VCRs or TVs When connecting your camcorder to a TV through a VCR Connect your camcorder to the input jack of an A/V connecting cable. Playing the picture on a TV You can be connected. In this...

Operating Guide
Page 29
The menu index screen appears. 2 Select the desired menu. After finishing the settings, touch (close ). b Notes • Cancel Easy Handycam operation to select the item, then touch [EXEC]. (The process in step 3 and 4 is the same as that in the direction of the arrow ... Unavailable items will be grayed out. Each touch of [ RET.] takes you do not have to touch . CAMERA lamp: settings for viewing/editing 2 Touch the LCD screen to select the menu item. Using the Menu 29 Using the Menu Using the menu items 1 Slide the POWER switch in step 2.) 3 Select the...
The menu index screen appears. 2 Select the desired menu. After finishing the settings, touch (close ). b Notes • Cancel Easy Handycam operation to select the item, then touch [EXEC]. (The process in step 3 and 4 is the same as that in the direction of the arrow ... Unavailable items will be grayed out. Each touch of [ RET.] takes you do not have to touch . CAMERA lamp: settings for viewing/editing 2 Touch the LCD screen to select the menu item. Using the Menu 29 Using the Menu Using the menu items 1 Slide the POWER switch in step 2.) 3 Select the...

Operating Guide
Page 34
...brightness with / . B OFF Data code is not displayed. 34 CAM DATA (below) Displays camera setting data. The recorded picture will appear. • During Easy Handycam operation, you can play back in the same area. CLOCK SET See page 15. [PAGE3] V SPD PLAY (Various speed playback) You can set [DATE/TIME...] only. LCD BRT (LCD bright) You can use the video operation buttons ( / / / ) on every PAGE. [PAGE1] MENU See page 37. BEEP* See page 33. END SCH ...
...brightness with / . B OFF Data code is not displayed. 34 CAM DATA (below) Displays camera setting data. The recorded picture will appear. • During Easy Handycam operation, you can play back in the same area. CLOCK SET See page 15. [PAGE3] V SPD PLAY (Various speed playback) You can set [DATE/TIME...] only. LCD BRT (LCD bright) You can use the video operation buttons ( / / / ) on every PAGE. [PAGE1] MENU See page 37. BEEP* See page 33. END SCH ...
Operating Guide
Page 35
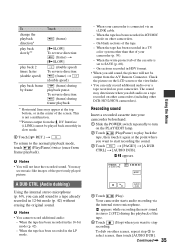
.... AUDIO DUB 4 Touch (Play). When your camcorder (p. 59). - Your camcorder starts audio recording via an i.LINK cable. - b Notes • You cannot record additional audio: - Check the picture on the LCD screen or the viewfinder. • You can... add sound to SAVE (p. 60). - appears while recording the new sound in stereo 2 (ST2) during frame playback. * Horizontal lines may appear at the point where you want to start recording the sound. 3 Touch t [PAGE3] t [A DUB CTRL] t [AUDIO DUB]. To dub on other DCR-HC52/HC54 camcorders...
.... AUDIO DUB 4 Touch (Play). When your camcorder (p. 59). - Your camcorder starts audio recording via an i.LINK cable. - b Notes • You cannot record additional audio: - Check the picture on the LCD screen or the viewfinder. • You can... add sound to SAVE (p. 60). - appears while recording the new sound in stereo 2 (ST2) during frame playback. * Horizontal lines may appear at the point where you want to start recording the sound. 3 Touch t [PAGE3] t [A DUB CTRL] t [AUDIO DUB]. To dub on other DCR-HC52/HC54 camcorders...

Operating Guide
Page 36
VCR SET AUDIO MIX ST1 ST2 EXEC RET. 4 Touch / to select [AUDIO MIX], then touch [EXEC]. REC CTRL (Recording control) See page 46. Operation button items (Continued) 6 Touch [ RET.] t . LCD BRT (LCD bright) See page 34. 36 b Notes • The original sound (ST1) is output at the default setting. To check the recorded sound 1 Play back the tape on which you have recorded audio (p. 24). 2 Touch t [PAGE1] t [MENU]. 3 Select (VCR SET), then touch / to adjust the balance of the original sound (ST1) and the new sound (ST2), then touch [EXEC].
VCR SET AUDIO MIX ST1 ST2 EXEC RET. 4 Touch / to select [AUDIO MIX], then touch [EXEC]. REC CTRL (Recording control) See page 46. Operation button items (Continued) 6 Touch [ RET.] t . LCD BRT (LCD bright) See page 34. 36 b Notes • The original sound (ST1) is output at the default setting. To check the recorded sound 1 Play back the tape on which you have recorded audio (p. 24). 2 Touch t [PAGE1] t [MENU]. 3 Select (VCR SET), then touch / to adjust the balance of the original sound (ST1) and the new sound (ST2), then touch [EXEC].

Operating Guide
Page 37
... z z SP AUDIO MODE z - 12BIT REMAIN z z AUTO SETUP MENU menu (p. 42) USB STREAM (DCR-HC54) z z OFF LANGUAGE z z z DEMO MODE z - OFF * The value set before Easy Handycam operation will be retained during Easy Handycam operation. LCD/VF SET menu (p. 41) LCD B.L. CAMERA PLAY/EDIT Easy Handycam MANUAL SET menu (p. 38) P EFFECT z z OFF CAMERA SET menu (p. 39) D ZOOM z - z - z z BRT...
... z z SP AUDIO MODE z - 12BIT REMAIN z z AUTO SETUP MENU menu (p. 42) USB STREAM (DCR-HC54) z z OFF LANGUAGE z z z DEMO MODE z - OFF * The value set before Easy Handycam operation will be retained during Easy Handycam operation. LCD/VF SET menu (p. 41) LCD B.L. CAMERA PLAY/EDIT Easy Handycam MANUAL SET menu (p. 38) P EFFECT z z OFF CAMERA SET menu (p. 39) D ZOOM z - z - z z BRT...
Operating Guide
Page 39
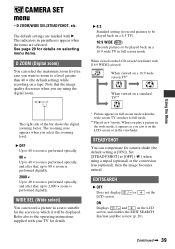
... appears when you saw it appears as you select the zooming level. When viewed on the LCD screen or in the wide mode, it on the LCD screen/viewfinder with your TV for the screen on the LCD screen, and enables the EDIT SEARCH function and Rec review (p. 26). B OFF Up to 40... when you want to zoom to 40 × zoom is [ON]). Refer also to 2,000 × zoom is performed digitally. EDITSEARCH B OFF Does not display LCD screen. When viewed on a 16:9 wide screen TV* When viewed on a 16:9 wide TV in case you are using a tripod (optional) or the conversion lens...
... appears when you saw it appears as you select the zooming level. When viewed on the LCD screen or in the wide mode, it on the LCD screen/viewfinder with your TV for the screen on the LCD screen, and enables the EDIT SEARCH function and Rec review (p. 26). B OFF Up to 40... when you want to zoom to 40 × zoom is [ON]). Refer also to 2,000 × zoom is performed digitally. EDITSEARCH B OFF Does not display LCD screen. When viewed on a 16:9 wide screen TV* When viewed on a 16:9 wide TV in case you are using a tripod (optional) or the conversion lens...

Operating Guide
Page 41
... light) You can adjust the brightness of the LCD screen's backlight. B BRT NORMAL Standard brightness. BRIGHT Brightens the viewfinder screen. 41 Using the Menu LCD/VF SET menu - The recorded picture will not be affected by this operation. b Notes • When you connect your camcorder to outside power sources, [BRIGHT] is automatically selected...
... light) You can adjust the brightness of the LCD screen's backlight. B BRT NORMAL Standard brightness. BRIGHT Brightens the viewfinder screen. 41 Using the Menu LCD/VF SET menu - The recorded picture will not be affected by this operation. b Notes • When you connect your camcorder to outside power sources, [BRIGHT] is automatically selected...

Operating Guide
Page 42
The indicators in the supplied CDROM for details on selecting menu items. USB STREAM (DCR-HC54) You can select the language to be used on the LCD screen. • Your camcorder offers [ENG[SIMP]] (simplified English) for details on selecting menu items. REC MODE (Recording mode) B SP (SP) Records ...See page 29 for details (p. 51). DEMO MODE The default setting is inserted. - See page 29 for when you have removed a cassette from your camcorder on the CAMERA lamp. REMAIN B AUTO Displays the remaining tape indicator for about 10 minutes.) - TAPE SET menu - b Notes • If you...
The indicators in the supplied CDROM for details on selecting menu items. USB STREAM (DCR-HC54) You can select the language to be used on the LCD screen. • Your camcorder offers [ENG[SIMP]] (simplified English) for details on selecting menu items. REC MODE (Recording mode) B SP (SP) Records ...See page 29 for details (p. 51). DEMO MODE The default setting is inserted. - See page 29 for when you have removed a cassette from your camcorder on the CAMERA lamp. REMAIN B AUTO Displays the remaining tape indicator for about 10 minutes.) - TAPE SET menu - b Notes • If you...

Operating Guide
Page 43
... with the time difference. V-OUT/LCD Shows displays such as the time code on the LCD screen and in the viewfinder. If you connect your camcorder for details on the TV screen, LCD screen, and in accordance with B. NEVER The camcorder is not automatically turned off when you... difference to 0, the clock returns to [NEVER]. DISP OUT (Display output) B LCD Shows displays such as the time code on selecting menu items. WORLD TIME When using your camcorder abroad, you do not operate your camcorder to a wall outlet (wall socket), [A.SHUT OFF] is horizontal or vertical by...
... with the time difference. V-OUT/LCD Shows displays such as the time code on the LCD screen and in the viewfinder. If you connect your camcorder for details on the TV screen, LCD screen, and in accordance with B. NEVER The camcorder is not automatically turned off when you... difference to 0, the clock returns to [NEVER]. DISP OUT (Display output) B LCD Shows displays such as the time code on selecting menu items. WORLD TIME When using your camcorder abroad, you do not operate your camcorder to a wall outlet (wall socket), [A.SHUT OFF] is horizontal or vertical by...


