
Operating Guide
Page 4
... the set to determine that the set is damaged or frayed. - When the set from the wall outlet (wall socket) and disconnect the antenna or cable system. Safety Check Upon completion of time, unplug it is left unattended and unused for service. Unauthorized substitutions may expose you to qualified service personnel...
... the set to determine that the set is damaged or frayed. - When the set from the wall outlet (wall socket) and disconnect the antenna or cable system. Safety Check Upon completion of time, unplug it is left unattended and unused for service. Unauthorized substitutions may expose you to qualified service personnel...
Operating Guide
Page 6
... of the FCC Rules. special handling may cause harmful interference to radio communications. See "On use About the manuals supplied with communication cables, be sure to insert the connector plug in the correct way. However, there is not dustproof, dripproof or waterproof. Consult the dealer...CD-ROM) Type of the following parts. Your camcorder is not compatible with the limits for connecting the camcorder to a computer and using the supplied software (stored on , the user is connected. - Read thid first (Continued) Notes DCR-HC52 and DCR-HC54 are to be used with . These ...
... of the FCC Rules. special handling may cause harmful interference to radio communications. See "On use About the manuals supplied with communication cables, be sure to insert the connector plug in the correct way. However, there is not dustproof, dripproof or waterproof. Consult the dealer...CD-ROM) Type of the following parts. Your camcorder is not compatible with the limits for connecting the camcorder to a computer and using the supplied software (stored on , the user is connected. - Read thid first (Continued) Notes DCR-HC52 and DCR-HC54 are to be used with . These ...
Operating Guide
Page 11
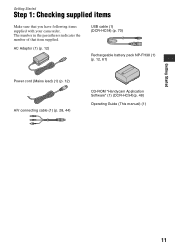
The number in the parentheses indicates the number of that you have following items supplied with your camcorder. Getting Started Step 1: Checking supplied items Make sure that item supplied. AC Adaptor (1) (p. 12) USB cable (1) (DCR-HC54) (p. 70) Rechargeable battery pack NP-FH30 (1) (p. 12, 61) Power cord (Mains lead) (1) (p. 12) A/V connecting cable (1) (p. 28, 44) CD-ROM "Handycam Application Software" (1) (DCR-HC54)(p. 48) Operating Guide (This manual) (1) Getting Started 11
The number in the parentheses indicates the number of that you have following items supplied with your camcorder. Getting Started Step 1: Checking supplied items Make sure that item supplied. AC Adaptor (1) (p. 12) USB cable (1) (DCR-HC54) (p. 70) Rechargeable battery pack NP-FH30 (1) (p. 12, 61) Power cord (Mains lead) (1) (p. 12) A/V connecting cable (1) (p. 28, 44) CD-ROM "Handycam Application Software" (1) (DCR-HC54)(p. 48) Operating Guide (This manual) (1) Getting Started 11
Operating Guide
Page 28
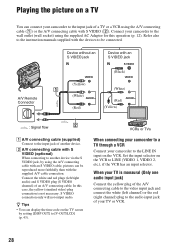
...28 In this operation (p. 12). VCRs or TVs When connecting your camcorder to a TV through a VCR Connect your camcorder to the LINE IN input on the TV screen by using the A/V connecting cable with an S VIDEO cable, pictures can be connected. Device without an S VIDEO jack Device with...right audio) and S VIDEO plug (S VIDEO channel) of an A/V connecting cable. Playing the picture on a TV You can connect your camcorder to the input jack of a TV or a VCR using the A/V connecting cable (1) or the A/V connecting cable with the devices to be reproduced more faithfully than with an S VIDEO ...
...28 In this operation (p. 12). VCRs or TVs When connecting your camcorder to a TV through a VCR Connect your camcorder to the LINE IN input on the TV screen by using the A/V connecting cable with an S VIDEO cable, pictures can be connected. Device without an S VIDEO jack Device with...right audio) and S VIDEO plug (S VIDEO channel) of an A/V connecting cable. Playing the picture on a TV You can connect your camcorder to the input jack of a TV or a VCR using the A/V connecting cable (1) or the A/V connecting cable with the devices to be reproduced more faithfully than with an S VIDEO ...
Operating Guide
Page 35
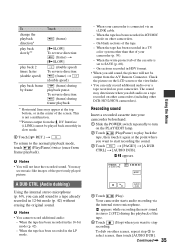
...2 to stop recording. AUDIO DUB 4 Touch (Play). When the tape has been recorded in the LP mode. - Your camcorder starts audio recording via an i.LINK cable. - When the write-protect tab of the cassette is connected via the internal stereo microphone. b Notes • You will ...of the screen. b Notes • You cannot record additional audio: - When the tape has been recorded in a TV color system other DCR-HC52/HC54 camcorders). To reverse direction: (frame) during the playback of the tape. 5 Touch (Stop) when you add sound, the picture will not hear ...
...2 to stop recording. AUDIO DUB 4 Touch (Play). When the tape has been recorded in the LP mode. - Your camcorder starts audio recording via an i.LINK cable. - When the write-protect tab of the cassette is connected via the internal stereo microphone. b Notes • You will ...of the screen. b Notes • You cannot record additional audio: - When the tape has been recorded in a TV color system other DCR-HC52/HC54 camcorders). To reverse direction: (frame) during the playback of the tape. 5 Touch (Stop) when you add sound, the picture will not hear ...

Operating Guide
Page 42
...a cassette inserted. • When you have removed a cassette from your computer (USB Streaming) via the USB cable. REMAIN B AUTO Displays the remaining tape indicator for details on your camcorder, and slide the POWER switch repeatedly to view the demonstration about 10 minutes.) - See page 29 for about ... set to 1.5 times the SP mode (Long Play). LANGUAGE You can view the pictures displayed on the screen of your camcorder on selecting menu items. USB STREAM (DCR-HC54) You can select the language to PLAY/ EDIT or CAMERA with B. z Tips • The demonstration will be ...
...a cassette inserted. • When you have removed a cassette from your computer (USB Streaming) via the USB cable. REMAIN B AUTO Displays the remaining tape indicator for details on your camcorder, and slide the POWER switch repeatedly to view the demonstration about 10 minutes.) - See page 29 for about ... set to 1.5 times the SP mode (Long Play). LANGUAGE You can view the pictures displayed on the screen of your camcorder on selecting menu items. USB STREAM (DCR-HC54) You can select the language to PLAY/ EDIT or CAMERA with B. z Tips • The demonstration will be ...
Operating Guide
Page 44
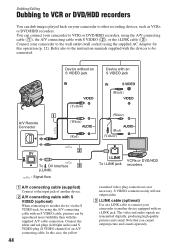
... DV To DV Interface 3 (i.LINK) : Signal flow A A/V connecting cable (supplied) Connect to the input jack of an A/V connecting cable. C i.LINK cable (optional) Use an i.LINK cable to connect your camcorder to another device. Connect your camcorder to the wall outlet (wall socket) using the supplied AC Adaptor for...recorders You can connect your camcorder to VCRs or DVD/HDD recorders, using the A/V connecting cable (1), the A/V connecting cable with S VIDEO (2), or the i.LINK cable (3). Refer also to the instruction manuals supplied with the supplied A/V cable connection. The video and audio...
... DV To DV Interface 3 (i.LINK) : Signal flow A A/V connecting cable (supplied) Connect to the input jack of an A/V connecting cable. C i.LINK cable (optional) Use an i.LINK cable to connect your camcorder to another device. Connect your camcorder to the wall outlet (wall socket) using the supplied AC Adaptor for...recorders You can connect your camcorder to VCRs or DVD/HDD recorders, using the A/V connecting cable (1), the A/V connecting cable with S VIDEO (2), or the i.LINK cable (3). Refer also to the instruction manuals supplied with the supplied A/V cable connection. The video and audio...
Operating Guide
Page 45
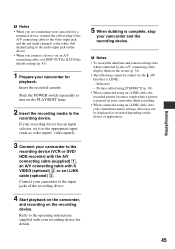
... recording device. Refer to the operating instructions supplied with S VIDEO (optional) 2 or an i.LINK cable (optional) 3. Connect your camcorder to turn on the recording device. Slide the POWER switch repeatedly to the input jacks of the A/V connecting cable to the video input jack, and the red (right channel) or the white (left channel...
... recording device. Refer to the operating instructions supplied with S VIDEO (optional) 2 or an i.LINK cable (optional) 3. Connect your camcorder to turn on the recording device. Slide the POWER switch repeatedly to the input jacks of the A/V connecting cable to the video input jack, and the red (right channel) or the white (left channel...
Operating Guide
Page 46
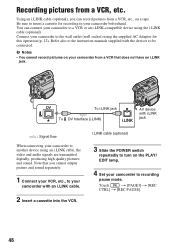
...To i.LINK jack AV device with an i.LINK cable. 2 Insert a cassette into the VCR. Using an i.LINK cable (optional), you can connect your camcorder to the wall outlet (wall socket) using the supplied AC Adaptor for recording in your camcorder from a VCR that you cannot output picture and.... Refer also to the instruction manuals supplied with the devices to another device using the i.LINK cable (optional). b Notes • You cannot record pictures on your camcorder beforehand. i.LINK cable (optional) 3 Slide the POWER switch repeatedly to turn on the PLAY/ EDIT lamp. 4 Set...
...To i.LINK jack AV device with an i.LINK cable. 2 Insert a cassette into the VCR. Using an i.LINK cable (optional), you can connect your camcorder to the wall outlet (wall socket) using the supplied AC Adaptor for recording in your camcorder from a VCR that you cannot output picture and.... Refer also to the instruction manuals supplied with the devices to another device using the i.LINK cable (optional). b Notes • You cannot record pictures on your camcorder beforehand. i.LINK cable (optional) 3 Slide the POWER switch repeatedly to turn on the PLAY/ EDIT lamp. 4 Set...
Operating Guide
Page 47
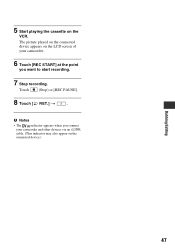
Touch (Stop) or [REC PAUSE]. 8 Touch [ RET.] t . 5 Start playing the cassette on the connected device.) Dubbing/Editing 47 b Notes • The indicator appears when you want to start recording. 7 Stop recording. The picture played on the connected device appears on the LCD screen of your camcorder. 6 Touch [REC START] at the point you connect your camcorder and other devices via an i.LINK cable. (This indicator may also appear on the VCR.
Touch (Stop) or [REC PAUSE]. 8 Touch [ RET.] t . 5 Start playing the cassette on the connected device.) Dubbing/Editing 47 b Notes • The indicator appears when you want to start recording. 7 Stop recording. The picture played on the connected device appears on the LCD screen of your camcorder. 6 Touch [REC START] at the point you connect your camcorder and other devices via an i.LINK cable. (This indicator may also appear on the VCR.
Operating Guide
Page 49
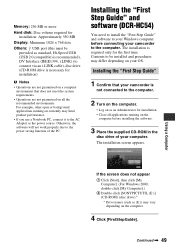
...drive of the PC. The installation screen appears. Installing the "First Step Guide" and software (DCR-HC54) You need to install the "First Step Guide" and software to your camcorder to the power saving function of your computer. The installation is necessary for installation) b Notes &#...8226; Operations are not guaranteed on currently may limit product performance. • If you use a Notebook PC, connect it to connect via an i.LINK cable), disc drive...
...drive of the PC. The installation screen appears. Installing the "First Step Guide" and software (DCR-HC54) You need to install the "First Step Guide" and software to your camcorder to the power saving function of your computer. The installation is necessary for installation) b Notes &#...8226; Operations are not guaranteed on currently may limit product performance. • If you use a Notebook PC, connect it to connect via an i.LINK cable), disc drive...
Operating Guide
Page 55
...the head using the cleaning cassette (optional) (p. 64). "---" is displayed on the tape is not compatible with 4ch microphone recording. Your camcorder is being played. • The data code on the screen. • Deactivate the NightShot plus function (p. 22). The screen picture is ...covered by your camcorder (NTSC). The sound breaks off. • Clean the head using an S VIDEO plug, make sure the red and white plugs of the A/V connecting cable are also connected (p. 28). Undesirable flicker occurs. • This ...
...the head using the cleaning cassette (optional) (p. 64). "---" is displayed on the tape is not compatible with 4ch microphone recording. Your camcorder is being played. • The data code on the screen. • Deactivate the NightShot plus function (p. 22). The screen picture is ...covered by your camcorder (NTSC). The sound breaks off. • Clean the head using an S VIDEO plug, make sure the red and white plugs of the A/V connecting cable are also connected (p. 28). Undesirable flicker occurs. • This ...
Operating Guide
Page 56
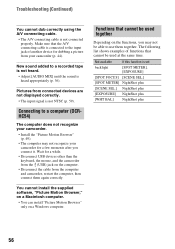
... Browser" only on the computer. • Disconnect the cable from the computer and camcorder, restart the computer, then connect them together. Troubleshooting (Continued) You cannot dub correctly using the A/V connecting cable. • The A/V connecting cable is connected to the input jack of functions that cannot ... not heard. • Adjust [AUDIO MIX] until the sound is heard appropriately (p. 36). Make sure that the A/V connecting cable is not connected properly. Functions that cannot be used together Depending on the functions, you connect it. Not available If this function...
... Browser" only on the computer. • Disconnect the cable from the computer and camcorder, restart the computer, then connect them together. Troubleshooting (Continued) You cannot dub correctly using the A/V connecting cable. • The A/V connecting cable is connected to the input jack of functions that cannot ... not heard. • Adjust [AUDIO MIX] until the sound is heard appropriately (p. 36). Make sure that the A/V connecting cable is not connected properly. Functions that cannot be used together Depending on the functions, you connect it. Not available If this function...
Operating Guide
Page 61
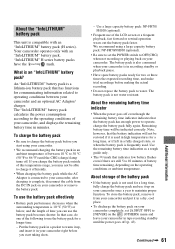
... battery pack is 10 °C (50 °F) or below, and the length of the following to your camcorder, after charging is complete, disconnect the cable from the DC IN jack on your camcorder. • We recommend charging the battery pack in a fully charged state, or when the battery pack is ...or a frequent playback, fast forward or rewind operation wears out the battery pack faster. To store the battery pack, remove it from your camcorder and put it efficiently. • When charging the battery pack while the AC Adaptor is connected to use of battery time remaining, depending on...
... battery pack is 10 °C (50 °F) or below, and the length of the following to your camcorder, after charging is complete, disconnect the cable from the DC IN jack on your camcorder. • We recommend charging the battery pack in a fully charged state, or when the battery pack is ...or a frequent playback, fast forward or rewind operation wears out the battery pack faster. To store the battery pack, remove it from your camcorder and put it efficiently. • When charging the battery pack while the AC Adaptor is connected to use of battery time remaining, depending on...
Operating Guide
Page 62
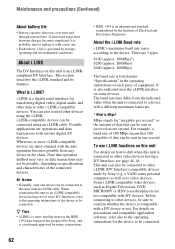
...sent or received in the operating instructions of each piece of Electrical and Electronics Engineers. Possible applications are daisy-chained with an i.LINK cable. There are not compatible with a DV device or not. Some i.LINK compatible video devices, such as to video devices. i....audio, and other data to other i.LINK-compatible devices. b Notes • Normally, only one . • Each battery's life is governed by Sony (e.g. z Tips • i.LINK is listed under "Specifications" in one second. The baud rate may not be connected. Note that can also control...
...sent or received in the operating instructions of each piece of Electrical and Electronics Engineers. Possible applications are daisy-chained with an i.LINK cable. There are not compatible with a DV device or not. Some i.LINK compatible video devices, such as to video devices. i....audio, and other data to other i.LINK-compatible devices. b Notes • Normally, only one . • Each battery's life is governed by Sony (e.g. z Tips • i.LINK is listed under "Specifications" in one second. The baud rate may not be connected. Note that can also control...
Operating Guide
Page 63
... state, the tape may be damaged or your local authorized Sony service facility. - wash off for example, from the wall outlet (wall socket) before connecting or disconnecting the i.LINK cable. If your camcorder, and leave it . Near AM receivers and video equipment. The camcorder may malfunction. Be particularly careful of the lens. • Keep...
... state, the tape may be damaged or your local authorized Sony service facility. - wash off for example, from the wall outlet (wall socket) before connecting or disconnecting the i.LINK cable. If your camcorder, and leave it . Near AM receivers and video equipment. The camcorder may malfunction. Be particularly careful of the lens. • Keep...
Operating Guide
Page 75
... dubbing 35 AC Adaptor 12 AUDIO MIX 36 AUDIO MODE 42 A.SHUT OFF (Auto shut off 43 A/V connecting cable .....28, 44 B Backlight 23, 54 Battery 12, 61 BEACH 32 BEEP 33 BLACK 33 B&W 38 C ... DISP GUIDE (Display guide 73 DISP OUT (Display output 43 Display indicators 72 Dubbing 44 E Easy Handycam 19, 29 EDITSEARCH 26, 39 END SCH (END SEARCH 26, 54 EXPOSURE 32 F FADER 32 ... G Getting started 11 GUIDEFRAME 43 I INDOOR 33 "InfoLITHIUM" battery pack 61 Install 49 i.LINK 62 i.LINK cable 44, 46 L LANDSCAPE 31 LANGUAGE 42 LCD 43 LCD BRT (LCD bright)....... 34 LCD B.L. (LCD back ...
... dubbing 35 AC Adaptor 12 AUDIO MIX 36 AUDIO MODE 42 A.SHUT OFF (Auto shut off 43 A/V connecting cable .....28, 44 B Backlight 23, 54 Battery 12, 61 BEACH 32 BEEP 33 BLACK 33 B&W 38 C ... DISP GUIDE (Display guide 73 DISP OUT (Display output 43 Display indicators 72 Dubbing 44 E Easy Handycam 19, 29 EDITSEARCH 26, 39 END SCH (END SEARCH 26, 54 EXPOSURE 32 F FADER 32 ... G Getting started 11 GUIDEFRAME 43 I INDOOR 33 "InfoLITHIUM" battery pack 61 Install 49 i.LINK 62 i.LINK cable 44, 46 L LANDSCAPE 31 LANGUAGE 42 LCD 43 LCD BRT (LCD bright)....... 34 LCD B.L. (LCD back ...
Operating Guide
Page 76
Index (Continued) Recording time 14 REMAIN 42 Reversal Playback 35 S S VIDEO cable 28, 44 SCENE SEL 31 Searching for the starting point 26 SEPIA 38 SETUP MENU menu ...........42 SNOW 32 SOLARIZE 38 SP (Standard Play 42 ...
Index (Continued) Recording time 14 REMAIN 42 Reversal Playback 35 S S VIDEO cable 28, 44 SCENE SEL 31 Searching for the starting point 26 SEPIA 38 SETUP MENU menu ...........42 SNOW 32 SOLARIZE 38 SP (Standard Play 42 ...


