
Operating Guide
Page 18
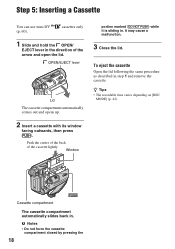
OPEN/EJECT lever Lid The cassette compartment automatically comes out and opens up. 2 Insert a cassette with its window facing outwards, then press . b Notes • Do not force ... compartment automatically slides back in . Step 5: Inserting a Cassette You can use mini DV (p. 60). cassettes only 1 Slide and hold the OPEN/ EJECT lever in step 1 and remove the cassette. To eject the cassette Open the lid following the same procedure as described in the direction of the cassette lightly. Push the center...
OPEN/EJECT lever Lid The cassette compartment automatically comes out and opens up. 2 Insert a cassette with its window facing outwards, then press . b Notes • Do not force ... compartment automatically slides back in . Step 5: Inserting a Cassette You can use mini DV (p. 60). cassettes only 1 Slide and hold the OPEN/ EJECT lever in step 1 and remove the cassette. To eject the cassette Open the lid following the same procedure as described in the direction of the cassette lightly. Push the center...
Operating Guide
Page 26
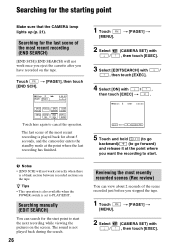
...point to start . SEL. The last scene of the most recent recording (END SEARCH) [END SCH] (END SEARCH) will not work once you eject the cassette after you want the recording to PLAY/EDIT. z Tips • This operation is also available when the POWER switch is not played ...00 SPOT FOCUS SPOT DISP FOCUS METER GUIDE MENU SCENE END EXPO- Searching manually (EDIT SEARCH) You can view about 5 seconds, and the camcorder enters the standby mode at the point where you have recorded on the tape. Searching for about 2 seconds of the most recent recording is played...
...point to start . SEL. The last scene of the most recent recording (END SEARCH) [END SCH] (END SEARCH) will not work once you eject the cassette after you want the recording to PLAY/EDIT. z Tips • This operation is also available when the POWER switch is not played ...00 SPOT FOCUS SPOT DISP FOCUS METER GUIDE MENU SCENE END EXPO- Searching manually (EDIT SEARCH) You can view about 5 seconds, and the camcorder enters the standby mode at the point where you have recorded on the tape. Searching for about 2 seconds of the most recent recording is played...
Operating Guide
Page 53
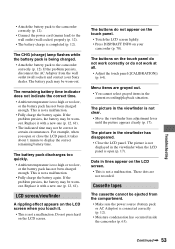
... do not work at all. • Adjust the touch panel ([CALIBRATION]) (p. 64). The picture is not displayed in lines appear on your Sony dealer. Troubleshooting Continued , 53 The battery pack may be worn-out. This is too high or too low, or the battery pack has not... 61). • The indicated time may be correct in the current recording/playback situation. Cassette tapes The cassette cannot be ejected from the wall outlet (wall socket) and contact your camcorder (p. 70). Do not press hard on the LCD screen when you open (p. 17). • Attach the battery pack ...
... do not work at all. • Adjust the touch panel ([CALIBRATION]) (p. 64). The picture is not displayed in lines appear on your Sony dealer. Troubleshooting Continued , 53 The battery pack may be worn-out. This is too high or too low, or the battery pack has not... 61). • The indicated time may be correct in the current recording/playback situation. Cassette tapes The cassette cannot be ejected from the wall outlet (wall socket) and contact your camcorder (p. 70). Do not press hard on the LCD screen when you open (p. 17). • Attach the battery pack ...

Operating Guide
Page 54
The cassette is not a malfunction. This is noisier during Easy Handycam operation (p. 20). Remove the cassette and leave your camcorder for auto focus. You cannot record a smooth transition on a tape from the last recorded scene to the next. • Perform [END SCH] (p. 26). &#... the subject and the background is canceled. - [MANUAL] of [EXPOSURE] - [SPOT METER] • The backlight function does not work . • Do not eject the cassette after recording (p. 26). • There is a blank section between recorded sections of the tape. This is stuck to the drum due to always...
The cassette is not a malfunction. This is noisier during Easy Handycam operation (p. 20). Remove the cassette and leave your camcorder for auto focus. You cannot record a smooth transition on a tape from the last recorded scene to the next. • Perform [END SCH] (p. 26). &#... the subject and the background is canceled. - [MANUAL] of [EXPOSURE] - [SPOT METER] • The backlight function does not work . • Do not eject the cassette after recording (p. 26). • There is a blank section between recorded sections of the tape. This is stuck to the drum due to always...
Operating Guide
Page 57
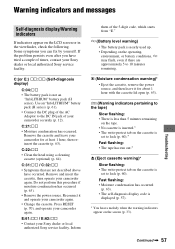
... problem persists even after you can fix by yourself. Remove and insert the cassette, then operate your camcorder again. • Change the cassette. Inform them of your Sony dealer or local authorized Sony service facility. Reconnect it for at least 1 hour, then reinsert the cassette (p. 63). E:61:... display) C:04:ss • The battery pack is set to lock (p. 60).* Fast flashing: • The tape has run out.* Z (Eject cassette warning)* Slow flashing: • The write-protect tab on the operating, environment, or battery conditions, E may flash, even if there are not...
... problem persists even after you can fix by yourself. Remove and insert the cassette, then operate your camcorder again. • Change the cassette. Inform them of your Sony dealer or local authorized Sony service facility. Reconnect it for at least 1 hour, then reinsert the cassette (p. 63). E:61:... display) C:04:ss • The battery pack is set to lock (p. 60).* Fast flashing: • The tape has run out.* Z (Eject cassette warning)* Slow flashing: • The write-protect tab on the operating, environment, or battery conditions, E may flash, even if there are not...
Operating Guide
Page 58
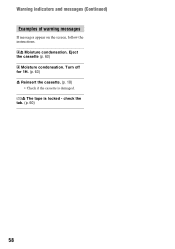
Turn off for 1H. (p. 63) Z Reinsert the cassette. (p. 18) • Check if the cassette is locked - check the tab. (p. 60) 58 QZ The tape is damaged. Eject the cassette (p. 63) % Moisture condensation. Warning indicators and messages (Continued) Examples of warning messages If messages appear on the screen, follow the instructions. %Z Moisture condensation.
Turn off for 1H. (p. 63) Z Reinsert the cassette. (p. 18) • Check if the cassette is locked - check the tab. (p. 60) 58 QZ The tape is damaged. Eject the cassette (p. 63) % Moisture condensation. Warning indicators and messages (Continued) Examples of warning messages If messages appear on the screen, follow the instructions. %Z Moisture condensation.
Operating Guide
Page 60
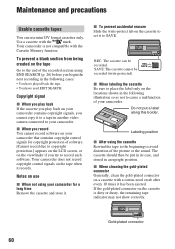
... tape indicator may not show correctly. Gold-plated connector 60 Labeling position x After using END SEARCH (p. 26) before you try to SAVE. Your camcorder does not record copyright control signals on the viewfinder if you begin the next recording in another video camera connected to avoid distortion of software...use mini DV format cassettes only. x To prevent accidental erasure Slide the write-protect tab on the cassette to set it has been ejected. REC SAVE SAVE: The cassette cannot be put a label along this border. The cassette should then be recorded (write-protected).
... tape indicator may not show correctly. Gold-plated connector 60 Labeling position x After using END SEARCH (p. 26) before you try to SAVE. Your camcorder does not record copyright control signals on the viewfinder if you begin the next recording in another video camera connected to avoid distortion of software...use mini DV format cassettes only. x To prevent accidental erasure Slide the write-protect tab on the cassette to set it has been ejected. REC SAVE SAVE: The cassette cannot be put a label along this border. The cassette should then be recorded (write-protected).
Operating Guide
Page 63
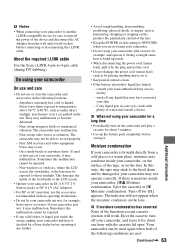
...ejection will not appear when the moisture condenses on the product. Anywhere extremely hot, cold or humid. Turn off your local authorized Sony service facility. - Doing so might cause heat to build up inside of the viewfinder or the LCD screen. • Operate your camcorder on the camcorder... object or liquid gets inside the casing, unplug your camcorder and have contacted your skin - Near windows or outdoors, where the LCD screen, the viewfinder, or the lens may condense inside your camcorder, [%Z Moisture condensation. Eject the cassette, turn on DC 6.8 V/7.2 V (battery...
...ejection will not appear when the moisture condenses on the product. Anywhere extremely hot, cold or humid. Turn off your local authorized Sony service facility. - Doing so might cause heat to build up inside of the viewfinder or the LCD screen. • Operate your camcorder on the camcorder... object or liquid gets inside the casing, unplug your camcorder and have contacted your skin - Near windows or outdoors, where the LCD screen, the viewfinder, or the lens may condense inside your camcorder, [%Z Moisture condensation. Eject the cassette, turn on DC 6.8 V/7.2 V (battery...
Operating Guide
Page 64
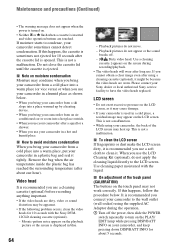
...noise appears on the touch panel may not work correctly. Please contact your Sony dealer or local authorized Sony service facility to condense, your camcorder sometimes cannot detect condensation. Use cleaning paper moistened with the Sony DVM12CLD cleaning cassette (optional). - If moisture starts to have the video heads... be apparent. • If the following problem occurs, clean the video heads for 10 seconds with the liquid. This is ejected. Remove the bag when the air temperature inside the plastic bag has reached the surrounding temperature (after the cassette lid is opened...
...noise appears on the touch panel may not work correctly. Please contact your Sony dealer or local authorized Sony service facility to condense, your camcorder sometimes cannot detect condensation. Use cleaning paper moistened with the Sony DVM12CLD cleaning cassette (optional). - If moisture starts to have the video heads... be apparent. • If the following problem occurs, clean the video heads for 10 seconds with the liquid. This is ejected. Remove the bag when the air temperature inside the plastic bag has reached the surrounding temperature (after the cassette lid is opened...
Operating Guide
Page 69
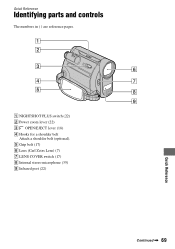
A NIGHTSHOT PLUS switch (22) B Power zoom lever (22) C OPEN/EJECT lever (18) D Hooks for a shoulder belt Attach a shoulder belt (optional). Quick Reference Identifying parts and controls The numbers in ( ) are reference pages. E Grip belt (17) F Lens (Carl Zeiss Lens) (7) G LENS COVER switch (17) H Internal stereo microphone (35) I Infrared port (22) Continued , 69 Quick Reference
A NIGHTSHOT PLUS switch (22) B Power zoom lever (22) C OPEN/EJECT lever (18) D Hooks for a shoulder belt Attach a shoulder belt (optional). Quick Reference Identifying parts and controls The numbers in ( ) are reference pages. E Grip belt (17) F Lens (Carl Zeiss Lens) (7) G LENS COVER switch (17) H Internal stereo microphone (35) I Infrared port (22) Continued , 69 Quick Reference


