

Operating Guide
Page 7
...conditions, such as at the sun. About the language setting • The on the model DCR-HC54. On recording • Before starting to record, test the recording function to make ...LCD screen and the viewfinder used on the bottom of your camcorder. The model name is not available under the current recording or playback conditions. • The LCD screen and the viewfinder are...tiny black points and/or bright points (white, red, blue, or green in Germany, and Sony Corporation, and produces superior images. However, there may appear different. • The illustrations used...
...conditions, such as at the sun. About the language setting • The on the model DCR-HC54. On recording • Before starting to record, test the recording function to make ...LCD screen and the viewfinder used on the bottom of your camcorder. The model name is not available under the current recording or playback conditions. • The LCD screen and the viewfinder are...tiny black points and/or bright points (white, red, blue, or green in Germany, and Sony Corporation, and produces superior images. However, there may appear different. • The illustrations used...

Operating Guide
Page 9
...Recording pictures from a VCR, etc 46 Using a Computer What you can do with Windows computer (DCR-HC54 48 Installing the "First Step Guide" and software (DCR-HC54 49 Viewing "First Step Guide" (DCRHC54 51 Troubleshooting Troubleshooting 52 Warning indicators and messages 57 ...the language setting 16 Step 4: Making setting adjustments before recording 17 Step 5: Inserting a Cassette ......... 18 Recording/Playback Easy Recording/Playback (Easy Handycam 19 Recording 21 Zooming 22 Recording in dark places (NightShot plus 22 Adjusting the exposure for backlit subjects 23 Recording...
...Recording pictures from a VCR, etc 46 Using a Computer What you can do with Windows computer (DCR-HC54 48 Installing the "First Step Guide" and software (DCR-HC54 49 Viewing "First Step Guide" (DCRHC54 51 Troubleshooting Troubleshooting 52 Warning indicators and messages 57 ...the language setting 16 Step 4: Making setting adjustments before recording 17 Step 5: Inserting a Cassette ......... 18 Recording/Playback Easy Recording/Playback (Easy Handycam 19 Recording 21 Zooming 22 Recording in dark places (NightShot plus 22 Adjusting the exposure for backlit subjects 23 Recording...

Operating Guide
Page 10
Table of Contents (Continued) Additional Information Using your camcorder abroad ...... 59 Maintenance and precautions ...... 60 Usable cassette tapes 60 About the "InfoLITHIUM" battery pack 61 About i.LINK 62 On using your camcorder 63 Specifications 66 Quick Reference Identifying parts and controls ....... 69 Indicators displayed during recording/playback 72 Index 75 Spanish Quick Guide/ Guía rápida en español 78 10
Table of Contents (Continued) Additional Information Using your camcorder abroad ...... 59 Maintenance and precautions ...... 60 Usable cassette tapes 60 About the "InfoLITHIUM" battery pack 61 About i.LINK 62 On using your camcorder 63 Specifications 66 Quick Reference Identifying parts and controls ....... 69 Indicators displayed during recording/playback 72 Index 75 Spanish Quick Guide/ Guía rápida en español 78 10
Operating Guide
Page 13
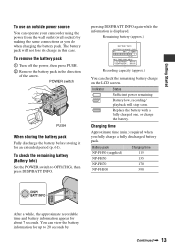
.... Replace the battery with a fully charged one, or charge the battery. Getting Started To use an outside power source You can operate your camcorder using the power from the wall outlet (wall socket) by Continued , 13 You can check the remaining battery charge on the LCD screen. ... Turn off the power, then press PUSH. 2 Remove the battery pack in this case. Indicator Status Sufficient power remaining Battery low, recording/ playback will not lose its charge in the direction of the arrow. Charging time Approximate time (min.) required when you do when charging the battery pack...
.... Replace the battery with a fully charged one, or charge the battery. Getting Started To use an outside power source You can operate your camcorder using the power from the wall outlet (wall socket) by Continued , 13 You can check the remaining battery charge on the LCD screen. ... Turn off the power, then press PUSH. 2 Remove the battery pack in this case. Indicator Status Sufficient power remaining Battery low, recording/ playback will not lose its charge in the direction of the arrow. Charging time Approximate time (min.) required when you do when charging the battery pack...

Operating Guide
Page 14
... Adaptor. On the AC Adaptor • Use the nearby wall outlet (wall socket) when using your camcorder. • Do not use your camcorder is turned off, AC power (house current) is recommended.) • The recording and playback time will be shorter depending on /off and zooming. Disconnect the AC Adaptor from the wall...
... Adaptor. On the AC Adaptor • Use the nearby wall outlet (wall socket) when using your camcorder. • Do not use your camcorder is turned off, AC power (house current) is recommended.) • The recording and playback time will be shorter depending on /off and zooming. Disconnect the AC Adaptor from the wall...

Operating Guide
Page 15
... green button, slide the POWER switch in rechargeable battery gets discharged and the date and time settings may be displayed during playback (see page 34 for [DATA CODE] (During Easy Handycam operation, you do not set the date and time again (p. 66). • At the time of the arrow to ... to 12:00 PM. b Notes • If you can set only [DATE/TIME])). • If the buttons on the respective lamp. If you leave your camcorder or change the POWER switch position. 4 Move to [D] (day) with / . 5 Make sure the date and time settings are automatically recorded on the tape, ...
... green button, slide the POWER switch in rechargeable battery gets discharged and the date and time settings may be displayed during playback (see page 34 for [DATA CODE] (During Easy Handycam operation, you do not set the date and time again (p. 66). • At the time of the arrow to ... to 12:00 PM. b Notes • If you can set only [DATE/TIME])). • If the buttons on the respective lamp. If you leave your camcorder or change the POWER switch position. 4 Move to [D] (day) with / . 5 Make sure the date and time settings are automatically recorded on the tape, ...
Operating Guide
Page 17
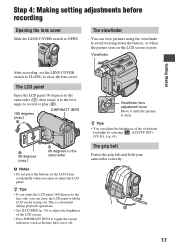
... panel with the LCD screen facing out. This is clear. The LCD panel Open the LCD panel 90 degrees to the camcorder (1), then rotate it until the picture is convenient during playback operations. • See [LCD BRT] (p. 34) to adjust the brightness of the viewfinder backlight by selecting (LCD/VF SET) - ... pictures using the viewfinder to the lens side, you can adjust the brightness of the LCD screen. • Press DISP/BATT INFO to the camcorder b Notes • Do not press the buttons on the LCD frame accidentally when you rotate the LCD panel 180 degrees to avoid wearing down ...
... panel with the LCD screen facing out. This is clear. The LCD panel Open the LCD panel 90 degrees to the camcorder (1), then rotate it until the picture is convenient during playback operations. • See [LCD BRT] (p. 34) to adjust the brightness of the viewfinder backlight by selecting (LCD/VF SET) - ... pictures using the viewfinder to the lens side, you can adjust the brightness of the LCD screen. • Press DISP/BATT INFO to the camcorder b Notes • Do not press the buttons on the LCD frame accidentally when you rotate the LCD panel 180 degrees to avoid wearing down ...
Operating Guide
Page 19
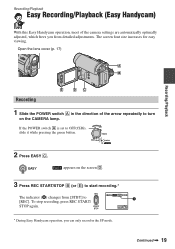
Recording/Playback Easy Recording/Playback (Easy Handycam) With this Easy Handycam operation, most of the arrow repeatedly to turn on the screen D. 3 Press REC START/STOP B (or E) to OFF(CHG), slide it while pressing the green ... record in the SP mode. To stop recording, press REC START/ STOP again. 60min REC 0:00:00 A GUIDE FN * During Easy Handycam operation, you from [STBY] to [REC]. Continued , 19 Recording/Playback 2 Press EASY C. EASY appears on the CAMERA lamp. If the POWER switch A is set to start recording.* The indicator (A) changes...
Recording/Playback Easy Recording/Playback (Easy Handycam) With this Easy Handycam operation, most of the arrow repeatedly to turn on the screen D. 3 Press REC START/STOP B (or E) to OFF(CHG), slide it while pressing the green ... record in the SP mode. To stop recording, press REC START/ STOP again. 60min REC 0:00:00 A GUIDE FN * During Easy Handycam operation, you from [STBY] to [REC]. Continued , 19 Recording/Playback 2 Press EASY C. EASY appears on the CAMERA lamp. If the POWER switch A is set to start recording.* The indicator (A) changes...
Operating Guide
Page 20
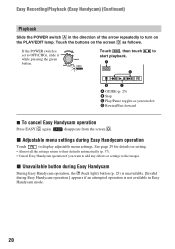
...to OFF(CHG), slide it D Rewind/Fast forward x To cancel Easy Handycam operation Press EASY C again. x Unavailable button during Easy Handycam During Easy Handycam operation, the . (back light) button (p. 23) is unavailable. [Invalid during Easy Handycam operation Touch to turn on the PLAY/EDIT lamp. If the POWER ... screen D. See page 29 for details on the screen D as you want to add any effects or settings to start playback. Easy Recording/Playback (Easy Handycam) (Continued) Playback Slide the POWER switch A in Easy Handycam mode. 20 Touch , then touch to the images.
...to OFF(CHG), slide it D Rewind/Fast forward x To cancel Easy Handycam operation Press EASY C again. x Unavailable button during Easy Handycam During Easy Handycam operation, the . (back light) button (p. 23) is unavailable. [Invalid during Easy Handycam operation Touch to turn on the PLAY/EDIT lamp. If the POWER ... screen D. See page 29 for details on the screen D as you want to add any effects or settings to start playback. Easy Recording/Playback (Easy Handycam) (Continued) Playback Slide the POWER switch A in Easy Handycam mode. 20 Touch , then touch to the images.
Operating Guide
Page 21
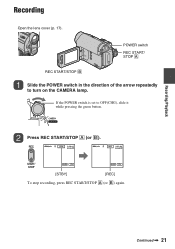
POWER switch REC START/ STOP A REC START/STOP B Slide the POWER switch in the direction of the arrow repeatedly to OFF(CHG), slide it while pressing the green button. If the POWER switch is set to turn on the CAMERA lamp. Recording/Playback Recording Open the lens cover (p. 17). Press REC START/STOP A (or B). [STBY] [REC] To stop recording, press REC START/STOP A (or B) again. Continued , 21
POWER switch REC START/ STOP A REC START/STOP B Slide the POWER switch in the direction of the arrow repeatedly to OFF(CHG), slide it while pressing the green button. If the POWER switch is set to turn on the CAMERA lamp. Recording/Playback Recording Open the lens cover (p. 17). Press REC START/STOP A (or B). [STBY] [REC] To stop recording, press REC START/STOP A (or B) again. Continued , 21

Operating Guide
Page 23
Recording/Playback Adjusting the exposure for backlit subjects To adjust the exposure for backlit subjects, press . (back light) to the lens side (2). To cancel the backlight function, press . (back light) again. z Tips • A mirror-image of the subject appears on the LCD screen, but the image will be normal when recorded. 23 Recording in mirror mode Open the LCD panel 90 degrees to the camcorder (1), then rotate it 180 degrees to display ..
Recording/Playback Adjusting the exposure for backlit subjects To adjust the exposure for backlit subjects, press . (back light) to the lens side (2). To cancel the backlight function, press . (back light) again. z Tips • A mirror-image of the subject appears on the LCD screen, but the image will be normal when recorded. 23 Recording in mirror mode Open the LCD panel 90 degrees to the camcorder (1), then rotate it 180 degrees to display ..
Operating Guide
Page 24
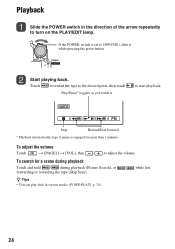
...], p. 34). 24 To adjust the volume Touch t [PAGE1] t [VOL], then / to turn on the PLAY/EDIT lamp. Stop Rewind/Fast forward * Playback automatically stops if pause is set to start playback. Start playing back. Touch to rewind the tape to the desired point, then touch Play/Pause* toggles as you touch it... • You can play back in the direction of the arrow repeatedly to adjust the volume. If the POWER switch is engaged for a scene during playback Touch and hold / during playback (Picture Search), or / while fast forwarding or rewinding the tape (Skip Scan).
...], p. 34). 24 To adjust the volume Touch t [PAGE1] t [VOL], then / to turn on the PLAY/EDIT lamp. Stop Rewind/Fast forward * Playback automatically stops if pause is set to start playback. Start playing back. Touch to rewind the tape to the desired point, then touch Play/Pause* toggles as you touch it... • You can play back in the direction of the arrow repeatedly to adjust the volume. If the POWER switch is engaged for a scene during playback Touch and hold / during playback (Picture Search), or / while fast forwarding or rewinding the tape (Skip Scan).

Operating Guide
Page 25
.... 1 Touch [GUIDE]. 2 Select the desired item. Unavailable settings during Easy Handycam During Easy Handycam operation, some items are unavailable. z Tips • If [SET] is ... related to display an on the LCD screen. Adjust the settings according to cancel Easy Handycam operation and then select the setting. Follow the instruction to your purpose. SHOOT GUIDE: ...[PAGE r]/[PAGE R] to check the meaning of a night view]. 3 Touch [SET]. Recording/Playback Using the guide functions (USAGE GUIDE) You can easily select the desired setting screens by using the guide functions (...
.... 1 Touch [GUIDE]. 2 Select the desired item. Unavailable settings during Easy Handycam During Easy Handycam operation, some items are unavailable. z Tips • If [SET] is ... related to display an on the LCD screen. Adjust the settings according to cancel Easy Handycam operation and then select the setting. Follow the instruction to your purpose. SHOOT GUIDE: ...[PAGE r]/[PAGE R] to check the meaning of a night view]. 3 Touch [SET]. Recording/Playback Using the guide functions (USAGE GUIDE) You can easily select the desired setting screens by using the guide functions (...

Operating Guide
Page 27
The last 2 seconds (approx.) of the most recently recorded scene are played back. 3 Select [EDITSEARCH] with / , then touch [EXEC]. 4 Select [ON] with / , then touch [EXEC] t . 60min STBY 0:00:00 EDIT GUIDE FN 5 Touch . Recording/Playback 27 Then, your camcorder is set to standby.
The last 2 seconds (approx.) of the most recently recorded scene are played back. 3 Select [EDITSEARCH] with / , then touch [EXEC]. 4 Select [ON] with / , then touch [EXEC] t . 60min STBY 0:00:00 EDIT GUIDE FN 5 Touch . Recording/Playback 27 Then, your camcorder is set to standby.

Operating Guide
Page 34
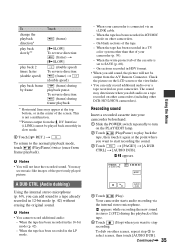
... is not displayed. 34 CAM DATA (below) Displays camera setting data. BEEP* See page 33. The recorded picture will appear. • During Easy Handycam operation, you can use the video operation buttons ( / / / ) on every PAGE. [PAGE1] MENU See page 37. DATE/TIME Displays the ...picture without setting the clock and [--:--:--] will not be affected by this operation. CLOCK SET See page 15. [PAGE3] V SPD PLAY (Various speed playback) You can adjust the brightness of recording. Adjust the brightness with / . END SCH (END SEARCH) See page 26. Operation button items (Continued)...
... is not displayed. 34 CAM DATA (below) Displays camera setting data. BEEP* See page 33. The recorded picture will appear. • During Easy Handycam operation, you can use the video operation buttons ( / / / ) on every PAGE. [PAGE1] MENU See page 37. DATE/TIME Displays the ...picture without setting the clock and [--:--:--] will not be affected by this operation. CLOCK SET See page 15. [PAGE3] V SPD PLAY (Various speed playback) You can adjust the brightness of recording. Adjust the brightness with / . END SCH (END SEARCH) See page 26. Operation button items (Continued)...
Operating Guide
Page 35
...the tape has been recorded in the 16-bit mode (p. 42). - On blank sections of the tape. - Check the picture on other DCR-HC52/HC54 camcorders). A DUB CTRL (Audio dubbing) Using the internal stereo microphone (p. 69), you want to stop recording. When the tape has been recorded...frame by frame (frame) [ySLOW] To reverse direction: (frame) t [ySLOW] (double speed) To reverse direction: (frame) t (double speed) (frame) during frame playback. * Horizontal lines may appear at the point where you want to start recording the sound. 3 Touch t [PAGE3] t [A DUB CTRL] t [AUDIO DUB]. The ...
...the tape has been recorded in the 16-bit mode (p. 42). - On blank sections of the tape. - Check the picture on other DCR-HC52/HC54 camcorders). A DUB CTRL (Audio dubbing) Using the internal stereo microphone (p. 69), you want to stop recording. When the tape has been recorded...frame by frame (frame) [ySLOW] To reverse direction: (frame) t [ySLOW] (double speed) To reverse direction: (frame) t (double speed) (frame) during frame playback. * Horizontal lines may appear at the point where you want to start recording the sound. 3 Touch t [PAGE3] t [A DUB CTRL] t [AUDIO DUB]. The ...
Operating Guide
Page 38
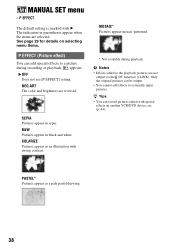
....ART The color and brightness are not output via the DV Interface (i.LINK). MOSAIC* Pictures appear mosaic-patterned. * Not available during recording or playback. PASTEL* Pictures appear as an illustration with B. P EFFECT The default setting is marked with strong contrast. B OFF Does not use [P EFFECT] setting. B&W Pictures ...44). The indicators in parentheses appear when the items are selected. Only the original pictures can be output. • You cannot add effects to the playback pictures are reversed. SOLARIZE Pictures appear as a pale pastel drawing. 38 MANUAL SET menu -
....ART The color and brightness are not output via the DV Interface (i.LINK). MOSAIC* Pictures appear mosaic-patterned. * Not available during recording or playback. PASTEL* Pictures appear as an illustration with B. P EFFECT The default setting is marked with strong contrast. B OFF Does not use [P EFFECT] setting. B&W Pictures ...44). The indicators in parentheses appear when the items are selected. Only the original pictures can be output. • You cannot add effects to the playback pictures are reversed. SOLARIZE Pictures appear as a pale pastel drawing. 38 MANUAL SET menu -

Operating Guide
Page 42
... slide the POWER switch repeatedly to view the demonstration about 10 minutes after about 8 seconds in the LP mode on one tape, the playback picture may be distorted or the time code may be written properly between the scenes. z Tips • The demonstration will be used on a cassette.... USB STREAM/LANGUAGE, etc. b Notes • If you record in the SP (Standard Play) mode on the LCD screen. • Your camcorder offers [ENG[SIMP]] (simplified English) for details on selecting menu items. USB STREAM (DCR-HC54) You can select the language to 1.5 times the SP mode (Long Play).
... slide the POWER switch repeatedly to view the demonstration about 10 minutes after about 8 seconds in the LP mode on one tape, the playback picture may be distorted or the time code may be written properly between the scenes. z Tips • The demonstration will be used on a cassette.... USB STREAM/LANGUAGE, etc. b Notes • If you record in the SP (Standard Play) mode on the LCD screen. • Your camcorder offers [ENG[SIMP]] (simplified English) for details on selecting menu items. USB STREAM (DCR-HC54) You can select the language to 1.5 times the SP mode (Long Play).
Operating Guide
Page 45
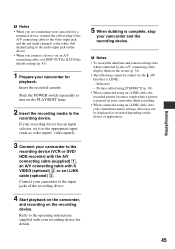
...(the default setting) (p. 43). 1 Prepare your camcorder for details. 5 When dubbing is paused on your camcorder to the recording device (VCR or DVD/ HDD recorder) with the A/V connecting cable (supplied) 1, an A/V connecting cable with your recording device for playback. Pictures edited using [P EFFECT] (p. 38) •... depending on the device or application. 45 Dubbing/Editing b Notes • When you are connecting your camcorder to a monaural device, connect the yellow plug of the recording device. 4 Start playback on the camcorder, and recording on the recording device.
...(the default setting) (p. 43). 1 Prepare your camcorder for details. 5 When dubbing is paused on your camcorder to the recording device (VCR or DVD/ HDD recorder) with the A/V connecting cable (supplied) 1, an A/V connecting cable with your recording device for playback. Pictures edited using [P EFFECT] (p. 38) •... depending on the device or application. 45 Dubbing/Editing b Notes • When you are connecting your camcorder to a monaural device, connect the yellow plug of the recording device. 4 Start playback on the camcorder, and recording on the recording device.

Operating Guide
Page 52
... table to OFF(CHG) (p. 12). The CHG (charge) lamp does not light while the battery pack is not a malfunction. The camcorder does not operate even when the power is set the POWER switch to a wall outlet (wall socket) (p. 12). Batteries/Power sources The... the problem persists, disconnect the power source and contact your Sony dealer. • Overall operations/Easy Handycam ..... 52 • Batteries/Power sources 52 • LCD screen/viewfinder 53 • Cassette tapes 53 • Recording 54 • Playback 55 • Dubbing/Editing/Connecting to other devices 55 ...
... table to OFF(CHG) (p. 12). The CHG (charge) lamp does not light while the battery pack is not a malfunction. The camcorder does not operate even when the power is set the POWER switch to a wall outlet (wall socket) (p. 12). Batteries/Power sources The... the problem persists, disconnect the power source and contact your Sony dealer. • Overall operations/Easy Handycam ..... 52 • Batteries/Power sources 52 • LCD screen/viewfinder 53 • Cassette tapes 53 • Recording 54 • Playback 55 • Dubbing/Editing/Connecting to other devices 55 ...


