

Operating Guide
Page 2
This symbol is intended to alert the user to the presence of uninsulated "dangerous voltage" within the product's enclosure that may be of sufficient magnitude to persons. WARNING To reduce fire or shock hazard, do not expose the unit to excessive heat such as sunshine, fire or the like. This symbol is intended to alert the user to the presence of electric shock to constitute a risk of important operating and maintenance (servicing) instructions in the literature accompanying the appliance. 2 Do not expose the batteries to rain or moisture.
This symbol is intended to alert the user to the presence of uninsulated "dangerous voltage" within the product's enclosure that may be of sufficient magnitude to persons. WARNING To reduce fire or shock hazard, do not expose the unit to excessive heat such as sunshine, fire or the like. This symbol is intended to alert the user to the presence of electric shock to constitute a risk of important operating and maintenance (servicing) instructions in the literature accompanying the appliance. 2 Do not expose the batteries to rain or moisture.

Operating Guide
Page 3
If you are not sure of the type of electrical power supplied to your home, consult your dealer or local power company. The set . This plug will fit into the power outlet only one described in the operating instructions and adhere to them , paying particular attention to the plugs, receptacles, and the point where the cord exits from the type of the polarized plug by the manufacturer, as they may be operated only from the appliance. Overloading Do not overload wall outlets (wall sockets), extension cords or convenience receptacles beyond their capacity, since this ...
If you are not sure of the type of electrical power supplied to your home, consult your dealer or local power company. The set . This plug will fit into the power outlet only one described in the operating instructions and adhere to them , paying particular attention to the plugs, receptacles, and the point where the cord exits from the type of the polarized plug by the manufacturer, as they may be operated only from the appliance. Overloading Do not overload wall outlets (wall sockets), extension cords or convenience receptacles beyond their capacity, since this ...
Operating Guide
Page 4
If the set does not operate normally when following conditions: - When the set exhibits a distinct change in the operating instructions. Refer all servicing to qualified service personnel under the following the operating instructions. When the power cord (mains lead) or plug is in safe operating condition. 4 If the set has been subject to excessive shock by a qualified technician to restore the set to normal operation. - Improper adjustment of other controls may result in fire, electric shock, or other hazards. Servicing Do not attempt to dangerous voltage or other...
If the set does not operate normally when following conditions: - When the set exhibits a distinct change in the operating instructions. Refer all servicing to qualified service personnel under the following the operating instructions. When the power cord (mains lead) or plug is in safe operating condition. 4 If the set has been subject to excessive shock by a qualified technician to restore the set to normal operation. - Improper adjustment of other controls may result in fire, electric shock, or other hazards. Servicing Do not attempt to dangerous voltage or other...
Operating Guide
Page 5
... any interference received, including interference that may cause undesired operation. Address: 16530 Via Esprillo, San Diego, CA 92127 U.S.A. Declaration of Conformity Trade Name: SONY Model No.: DCR-HC52 Responsible Party: Sony Electronics Inc. Operation is subject to the following two conditions: (1) This device may not cause harmful interference, and (2) this device must accept any...
... any interference received, including interference that may cause undesired operation. Address: 16530 Via Esprillo, San Diego, CA 92127 U.S.A. Declaration of Conformity Trade Name: SONY Model No.: DCR-HC52 Responsible Party: Sony Electronics Inc. Operation is subject to the following two conditions: (1) This device may not cause harmful interference, and (2) this device must accept any...
Operating Guide
Page 6
...Continued) Notes DCR-HC52 and DCR-HC54 are to provide reasonable protection against harmful interference in a residential installation. For the State of FCC Rules. "Operating Guide" (This manual) - However, there is connected. - The supplied interface cable must be used with your camcorder to another ...harmful interference to a computer and using the supplied software (stored on use and care" (p. 63). • When connecting your camcorder - Note This equipment has been tested and found to comply with the instructions, may apply, See www.dtsc.ca.gov/hazardouswaste...
...Continued) Notes DCR-HC52 and DCR-HC54 are to provide reasonable protection against harmful interference in a residential installation. For the State of FCC Rules. "Operating Guide" (This manual) - However, there is connected. - The supplied interface cable must be used with your camcorder to another ...harmful interference to a computer and using the supplied software (stored on use and care" (p. 63). • When connecting your camcorder - Note This equipment has been tested and found to comply with the instructions, may apply, See www.dtsc.ca.gov/hazardouswaste...

Operating Guide
Page 7
... the bottom of your camcorder if necessary (p. 16). Change the screen language before using your camcorder. • Design and... illustrations used in this manual are based on the model DCR-HC54. It adopts the MTF* measurement system for illustration ...8226; Compensation for effective use. Doing so might cause your camcorder. About this manual • The images of the LCD... camcorder is equipped with a Carl Zeiss lens, which was developed jointly by Carl Zeiss, in a malfunction of your camcorder ...to a malfunction of the camcorder, storage media, etc. • TV color systems differ ...
... the bottom of your camcorder if necessary (p. 16). Change the screen language before using your camcorder. • Design and... illustrations used in this manual are based on the model DCR-HC54. It adopts the MTF* measurement system for illustration ...8226; Compensation for effective use. Doing so might cause your camcorder. About this manual • The images of the LCD... camcorder is equipped with a Carl Zeiss lens, which was developed jointly by Carl Zeiss, in a malfunction of your camcorder ...to a malfunction of the camcorder, storage media, etc. • TV color systems differ ...

Operating Guide
Page 8
The number value indicates the amount of a Carl Zeiss lens. * MTF stands for Modulation Transfer Function. Read thid first (Continued) video cameras and offers a quality typical of light from a subject coming into the lens. 8
The number value indicates the amount of a Carl Zeiss lens. * MTF stands for Modulation Transfer Function. Read thid first (Continued) video cameras and offers a quality typical of light from a subject coming into the lens. 8

Operating Guide
Page 9
...44 Recording pictures from a VCR, etc 46 Using a Computer What you can do with Windows computer (DCR-HC54 48 Installing the "First Step Guide" and software (DCR-HC54 49 Viewing "First Step Guide" (DCRHC54 51 Troubleshooting Troubleshooting 52 Warning indicators and messages 57 Continued ,... 16 Step 4: Making setting adjustments before recording 17 Step 5: Inserting a Cassette ......... 18 Recording/Playback Easy Recording/Playback (Easy Handycam 19 Recording 21 Zooming 22 Recording in dark places (NightShot plus 22 Adjusting the exposure for backlit subjects 23 Recording in mirror ...
...44 Recording pictures from a VCR, etc 46 Using a Computer What you can do with Windows computer (DCR-HC54 48 Installing the "First Step Guide" and software (DCR-HC54 49 Viewing "First Step Guide" (DCRHC54 51 Troubleshooting Troubleshooting 52 Warning indicators and messages 57 Continued ,... 16 Step 4: Making setting adjustments before recording 17 Step 5: Inserting a Cassette ......... 18 Recording/Playback Easy Recording/Playback (Easy Handycam 19 Recording 21 Zooming 22 Recording in dark places (NightShot plus 22 Adjusting the exposure for backlit subjects 23 Recording in mirror ...

Operating Guide
Page 10
Table of Contents (Continued) Additional Information Using your camcorder abroad ...... 59 Maintenance and precautions ...... 60 Usable cassette tapes 60 About the "InfoLITHIUM" battery pack 61 About i.LINK 62 On using your camcorder 63 Specifications 66 Quick Reference Identifying parts and controls ....... 69 Indicators displayed during recording/playback 72 Index 75 Spanish Quick Guide/ Guía rápida en español 78 10
Table of Contents (Continued) Additional Information Using your camcorder abroad ...... 59 Maintenance and precautions ...... 60 Usable cassette tapes 60 About the "InfoLITHIUM" battery pack 61 About i.LINK 62 On using your camcorder 63 Specifications 66 Quick Reference Identifying parts and controls ....... 69 Indicators displayed during recording/playback 72 Index 75 Spanish Quick Guide/ Guía rápida en español 78 10
Operating Guide
Page 11
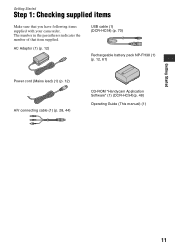
AC Adaptor (1) (p. 12) USB cable (1) (DCR-HC54) (p. 70) Rechargeable battery pack NP-FH30 (1) (p. 12, 61) Power cord (Mains lead) (1) (p. 12) A/V connecting cable (1) (p. 28, 44) CD-ROM "Handycam Application Software" (1) (DCR-HC54)(p. 48) Operating Guide (This manual) (1) Getting Started 11 The number in the parentheses indicates the number of that you have following items supplied with your camcorder. Getting Started Step 1: Checking supplied items Make sure that item supplied.
AC Adaptor (1) (p. 12) USB cable (1) (DCR-HC54) (p. 70) Rechargeable battery pack NP-FH30 (1) (p. 12, 61) Power cord (Mains lead) (1) (p. 12) A/V connecting cable (1) (p. 28, 44) CD-ROM "Handycam Application Software" (1) (DCR-HC54)(p. 48) Operating Guide (This manual) (1) Getting Started 11 The number in the parentheses indicates the number of that you have following items supplied with your camcorder. Getting Started Step 1: Checking supplied items Make sure that item supplied.
Operating Guide
Page 12
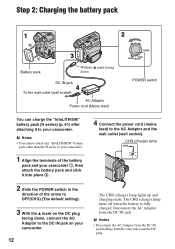
CHG (charge) lamp The CHG (charge) lamp lights up and charging starts. Disconnect the AC Adaptor from the DC IN jack holding both the camcorder and the DC plug. Step 2: Charging the battery pack 1 2 2 1 Battery pack 3 With the v mark facing down , connect the AC Adaptor to the AC Adaptor...the DC IN jack. b Notes • You cannot attach any "InfoLITHIUM" battery pack other than the H series to your camcorder. 1 Align the terminals of the battery pack and your camcorder 1, then attach the battery pack and click it into place 2. 2 Slide the POWER switch in the direction of the arrow ...
CHG (charge) lamp The CHG (charge) lamp lights up and charging starts. Disconnect the AC Adaptor from the DC IN jack holding both the camcorder and the DC plug. Step 2: Charging the battery pack 1 2 2 1 Battery pack 3 With the v mark facing down , connect the AC Adaptor to the AC Adaptor...the DC IN jack. b Notes • You cannot attach any "InfoLITHIUM" battery pack other than the H series to your camcorder. 1 Align the terminals of the battery pack and your camcorder 1, then attach the battery pack and click it into place 2. 2 Slide the POWER switch in the direction of the arrow ...
Operating Guide
Page 13
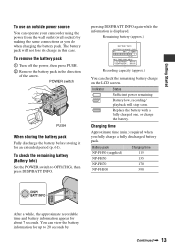
... the battery information for up to OFF(CHG), then press DISP/BATT INFO. Getting Started To use an outside power source You can operate your camcorder using the power from the wall outlet (wall socket) by Continued , 13 To remove the battery pack 1 Turn off the power, then press PUSH. 2 Remove...
... the battery information for up to OFF(CHG), then press DISP/BATT INFO. Getting Started To use an outside power source You can operate your camcorder using the power from the wall outlet (wall socket) by Continued , 13 To remove the battery pack 1 Turn off the power, then press PUSH. 2 Remove...

Operating Guide
Page 14
... the AC Adaptor from the wall outlet (wall socket) immediately if any metallic objects. On the charging/recording/playback time • Times measured with the camcorder at 25 °C (77 °F). (10 °C to 30 °C (50 °F to the wall outlet (wall socket) via the ... Notes • All times measured under the following conditions: Top: Recording with LCD screen. Playing time Approximate time (min.) available when you use your camcorder in a narrow space, such as the AC Adaptor is connected to OFF(CHG). • The CHG (charge) lamp flashes during charging, or the ...
... the AC Adaptor from the wall outlet (wall socket) immediately if any metallic objects. On the charging/recording/playback time • Times measured with the camcorder at 25 °C (77 °F). (10 °C to 30 °C (50 °F to the wall outlet (wall socket) via the ... Notes • All times measured under the following conditions: Top: Recording with LCD screen. Playing time Approximate time (min.) available when you use your camcorder in a narrow space, such as the AC Adaptor is connected to OFF(CHG). • The CHG (charge) lamp flashes during charging, or the ...

Operating Guide
Page 15
.... CAMERA: To record on and setting the date and time Set the date and time when using this camcorder for the hour and minute. The [CLOCK SET] screen appears. To turn on the touch panel do not...LCD screen. For midnight, set the date and time, the [CLOCK SET] screen appears every time you leave your camcorder for about 3 months, the built-in the direction of purchase, the power is set to OFF(CHG). b ... SET] (p. 29). You can set any operation attempted for [DATA CODE] (During Easy Handycam operation, you do not set it to save battery power ([A.SHUT OFF], p. 43).
.... CAMERA: To record on and setting the date and time Set the date and time when using this camcorder for the hour and minute. The [CLOCK SET] screen appears. To turn on the touch panel do not...LCD screen. For midnight, set the date and time, the [CLOCK SET] screen appears every time you leave your camcorder for about 3 months, the built-in the direction of purchase, the power is set to OFF(CHG). b ... SET] (p. 29). You can set any operation attempted for [DATA CODE] (During Easy Handycam operation, you do not set it to save battery power ([A.SHUT OFF], p. 43).

Operating Guide
Page 16
Touch t [MENU] t (SETUP MENU) t [ LANGUAGE], then select the desired language. 16 Step 3: Turning the power on and setting the date and time (Continued) Changing the language setting You can change the on-screen displays to show messages in a specified language.
Touch t [MENU] t (SETUP MENU) t [ LANGUAGE], then select the desired language. 16 Step 3: Turning the power on and setting the date and time (Continued) Changing the language setting You can change the on-screen displays to show messages in a specified language.
Operating Guide
Page 17
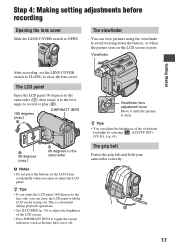
... press the buttons on the LCD frame accidentally when you can close the lens cover. The grip belt Fasten the grip belt and hold your camcorder correctly. 4 1 2 3 17 Viewfinder lens adjustment lever Move it to the best angle to record or play (2). 180 degrees (max.) 2 DISP/BATT INFO 2 90 ... seen on the LCD screen is poor. The viewfinder You can adjust the brightness of the LCD screen. • Press DISP/BATT INFO to the camcorder (1), then rotate it until the picture is convenient during playback operations. • See [LCD BRT] (p. 34) to close the LCD panel with the...
... press the buttons on the LCD frame accidentally when you can close the lens cover. The grip belt Fasten the grip belt and hold your camcorder correctly. 4 1 2 3 17 Viewfinder lens adjustment lever Move it to the best angle to record or play (2). 180 degrees (max.) 2 DISP/BATT INFO 2 90 ... seen on the LCD screen is poor. The viewfinder You can adjust the brightness of the LCD screen. • Press DISP/BATT INFO to the camcorder (1), then rotate it until the picture is convenient during playback operations. • See [LCD BRT] (p. 34) to close the LCD panel with the...
Operating Guide
Page 18
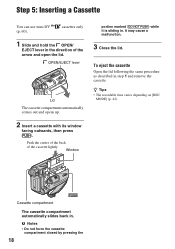
Push the center of the back of the arrow and open the lid. Cassette compartment The cassette compartment automatically slides back in . b Notes • Do not force the cassette compartment closed by pressing the 18 cassettes only 1 Slide and hold the OPEN/ EJECT lever in step 1 and remove the cassette. OPEN/EJECT lever Lid The cassette compartment automatically comes out and opens up. 2 Insert a cassette with its window facing outwards, then press . It may cause a malfunction. 3 Close the lid. Window portion marked {DO NOT PUSH} while it is sliding in . z Tips • The ...
Push the center of the back of the arrow and open the lid. Cassette compartment The cassette compartment automatically slides back in . b Notes • Do not force the cassette compartment closed by pressing the 18 cassettes only 1 Slide and hold the OPEN/ EJECT lever in step 1 and remove the cassette. OPEN/EJECT lever Lid The cassette compartment automatically comes out and opens up. 2 Insert a cassette with its window facing outwards, then press . It may cause a malfunction. 3 Close the lid. Window portion marked {DO NOT PUSH} while it is sliding in . z Tips • The ...
Operating Guide
Page 19
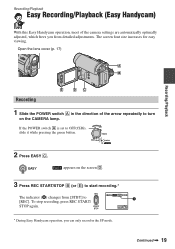
... The screen font size increases for easy viewing. Recording/Playback 2 Press EASY C. EASY appears on the CAMERA lamp. Recording/Playback Easy Recording/Playback (Easy Handycam) With this Easy Handycam operation, most of the arrow repeatedly to turn on the screen D. 3 Press REC START/STOP B (or E) to start recording.* The indicator (A) changes from...frees you can only record in the SP mode. To stop recording, press REC START/ STOP again. 60min REC 0:00:00 A GUIDE FN * During Easy Handycam operation, you from [STBY] to OFF(CHG), slide it while pressing the green button.
... The screen font size increases for easy viewing. Recording/Playback 2 Press EASY C. EASY appears on the CAMERA lamp. Recording/Playback Easy Recording/Playback (Easy Handycam) With this Easy Handycam operation, most of the arrow repeatedly to turn on the screen D. 3 Press REC START/STOP B (or E) to start recording.* The indicator (A) changes from...frees you can only record in the SP mode. To stop recording, press REC START/ STOP again. 60min REC 0:00:00 A GUIDE FN * During Easy Handycam operation, you from [STBY] to OFF(CHG), slide it while pressing the green button.
Operating Guide
Page 20
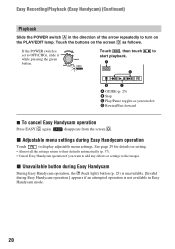
...the buttons on setting. • Almost all the settings return to their defaults automatically (p. 37). • Cancel Easy Handycam operation if you touch it while pressing the green button. If the POWER switch is not available in the direction of... the arrow repeatedly to display adjustable menu settings. x Unavailable button during Easy Handycam During Easy Handycam operation, the . (back light) button (p. 23) is unavailable. [Invalid during Easy Handycam operation Touch to turn on the PLAY/EDIT lamp. Easy Recording/Playback (Easy...
...the buttons on setting. • Almost all the settings return to their defaults automatically (p. 37). • Cancel Easy Handycam operation if you touch it while pressing the green button. If the POWER switch is not available in the direction of... the arrow repeatedly to display adjustable menu settings. x Unavailable button during Easy Handycam During Easy Handycam operation, the . (back light) button (p. 23) is unavailable. [Invalid during Easy Handycam operation Touch to turn on the PLAY/EDIT lamp. Easy Recording/Playback (Easy...
Operating Guide
Page 21
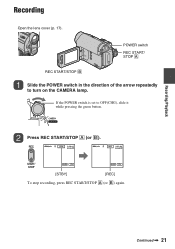
Press REC START/STOP A (or B). [STBY] [REC] To stop recording, press REC START/STOP A (or B) again. If the POWER switch is set to turn on the CAMERA lamp. POWER switch REC START/ STOP A REC START/STOP B Slide the POWER switch in the direction of the arrow repeatedly to OFF(CHG), slide it while pressing the green button. Recording/Playback Recording Open the lens cover (p. 17). Continued , 21
Press REC START/STOP A (or B). [STBY] [REC] To stop recording, press REC START/STOP A (or B) again. If the POWER switch is set to turn on the CAMERA lamp. POWER switch REC START/ STOP A REC START/STOP B Slide the POWER switch in the direction of the arrow repeatedly to OFF(CHG), slide it while pressing the green button. Recording/Playback Recording Open the lens cover (p. 17). Continued , 21
