

Operating Guide
Page 2
This symbol is intended to alert the user to the presence of electric shock to constitute a risk of important operating and maintenance (servicing) instructions in the literature accompanying the appliance. 2 This symbol is intended to alert the user to the presence of uninsulated "dangerous voltage" within the product's enclosure that may be of sufficient magnitude to persons. Do not expose the batteries to rain or moisture. WARNING To reduce fire or shock hazard, do not expose the unit to excessive heat such as sunshine, fire or the like.
This symbol is intended to alert the user to the presence of electric shock to constitute a risk of important operating and maintenance (servicing) instructions in the literature accompanying the appliance. 2 This symbol is intended to alert the user to the presence of uninsulated "dangerous voltage" within the product's enclosure that may be of sufficient magnitude to persons. Do not expose the batteries to rain or moisture. WARNING To reduce fire or shock hazard, do not expose the unit to excessive heat such as sunshine, fire or the like.

Operating Guide
Page 3
For those sets designed to operate from battery power, or other similar surface. - If the plug should be walked on the appliance, or the one way. Overloading Do not overload wall outlets (wall ...
For those sets designed to operate from battery power, or other similar surface. - If the plug should be walked on the appliance, or the one way. Overloading Do not overload wall outlets (wall ...
Operating Guide
Page 5
... of Conformity Trade Name: SONY Model No.: DCR-HC52 Responsible Party: Sony Electronics Inc. For customers in the U.S.A. and CANADA RECYCLING LITHIUM-ION BATTERIES Lithium-Ion batteries are located on the bottom. For more information regarding this product. Battery pack This device complies with Part 15 of rechargeable batteries, call : Sony Customer Information Center 1-800222-SONY (7669). Operation is for...
... of Conformity Trade Name: SONY Model No.: DCR-HC52 Responsible Party: Sony Electronics Inc. For customers in the U.S.A. and CANADA RECYCLING LITHIUM-ION BATTERIES Lithium-Ion batteries are located on the bottom. For more information regarding this product. Battery pack This device complies with Part 15 of rechargeable batteries, call : Sony Customer Information Center 1-800222-SONY (7669). Operation is for...
Operating Guide
Page 6
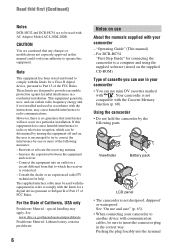
Reorient or relocate the receiving antenna. - "Operating Guide" (This manual) - Viewfinder Battery pack LCD panel • The camcorder is not compatible with AC Adaptor Model AC-L200/L200B. However, there is no guarantee that to which...battery contains perchlorate. 6 Notes on , the user is connected. - Consult the dealer or an experienced radio/TV technician for a Class B digital device, pursuant to Part 15 of FCC Rules. Connect the equipment into the terminal Your camcorder is not dustproof, dripproof or waterproof. Read thid first (Continued) Notes DCR-HC52 and DCR...
Reorient or relocate the receiving antenna. - "Operating Guide" (This manual) - Viewfinder Battery pack LCD panel • The camcorder is not compatible with AC Adaptor Model AC-L200/L200B. However, there is no guarantee that to which...battery contains perchlorate. 6 Notes on , the user is connected. - Consult the dealer or an experienced radio/TV technician for a Class B digital device, pursuant to Part 15 of FCC Rules. Connect the equipment into the terminal Your camcorder is not dustproof, dripproof or waterproof. Read thid first (Continued) Notes DCR-HC52 and DCR...

Operating Guide
Page 9
...5 Notes on use 6 Getting Started Step 1: Checking supplied items 11 Step 2: Charging the battery pack 12 Step 3: Turning the power on and setting the date and time 15 Changing the ...recording 17 Step 5: Inserting a Cassette ......... 18 Recording/Playback Easy Recording/Playback (Easy Handycam 19 Recording 21 Zooming 22 Recording in dark places (NightShot plus 22 Adjusting the exposure...46 Using a Computer What you can do with Windows computer (DCR-HC54 48 Installing the "First Step Guide" and software (DCR-HC54 49 Viewing "First Step Guide" (DCRHC54 51 Troubleshooting Troubleshooting...
...5 Notes on use 6 Getting Started Step 1: Checking supplied items 11 Step 2: Charging the battery pack 12 Step 3: Turning the power on and setting the date and time 15 Changing the ...recording 17 Step 5: Inserting a Cassette ......... 18 Recording/Playback Easy Recording/Playback (Easy Handycam 19 Recording 21 Zooming 22 Recording in dark places (NightShot plus 22 Adjusting the exposure...46 Using a Computer What you can do with Windows computer (DCR-HC54 48 Installing the "First Step Guide" and software (DCR-HC54 49 Viewing "First Step Guide" (DCRHC54 51 Troubleshooting Troubleshooting...

Operating Guide
Page 10
Table of Contents (Continued) Additional Information Using your camcorder abroad ...... 59 Maintenance and precautions ...... 60 Usable cassette tapes 60 About the "InfoLITHIUM" battery pack 61 About i.LINK 62 On using your camcorder 63 Specifications 66 Quick Reference Identifying parts and controls ....... 69 Indicators displayed during recording/playback 72 Index 75 Spanish Quick Guide/ Guía rápida en español 78 10
Table of Contents (Continued) Additional Information Using your camcorder abroad ...... 59 Maintenance and precautions ...... 60 Usable cassette tapes 60 About the "InfoLITHIUM" battery pack 61 About i.LINK 62 On using your camcorder 63 Specifications 66 Quick Reference Identifying parts and controls ....... 69 Indicators displayed during recording/playback 72 Index 75 Spanish Quick Guide/ Guía rápida en español 78 10
Operating Guide
Page 11
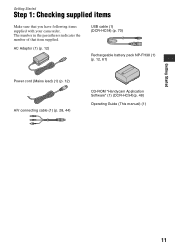
The number in the parentheses indicates the number of that you have following items supplied with your camcorder. AC Adaptor (1) (p. 12) USB cable (1) (DCR-HC54) (p. 70) Rechargeable battery pack NP-FH30 (1) (p. 12, 61) Power cord (Mains lead) (1) (p. 12) A/V connecting cable (1) (p. 28, 44) CD-ROM "Handycam Application Software" (1) (DCR-HC54)(p. 48) Operating Guide (This manual) (1) Getting Started 11 Getting Started Step 1: Checking supplied items Make sure that item supplied.
The number in the parentheses indicates the number of that you have following items supplied with your camcorder. AC Adaptor (1) (p. 12) USB cable (1) (DCR-HC54) (p. 70) Rechargeable battery pack NP-FH30 (1) (p. 12, 61) Power cord (Mains lead) (1) (p. 12) A/V connecting cable (1) (p. 28, 44) CD-ROM "Handycam Application Software" (1) (DCR-HC54)(p. 48) Operating Guide (This manual) (1) Getting Started 11 Getting Started Step 1: Checking supplied items Make sure that item supplied.
Operating Guide
Page 12
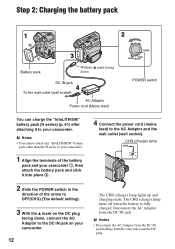
...outlet (wall socket). b Notes • You cannot attach any "InfoLITHIUM" battery pack other than the H series to your camcorder. 1 Align the terminals of the battery pack and your camcorder 1, then attach the battery pack and click it to your camcorder. 12 4 Connect the power cord (mains lead) to OFF(CHG) (The... default setting). 3 With the v mark on your camcorder. CHG (charge) lamp The CHG (charge) lamp lights up and charging starts. The CHG (charge) lamp turns off when the battery is fully charged. b Notes • Disconnect the AC Adaptor from the DC IN ...
...outlet (wall socket). b Notes • You cannot attach any "InfoLITHIUM" battery pack other than the H series to your camcorder. 1 Align the terminals of the battery pack and your camcorder 1, then attach the battery pack and click it to your camcorder. 12 4 Connect the power cord (mains lead) to OFF(CHG) (The... default setting). 3 With the v mark on your camcorder. CHG (charge) lamp The CHG (charge) lamp lights up and charging starts. The CHG (charge) lamp turns off when the battery is fully charged. b Notes • Disconnect the AC Adaptor from the DC IN ...
Operating Guide
Page 13
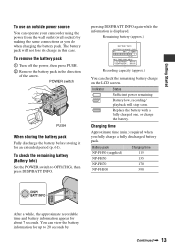
... NP-FH100 Charging time 115 135 170 390 After a while, the approximate recordable time and battery information appear for an extended period (p. 61). To check the remaining battery (Battery Info) Set the POWER switch to 20 seconds by making the same connections as you fully ...battery pack will stop soon. Replace the battery with a fully charged one, or charge the battery. Indicator Status Sufficient power remaining Battery low, recording/ playback will not lose its charge in the direction of the arrow. Getting Started To use an outside power source You can operate your camcorder...
... NP-FH100 Charging time 115 135 170 390 After a while, the approximate recordable time and battery information appear for an extended period (p. 61). To check the remaining battery (Battery Info) Set the POWER switch to 20 seconds by making the same connections as you fully ...battery pack will stop soon. Replace the battery with a fully charged one, or charge the battery. Indicator Status Sufficient power remaining Battery low, recording/ playback will not lose its charge in the direction of the arrow. Getting Started To use an outside power source You can operate your camcorder...

Operating Guide
Page 14
... b Notes • All times measured under the following conditions. - The battery pack is damaged. 14 - This may cause a malfunction. • Even if your camcorder is connected to the DC IN jack of the AC Adaptor or battery terminal with viewfinder while the LCD panel closed 135 220 465 1065 On.... On the AC Adaptor • Use the nearby wall outlet (wall socket) when using your camcorder. • Do not use your camcorder, even when the power cord (mains lead) is worn-out (for Battery Info only). • The power will be shorter depending on /off , AC power (house current...
... b Notes • All times measured under the following conditions. - The battery pack is damaged. 14 - This may cause a malfunction. • Even if your camcorder is connected to the DC IN jack of the AC Adaptor or battery terminal with viewfinder while the LCD panel closed 135 220 465 1065 On.... On the AC Adaptor • Use the nearby wall outlet (wall socket) when using your camcorder. • Do not use your camcorder, even when the power cord (mains lead) is worn-out (for Battery Info only). • The power will be shorter depending on /off , AC power (house current...

Operating Guide
Page 15
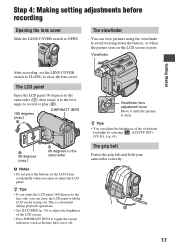
... 15 POWER switch 1 While pressing the green button, slide the POWER switch in rechargeable battery gets discharged and the date and time settings may be displayed during playback (see page 34 for [DATA CODE] (During Easy Handycam operation, you do not set with / and repeat for the first time. To turn... the hour and minute. If you turn off the power Slide the POWER switch to save battery power ([A.SHUT OFF], p. 43). Touch the button on your camcorder without any year up to the year 2079. 3 Move to [M] (month) with , then set it to turn on the LCD screen. PLAY/EDIT:...
... 15 POWER switch 1 While pressing the green button, slide the POWER switch in rechargeable battery gets discharged and the date and time settings may be displayed during playback (see page 34 for [DATA CODE] (During Easy Handycam operation, you do not set with / and repeat for the first time. To turn... the hour and minute. If you turn off the power Slide the POWER switch to save battery power ([A.SHUT OFF], p. 43). Touch the button on your camcorder without any year up to the year 2079. 3 Move to [M] (month) with , then set it to turn on the LCD screen. PLAY/EDIT:...
Operating Guide
Page 17
...DISP/BATT INFO 2 90 degrees (max.) 1 90 degrees to avoid wearing down the battery, or when the picture seen on the LCD screen is poor. The LCD panel Open the LCD panel 90 degrees to the camcorder (1), then rotate it until the picture is convenient during playback operations. • See ...LCD/VF SET) - [VF B.L.] (p. 41). The grip belt Fasten the grip belt and hold your camcorder correctly. 4 1 2 3 17 z Tips • You can view pictures using the viewfinder to the camcorder b Notes • Do not press the buttons on the LCD frame accidentally when you can close the lens...
...DISP/BATT INFO 2 90 degrees (max.) 1 90 degrees to avoid wearing down the battery, or when the picture seen on the LCD screen is poor. The LCD panel Open the LCD panel 90 degrees to the camcorder (1), then rotate it until the picture is convenient during playback operations. • See ...LCD/VF SET) - [VF B.L.] (p. 41). The grip belt Fasten the grip belt and hold your camcorder correctly. 4 1 2 3 17 z Tips • You can view pictures using the viewfinder to the camcorder b Notes • Do not press the buttons on the LCD frame accidentally when you can close the lens...

Operating Guide
Page 33
...brightness of paper, to color. Outdoors - Under daylight fluorescent lamps INDOOR (n) The white balance is canceled. z Tips • If you have changed the battery pack while [AUTO] was selected, if keeps flashing after inside the house, or vice versa, you will be set. • When [ONE PUSH] ...was selected, or taken your camcorder at a nearby white object for about 10 seconds for better color balance adjustment. • When the white balance has been set with [ONE PUSH], ...
...brightness of paper, to color. Outdoors - Under daylight fluorescent lamps INDOOR (n) The white balance is canceled. z Tips • If you have changed the battery pack while [AUTO] was selected, if keeps flashing after inside the house, or vice versa, you will be set. • When [ONE PUSH] ...was selected, or taken your camcorder at a nearby white object for about 10 seconds for better color balance adjustment. • When the white balance has been set with [ONE PUSH], ...

Operating Guide
Page 41
...page 29 for details on the LCD screen with B. b Notes • When you connect your camcorder to outside power sources, [BRIGHT] is automatically selected for the setting. • When you select [BRIGHT], battery life is slightly reduced during recording. B LETTER BOX Normal setting (standard type of the viewfinder. WIDE... will not be affected by setting [WIDE SEL] to [16:9 WIDE]. B BRT NORMAL Standard brightness. b Notes • When you connect your camcorder to outside power sources, [BRIGHT] is automatically selected for the setting. • When you select [BRIGHT...
...page 29 for details on the LCD screen with B. b Notes • When you connect your camcorder to outside power sources, [BRIGHT] is automatically selected for the setting. • When you select [BRIGHT], battery life is slightly reduced during recording. B LETTER BOX Normal setting (standard type of the viewfinder. WIDE... will not be affected by setting [WIDE SEL] to [16:9 WIDE]. B BRT NORMAL Standard brightness. b Notes • When you connect your camcorder to outside power sources, [BRIGHT] is automatically selected for the setting. • When you select [BRIGHT...

Operating Guide
Page 52
...] - [SPOT METER] - [SCENE SEL.] - [EXPOSURE] - [WHT BAL] - [AUDIO MIX] The camcorder gets warm. • The camcorder may get warmer while you use it after about 1 minute. • Press the RESET button (p. 70) using your Sony dealer. • Overall operations/Easy Handycam ..... 52 • Batteries/Power sources 52 • LCD screen/viewfinder 53 • Cassette tapes...
...] - [SPOT METER] - [SCENE SEL.] - [EXPOSURE] - [WHT BAL] - [AUDIO MIX] The camcorder gets warm. • The camcorder may get warmer while you use it after about 1 minute. • Press the RESET button (p. 70) using your Sony dealer. • Overall operations/Easy Handycam ..... 52 • Batteries/Power sources 52 • LCD screen/viewfinder 53 • Cassette tapes...
Operating Guide
Page 53
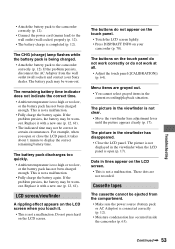
...time may be ejected from the wall outlet (wall socket) and contact your camcorder (p. 70). • Attach the battery pack to the camcorder correctly (p. 12). • Connect the power cord (mains lead) to the camcorder correctly (p. 12). Do not press hard on the touch panel do not ...work correctly or do not appear on the touch panel. • Touch the LCD screen lightly. • Press DISP/BATT INFO on your Sony...
...time may be ejected from the wall outlet (wall socket) and contact your camcorder (p. 70). • Attach the battery pack to the camcorder correctly (p. 12). • Connect the power cord (mains lead) to the camcorder correctly (p. 12). Do not press hard on the touch panel do not ...work correctly or do not appear on the touch panel. • Touch the LCD screen lightly. • Press DISP/BATT INFO on your Sony...

Operating Guide
Page 54
...8226; The backlight function does not work during rewinding or fast-forwarding. • When using a cassette with battery operation) and therefore increases noise. This is stuck to the drum due to moisture condensation. Rewind it, ... for at least 1 hour, then re-insert the cassette (p. 63). Remove the cassette and leave your camcorder for auto focus. The backlight function does not function. • In the following settings, the backlight function...] (p. 39). The remaining tape indicator is noisier during Easy Handycam operation (p. 20). This is not a malfunction.
...8226; The backlight function does not work during rewinding or fast-forwarding. • When using a cassette with battery operation) and therefore increases noise. This is stuck to the drum due to moisture condensation. Rewind it, ... for at least 1 hour, then re-insert the cassette (p. 63). Remove the cassette and leave your camcorder for auto focus. The backlight function does not function. • In the following settings, the backlight function...] (p. 39). The remaining tape indicator is noisier during Easy Handycam operation (p. 20). This is not a malfunction.
Operating Guide
Page 57
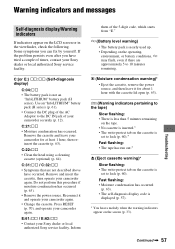
... DC IN jack of the 5-digit code, which starts from "E." Press RESET (p. 70), and operate your Sony dealer or local authorized Sony service facility. E:61:ss / E:62:ss • Contact your camcorder again. E (Battery level warning) • The battery pack is set to lock (p. 60).* Fast flashing: • The tape has run out.* Z (Eject cassette...
... DC IN jack of the 5-digit code, which starts from "E." Press RESET (p. 70), and operate your Sony dealer or local authorized Sony service facility. E:61:ss / E:62:ss • Contact your camcorder again. E (Battery level warning) • The battery pack is set to lock (p. 60).* Fast flashing: • The tape has run out.* Z (Eject cassette...
Operating Guide
Page 61
... to the operating conditions of between your camcorder or remove the battery pack. The battery pack is an "InfoLITHIUM" battery pack? About the remaining battery time indicator • When the power goes off (p. 43). Your camcorder operates only with an "InfoLITHIUM" battery pack (H series). Use the remaining battery time indication as a rough guide only. • The E mark that...
... to the operating conditions of between your camcorder or remove the battery pack. The battery pack is an "InfoLITHIUM" battery pack? About the remaining battery time indicator • When the power goes off (p. 43). Your camcorder operates only with an "InfoLITHIUM" battery pack (H series). Use the remaining battery time indication as a rough guide only. • The E mark that...
Operating Guide
Page 62
...1394 is Mbps? To use . About i.LINK The DV Interface on some devices. Maintenance and precautions (Continued) About battery life • Battery capacity decreases over time and through repeated use i.LINK functions on this unit For details on precautions and compatible application ...i.LINK-compatible devices. Possible applications are not compatible with a different maximum baud rate. * What is an international standard standardized by Sony (e.g. i.LINK is also indicated near the i.LINK interface on this unit is an i.LINKcompliant DV Interface. Before connecting to a device...
...1394 is Mbps? To use . About i.LINK The DV Interface on some devices. Maintenance and precautions (Continued) About battery life • Battery capacity decreases over time and through repeated use i.LINK functions on this unit For details on precautions and compatible application ...i.LINK-compatible devices. Possible applications are not compatible with a different maximum baud rate. * What is an international standard standardized by Sony (e.g. i.LINK is also indicated near the i.LINK interface on this unit is an i.LINKcompliant DV Interface. Before connecting to a device...


