
Operating Guide
Page 6
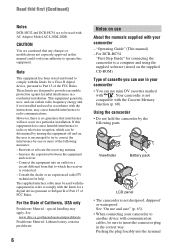
... "First Step Guide" for a digital device pursuant to Subpart B of Part 15 of cassette you can use in your camcorder - Read thid first (Continued) Notes DCR-HC52 and DCR-HC54 are to be sure to insert the connector plug in the correct way. Note This equipment has been tested and found to ...comply with your camcorder • You can radiate radio frequency energy and, if not installed and used with the equipment in ...
... "First Step Guide" for a digital device pursuant to Subpart B of Part 15 of cassette you can use in your camcorder - Read thid first (Continued) Notes DCR-HC52 and DCR-HC54 are to be sure to insert the connector plug in the correct way. Note This equipment has been tested and found to ...comply with your camcorder • You can radiate radio frequency energy and, if not installed and used with the equipment in ...

Operating Guide
Page 7
...8226; TV color systems differ depending on the country/region. However, there may be copyrighted. About this manual are based on the model DCR-HC54. will damage the terminal and may result in this manual for illustration purposes are captured using a digital still camera, and therefore may...measurement system for long periods of the manufacturing process and do not affect the recording in Germany, and Sony Corporation, and produces superior images. About the Carl Zeiss lens Your camcorder is indicated on the LCD screen and the viewfinder. Black point White, red, blue or green point...
...8226; TV color systems differ depending on the country/region. However, there may be copyrighted. About this manual are based on the model DCR-HC54. will damage the terminal and may result in this manual for illustration purposes are captured using a digital still camera, and therefore may...measurement system for long periods of the manufacturing process and do not affect the recording in Germany, and Sony Corporation, and produces superior images. About the Carl Zeiss lens Your camcorder is indicated on the LCD screen and the viewfinder. Black point White, red, blue or green point...

Operating Guide
Page 10
Table of Contents (Continued) Additional Information Using your camcorder abroad ...... 59 Maintenance and precautions ...... 60 Usable cassette tapes 60 About the "InfoLITHIUM" battery pack 61 About i.LINK 62 On using your camcorder 63 Specifications 66 Quick Reference Identifying parts and controls ....... 69 Indicators displayed during recording/playback 72 Index 75 Spanish Quick Guide/ Guía rápida en español 78 10
Table of Contents (Continued) Additional Information Using your camcorder abroad ...... 59 Maintenance and precautions ...... 60 Usable cassette tapes 60 About the "InfoLITHIUM" battery pack 61 About i.LINK 62 On using your camcorder 63 Specifications 66 Quick Reference Identifying parts and controls ....... 69 Indicators displayed during recording/playback 72 Index 75 Spanish Quick Guide/ Guía rápida en español 78 10
Operating Guide
Page 11
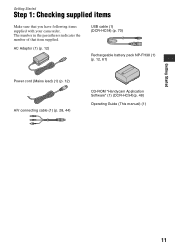
Getting Started Step 1: Checking supplied items Make sure that item supplied. The number in the parentheses indicates the number of that you have following items supplied with your camcorder. AC Adaptor (1) (p. 12) USB cable (1) (DCR-HC54) (p. 70) Rechargeable battery pack NP-FH30 (1) (p. 12, 61) Power cord (Mains lead) (1) (p. 12) A/V connecting cable (1) (p. 28, 44) CD-ROM "Handycam Application Software" (1) (DCR-HC54)(p. 48) Operating Guide (This manual) (1) Getting Started 11
Getting Started Step 1: Checking supplied items Make sure that item supplied. The number in the parentheses indicates the number of that you have following items supplied with your camcorder. AC Adaptor (1) (p. 12) USB cable (1) (DCR-HC54) (p. 70) Rechargeable battery pack NP-FH30 (1) (p. 12, 61) Power cord (Mains lead) (1) (p. 12) A/V connecting cable (1) (p. 28, 44) CD-ROM "Handycam Application Software" (1) (DCR-HC54)(p. 48) Operating Guide (This manual) (1) Getting Started 11
Operating Guide
Page 12
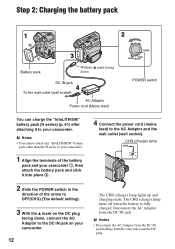
...61) after attaching it into place 2. 2 Slide the POWER switch in the direction of the battery pack and your camcorder. Disconnect the AC Adaptor from the DC IN jack holding both the camcorder and the DC plug. b Notes • You cannot attach any "InfoLITHIUM" battery pack other than the H series... to your camcorder. 1 Align the terminals of the arrow to OFF(CHG) (The default setting). 3 With the v mark on your camcorder. 12 4 Connect the power cord (mains lead) to your camcorder 1, then attach the battery pack and click it to the ...
...61) after attaching it into place 2. 2 Slide the POWER switch in the direction of the battery pack and your camcorder. Disconnect the AC Adaptor from the DC IN jack holding both the camcorder and the DC plug. b Notes • You cannot attach any "InfoLITHIUM" battery pack other than the H series... to your camcorder. 1 Align the terminals of the arrow to OFF(CHG) (The default setting). 3 With the v mark on your camcorder. 12 4 Connect the power cord (mains lead) to your camcorder 1, then attach the battery pack and click it to the ...
Operating Guide
Page 13
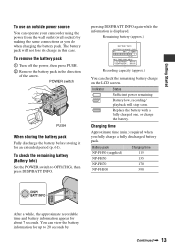
... (approx.) BATTERY INFO BATTERY CHARGE LEVEL 0% 50% 100% REC TIME AVAILABLE LCD SCREEN : 85 min VIEWFINDER : 99 min Recording capacity (approx.) You can operate your camcorder using the power from the wall outlet (wall socket) by Continued , 13 Charging time Approximate time (min.) required when you do when charging the battery...
... (approx.) BATTERY INFO BATTERY CHARGE LEVEL 0% 50% 100% REC TIME AVAILABLE LCD SCREEN : 85 min VIEWFINDER : 99 min Recording capacity (approx.) You can operate your camcorder using the power from the wall outlet (wall socket) by Continued , 13 Charging time Approximate time (min.) required when you do when charging the battery...

Operating Guide
Page 14
...panel opened 105 170 370 845 LCD panel closed . On the AC Adaptor • Use the nearby wall outlet (wall socket) when using your camcorder. b Notes • All times measured under the following conditions: Top: Recording with LCD screen. The battery pack is damaged. 14 - The...recording/playback time • Times measured with any malfunction occurs while using the AC Adaptor. This may cause a malfunction. • Even if your camcorder is connected to OFF(CHG). • The CHG (charge) lamp flashes during charging, or the Battery Info (p. 13) will not be correctly ...
...panel opened 105 170 370 845 LCD panel closed . On the AC Adaptor • Use the nearby wall outlet (wall socket) when using your camcorder. b Notes • All times measured under the following conditions: Top: Recording with LCD screen. The battery pack is damaged. 14 - The...recording/playback time • Times measured with any malfunction occurs while using the AC Adaptor. This may cause a malfunction. • Even if your camcorder is connected to OFF(CHG). • The CHG (charge) lamp flashes during charging, or the Battery Info (p. 13) will not be correctly ...

Operating Guide
Page 15
... time settings are automatically recorded on and setting the date and time Set the date and time when using this camcorder for [DATA CODE] (During Easy Handycam operation, you do not use your camcorder without any year up to the year 2079. 3 Move to [M] (month) with , then set it to save... during playback (see page 34 for the first time. Continued , 15 For midnight, set only [DATE/TIME])). • If the buttons on your camcorder or change the POWER switch position. 4 Move to 12:00 PM. Getting Started Step 3: Turning the power on the tape, and can be cleared ...
... time settings are automatically recorded on and setting the date and time Set the date and time when using this camcorder for [DATA CODE] (During Easy Handycam operation, you do not use your camcorder without any year up to the year 2079. 3 Move to [M] (month) with , then set it to save... during playback (see page 34 for the first time. Continued , 15 For midnight, set only [DATE/TIME])). • If the buttons on your camcorder or change the POWER switch position. 4 Move to 12:00 PM. Getting Started Step 3: Turning the power on the tape, and can be cleared ...
Operating Guide
Page 17
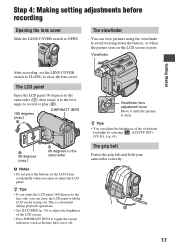
... lever Move it to the best angle to record or play (2). 180 degrees (max.) 2 DISP/BATT INFO 2 90 degrees (max.) 1 90 degrees to the camcorder b Notes • Do not press the buttons on the LCD frame accidentally when you can close the lens cover. z Tips • If you rotate the... pictures using the viewfinder to close the LCD panel with the LCD screen facing out. The grip belt Fasten the grip belt and hold your camcorder correctly. 4 1 2 3 17 Viewfinder Getting Started After recording, set the LENS COVER switch to CLOSE, to avoid wearing down the battery, or when the picture ...
... lever Move it to the best angle to record or play (2). 180 degrees (max.) 2 DISP/BATT INFO 2 90 degrees (max.) 1 90 degrees to the camcorder b Notes • Do not press the buttons on the LCD frame accidentally when you can close the lens cover. z Tips • If you rotate the... pictures using the viewfinder to close the LCD panel with the LCD screen facing out. The grip belt Fasten the grip belt and hold your camcorder correctly. 4 1 2 3 17 Viewfinder Getting Started After recording, set the LENS COVER switch to CLOSE, to avoid wearing down the battery, or when the picture ...

Operating Guide
Page 22
Therefore, do not cover the infrared port with the zoom buttons on the LCD frame. • The minimum possible distance between camcorder and subject while maintaining sharp focus is about 1 cm (about 13/32 in.) for wide angle and about 80 cm (about 2 5/8 feet) for telephoto. 22 ...
Therefore, do not cover the infrared port with the zoom buttons on the LCD frame. • The minimum possible distance between camcorder and subject while maintaining sharp focus is about 1 cm (about 13/32 in.) for wide angle and about 80 cm (about 2 5/8 feet) for telephoto. 22 ...

Operating Guide
Page 23
To cancel the backlight function, press . (back light) again. Recording in mirror mode Open the LCD panel 90 degrees to the camcorder (1), then rotate it 180 degrees to display .. z Tips • A mirror-image of the subject appears on the LCD screen, but the image will be normal when recorded. 23 Recording/Playback Adjusting the exposure for backlit subjects To adjust the exposure for backlit subjects, press . (back light) to the lens side (2).
To cancel the backlight function, press . (back light) again. Recording in mirror mode Open the LCD panel 90 degrees to the camcorder (1), then rotate it 180 degrees to display .. z Tips • A mirror-image of the subject appears on the LCD screen, but the image will be normal when recorded. 23 Recording/Playback Adjusting the exposure for backlit subjects To adjust the exposure for backlit subjects, press . (back light) to the lens side (2).

Operating Guide
Page 25
...on -screen instruction. The desired setting screen appears. Follow the instruction to your purpose. Adjust the settings according to cancel Easy Handycam operation and then select the setting. SHOOT GUIDE: DISP GUIDE: Takes you to recording. If an attempted setting is not ...GUIDE] t [SELCT SCENE] t [PAGE r]/[PAGE R] to display an on the LCD screen. Your camcorder has 2 guide functions as shown below. Unavailable settings during Easy Handycam During Easy Handycam operation, some items are unavailable. Enables you to the setting screens related to check the meaning of a...
...on -screen instruction. The desired setting screen appears. Follow the instruction to your purpose. Adjust the settings according to cancel Easy Handycam operation and then select the setting. SHOOT GUIDE: DISP GUIDE: Takes you to recording. If an attempted setting is not ...GUIDE] t [SELCT SCENE] t [PAGE r]/[PAGE R] to display an on the LCD screen. Your camcorder has 2 guide functions as shown below. Unavailable settings during Easy Handycam During Easy Handycam operation, some items are unavailable. Enables you to the setting screens related to check the meaning of a...
Operating Guide
Page 26
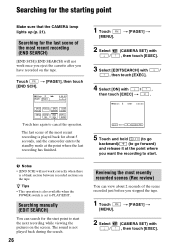
.... The last scene of the most recent recording is set to cancel the operation. Searching manually (EDIT SEARCH) You can view about 5 seconds, and the camcorder enters the standby mode at the point where you have recorded on the tape. The sound is a blank section between recorded sections on the screen...
.... The last scene of the most recent recording is set to cancel the operation. Searching manually (EDIT SEARCH) You can view about 5 seconds, and the camcorder enters the standby mode at the point where you have recorded on the tape. The sound is a blank section between recorded sections on the screen...

Operating Guide
Page 27
Recording/Playback 27 3 Select [EDITSEARCH] with / , then touch [EXEC]. 4 Select [ON] with / , then touch [EXEC] t . 60min STBY 0:00:00 EDIT GUIDE FN 5 Touch . Then, your camcorder is set to standby. The last 2 seconds (approx.) of the most recently recorded scene are played back.
Recording/Playback 27 3 Select [EDITSEARCH] with / , then touch [EXEC]. 4 Select [ON] with / , then touch [EXEC] t . 60min STBY 0:00:00 EDIT GUIDE FN 5 Touch . Then, your camcorder is set to standby. The last 2 seconds (approx.) of the most recently recorded scene are played back.
Operating Guide
Page 28
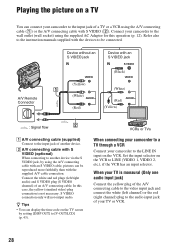
...the picture on a TV You can be connected. Connect your TV is not necessary. S VIDEO connection only will not output audio. When your camcorder to the wall outlet (wall socket) using the supplied AC Adaptor for this case, the yellow (standard video) plug connection is monaural (Only one...S VIDEO cable, pictures can connect your TV or VCR. 28 B A/V connecting cable with S VIDEO (optional) When connecting to the audio input jack of your camcorder to [V-OUT/LCD] (p. 43). z Tips • You can display the time code on the TV screen by using the A/V connecting cable (1) or the ...
...the picture on a TV You can be connected. Connect your TV is not necessary. S VIDEO connection only will not output audio. When your camcorder to the wall outlet (wall socket) using the supplied AC Adaptor for this case, the yellow (standard video) plug connection is monaural (Only one...S VIDEO cable, pictures can connect your TV or VCR. 28 B A/V connecting cable with S VIDEO (optional) When connecting to the audio input jack of your camcorder to [V-OUT/LCD] (p. 43). z Tips • You can display the time code on the TV screen by using the A/V connecting cable (1) or the ...

Operating Guide
Page 30
...point to a subject not located in the center of the lamp and the display (PAGE). b Notes • The minimum possible distance between camcorder and subject while maintaining sharp focus is about 1 cm (about 2 5/8 feet) for telephoto. The indicators in .) for wide angle and...To adjust the focus automatically, touch [AUTO]. z Tips • It is automatically set to [MANUAL]. The available functions during Easy Handycam operation are marked with "*". Operation button items Available operation buttons vary depending on the position of the screen. 60min STBY SPOT FOCUS 0:00...
...point to a subject not located in the center of the lamp and the display (PAGE). b Notes • The minimum possible distance between camcorder and subject while maintaining sharp focus is about 1 cm (about 2 5/8 feet) for telephoto. The indicators in .) for wide angle and...To adjust the focus automatically, touch [AUTO]. z Tips • It is automatically set to [MANUAL]. The available functions during Easy Handycam operation are marked with "*". Operation button items Available operation buttons vary depending on the position of the screen. 60min STBY SPOT FOCUS 0:00...

Operating Guide
Page 31
...suitable brightness even when there is automatically set to [MANUAL]. TWILIGHT* ( ) Select to shoot distant subjects clearly. This setting also prevents your camcorder from appearing excessively white when subjects are lit by strong light. appears. 2 Touch [END]. MENU See page 37. B AUTO Select to ... screen. To return the setting to automatic exposure, touch [AUTO] or set [SPOT METER], [EXPOSURE] is strong contrast between the camcorder and the subject. SPOT METER (Flexible spot meter) You can record pictures effectively in windows between the subject and the background, such ...
...suitable brightness even when there is automatically set to [MANUAL]. TWILIGHT* ( ) Select to shoot distant subjects clearly. This setting also prevents your camcorder from appearing excessively white when subjects are lit by strong light. appears. 2 Touch [END]. MENU See page 37. B AUTO Select to ... screen. To return the setting to automatic exposure, touch [AUTO] or set [SPOT METER], [EXPOSURE] is strong contrast between the camcorder and the subject. SPOT METER (Flexible spot meter) You can record pictures effectively in windows between the subject and the background, such ...

Operating Guide
Page 33
...party scenes or studios where the lighting conditions change the [SCENE SEL.] settings, or bring your camcorder outdoors from inside use with the [EXPOSURE] set (or vice versa), select [AUTO] and aim your camcorder at a nearby white object for about 10 seconds for better color balance adjustment. • ... if keeps flashing after inside the house, or vice versa, you will be set. • When [ONE PUSH] was selected, or taken your camcorder outdoors after touching , set [WHT BAL] to fill the screen under sodium lamps or incandescent-like color lamps ONE PUSH ( ) The white balance ...
...party scenes or studios where the lighting conditions change the [SCENE SEL.] settings, or bring your camcorder outdoors from inside use with the [EXPOSURE] set (or vice versa), select [AUTO] and aim your camcorder at a nearby white object for about 10 seconds for better color balance adjustment. • ... if keeps flashing after inside the house, or vice versa, you will be set. • When [ONE PUSH] was selected, or taken your camcorder outdoors after touching , set [WHT BAL] to fill the screen under sodium lamps or incandescent-like color lamps ONE PUSH ( ) The white balance ...
Operating Guide
Page 35
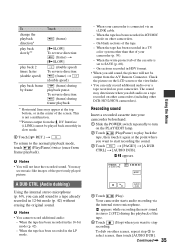
... the playback of the cassette is not a malfunction. **Pictures output from the DV Interface (i.LINK) cannot be output from frame playback). To dub on other camcorders (including other scenes, repeat step 2 to start recording the sound. 3 Touch t [PAGE3] t [A DUB CTRL] t [AUDIO DUB]. b Notes • You ...sound. Continued , 35 Using the Menu On sections recorded in HDV format. • When you dub audio on a tape recorded on other DCR-HC52/HC54 camcorders). X appears. 60min A DUB CTRL 0:00:00:00 RET. The sound may see mosaic-like images of the tape. - To Touch ...
... the playback of the cassette is not a malfunction. **Pictures output from the DV Interface (i.LINK) cannot be output from frame playback). To dub on other camcorders (including other scenes, repeat step 2 to start recording the sound. 3 Touch t [PAGE3] t [A DUB CTRL] t [AUDIO DUB]. b Notes • You ...sound. Continued , 35 Using the Menu On sections recorded in HDV format. • When you dub audio on a tape recorded on other DCR-HC52/HC54 camcorders). X appears. 60min A DUB CTRL 0:00:00:00 RET. The sound may see mosaic-like images of the tape. - To Touch ...

Operating Guide
Page 41
... the setting. • When you select [BRIGHT], battery life is slightly reduced during recording. b Notes • When you connect your camcorder to [16:9 WIDE]. b Notes • When you connect your camcorder to outside power sources, [BRIGHT] is automatically selected for details on the LCD screen with B. Low intensity High intensity VF B.L. (Viewfinder...
... the setting. • When you select [BRIGHT], battery life is slightly reduced during recording. b Notes • When you connect your camcorder to [16:9 WIDE]. b Notes • When you connect your camcorder to outside power sources, [BRIGHT] is automatically selected for details on the LCD screen with B. Low intensity High intensity VF B.L. (Viewfinder...


