
Operating Instructions
Page 11
7. Specifications Main Unit...101 Options ...105 Exposure Glass Cover 105 Auto Document Feeder (ADF 105 Auto Document Feeder capable of scanning both sides of a sheet (ARDF).......... 106 Internal Tray 2 (1 bin tray 106 Paper Tray Unit (1-tray type 107 Paper Tray Unit (2-tray type 108 Copy Paper ...109 Recommended Paper Sizes and Types 109 Unusable Paper ...111 Paper Storage ...112 INDEX...113 ix Security Security...97 Primary Security Functions 97 Extended Security Function 97 Operating Environment and Notes 99 Operating Environment 99 For Administrator...99 For User ...99 8.
7. Specifications Main Unit...101 Options ...105 Exposure Glass Cover 105 Auto Document Feeder (ADF 105 Auto Document Feeder capable of scanning both sides of a sheet (ARDF).......... 106 Internal Tray 2 (1 bin tray 106 Paper Tray Unit (1-tray type 107 Paper Tray Unit (2-tray type 108 Copy Paper ...109 Recommended Paper Sizes and Types 109 Unusable Paper ...111 Paper Storage ...112 INDEX...113 ix Security Security...97 Primary Security Functions 97 Extended Security Function 97 Operating Environment and Notes 99 Operating Environment 99 For Administrator...99 For User ...99 8.

Operating Instructions
Page 19
..., originals might be damaged, or data might result in this manual: • Auto Document Feeder → ADF • Auto Document Feeder capable of scanning both sides of a sheet → ARDF 7
..., originals might be damaged, or data might result in this manual: • Auto Document Feeder → ADF • Auto Document Feeder capable of scanning both sides of a sheet → ARDF 7

Operating Instructions
Page 21
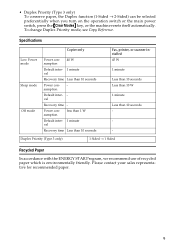
Duplex Priority (Type 3 only) 1 Sided → 1 Sided Recycled Paper In accordance with the ENERGY STAR Program, we recommend use of recycled paper which is environmentally friendly. Please contact your sales representative for ... Power consumption 40 W Default inter- 1 minute val Recovery time Less than 10 seconds - - - • Duplex Priority (Type 3 only) To conserve paper, the Duplex function (1-Sided → 2-Sided) can be selected preferentially when you turn on the operation switch or the main power switch, press the {Clear Modes} key, or the machine resets...
Duplex Priority (Type 3 only) 1 Sided → 1 Sided Recycled Paper In accordance with the ENERGY STAR Program, we recommend use of recycled paper which is environmentally friendly. Please contact your sales representative for ... Power consumption 40 W Default inter- 1 minute val Recovery time Less than 10 seconds - - - • Duplex Priority (Type 3 only) To conserve paper, the Duplex function (1-Sided → 2-Sided) can be selected preferentially when you turn on the operation switch or the main power switch, press the {Clear Modes} key, or the machine resets...

Operating Instructions
Page 25
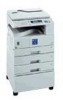
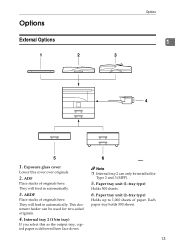
...). 5. Options External Options Options 1 1. Paper tray unit (2-tray type) Holds up to 1,000 sheets of paper. Note ❒ Internal tray 2 can be installed for two-sided originals. 4.
...). 5. Options External Options Options 1 1. Paper tray unit (2-tray type) Holds up to 1,000 sheets of paper. Note ❒ Internal tray 2 can be installed for two-sided originals. 4.
Operating Instructions
Page 50
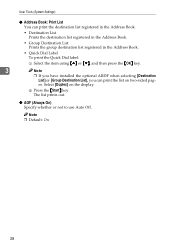
... have installed the optional ARDF when selecting [Destination List] or [Group Destination List], you can print the list on the display. Select [Duplex] on two-sided pag-
... have installed the optional ARDF when selecting [Destination List] or [Group Destination List], you can print the list on the display. Select [Duplex] on two-sided pag-

Operating Instructions
Page 96
...109 "Copy Paper". driver. [Off] is communicating with external equipment. p.88 "Changing the Paper Size". per of a size not shown on the reverse side of a size that can- An error message remains, even if misfed paper is communi- See p.85 you open appears, it remains until and close ...the cov- er, as required. tor code. 84 Load paper into Tray 1-4 with the print side up, and bypass tray with the printer printing. Misfeeds occur frequently. You may have loaded pa- "x Clearing Misfeeds". See p.88 "Changing the Paper...
...109 "Copy Paper". driver. [Off] is communicating with external equipment. p.88 "Changing the Paper Size". per of a size not shown on the reverse side of a size that can- An error message remains, even if misfed paper is communi- See p.85 you open appears, it remains until and close ...the cov- er, as required. tor code. 84 Load paper into Tray 1-4 with the print side up, and bypass tray with the printer printing. Misfeeds occur frequently. You may have loaded pa- "x Clearing Misfeeds". See p.88 "Changing the Paper...

Operating Instructions
Page 101
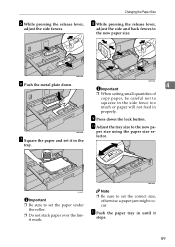
lector. it stops. 89 K Push the paper tray in the tray. H While pressing the release lever, adjust the side and back fences to squeeze in the side fence too much or paper will not feed in properly. ZENY390E F Push the metal plate down the lock button. Important ZENY320E 4 ❒ When setting small... careful not to the new paper size. per size using the paper size se- Changing the Paper Size E While pressing the release lever, adjust the side fences. Note ❒ Be sure to set it in until it mark. J Adjust the tray size to set the paper under the roller. ❒ ...
lector. it stops. 89 K Push the paper tray in the tray. H While pressing the release lever, adjust the side and back fences to squeeze in the side fence too much or paper will not feed in properly. ZENY390E F Push the metal plate down the lock button. Important ZENY320E 4 ❒ When setting small... careful not to the new paper size. per size using the paper size se- Changing the Paper Size E While pressing the release lever, adjust the side fences. Note ❒ Be sure to set it in until it mark. J Adjust the tray size to set the paper under the roller. ❒ ...

Operating Instructions
Page 102
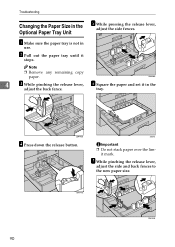
A Make sure the paper tray is not in the adjust the back fence. G While pinching the release lever, adjust the side and back fences to the new paper size. 90 AAI034S Important ❒ Do not stack paper over the lim- Note ❒ Remove any remaining copy paper. 4 C F While pinching the release lever, Square the paper and set it in use. tray. B Pull out the paper tray until it mark. it stops. D Press down the release button. Troubleshooting Changing the Paper Size in the Optional Paper Tray Unit E While pressing the release lever, adjust the side fences.
A Make sure the paper tray is not in the adjust the back fence. G While pinching the release lever, adjust the side and back fences to the new paper size. 90 AAI034S Important ❒ Do not stack paper over the lim- Note ❒ Remove any remaining copy paper. 4 C F While pinching the release lever, Square the paper and set it in use. tray. B Pull out the paper tray until it mark. it stops. D Press down the release button. Troubleshooting Changing the Paper Size in the Optional Paper Tray Unit E While pressing the release lever, adjust the side fences.
Operating Instructions
Page 103
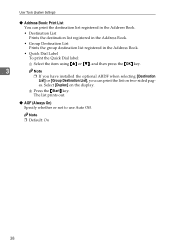
J Push the paper tray in properly. H Press down the lock button. Note ❒ Be sure to the new pa- I Adjust the tray size to set the correct size, otherwise a paper jam might occur. per size using the paper size selector. Changing the Paper Size 4 91 Important ❒ When setting small quantities of copy paper, be careful not to squeeze in the side fence too much or paper will not feed in until it stops.
J Push the paper tray in properly. H Press down the lock button. Note ❒ Be sure to the new pa- I Adjust the tray size to set the correct size, otherwise a paper jam might occur. per size using the paper size selector. Changing the Paper Size 4 91 Important ❒ When setting small quantities of copy paper, be careful not to squeeze in the side fence too much or paper will not feed in until it stops.

Operating Instructions
Page 117
Options 8 105 Options Exposure Glass Cover Lower this over originals. A5KL • 11" × 17"L - 51/2" × 81/2"KL ❖ Original weight: • One-sided originals: 52 - 105 g/m2 (14 - 28 lb) ❖ Number of originals to be set: • 30 sheets (80 g/m2, 20 lb) ❖ Maximum power consumption: &#...
Options 8 105 Options Exposure Glass Cover Lower this over originals. A5KL • 11" × 17"L - 51/2" × 81/2"KL ❖ Original weight: • One-sided originals: 52 - 105 g/m2 (14 - 28 lb) ❖ Number of originals to be set: • 30 sheets (80 g/m2, 20 lb) ❖ Maximum power consumption: &#...

Operating Instructions
Page 118
...; Specifications are subject to change without notice. A5KL • 11" × 17"L - 51/2" × 81/2"KL ❖ Original weight: • One-sided originals: 40 - 128 g/m2 (11 - 34 lb) • Two-sided originals: 52 - 105 g/m2 (14 - 28 lb) (Duplex) ❖ Number of bins: 1 ❖ Paper size: • A3 - A5 • 11... g/m2, 20 lb.) ❖ Paper weight: 60 - 105 g/m2 (20 - 28lb.) ❖ Maximum power consumption: 20 W 106 Specifications Auto Document Feeder capable of scanning both sides of a sheet (ARDF) ❖ Original size: • A3L -
...; Specifications are subject to change without notice. A5KL • 11" × 17"L - 51/2" × 81/2"KL ❖ Original weight: • One-sided originals: 40 - 128 g/m2 (11 - 34 lb) • Two-sided originals: 52 - 105 g/m2 (14 - 28 lb) (Duplex) ❖ Number of bins: 1 ❖ Paper size: • A3 - A5 • 11... g/m2, 20 lb.) ❖ Paper weight: 60 - 105 g/m2 (20 - 28lb.) ❖ Maximum power consumption: 20 W 106 Specifications Auto Document Feeder capable of scanning both sides of a sheet (ARDF) ❖ Original size: • A3L -

Settings Guide
Page 2
...employed in hazardous radiation exposure. With this manual. For details about power source, see "Power Connection" in the following label is considered a class 1 laser device, safe for quick reference. Direct (or indirect reflected ) eye contact with duplex unit (A4K, 81/2" × 11"K) Certain types might ... of the machines do not appear in the Copy Reference. Introduction This manual contains detailed instructions and notes on the back side of the machine. Notes: The model names of size notation are subject to the metric version. For details, please contact your local...
...employed in hazardous radiation exposure. With this manual. For details about power source, see "Power Connection" in the following label is considered a class 1 laser device, safe for quick reference. Direct (or indirect reflected ) eye contact with duplex unit (A4K, 81/2" × 11"K) Certain types might ... of the machines do not appear in the Copy Reference. Introduction This manual contains detailed instructions and notes on the back side of the machine. Notes: The model names of size notation are subject to the metric version. For details, please contact your local...

Settings Guide
Page 11
Specifications Main Unit...101 Options ...105 Exposure Glass Cover 105 Auto Document Feeder (ADF 105 Auto Document Feeder capable of scanning both sides of a sheet (ARDF)..........106 Internal Tray 2 (1 bin tray 106 Paper Tray Unit (1-tray type 107 Paper Tray Unit (2-tray type 108 Copy Paper ...109 Recommended Paper Sizes and Types 109 Unusable Paper ...111 Paper Storage ...112 INDEX...113 ix Security Security...97 Primary Security Functions 97 Extended Security Function 97 Operating Environment and Notes 99 Operating Environment 99 For Administrator...99 For User ...99 8. 7.
Specifications Main Unit...101 Options ...105 Exposure Glass Cover 105 Auto Document Feeder (ADF 105 Auto Document Feeder capable of scanning both sides of a sheet (ARDF)..........106 Internal Tray 2 (1 bin tray 106 Paper Tray Unit (1-tray type 107 Paper Tray Unit (2-tray type 108 Copy Paper ...109 Recommended Paper Sizes and Types 109 Unusable Paper ...111 Paper Storage ...112 INDEX...113 ix Security Security...97 Primary Security Functions 97 Extended Security Function 97 Operating Environment and Notes 99 Operating Environment 99 For Administrator...99 For User ...99 8. 7.
Settings Guide
Page 19
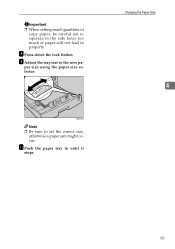
.... {} Keys built into the machine's control panel. Important If this manual: • Auto Document Feeder → ADF • Auto Document Feeder capable of scanning both sides of this machine are described in minor or moderate injury or property damage that might be used together, or conditions in this instruction is used...
.... {} Keys built into the machine's control panel. Important If this manual: • Auto Document Feeder → ADF • Auto Document Feeder capable of scanning both sides of this machine are described in minor or moderate injury or property damage that might be used together, or conditions in this instruction is used...
Settings Guide
Page 21
val Recovery time - sumption Default inter- Duplex Priority (Type 3 only) 1 Sided → 1 Sided Recycled Paper In accordance with the ENERGY STAR Program, we recommend use of recycled paper which is environmentally friendly. To change Duplex Priority mode, see... than 10 seconds Less than 10 W 1 minute Less than 10 seconds Power con- • Duplex Priority (Type 3 only) To conserve paper, the Duplex function (1-Sided → 2-Sided) can be selected preferentially when you turn on the operation switch or the main power switch, press the {Clear Modes} key, or the machine resets...
val Recovery time - sumption Default inter- Duplex Priority (Type 3 only) 1 Sided → 1 Sided Recycled Paper In accordance with the ENERGY STAR Program, we recommend use of recycled paper which is environmentally friendly. To change Duplex Priority mode, see... than 10 seconds Less than 10 W 1 minute Less than 10 seconds Power con- • Duplex Priority (Type 3 only) To conserve paper, the Duplex function (1-Sided → 2-Sided) can be selected preferentially when you turn on the operation switch or the main power switch, press the {Clear Modes} key, or the machine resets...
Settings Guide
Page 25
... here. Options External Options Options 1 1. This document feeder can only be used for Type 2 and 3 (MFP). 5. Note ❒ Internal tray 2 can be installed for two-sided originals. 4. They will feed in automatically. 3. Internal tray 2 (1 bin tray) If you select this cover over originals. 2. Paper tray unit (2-tray type) Holds up to...
... here. Options External Options Options 1 1. This document feeder can only be used for Type 2 and 3 (MFP). 5. Note ❒ Internal tray 2 can be installed for two-sided originals. 4. They will feed in automatically. 3. Internal tray 2 (1 bin tray) If you select this cover over originals. 2. Paper tray unit (2-tray type) Holds up to...
Settings Guide
Page 50
... display. The list prints out. ❖ AOF (Always On) Specify whether or not to use Auto Off. B Press the {Start} key. Select [Duplex] on two-sided pag- Note ❒ Default: On 38 es.
... display. The list prints out. ❖ AOF (Always On) Specify whether or not to use Auto Off. B Press the {Start} key. Select [Duplex] on two-sided pag- Note ❒ Default: On 38 es.

Settings Guide
Page 96
...a computer. • The machine is set properly. 4 not be set the paper size. When using paper of a size not shown on the reverse side of the paper. er, as required. You forgot your service representative. Contact your key opera- - ing case: cating with external equipment. not be detected... automatically, use paper in For duplex printing, select Tray 1-4 the bypass tray for [Duplex] in Paper in copier mode or with the print side down. You may have loaded pa- See p.30 "Tray Paper Size: Tray 1-4" and p.109 "Copy Paper". You cannot use the paper size selector...
...a computer. • The machine is set properly. 4 not be set the paper size. When using paper of a size not shown on the reverse side of the paper. er, as required. You forgot your service representative. Contact your key opera- - ing case: cating with external equipment. not be detected... automatically, use paper in For duplex printing, select Tray 1-4 the bypass tray for [Duplex] in Paper in copier mode or with the print side down. You may have loaded pa- See p.30 "Tray Paper Size: Tray 1-4" and p.109 "Copy Paper". You cannot use the paper size selector...
Settings Guide
Page 101
... roller. ❒ Do not stack paper over the lim- per size using the paper size se- AAI022S Important ❒ Be sure to squeeze in the side fence too much or paper will not feed in properly. I Press down . lector. Note ❒ Be sure to the new pa- Changing the Paper... Size E While pressing the release lever, adjust the side fences. J Adjust the tray size to set it in until it mark. K Push the paper tray in the tray. ZENY390E F Push the metal plate down...
... roller. ❒ Do not stack paper over the lim- per size using the paper size se- AAI022S Important ❒ Be sure to squeeze in the side fence too much or paper will not feed in properly. I Press down . lector. Note ❒ Be sure to the new pa- Changing the Paper... Size E While pressing the release lever, adjust the side fences. J Adjust the tray size to set it in until it mark. K Push the paper tray in the tray. ZENY390E F Push the metal plate down...
Settings Guide
Page 102
B Pull out the paper tray until it mark. tray. it stops. AAI034S Important ❒ Do not stack paper over the lim- A Make sure the paper tray is not in the Optional Paper Tray Unit E While pressing the release lever, adjust the side fences. Troubleshooting Changing the Paper Size in use. D Press down the release button. Note ❒ Remove any remaining copy paper. 4 C F While pinching the release lever, Square the paper and set it in the adjust the back fence. G While pinching the release lever, adjust the side and back fences to the new paper size. 90
B Pull out the paper tray until it mark. tray. it stops. AAI034S Important ❒ Do not stack paper over the lim- A Make sure the paper tray is not in the Optional Paper Tray Unit E While pressing the release lever, adjust the side fences. Troubleshooting Changing the Paper Size in use. D Press down the release button. Note ❒ Remove any remaining copy paper. 4 C F While pinching the release lever, Square the paper and set it in the adjust the back fence. G While pinching the release lever, adjust the side and back fences to the new paper size. 90


