
Operating Instructions
Page 2
... wavelength, GaAIAs laser diode. For details, please contact your local dealer. For details about power source, see P.iii "Machine Types".) • Type 1: 8016/DSm616/LD116/Aficio 2016 • Type 2: 8020/DSm620/LD120/Aficio 2020 • Type 3: 8020d/DSm620d/LD120d/Aficio 2020D Certain types might... be available in this manual might not be responsible for any damage or expense that you use genuine toner from the supplier with ...
... wavelength, GaAIAs laser diode. For details, please contact your local dealer. For details about power source, see P.iii "Machine Types".) • Type 1: 8016/DSm616/LD116/Aficio 2016 • Type 2: 8020/DSm620/LD120/Aficio 2020 • Type 3: 8020d/DSm620d/LD120d/Aficio 2020D Certain types might... be available in this manual might not be responsible for any damage or expense that you use genuine toner from the supplier with ...
Operating Instructions
Page 27
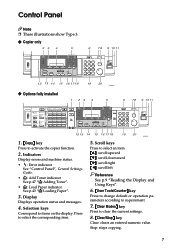
... Receive File Immediate Trance. Fax function keys Reference Facsimile Reference and Facsimile Reference 2. {Facsimile} key Press to items on the display. B: Load Paper indicator. D: Add Toner indicator. Scroll keys Press to activate the printer function. 7. Scanner/Fax function keys Reference Scanner Reference, Facsimile Reference , and Facsimile Reference 4. {Scanner} key Press to...
... Receive File Immediate Trance. Fax function keys Reference Facsimile Reference and Facsimile Reference 2. {Facsimile} key Press to items on the display. B: Load Paper indicator. D: Add Toner indicator. Scroll keys Press to activate the printer function. 7. Scanner/Fax function keys Reference Scanner Reference, Facsimile Reference , and Facsimile Reference 4. {Scanner} key Press to...

Operating Instructions
Page 95
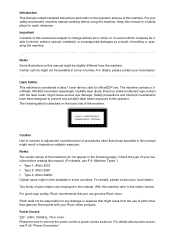
... Not Operate As You Want The following chart gives explanations of common problems and messages. Problem Causes Solutions "Please wait." ation switch or change the toner bottle. The operation switch is in Energy Turn on .
... Not Operate As You Want The following chart gives explanations of common problems and messages. Problem Causes Solutions "Please wait." ation switch or change the toner bottle. The operation switch is in Energy Turn on .

Settings Guide
Page 2
...read this manual might not be responsible for office/EDP use genuine toner from the supplier with your office products. In no event will the company be available in hazardous radiation exposure. Laser Safety: This machine is attached on the operation and use of...other than those specified in the following label is considered a class 1 laser device, safe for any possible laser beam exposure to the metric version. The machine contains a 5milliwatt, 760-800 nanometer wavelength, GaAIAs laser diode. Certain options might result in some countries. Direct (or indirect ...
...read this manual might not be responsible for office/EDP use genuine toner from the supplier with your office products. In no event will the company be available in hazardous radiation exposure. Laser Safety: This machine is attached on the operation and use of...other than those specified in the following label is considered a class 1 laser device, safe for any possible laser beam exposure to the metric version. The machine contains a 5milliwatt, 760-800 nanometer wavelength, GaAIAs laser diode. Certain options might result in some countries. Direct (or indirect ...

Settings Guide
Page 27
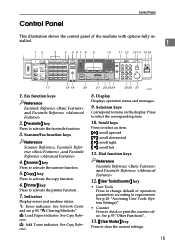
Indicators Display errors and machine status. See Copy Reference. D: Add Toner indicator. Press to clear the current settings. 15 See p.93 "Other Functions". 13. {Clear Modes} key Press to select the corresponding item. 10. h: Error indicator. ...
Indicators Display errors and machine status. See Copy Reference. D: Add Toner indicator. Press to clear the current settings. 15 See p.93 "Other Functions". 13. {Clear Modes} key Press to select the corresponding item. 10. h: Error indicator. ...

Settings Guide
Page 95
... the main power switch. The user code entry display appears. 4. If other manuals for This Machine". when you turn on . ation switch or change the toner bottle. The display is turned off. Users are restricted by user Enter the user code (up to get ready. on the oper- its), and then...
... the main power switch. The user code entry display appears. 4. If other manuals for This Machine". when you turn on . ation switch or change the toner bottle. The display is turned off. Users are restricted by user Enter the user code (up to get ready. on the oper- its), and then...
Copy Reference
Page 2
...in this manual might not be sure to connect the power cord to the operator. Ricoh shall not be liable for any possible laser beam exposure to a power source as a result of handling or operating the machine....Ricoh toner. Two kinds of parts other than genuine Ricoh parts with the laser beam might be available in hazardous radiation exposure. Safety precautions and interlock mechanisms have been designed to the metric version. For details about power source, see P.6 "Machine Types".) • Type 1: Aficio 2016 • Type 2: Aficio 2020 • Type 3: Aficio 2020D...
...in this manual might not be sure to connect the power cord to the operator. Ricoh shall not be liable for any possible laser beam exposure to a power source as a result of handling or operating the machine....Ricoh toner. Two kinds of parts other than genuine Ricoh parts with the laser beam might be available in hazardous radiation exposure. Safety precautions and interlock mechanisms have been designed to the metric version. For details about power source, see P.6 "Machine Types".) • Type 1: Aficio 2016 • Type 2: Aficio 2020 • Type 3: Aficio 2020D...
Copy Reference
Page 6
... When Memory Is Full 42 B Loading Paper 43 Loading Paper...43 Orientation-Fixed Paper or Two-Sided Paper 44 D Adding Toner 47 Handling Toner...47 Toner Storage ...47 Used Toner ...47 Removing Toner 48 Inserting Toner...49 4. Number of Sets 54 Original Count Display 54 Reproduction Ratio 54 Preset R/E Priority 55 Duplex Margin ...55 Rotate Sort...
... When Memory Is Full 42 B Loading Paper 43 Loading Paper...43 Orientation-Fixed Paper or Two-Sided Paper 44 D Adding Toner 47 Handling Toner...47 Toner Storage ...47 Used Toner ...47 Removing Toner 48 Inserting Toner...49 4. Number of Sets 54 Original Count Display 54 Reproduction Ratio 54 Preset R/E Priority 55 Duplex Margin ...55 Rotate Sort...

Copy Reference
Page 11
...disconnect the power plug (by pulling the plug, not the cable) if any of your machine has been damaged. • Do not incinerate spilled toner or used toner. These actions could result in death or serious injury. R WARNING: • Disconnect the power plug (by pulling the plug, not the cable...) if the power cable or plug becomes frayed or otherwise damaged. • To avoid hazardous electric shock or laser radiation exposure, do not remove any ...
...disconnect the power plug (by pulling the plug, not the cable) if any of your machine has been damaged. • Do not incinerate spilled toner or used toner. These actions could result in death or serious injury. R WARNING: • Disconnect the power plug (by pulling the plug, not the cable...) if the power cable or plug becomes frayed or otherwise damaged. • To avoid hazardous electric shock or laser radiation exposure, do not remove any ...

Copy Reference
Page 12
... plug (not the cable). • Do not allow paper clips, staples, or other small metallic objects to fall inside the machine. • Keep toner (used or unused) and toner bottle out of the reach of children. • For environmental reasons, do not push the upper part of the machine could be very...
... plug (not the cable). • Do not allow paper clips, staples, or other small metallic objects to fall inside the machine. • Keep toner (used or unused) and toner bottle out of the reach of children. • For environmental reasons, do not push the upper part of the machine could be very...
Copy Reference
Page 15
... 1. {Copy} key Press to select the corresponding item. 5. Indicators Display errors and machine status. • h: Error indicator See "Control Panel", General Settings Guide. • D: Add Toner indicator See p.47 "D Adding Toner". • B: Load Paper indicator See p.43 "B Loading Paper". 3. Press to activate the copier function. 2.
... 1. {Copy} key Press to select the corresponding item. 5. Indicators Display errors and machine status. • h: Error indicator See "Control Panel", General Settings Guide. • D: Add Toner indicator See p.47 "D Adding Toner". • B: Load Paper indicator See p.43 "B Loading Paper". 3. Press to activate the copier function. 2.
Copy Reference
Page 21
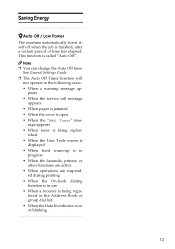
ed during printing • When the On-hook dialing function is in use • When a receiver is open • When the "Add Toner" mes- Note ❒ You can change the Auto Off time. pears • When the service call message appears • When paper is jammed •...; When the cover is being replen- This function is being regis- sage appears • When toner is called "Auto Off". See General Settings Guide. ❒ The Auto Off Timer function will not operate in progress • When the facsimile, printer,...
ed during printing • When the On-hook dialing function is in use • When a receiver is open • When the "Add Toner" mes- Note ❒ You can change the Auto Off time. pears • When the service call message appears • When paper is jammed •...; When the cover is being replen- This function is being regis- sage appears • When toner is called "Auto Off". See General Settings Guide. ❒ The Auto Off Timer function will not operate in progress • When the facsimile, printer,...

Copy Reference
Page 48
...image density. See selected. Image density is Select the proper paper size. See p.26 "Adjusting Image Density". Use the recommended paper. Toner". correctly. "Placing Originals". selected. Copies are too light. See p.18 "Placing Originals". Troubleshooting If You Cannot Make Clear Copies Problem...". Note ❒ A light copy may result when you use damp or rough grain paper. Toner bottle is not placed Place originals correctly. p.26 "Adjusting Image Density". Add toner. Parts of the paper are not The original is almost emp- Image density is too light....
...image density. See selected. Image density is Select the proper paper size. See p.26 "Adjusting Image Density". Use the recommended paper. Toner". correctly. "Placing Originals". selected. Copies are too light. See p.18 "Placing Originals". Troubleshooting If You Cannot Make Clear Copies Problem...". Note ❒ A light copy may result when you use damp or rough grain paper. Toner bottle is not placed Place originals correctly. p.26 "Adjusting Image Density". Add toner. Parts of the paper are not The original is almost emp- Image density is too light....
Copy Reference
Page 55
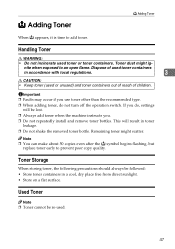
... quality. Important ❒ Faults may occur if you use toner other than the recommended type. ❒ When adding toner, do , settings will result in toner leakage. ❒ Do not shake the removed toner bottle. Used Toner Note ❒ Toner cannot be re-used or unused) and toner containers out of reach of children. This will be followed...
... quality. Important ❒ Faults may occur if you use toner other than the recommended type. ❒ When adding toner, do , settings will result in toner leakage. ❒ Do not shake the removed toner bottle. Used Toner Note ❒ Toner cannot be re-used or unused) and toner containers out of reach of children. This will be followed...

Copy Reference
Page 56
Troubleshooting Removing Toner • 1: Open the front cover of the machine. • 2: Lift the green lever. 3 • 3: Push the green lever, and then gently pull out the holder. • 4: Press the toner bottle back to raise its top, and then gently pull it out. 48
Troubleshooting Removing Toner • 1: Open the front cover of the machine. • 2: Lift the green lever. 3 • 3: Push the green lever, and then gently pull out the holder. • 4: Press the toner bottle back to raise its top, and then gently pull it out. 48
Copy Reference
Page 57
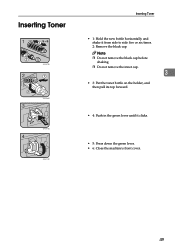
Note ❒ Do not remove the black cap before shaking. ❒ Do not remove the inner cap. 3 • 3: Put the toner bottle on the holder, and then pull its top forward. • 4: Push in the green lever until it from side to side five or six times. 2: Remove the black cap. Inserting Toner Inserting Toner • 1: Hold the new bottle horizontally and shake it clicks. • 5: Press down the green lever. • 6: Close the machine's front cover. 49
Note ❒ Do not remove the black cap before shaking. ❒ Do not remove the inner cap. 3 • 3: Put the toner bottle on the holder, and then pull its top forward. • 4: Push in the green lever until it from side to side five or six times. 2: Remove the black cap. Inserting Toner Inserting Toner • 1: Hold the new bottle horizontally and shake it clicks. • 5: Press down the green lever. • 6: Close the machine's front cover. 49
Copy Reference
Page 75
INDEX 1 Sided → 2 Sided, 31 2 Sided → 1 Sided, 37 2 Sided → 2 Sided, 32 A Accessing user tools copier features, 51 Adding toner, 47 Adjusting image density, 26 Auto paper select, 26 reduce/enlarge, 29 tray switching, 53 Auto Off / Low Power, 13 Auto paper select, 27 B Basic ..., 24 Copy key, 7 Counter key, 7 D Display, 9 Do's and Don'ts, 57 Duplex 1 sided → 2 sided, 31 2 sided → 2 sided, 32 Duplex key, 8 E Environment, 58 H Handling toner, 47 I Indicators, 7 Inserting toner, 49 67
INDEX 1 Sided → 2 Sided, 31 2 Sided → 1 Sided, 37 2 Sided → 2 Sided, 32 A Accessing user tools copier features, 51 Adding toner, 47 Adjusting image density, 26 Auto paper select, 26 reduce/enlarge, 29 tray switching, 53 Auto Off / Low Power, 13 Auto paper select, 27 B Basic ..., 24 Copy key, 7 Counter key, 7 D Display, 9 Do's and Don'ts, 57 Duplex 1 sided → 2 sided, 31 2 sided → 2 sided, 32 Duplex key, 8 E Environment, 58 H Handling toner, 47 I Indicators, 7 Inserting toner, 49 67
Copy Reference
Page 76
.../ARDF, 19 originals on exposure glass, 18 Placing Originals, 15 Power connection, 59 68 Q Quitting user tools, 52 R Reading display, 9 using keys, 9 Remarks, 57 Removing toner, 48 Rotated copy, 27 S Safety information, 3 Saving energy, 13 Scroll keys, 7 Selecting copy paper, 26 original type setting, 26 Selection keys, 7 Series copies 2 sided →..., 65 bypass tray copy, 64 combine, 66 duplex, 65 duplex margin, 66 preset enlarge/reduce, 64 rotate sort, 65 sort, 65 zoom, 65 T Text, 26 Toner adding, 47 handling, 47 inserting, 49 removing, 48
.../ARDF, 19 originals on exposure glass, 18 Placing Originals, 15 Power connection, 59 68 Q Quitting user tools, 52 R Reading display, 9 using keys, 9 Remarks, 57 Removing toner, 48 Rotated copy, 27 S Safety information, 3 Saving energy, 13 Scroll keys, 7 Selecting copy paper, 26 original type setting, 26 Selection keys, 7 Series copies 2 sided →..., 65 bypass tray copy, 64 combine, 66 duplex, 65 duplex margin, 66 preset enlarge/reduce, 64 rotate sort, 65 sort, 65 zoom, 65 T Text, 26 Toner adding, 47 handling, 47 inserting, 49 removing, 48

Copy Reference
Page 77
storage, 47 used, 47 Toner storage, 47 Troubleshooting, 39 memory is full, 42 you cannot make clear copies, 40 you cannot make copies as you want, 41 your machine does not operate as you want, 39 Turning Off main power, 12 power, 12 Turning On, 11 main power, 11 power, 11 Two-sided combine 1 sided 4 pages → combine 2 side, 35 1 sided 8 pages → combine 2 side, 35 2 sided 4 pages → combine 2 side, 35 2 sided 8 pages → combine 2 side, 35 U Used toner, 47 User Tools, 51 User Tools key, 7 W Weights of recommended originals, 15 69
storage, 47 used, 47 Toner storage, 47 Troubleshooting, 39 memory is full, 42 you cannot make clear copies, 40 you cannot make copies as you want, 41 your machine does not operate as you want, 39 Turning Off main power, 12 power, 12 Turning On, 11 main power, 11 power, 11 Two-sided combine 1 sided 4 pages → combine 2 side, 35 1 sided 8 pages → combine 2 side, 35 2 sided 4 pages → combine 2 side, 35 2 sided 8 pages → combine 2 side, 35 U Used toner, 47 User Tools, 51 User Tools key, 7 W Weights of recommended originals, 15 69
Operating Instructions
Page 3
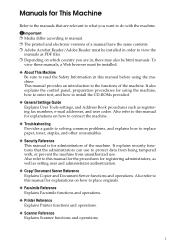
... Reader/Adobe Reader must be installed in this manual for the procedures for administrators of the machine. This manual provides an introduction to replace paper, toner, staples, and other consumables. ❖ Security Reference This manual is for registering administrators, as well as registering fax numbers, e-mail addresses, and user codes. Also...
... Reader/Adobe Reader must be installed in this manual for the procedures for administrators of the machine. This manual provides an introduction to replace paper, toner, staples, and other consumables. ❖ Security Reference This manual is for registering administrators, as well as registering fax numbers, e-mail addresses, and user codes. Also...


