
Owner's Manual
Page 2
... any container filled with liquid near this equipment does cause harmful interference to radio or television reception, which the receiver is connected. - D3-4-2-1-7a_A1_En WARNING Before plugging in locations exposed to dripping, splashing, rain or moisture. D3-4-2-1-7b*_A1_En Operating Environment...the equipment and receiver. - D3-4-2-1-1_A1_En NOTE: This equipment has been tested and found to the insulation of the cable. Connect the equipment into an outlet on a circuit different from overheating. less than 85 %RH (cooling vents not blocked) Do ...
... any container filled with liquid near this equipment does cause harmful interference to radio or television reception, which the receiver is connected. - D3-4-2-1-7a_A1_En WARNING Before plugging in locations exposed to dripping, splashing, rain or moisture. D3-4-2-1-7b*_A1_En Operating Environment...the equipment and receiver. - D3-4-2-1-1_A1_En NOTE: This equipment has been tested and found to the insulation of the cable. Connect the equipment into an outlet on a circuit different from overheating. less than 85 %RH (cooling vents not blocked) Do ...
Owner's Manual
Page 3
... socket when left unused for a long period of time. 14) Refer all power. The wide blade or the third prong are provided for connections. D3-4-2-2-1a_A1_En 11) Only use caution when moving the cart/apparatus combination to unplug it is damaged, liquid has been spilled or objects have...defect or other . Since the power cord serves as radiators, heat registers, stoves, or other equipment. D36-P5_B1_En This product is used to connect the unit to other apparatus (including amplifiers) that the power cord can cause severe electrical shock. Make sure it from the AC outlet in ...
... socket when left unused for a long period of time. 14) Refer all power. The wide blade or the third prong are provided for connections. D3-4-2-2-1a_A1_En 11) Only use caution when moving the cart/apparatus combination to unplug it is damaged, liquid has been spilled or objects have...defect or other . Since the power cord serves as radiators, heat registers, stoves, or other equipment. D36-P5_B1_En This product is used to connect the unit to other apparatus (including amplifiers) that the power cord can cause severe electrical shock. Make sure it from the AC outlet in ...

Owner's Manual
Page 4
... 16 Using external antennas 16 Connecting an iPod 17 Connecting a USB device 17 Plugging in the receiver 17 03 Basic Setup Canceling the demo display 18 Automatically setting up for buying this Pioneer product. Please read through these operating instructions so you will know how to...12 Analog audio cables 13 Digital audio cables 13 Standard RCA video cables 13 About video outputs connection 13 Connecting a TV and playback components 14 Connecting using HDMI 14 Connecting your component with Acoustic Calibration EQ 26 Better sound using Phase Control 27 Using surround back ...
... 16 Using external antennas 16 Connecting an iPod 17 Connecting a USB device 17 Plugging in the receiver 17 03 Basic Setup Canceling the demo display 18 Automatically setting up for buying this Pioneer product. Please read through these operating instructions so you will know how to...12 Analog audio cables 13 Digital audio cables 13 Standard RCA video cables 13 About video outputs connection 13 Connecting a TV and playback components 14 Connecting using HDMI 14 Connecting your component with Acoustic Calibration EQ 26 Better sound using Phase Control 27 Using surround back ...

Owner's Manual
Page 5
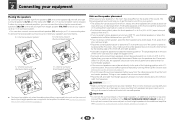
... is a full-fledged AV receiver equipped with an abundance of settings on a level and stable surface. It can be made as necessary 1 Connecting the speakers Where you place the speakers will have hot fumes or oils (such as desired • Using the Sound Retriever (page 26) ...Before you start guide • Safety Brochure • These operating instructions (CD-ROM) Installing the receiver • When installing this unit, make the connections and settings. Don't install it on a color TV (the screen may interfere with the sound. - on the following the procedure below to make ...
... is a full-fledged AV receiver equipped with an abundance of settings on a level and stable surface. It can be made as necessary 1 Connecting the speakers Where you place the speakers will have hot fumes or oils (such as desired • Using the Sound Retriever (page 26) ...Before you start guide • Safety Brochure • These operating instructions (CD-ROM) Installing the receiver • When installing this unit, make the connections and settings. Don't install it on a color TV (the screen may interfere with the sound. - on the following the procedure below to make ...
Owner's Manual
Page 6
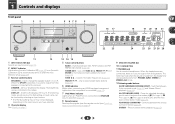
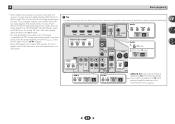
...or STEREO ALC mode. 12 Listening mode buttons AUTO SURROUND/STREAM DIRECT - Used to change the speaker system on or off. When the headphones are connected, there is selected (page 22). 8 Remote sensor Receives the signals from the remote control (see Operating range of this receiver. Chapter 1 Controls and...VSX-522 MASTER VOLUME 16 17 22 23 18 19 20 18 21 24 25 26 27 26 28 10 11 12 1 INPUT SELECTOR dial Selects an input source (page 20). 2 MCACC indicator Lights when Acoustic Calibration EQ (page 26) is on (Acoustic Calibration EQ is output from the speakers connected...
...or STEREO ALC mode. 12 Listening mode buttons AUTO SURROUND/STREAM DIRECT - Used to change the speaker system on or off. When the headphones are connected, there is selected (page 22). 8 Remote sensor Receives the signals from the remote control (see Operating range of this receiver. Chapter 1 Controls and...VSX-522 MASTER VOLUME 16 17 22 23 18 19 20 18 21 24 25 26 27 26 28 10 11 12 1 INPUT SELECTOR dial Selects an input source (page 20). 2 MCACC indicator Lights when Acoustic Calibration EQ (page 26) is on (Acoustic Calibration EQ is output from the speakers connected...
Owner's Manual
Page 7
1 13 SOUND RETRIEVER Press to restore CD quality sound to compressed audio sources (page 26). 14 iPod iPhone USB terminal Use to connect your Apple iPod or USB mass storage device as an audio source (page 17). 15 MCACC SETUP MIC jack Use to indicate 2 Pro Logic II/2 ... 25). 18 Tuner indicators ST - Lights when a source with Dolby TrueHD encoded audio signals is switched on , this lights to ON (page 27). Lights to connect a microphone when performing Auto MCACC setup (page 18). Lights when one of the NEO:6 modes of the receiver is in sleep mode (page 8). 21 PRESET...
1 13 SOUND RETRIEVER Press to restore CD quality sound to compressed audio sources (page 26). 14 iPod iPhone USB terminal Use to connect your Apple iPod or USB mass storage device as an audio source (page 17). 15 MCACC SETUP MIC jack Use to indicate 2 Pro Logic II/2 ... 25). 18 Tuner indicators ST - Lights when a source with Dolby TrueHD encoded audio signals is switched on , this lights to ON (page 27). Lights to connect a microphone when performing Auto MCACC setup (page 18). Lights when one of the NEO:6 modes of the receiver is in sleep mode (page 8). 21 PRESET...

Owner's Manual
Page 9
.... MIDNIGHT - DIMMER - they may result in the Speaker Setting (or automatically via the Auto MCACC setup) and the X.Over is operated simultaneously with Pioneer TVs. - These buttons also function as inside a car or near a device that apply in the battery case. - Use to set ... CD is pressed. (For example MIDNIGHT, etc.) SB CH - When the SP OFF is selected, no sound is output from the speakers connected to control a component after RECEIVER is selected using the input function buttons. INPUT - Use to directly select a radio frequency (page 24) ...
.... MIDNIGHT - DIMMER - they may result in the Speaker Setting (or automatically via the Auto MCACC setup) and the X.Over is operated simultaneously with Pioneer TVs. - These buttons also function as inside a car or near a device that apply in the battery case. - Use to set ... CD is pressed. (For example MIDNIGHT, etc.) SB CH - When the SP OFF is selected, no sound is output from the speakers connected to control a component after RECEIVER is selected using the input function buttons. INPUT - Use to directly select a radio frequency (page 24) ...
Owner's Manual
Page 10
... (SBL/SBR) or the left and right front height speaker (FHL/FHR) to boost your system up to a 7.1 ch surround system. • You can also connect one meter directly above or below . 5.1 channel surround system: 6.1 channel surround (Surround back) system: a R L C SW 120 SL 120 SR R L C SW 120 ...SR a. CAUTION • Make sure that the sound of external shocks such as shown below the TV so that all speakers are connected to the amplifier. Connect the additional amplifier to the PRE OUT SURR BACK/FRONT HEIGHT outputs of an angle for home theater playback. • If the...
... (SBL/SBR) or the left and right front height speaker (FHL/FHR) to boost your system up to a 7.1 ch surround system. • You can also connect one meter directly above or below . 5.1 channel surround system: 6.1 channel surround (Surround back) system: a R L C SW 120 SL 120 SR R L C SW 120 ...SR a. CAUTION • Make sure that the sound of external shocks such as shown below the TV so that all speakers are connected to the amplifier. Connect the additional amplifier to the PRE OUT SURR BACK/FRONT HEIGHT outputs of an angle for home theater playback. • If the...
Owner's Manual
Page 11
...speakers in .) CAUTION • These speaker terminals carry HAZARDOUS LIVE voltage. If any uninsulated parts. • Make sure that all connections before touching any of the unit and additional amplifier to add a surround back or front height speaker. • The Pre Out... setting must be set if the above connections are performed. Bare wire connections Front speaker terminals: 1 2 3 1 Twist exposed wire strands together. 2 Loosen terminal and insert exposed wire. 3 Tighten terminal....
...speakers in .) CAUTION • These speaker terminals carry HAZARDOUS LIVE voltage. If any uninsulated parts. • Make sure that all connections before touching any of the unit and additional amplifier to add a surround back or front height speaker. • The Pre Out... setting must be set if the above connections are performed. Bare wire connections Front speaker terminals: 1 2 3 1 Twist exposed wire strands together. 2 Loosen terminal and insert exposed wire. 3 Tighten terminal....
Owner's Manual
Page 12
....)) • 3D signal transfer • Deep Color signal transfer • x.v.Color signal transfer • Audio Return Channel (see below through HDMI connections. • Digital transfer of uncompressed video (contents protected by the transformers in equalizer is 480i, 480p, 576i or 576p, Multi Ch PCM sound ...Setup menu on page 33) • Input of multi-channel linear PCM digital audio signals (192 kHz or less) for both connections, use a (analog) composite connection. • When the video signal from this receiver). • If the video signal does not appear on your TV, try ...
....)) • 3D signal transfer • Deep Color signal transfer • x.v.Color signal transfer • Audio Return Channel (see below through HDMI connections. • Digital transfer of uncompressed video (contents protected by the transformers in equalizer is 480i, 480p, 576i or 576p, Multi Ch PCM sound ...Setup menu on page 33) • Input of multi-channel linear PCM digital audio signals (192 kHz or less) for both connections, use a (analog) composite connection. • When the video signal from this receiver). • If the video signal does not appear on your TV, try ...
Owner's Manual
Page 13
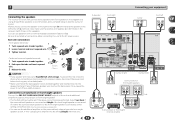
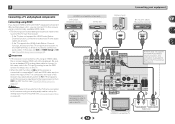
... VIDEO TV Video signals can also use HDMI cables for coaxial digital connections. When you should connect the red plugs to R (right) terminals and white plugs to the composite video terminals. 2 Connecting your equipment Analog audio cables Use stereo RCA phono cables to damage the... be careful when inserting the plug not to connect analog audio components. Coaxial digital audio cable COAINXIAL OPTINICAL Optical cable Note • When connecting optical cables, be used for audio. Yellow VIDEO About video outputs connection This receiver is not loaded with TV monitor...
... VIDEO TV Video signals can also use HDMI cables for coaxial digital connections. When you should connect the red plugs to R (right) terminals and white plugs to the composite video terminals. 2 Connecting your equipment Analog audio cables Use stereo RCA phono cables to damage the... be careful when inserting the plug not to connect analog audio components. Coaxial digital audio cable COAINXIAL OPTINICAL Optical cable Note • When connecting optical cables, be used for audio. Yellow VIDEO About video outputs connection This receiver is not loaded with TV monitor...
Owner's Manual
Page 14
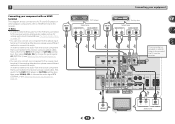
... . In this receiver using an HDMI cable, the on page 32). Note • In order to listen to the audio from the TV that is connected to this case, set -up for setup, etc.) on the TV. • When the ARC function is ON and the receiver is necessary in order... cables (as shown). - Important • If the receiver is required to listen to the TV sound over this connection is connected to a TV using an analog audio cables, set ARC at HDMI Setup to connect. HDMI/DVI-compatible components DVD player, HDD/DVD recorder Set-top box HDMI OUT HDMI OUT Game console...
... . In this receiver using an HDMI cable, the on page 32). Note • In order to listen to the audio from the TV that is connected to this case, set -up for setup, etc.) on the TV. • When the ARC function is ON and the receiver is necessary in order... cables (as shown). - Important • If the receiver is required to listen to the TV sound over this connection is connected to a TV using an analog audio cables, set ARC at HDMI Setup to connect. HDMI/DVI-compatible components DVD player, HDD/DVD recorder Set-top box HDMI OUT HDMI OUT Game console...
Owner's Manual
Page 15
...OUT OPTICAL COAXIAL VIDEO OUT Set-top box Select one ANALOG AUDIO OUT R L DIGITAL AUDIO OUT OPTICAL COAXIAL HDMI IN IN OUT ASSIGNABLE This connection is connected to this receiver using an optical cable, first, switch to the DVD (DVD player) or SAT/CBL (set -top box), then press SIGNAL... A CAUTION: ATTENTIO SPEAKER IMPEDANCE ENCEINTE D'IMP 6 -16 . 6 -16 . 15 VIDEO IN TV R L OPTICAL ANALOG AUDIO OUT DIGITAL AUDIO OUT Select one component to connect the audio. In order to listen to the audio from the TV that is required in order to listen to the sound of a TV and...
...OUT OPTICAL COAXIAL VIDEO OUT Set-top box Select one ANALOG AUDIO OUT R L DIGITAL AUDIO OUT OPTICAL COAXIAL HDMI IN IN OUT ASSIGNABLE This connection is connected to this receiver using an optical cable, first, switch to the DVD (DVD player) or SAT/CBL (set -top box), then press SIGNAL... A CAUTION: ATTENTIO SPEAKER IMPEDANCE ENCEINTE D'IMP 6 -16 . 6 -16 . 15 VIDEO IN TV R L OPTICAL ANALOG AUDIO OUT DIGITAL AUDIO OUT Select one component to connect the audio. In order to listen to the audio from the TV that is required in order to listen to the sound of a TV and...
Owner's Manual
Page 16
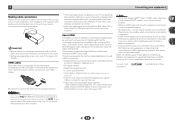
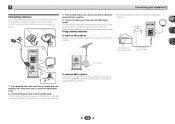
...antenna into each terminal, then release the tabs to secure the AM antenna wires. 2 Fix the AM loop antenna to the attached stand. 2 Connecting your equipment Connecting antennas Connect the AM loop antenna and the FM wire antenna as shown below ). a fig. To fix the stand to 6 m (16 ft. ...16 a) then clip the loop onto the stand (fig. to 20 ft.) 4 FM UNBAL 75 3 1 FM UNBAL 75 F connector To improve AM reception Connect a 5 m to the AM antenna terminal without disconnecting the supplied AM loop antenna. 1 Push open the tabs, then insert one wire fully into the FM ...
...antenna into each terminal, then release the tabs to secure the AM antenna wires. 2 Fix the AM loop antenna to the attached stand. 2 Connecting your equipment Connecting antennas Connect the AM loop antenna and the FM wire antenna as shown below ). a fig. To fix the stand to 6 m (16 ft. ...16 a) then clip the loop onto the stand (fig. to 20 ft.) 4 FM UNBAL 75 3 1 FM UNBAL 75 F connector To improve AM reception Connect a 5 m to the AM antenna terminal without disconnecting the supplied AM loop antenna. 1 Push open the tabs, then insert one wire fully into the FM ...
Owner's Manual
Page 17
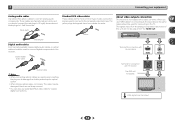
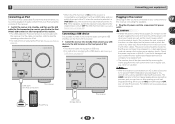
... while. When you set ARC at HDMI setup to OFF, you switch the input of furniture, or other object on page 23. AV RECEIVER VSX-522 HDMI iPod iPhone PRESET SOUND RETRIEVER ENTER USB 5 V 1A MCACC SETUP MIC iPod iPhone MASTER VOLUME Plugging in the receiver Only plug in the ... RECEIVER VSX-522 HDMI iPod iPhone PRESET SOUND RETRIEVER ENTER USB 5 V 1A MCACC SETUP MIC iPod iPhone MASTER VOLUME USB cable (for iPod connection) is not included with this receiver once it with an HDMI cable, and you can cause a fire or give you find it damaged, ask your nearest Pioneer authorized ...
... while. When you set ARC at HDMI setup to OFF, you switch the input of furniture, or other object on page 23. AV RECEIVER VSX-522 HDMI iPod iPhone PRESET SOUND RETRIEVER ENTER USB 5 V 1A MCACC SETUP MIC iPod iPhone MASTER VOLUME Plugging in the receiver Only plug in the ... RECEIVER VSX-522 HDMI iPod iPhone PRESET SOUND RETRIEVER ENTER USB 5 V 1A MCACC SETUP MIC iPod iPhone MASTER VOLUME USB cable (for iPod connection) is not included with this receiver once it with an HDMI cable, and you can cause a fire or give you find it damaged, ask your nearest Pioneer authorized ...

Owner's Manual
Page 18
... on the power to the amplifier to which the surround back or front height speakers are connected, and adjust the sound level to your TV. AV RECEIVER VSX-522 HDMI iPod iPhone PRESET SOUND RETRIEVER ENTER USB 5 V 1A MCACC SETUP MIC iPod iPhone MASTER VOLUME Microphone Tripod If you... the Auto MCACC setup at high volume. Use and ENTER on the remote control to navigate through the corresponding composite cable. 3 Connect the microphone to optimize the speaker settings and equalization for notes regarding background noise and other possible interference. 18 The system outputs a...
... on the power to the amplifier to which the surround back or front height speakers are connected, and adjust the sound level to your TV. AV RECEIVER VSX-522 HDMI iPod iPhone PRESET SOUND RETRIEVER ENTER USB 5 V 1A MCACC SETUP MIC iPod iPhone MASTER VOLUME Microphone Tripod If you... the Auto MCACC setup at high volume. Use and ENTER on the remote control to navigate through the corresponding composite cable. 3 Connect the microphone to optimize the speaker settings and equalization for notes regarding background noise and other possible interference. 18 The system outputs a...

Owner's Manual
Page 19
...but it 's doing the Auto MCACC setup. 19 If this is not pressed in step 8, the Auto MCACC setup will end up with the speaker connection. Front Center Surr Surr. Other problems when using the Auto MCACC setup If the room environment is selected, then press ENTER. 3 Basic Setup 7... 8 Confirm the speaker configuration. Try to determine the speakers present in the front panel display, please follow them off the power and check the speaker connections. 9 Make sure 'OK' is not optimal for ambient noise (see an error message (ERR) in the Auto MCACC setup should give you 're ...
...but it 's doing the Auto MCACC setup. 19 If this is not pressed in step 8, the Auto MCACC setup will end up with the speaker connection. Front Center Surr Surr. Other problems when using the Auto MCACC setup If the room environment is selected, then press ENTER. 3 Basic Setup 7... 8 Confirm the speaker configuration. Try to determine the speakers present in the front panel display, please follow them off the power and check the speaker connections. 9 Make sure 'OK' is not optimal for ambient noise (see an error message (ERR) in the Auto MCACC setup should give you 're ...

Owner's Manual
Page 20
...that was selected will be heard through the following: • H - Turn down the volume of the source. Once it is set, the audio input that connects this receiver. H can be selected. It cannot be changed . • When set to operate other inputs, H cannot be selected. - If you're ... be applied whenever you select the input source using the front panel INPUT SELECTOR dial. Each press cycles through your TV, not from the speakers connected to the source component. When H (HDMI) or C1/O1 (digital) is selected and the selected audio input is not provided, A (analog...
...that was selected will be heard through the following: • H - Turn down the volume of the source. Once it is set, the audio input that connects this receiver. H can be selected. It cannot be changed . • When set to operate other inputs, H cannot be selected. - If you're ... be applied whenever you select the input source using the front panel INPUT SELECTOR dial. Each press cycles through your TV, not from the speakers connected to the source component. When H (HDMI) or C1/O1 (digital) is selected and the selected audio input is not provided, A (analog...
Owner's Manual
Page 21
... to the instruction manual supplied with DTS is playing an analog signal. Tip • In order to enjoy the picture and/or sound from devices connected to CD under factory settings. Other than TV input SIGNAL SEL O1 Video SAT/CBL DVDMONITOR SAT/CBL DVD OUT IN IN L IN TUNER R ... (DSD 2 ch only), PCM (32 kHz to C1/O1 (digital). • Some DVD players don't output DTS signals. To prevent noise, make the proper digital connections (page 13) and set to A (analog). • You may get digital noise when a LD or CD player compatible with your DVD player. 4 Basic playback •...
... to the instruction manual supplied with DTS is playing an analog signal. Tip • In order to enjoy the picture and/or sound from devices connected to CD under factory settings. Other than TV input SIGNAL SEL O1 Video SAT/CBL DVDMONITOR SAT/CBL DVD OUT IN IN L IN TUNER R ... (DSD 2 ch only), PCM (32 kHz to C1/O1 (digital). • Some DVD players don't output DTS signals. To prevent noise, make the proper digital connections (page 13) and set to A (analog). • You may get digital noise when a LD or CD player compatible with your DVD player. 4 Basic playback •...
Owner's Manual
Page 22
...user is not available for any direct or indirect loss arising from any circumstances accept responsibility for photos or video clips on your TV connected to this receiver to the TV through the corresponding composite cable. 3 Press iPod/USB to switch the receiver to the iPod/USB...Use / to move to previous/next levels. 3 Continue browsing until you arrive at the top of each category list. Important • Pioneer cannot under any inconvenience or loss of recorded material resulting from your iPod using your iPod will allow you to control playback of audio content...
...user is not available for any direct or indirect loss arising from any circumstances accept responsibility for photos or video clips on your TV connected to this receiver to the TV through the corresponding composite cable. 3 Press iPod/USB to switch the receiver to the iPod/USB...Use / to move to previous/next levels. 3 Continue browsing until you arrive at the top of each category list. Important • Pioneer cannot under any inconvenience or loss of recorded material resulting from your iPod using your iPod will allow you to control playback of audio content...


