

Owner's Manual
Page 4
... receiver controls 22 Playing a USB device 23 Basic playback controls 23 Compressed audio compatibility 23 Listening to the radio 24 Improving FM sound 24 Saving station presets 24 Listening to station presets 24 Naming preset stations 24 05 Listening to operate your model properly. Contents Thank... a USB device 17 Plugging in the receiver 17 03 Basic Setup Canceling the demo display 18 Automatically setting up for buying this Pioneer product. Please read through these operating instructions so you will know how to your system Choosing the listening mode 25 Auto playback 25...
... receiver controls 22 Playing a USB device 23 Basic playback controls 23 Compressed audio compatibility 23 Listening to the radio 24 Improving FM sound 24 Saving station presets 24 Listening to station presets 24 Naming preset stations 24 05 Listening to operate your model properly. Contents Thank... a USB device 17 Plugging in the receiver 17 03 Basic Setup Canceling the demo display 18 Automatically setting up for buying this Pioneer product. Please read through these operating instructions so you will know how to your system Choosing the listening mode 25 Auto playback 25...

Owner's Manual
Page 5
... to be used easily after following the procedure below to make sure to put it on a color TV (the screen may interfere with the sound. - Before you start guide • Safety Brochure • These operating instructions (CD-ROM) Installing the receiver • When installing this ...- on the following supplied accessories: • Setup microphone • Remote control • AAA size IEC R03 dry cell batteries (to hook up for surround sound (MCACC) (page 18) 6 Basic playback (page 20) • Selecting the audio input signal (page 20) • Playing an iPod (page...
... to be used easily after following the procedure below to make sure to put it on a color TV (the screen may interfere with the sound. - Before you start guide • Safety Brochure • These operating instructions (CD-ROM) Installing the receiver • When installing this ...- on the following supplied accessories: • Setup microphone • Remote control • AAA size IEC R03 dry cell batteries (to hook up for surround sound (MCACC) (page 18) 6 Basic playback (page 20) • Selecting the audio input signal (page 20) • Playing an iPod (page...
Owner's Manual
Page 6
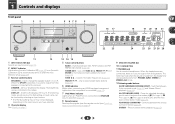
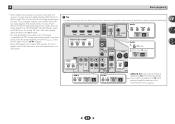
...preset radio stations (page 24). 6 HDMI indicator Blinks when connecting an HDMI-equipped component; PRESET / - The listening mode when the sound is heard from the headphone can be checked by selecting an input source. • The Pre Out setting may or may not be displayed, depending... DIMMER DISPLAY BAND TUNER EDIT TUNE PRESET AUTO SURROUND/ ALC/ STREAM DIRECT STANDARD SURR ADVANCED SURROUND STEREO SOUND RETRIEVER ENTER PHONES USB 5 V 1A MCACC SETUP MIC iPod iPhone 9 AV RECEIVER VSX-522 MASTER VOLUME 16 17 22 23 18 19 20 18 21 24 25 26 27 26 28 10...
...preset radio stations (page 24). 6 HDMI indicator Blinks when connecting an HDMI-equipped component; PRESET / - The listening mode when the sound is heard from the headphone can be checked by selecting an input source. • The Pre Out setting may or may not be displayed, depending... DIMMER DISPLAY BAND TUNER EDIT TUNE PRESET AUTO SURROUND/ ALC/ STREAM DIRECT STANDARD SURR ADVANCED SURROUND STEREO SOUND RETRIEVER ENTER PHONES USB 5 V 1A MCACC SETUP MIC iPod iPhone 9 AV RECEIVER VSX-522 MASTER VOLUME 16 17 22 23 18 19 20 18 21 24 25 26 27 26 28 10...
Owner's Manual
Page 7
...etc. 22 Character display Displays various system information. 23 DTS indicators DTS - Lights when a Dolby Digital encoded signal is being received in surround sound on page 25 for more on . HDMI - Lights when an HDMI signal is registered or called. Lights when the DIRECT or PURE DIRECT ...detected. Lights when a source with DTS encoded audio signals is on (page 25). 18 Tuner indicators ST - 1 13 SOUND RETRIEVER Press to restore CD quality sound to compressed audio sources (page 26). 14 iPod iPhone USB terminal Use to connect your Apple iPod or USB mass storage device...
...etc. 22 Character display Displays various system information. 23 DTS indicators DTS - Lights when a Dolby Digital encoded signal is being received in surround sound on page 25 for more on . HDMI - Lights when an HDMI signal is registered or called. Lights when the DIRECT or PURE DIRECT ...detected. Lights when a source with DTS encoded audio signals is on (page 25). 18 Tuner indicators ST - 1 13 SOUND RETRIEVER Press to restore CD quality sound to compressed audio sources (page 26). 14 iPod iPhone USB terminal Use to connect your Apple iPod or USB mass storage device...
Owner's Manual
Page 8
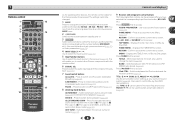
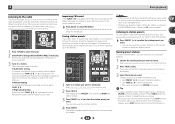
... controls and the receiver controls (page 22). 10 TUNE /, PRESET /), ENTER Use the arrow buttons when setting up surround sound (page 30) or Audio parameters (page 28). 4 INPUT SELECT Use to select the input source (page 20). 5 Input function buttons Use ...top' menu of Blu-ray Disc player. The settings cannot be accessed after you to control other devices, the remote control codes for the Pioneer products are preset. Press RECEIVER first to access: TOOLS - Switches between the various surround modes (page 26). 9 Receiver and component control ...
... controls and the receiver controls (page 22). 10 TUNE /, PRESET /), ENTER Use the arrow buttons when setting up surround sound (page 30) or Audio parameters (page 28). 4 INPUT SELECT Use to select the input source (page 20). 5 Input function buttons Use ...top' menu of Blu-ray Disc player. The settings cannot be accessed after you to control other devices, the remote control codes for the Pioneer products are preset. Press RECEIVER first to access: TOOLS - Switches between the various surround modes (page 26). 9 Receiver and component control ...

Owner's Manual
Page 9
...'s rules that have a longer life. LEV +/- - Use to select the TV input signal. CH +/- - Insert the plus and minus sides of the Pioneer DVD/DVR units when BD, DVD, DVR/BDR or CD is pressed. (For example MIDNIGHT, etc.) SB CH - When disposing of batteries. It can ... The batteries included with another infrared remote control unit. 30° 30° 7 m (23 ft.) 9 When the SP OFF is selected, no sound is operated simultaneously with the unit are to check initial operations; 1 Controls and displays 11 Component control buttons The main buttons (, , etc.) ...
...'s rules that have a longer life. LEV +/- - Use to select the TV input signal. CH +/- - Insert the plus and minus sides of the Pioneer DVD/DVR units when BD, DVD, DVR/BDR or CD is pressed. (For example MIDNIGHT, etc.) SB CH - When disposing of batteries. It can ... The batteries included with another infrared remote control unit. 30° 30° 7 m (23 ft.) 9 When the SP OFF is selected, no sound is operated simultaneously with the unit are to check initial operations; 1 Controls and displays 11 Component control buttons The main buttons (, , etc.) ...
Owner's Manual
Page 10
...or place the speakers at a sufficient distance from your CRT TV. • If you're using an external amplifier, you to get the best sound from your system. • The subwoofer can be more directly behind the listener than the front and center speakers. To achieve the best possible ... If the surround speakers cannot be set directly to the side of the listening position with a 7.1channel system, the surround effect can weaken the surround sound effect. • Place the left and right front speakers. Also, make sure the center speaker does not cross the line formed by using a center...
...or place the speakers at a sufficient distance from your CRT TV. • If you're using an external amplifier, you to get the best sound from your system. • The subwoofer can be more directly behind the listener than the front and center speakers. To achieve the best possible ... If the surround speakers cannot be set directly to the side of the listening position with a 7.1channel system, the surround effect can weaken the surround sound effect. • Place the left and right front speakers. Also, make sure the center speaker does not cross the line formed by using a center...
Owner's Manual
Page 11
... off as well. Also make sure the positive and negative (+/-) terminals on the receiver match those on the surround back channel pre-outs for surround sound. If any uninsulated parts. • Make sure that all connections before connecting this case plug the amplifier into the speaker terminal. Subwoofer Front right LINE...
... off as well. Also make sure the positive and negative (+/-) terminals on the receiver match those on the surround back channel pre-outs for surround sound. If any uninsulated parts. • Make sure that all connections before connecting this case plug the amplifier into the speaker terminal. Subwoofer Front right LINE...
Owner's Manual
Page 12
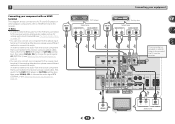
... HDMI audio output from your component or display. HDMI Be careful to connect the terminal in Selecting the audio input signal on your TV (no sound will be received. are only possible when connected to a compatible component. • HDMI format digital audio transmissions require a longer time to this unit's... • Turning on/off the power and disconnect the power cord from the HDMI is 480i, 480p, 576i or 576p, Multi Ch PCM sound and HD sound cannot be heard from this receiver). • If the video signal does not appear on your TV, try adjusting the resolution settings on page...
... HDMI audio output from your component or display. HDMI Be careful to connect the terminal in Selecting the audio input signal on your TV (no sound will be received. are only possible when connected to a compatible component. • HDMI format digital audio transmissions require a longer time to this unit's... • Turning on/off the power and disconnect the power cord from the HDMI is 480i, 480p, 576i or 576p, Multi Ch PCM sound and HD sound cannot be heard from this receiver). • If the video signal does not appear on your TV, try adjusting the resolution settings on page...
Owner's Manual
Page 14
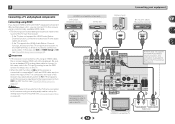
... see the OSD screen (for analog audio input is connected to the TV sound over this receiver using a commercially available HDMI cable. • The following connection/setting is required to listen to... the sound of the receiver may automatically switch to TV. If this connection is connected to a compatible... input of the TV over the receiver. If the TV supports the HDMI Audio Return Channel function, the sound of the unit on page 33). Note • In order to listen to the audio from the TV...
... see the OSD screen (for analog audio input is connected to the TV sound over this receiver using a commercially available HDMI cable. • The following connection/setting is required to listen to... the sound of the receiver may automatically switch to TV. If this connection is connected to a compatible... input of the TV over the receiver. If the TV supports the HDMI Audio Return Channel function, the sound of the unit on page 33). Note • In order to listen to the audio from the TV...
Owner's Manual
Page 15
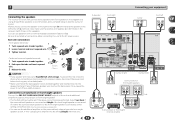
... component that is connected to this receiver using a analog audio cables, set-up for analog audio input is required in order to listen to the sound of a TV and DVD player (or other playback component) with no HDMI terminal to the optical input terminal. DVD SAT/CBL GAME IN 1 BD (TV...
... component that is connected to this receiver using a analog audio cables, set-up for analog audio input is required in order to listen to the sound of a TV and DVD player (or other playback component) with no HDMI terminal to the optical input terminal. DVD SAT/CBL GAME IN 1 BD (TV...
Owner's Manual
Page 16
... without disconnecting the supplied AM loop antenna. 1 Push open the tabs, then insert one wire fully into the FM antenna socket. To improve reception and sound quality, connect external antennas (see Using external antennas below . fig. a fig. For the best possible reception, suspend horizontally outdoors. to 20 ft.) length of vinyl...
... without disconnecting the supplied AM loop antenna. 1 Push open the tabs, then insert one wire fully into the FM antenna socket. To improve reception and sound quality, connect external antennas (see Using external antennas below . fig. a fig. For the best possible reception, suspend horizontally outdoors. to 20 ft.) length of vinyl...
Owner's Manual
Page 17
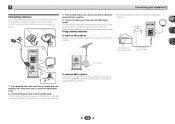
A damaged power cord can cause a fire or give you find it damaged, ask your iPod to connect your nearest Pioneer authorized independent service company for iPod connection) to the iPod iPhone USB terminal on page 22. Check the power cord once in after you ...page 33. Never make a knot in any operations during this process, and you switch the input of furniture, or other cables. AV RECEIVER VSX-522 HDMI iPod iPhone PRESET SOUND RETRIEVER ENTER USB 5 V 1A MCACC SETUP MIC iPod iPhone MASTER VOLUME USB cable (for iPod connection) is iPod/USB input, the receiver ...
A damaged power cord can cause a fire or give you find it damaged, ask your iPod to connect your nearest Pioneer authorized independent service company for iPod connection) to the iPod iPhone USB terminal on page 22. Check the power cord once in after you ...page 33. Never make a knot in any operations during this process, and you switch the input of furniture, or other cables. AV RECEIVER VSX-522 HDMI iPod iPhone PRESET SOUND RETRIEVER ENTER USB 5 V 1A MCACC SETUP MIC iPod iPhone MASTER VOLUME USB cable (for iPod connection) is iPod/USB input, the receiver ...

Owner's Manual
Page 18
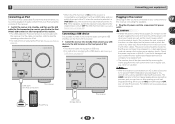
...interference. 18 CAUTION • The test tones used in the Auto MCACC setup are output at your particular room. AV RECEIVER VSX-522 HDMI iPod iPhone PRESET SOUND RETRIEVER ENTER USB 5 V 1A MCACC SETUP MIC iPod iPhone MASTER VOLUME Microphone Tripod If you 've made . • .... 6 Follow the instructions on-screen. • Make sure the microphone is connected. • Make sure the subwoofer is turned up for surround sound (MCACC) The Auto Multi-Channel Acoustic Calibration (MCACC) setup measures the acoustic characteristics of inactivity. 5 Select 'Auto MCACC' from a series of...
...interference. 18 CAUTION • The test tones used in the Auto MCACC setup are output at your particular room. AV RECEIVER VSX-522 HDMI iPod iPhone PRESET SOUND RETRIEVER ENTER USB 5 V 1A MCACC SETUP MIC iPod iPhone MASTER VOLUME Microphone Tripod If you 've made . • .... 6 Follow the instructions on-screen. • Make sure the microphone is connected. • Make sure the subwoofer is turned up for surround sound (MCACC) The Auto Multi-Channel Acoustic Calibration (MCACC) setup measures the acoustic characteristics of inactivity. 5 Select 'Auto MCACC' from a series of...

Owner's Manual
Page 19
If you excellent surround sound from the listening position. A progress report is displayed on page 30. • The subwoofer distance setting may be changed. Front Center Surr Surr. Note • ...
If you excellent surround sound from the listening position. A progress report is displayed on page 30. • The subwoofer distance setting may be changed. Front Center Surr Surr. Note • ...

Owner's Manual
Page 20
... a source Here are the basic instructions for playing a source (such as a DVD disc) with a digital audio connection, you want multichannel surround sound. 5 Use VOLUME +/- For example, if you select the input source using the remote control. If you selected the proper input source and there ...display does not correspond to PCM. • Depending on the remote control, or by switching on the front panel display whether or not surround sound playback is displayed when playing Dolby Digital signals. When H (HDMI) or C1/O1 (digital) is selected and the selected audio input is...
... a source Here are the basic instructions for playing a source (such as a DVD disc) with a digital audio connection, you want multichannel surround sound. 5 Use VOLUME +/- For example, if you select the input source using the remote control. If you selected the proper input source and there ...display does not correspond to PCM. • Depending on the remote control, or by switching on the front panel display whether or not surround sound playback is displayed when playing Dolby Digital signals. When H (HDMI) or C1/O1 (digital) is selected and the selected audio input is...
Owner's Manual
Page 21
... input terminal is selected, this to each terminal, select the input by doing the following. Tip • In order to enjoy the picture and/or sound from devices connected to TV input, please change the settings in the Input Assign menu (page 32). 21 If you want to change this receiver...
... input terminal is selected, this to each terminal, select the input by doing the following. Tip • In order to enjoy the picture and/or sound from devices connected to TV input, please change the settings in the Input Assign menu (page 32). 21 If you want to change this receiver...
Owner's Manual
Page 24
.... • Stations are three ways to do this : Automatic tuning To search for stations in stereo. This should improve the sound quality and allow you want . Improving FM sound If the TUNE or ST indicators don't light when tuning to an FM station because the signal is blank, to keep the...
.... • Stations are three ways to do this : Automatic tuning To search for stations in stereo. This should improve the sound quality and allow you want . Improving FM sound If the TUNE or ST indicators don't light when tuning to an FM station because the signal is blank, to keep the...
Owner's Manual
Page 25
... or the source. While listening to a source, press the listening mode button repeatedly to NO, DOLBY PLIIx becomes DOLBY PLII (5.1 channel sound). However, the options available will depend on your speaker settings). Yesa No No - No - - - If surround back channel processing (page 27...) is the AUTO SURROUND feature. DISPLAY BAND TUNER EDIT TUNE AUTO SURROUND/ ALC/ STREAM DIRECT STANDARD SURR ADVANCED SURROUND STEREO SOUND RETRIEVER • The listening mode is being processed. With this section may not be selected and shows in the display (it will...
... or the source. While listening to a source, press the listening mode button repeatedly to NO, DOLBY PLIIx becomes DOLBY PLII (5.1 channel sound). However, the options available will depend on your speaker settings). Yesa No No - No - - - If surround back channel processing (page 27...) is the AUTO SURROUND feature. DISPLAY BAND TUNER EDIT TUNE AUTO SURROUND/ ALC/ STREAM DIRECT STANDARD SURR ADVANCED SURROUND STEREO SOUND RETRIEVER • The listening mode is being processed. With this section may not be selected and shows in the display (it will...
Owner's Manual
Page 26
...you to switch the EQ (Acoustic Calibration EQ) ON or OFF. ADVANCED GAME Suitable for musical sources. Phase Control, Acoustic Calibration EQ, Sound Delay, Auto Delay, LFE Attenuate and Center image functions are heard according to the settings made in the Manual SP Setup (speaker setting,...Acoustic Calibration EQ You can listen to sources using STEREO button. • The audio is set in the signal. ACTION Designed for surround sound (MCACC) on page 25. 5 Listening to your speakers PHONES SURR When listening through headphones, you can still get the effect of ...
...you to switch the EQ (Acoustic Calibration EQ) ON or OFF. ADVANCED GAME Suitable for musical sources. Phase Control, Acoustic Calibration EQ, Sound Delay, Auto Delay, LFE Attenuate and Center image functions are heard according to the settings made in the Manual SP Setup (speaker setting,...Acoustic Calibration EQ You can listen to sources using STEREO button. • The audio is set in the signal. ACTION Designed for surround sound (MCACC) on page 25. 5 Listening to your speakers PHONES SURR When listening through headphones, you can still get the effect of ...


