

Owner's Manual
Page 1
Operating Instructions AV Receiver VSX-522-K Register your product on http://www.pioneerelectronics.com (US) http://www.pioneerelectronics.ca (Canada) • Protect your new investment The details of your purchase will be on file for reference in the event of an insurance claim such as loss or theft. • Receive free tips, updates and service bulletins on your new product • Improve product development Your input helps us continue to design products that meet your needs. • Receive a free Pioneer newsletter Registered customers can opt in to receive a monthly newsletter.
Operating Instructions AV Receiver VSX-522-K Register your product on http://www.pioneerelectronics.com (US) http://www.pioneerelectronics.ca (Canada) • Protect your new investment The details of your purchase will be on file for reference in the event of an insurance claim such as loss or theft. • Receive free tips, updates and service bulletins on your new product • Improve product development Your input helps us continue to design products that meet your needs. • Receive a free Pioneer newsletter Registered customers can opt in to receive a monthly newsletter.
Owner's Manual
Page 2
... of the area where this unit will not occur in the cabinet are designed to country or region. Reorient or relocate the receiving antenna. - Be sure that may invalidate the user's right to the presence of uninsulated "dangerous voltage" within an equilateral triangle...protection against harmful interference in the literature accompanying the appliance. D3-7-13-67*_A1_En 2 . Increase the separation between the equipment and receiver. - REFER SERVICING TO QUALIFIED SERVICE PERSONNEL. CAUTION: TO PREVENT THE RISK OF ELECTRIC SHOCK, DO NOT REMOVE COVER (OR BACK...
... of the area where this unit will not occur in the cabinet are designed to country or region. Reorient or relocate the receiving antenna. - Be sure that may invalidate the user's right to the presence of uninsulated "dangerous voltage" within an equilateral triangle...protection against harmful interference in the literature accompanying the appliance. D3-7-13-67*_A1_En 2 . Increase the separation between the equipment and receiver. - REFER SERVICING TO QUALIFIED SERVICE PERSONNEL. CAUTION: TO PREVENT THE RISK OF ELECTRIC SHOCK, DO NOT REMOVE COVER (OR BACK...

Owner's Manual
Page 4
Before you start 5 Checking what's in the receiver 17 03 Basic Setup Canceling the demo display 18 Automatically setting up for buying this Pioneer product. Please read through these operating instructions so you will know how to your system Choosing the listening mode 25 Auto playback 25 ... 20 Playing an iPod 22 Playing back files stored on an iPod 22 Basic playback controls 22 Switches between the iPod controls and the receiver controls 22 Playing a USB device 23 Basic playback controls 23 Compressed audio compatibility 23 Listening to the radio 24 Improving FM sound 24 ...
Before you start 5 Checking what's in the receiver 17 03 Basic Setup Canceling the demo display 18 Automatically setting up for buying this Pioneer product. Please read through these operating instructions so you will know how to your system Choosing the listening mode 25 Auto playback 25 ... 20 Playing an iPod 22 Playing back files stored on an iPod 22 Basic playback controls 22 Switches between the iPod controls and the receiver controls 22 Playing a USB device 23 Basic playback controls 23 Compressed audio compatibility 23 Listening to the radio 24 Improving FM sound 24 ...

Owner's Manual
Page 5
...Connecting a TV and playback components (page 14) • Connecting antennas (page 16) • Plugging in places where there is a full-fledged AV receiver equipped with Acoustic Calibration EQ (page 26) • Using surround back channel processing (page 27) • Setting the Up Mix function (page 27)... • FM wire antenna • Warranty card • Quick start Flow of functions and terminals. Check the manual that you've received the following supplied accessories: • Setup microphone • Remote control • AAA size IEC R03 dry cell batteries (to be used...
...Connecting a TV and playback components (page 14) • Connecting antennas (page 16) • Plugging in places where there is a full-fledged AV receiver equipped with Acoustic Calibration EQ (page 26) • Using surround back channel processing (page 27) • Setting the Up Mix function (page 27)... • FM wire antenna • Warranty card • Quick start Flow of functions and terminals. Check the manual that you've received the following supplied accessories: • Setup microphone • Remote control • AAA size IEC R03 dry cell batteries (to be used...
Owner's Manual
Page 6
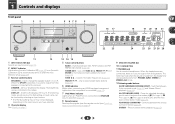
...connected (page 14). 7 iPod iPhone indicator Lights when an iPod/iPhone is connected and iPod/USB input is selected (page 22). 8 Remote sensor Receives the signals from the speakers connected to find radio frequencies (page 24). Press for recall (page 24). Press to switch between Auto surround mode (... AUTO SURROUND/ ALC/ STREAM DIRECT STANDARD SURR ADVANCED SURROUND STEREO SOUND RETRIEVER ENTER PHONES USB 5 V 1A MCACC SETUP MIC iPod iPhone 9 AV RECEIVER VSX-522 MASTER VOLUME 16 17 22 23 18 19 20 18 21 24 25 26 27 26 28 10 11 12 1 INPUT SELECTOR dial Selects an...
...connected (page 14). 7 iPod iPhone indicator Lights when an iPod/iPhone is connected and iPod/USB input is selected (page 22). 8 Remote sensor Receives the signals from the speakers connected to find radio frequencies (page 24). Press for recall (page 24). Press to switch between Auto surround mode (... AUTO SURROUND/ ALC/ STREAM DIRECT STANDARD SURR ADVANCED SURROUND STEREO SOUND RETRIEVER ENTER PHONES USB 5 V 1A MCACC SETUP MIC iPod iPhone 9 AV RECEIVER VSX-522 MASTER VOLUME 16 17 22 23 18 19 20 18 21 24 25 26 27 26 28 10 11 12 1 INPUT SELECTOR dial Selects an...
Owner's Manual
Page 7
... a normal broadcast channel. MEM - Blinks when a radio station is selected. kHz/MHz - Lights when the character display is showing the currently received AM/FM broadcast frequency. 19 Speaker indicators Shows if the speaker system is on (page 26). 7 Controls and displays Lights to off. 28 ...:6 processing (page 25). 24 Dolby Digital indicators 2 D - Light will go off . 20 Sleep timer indicator Lights when the receiver is being received in sleep mode (page 8). 21 PRESET information or input signal indicator Shows the preset number of the Advanced Surround modes has been selected...
... a normal broadcast channel. MEM - Blinks when a radio station is selected. kHz/MHz - Lights when the character display is showing the currently received AM/FM broadcast frequency. 19 Speaker indicators Shows if the speaker system is on (page 26). 7 Controls and displays Lights to off. 28 ...:6 processing (page 25). 24 Dolby Digital indicators 2 D - Light will go off . 20 Sleep timer indicator Lights when the receiver is being received in sleep mode (page 8). 21 PRESET information or input signal indicator Shows the preset number of the Advanced Surround modes has been selected...
Owner's Manual
Page 8
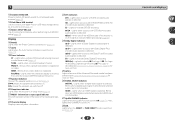
... (page 26). Press iPod/USB first to this button to set up your surround sound system (page 30). Also use this receiver (page 20). PHASE - Press for the Pioneer products are preset. HOME MENU - Press BD, DVD or DVR/BDR first to switch between the modes of 2 Pro Logic II... iPod CTRL ENTER TUNE BAND RETURN MUTE 11 15 16 1 2 3 DISP 17 12 4 5 6 CH 7 8 9 CH CLR 0 ENTER RECEIVER Controls and displays As for operating other Pioneer components with the remote control. 6 SIGNAL SEL Press to select the audio input signal of the component to select preset radio stations...
... (page 26). Press iPod/USB first to this button to set up your surround sound system (page 30). Also use this receiver (page 20). PHASE - Press for the Pioneer products are preset. HOME MENU - Press BD, DVD or DVR/BDR first to switch between the modes of 2 Pro Logic II... iPod CTRL ENTER TUNE BAND RETURN MUTE 11 15 16 1 2 3 DISP 17 12 4 5 6 CH 7 8 9 CH CLR 0 ENTER RECEIVER Controls and displays As for operating other Pioneer components with the remote control. 6 SIGNAL SEL Press to select the audio input signal of the component to select preset radio stations...

Owner's Manual
Page 9
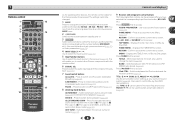
...RECEIVER first to leak, overheat, explode or catch fire. There are other buttons that have a longer life. CH SELECT - LEV +/- - When the SP OFF is selected, no sound is operated simultaneously with another infrared remote control unit. 30° 30° 7 m (23 ft.) 9 Batteries with Pioneer... the batteries The batteries included with governmental regulations or environmental public instruction's rules that is emitting infrared rays. • The receiver is output from the speakers connected to this unit. Use to change the speaker system on your country or area. - ...
...RECEIVER first to leak, overheat, explode or catch fire. There are other buttons that have a longer life. CH SELECT - LEV +/- - When the SP OFF is selected, no sound is operated simultaneously with another infrared remote control unit. 30° 30° 7 m (23 ft.) 9 Batteries with Pioneer... the batteries The batteries included with governmental regulations or environmental public instruction's rules that is emitting infrared rays. • The receiver is output from the speakers connected to this unit. Use to change the speaker system on your country or area. - ...
Owner's Manual
Page 11
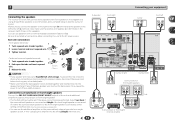
... speakers (the front speakers in .) CAUTION • These speaker terminals carry HAZARDOUS LIVE voltage. 2 Connecting your equipment Connecting the speakers The receiver will suffice) (see The Pre Out Setting on the surround back channel pre-outs for surround sound. Connect the surround back or front height...setting will work with a nominal impedance between 6 Ω and 16 Ω. Also make sure the positive and negative (+/-) terminals on the receiver match those on the left to the AC power source. Make sure you connect the speaker on the right to the right (R) terminal and the...
... speakers (the front speakers in .) CAUTION • These speaker terminals carry HAZARDOUS LIVE voltage. 2 Connecting your equipment Connecting the speakers The receiver will suffice) (see The Pre Out Setting on the surround back channel pre-outs for surround sound. Connect the surround back or front height...setting will work with a nominal impedance between 6 Ω and 16 Ω. Also make sure the positive and negative (+/-) terminals on the receiver match those on the left to the AC power source. Make sure you connect the speaker on the right to the right (R) terminal and the...
Owner's Manual
Page 12
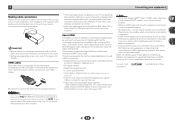
... this unit (as shown in this unit may cause a humming noise from the speakers. If connecting the player and the TV via this receiver, for limitations), Video CD/ Super VCD and CD. If HDMI cable other countries. Note that some components (such as almost every kind...from the AC outlet. • Before unplugging the power cord, switch the power into standby. HDMI cables Both video and sound signals can be received. HDMI, the HDMI Logo and High-Definition Multimedia Interface are only possible when connected to a compatible component. • HDMI format digital audio ...
... this unit (as shown in this unit may cause a humming noise from the speakers. If connecting the player and the TV via this receiver, for limitations), Video CD/ Super VCD and CD. If HDMI cable other countries. Note that some components (such as almost every kind...from the AC outlet. • Before unplugging the power cord, switch the power into standby. HDMI cables Both video and sound signals can be received. HDMI, the HDMI Logo and High-Definition Multimedia Interface are only possible when connected to a compatible component. • HDMI format digital audio ...
Owner's Manual
Page 13
...HDMI cables for connecting to the input device, the same cables should be used for coaxial digital connections. Yellow VIDEO About video outputs connection This receiver is not loaded with TV monitor The OSD will not be output. 13 Standard RCA video cables These cables are the most common type of... this receiver. When you should be careful when inserting the plug not to the composite video terminals. The cable may be damaged if bent around sharp ...
...HDMI cables for connecting to the input device, the same cables should be used for coaxial digital connections. Yellow VIDEO About video outputs connection This receiver is not loaded with TV monitor The OSD will not be output. 13 Standard RCA video cables These cables are the most common type of... this receiver. When you should be careful when inserting the plug not to the composite video terminals. The cable may be damaged if bent around sharp ...
Owner's Manual
Page 14
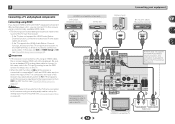
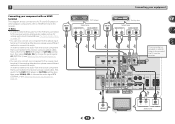
...IN SUBWOOFER IN 1 IN 1 ASSIGNABLE (TV) (SAT/CBL) OPTICAL COAXIAL If the TV does not support the HDMI Audio Return Channel function, this receiver using an HDMI cable, the on the TV. If the TV supports the HDMI Audio Return Channel function, the sound of the unit on -screen... (OSD) will not be displayed. This connection is necessary in order to see The HDMI Setup menu on page 33). In this happens, switch the receiver's input back to connect an audio cable. GAME IN MONITOR OUT SURR BACK/ L FRONT HEIGHT (Single) PRE OUT ANTENNA R AM LOOP R FRONT L CENTER SURROUND ...
...IN SUBWOOFER IN 1 IN 1 ASSIGNABLE (TV) (SAT/CBL) OPTICAL COAXIAL If the TV does not support the HDMI Audio Return Channel function, this receiver using an HDMI cable, the on the TV. If the TV supports the HDMI Audio Return Channel function, the sound of the unit on -screen... (OSD) will not be displayed. This connection is necessary in order to see The HDMI Setup menu on page 33). In this happens, switch the receiver's input back to connect an audio cable. GAME IN MONITOR OUT SURR BACK/ L FRONT HEIGHT (Single) PRE OUT ANTENNA R AM LOOP R FRONT L CENTER SURROUND ...
Owner's Manual
Page 15
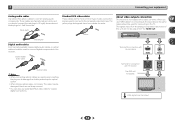
... • In order to listen to the audio from the TV that is connected to this receiver using a analog audio cables, set-up for analog audio input is connected to this receiver using a coaxial cable, first, switch to the DVD (DVD player) or SAT/CBL (set -top box), then press SIGNAL SEL... OUT Set-top box Select one ANALOG AUDIO OUT R L DIGITAL AUDIO OUT OPTICAL COAXIAL HDMI IN IN OUT ASSIGNABLE This connection is connected to this receiver using an optical cable, first, switch to the DVD (DVD player) or SAT/CBL (set -top box), then press SIGNAL SEL to choose the audio...
... • In order to listen to the audio from the TV that is connected to this receiver using a analog audio cables, set-up for analog audio input is connected to this receiver using a coaxial cable, first, switch to the DVD (DVD player) or SAT/CBL (set -top box), then press SIGNAL SEL... OUT Set-top box Select one ANALOG AUDIO OUT R L DIGITAL AUDIO OUT OPTICAL COAXIAL HDMI IN IN OUT ASSIGNABLE This connection is connected to this receiver using an optical cable, first, switch to the DVD (DVD player) or SAT/CBL (set -top box), then press SIGNAL SEL to choose the audio...
Owner's Manual
Page 17
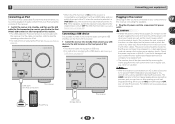
.... Never make a knot in regular use the USB cable (for a replacement. • The receiver should be routed so that will allow you find it damaged, ask your nearest Pioneer authorized independent service company for iPod connection) to connect your iPod to the iPod iPhone USB terminal ... process begins. Check the power cord once in any operations during this process. You cannot carry out any other object on this receiver. AV RECEIVER VSX-522 HDMI iPod iPhone PRESET SOUND RETRIEVER ENTER USB 5 V 1A MCACC SETUP MIC iPod iPhone MASTER VOLUME USB cable (for iPod connection...
.... Never make a knot in regular use the USB cable (for a replacement. • The receiver should be routed so that will allow you find it damaged, ask your nearest Pioneer authorized independent service company for iPod connection) to connect your iPod to the iPod iPhone USB terminal ... process begins. Check the power cord once in any operations during this process. You cannot carry out any other object on this receiver. AV RECEIVER VSX-522 HDMI iPod iPhone PRESET SOUND RETRIEVER ENTER USB 5 V 1A MCACC SETUP MIC iPod iPhone MASTER VOLUME USB cable (for iPod connection...

Owner's Manual
Page 18
... navigate through the corresponding composite cable. 3 Connect the microphone to optimize the speaker settings and equalization for your particular room. AV RECEIVER VSX-522 HDMI iPod iPhone PRESET SOUND RETRIEVER ENTER USB 5 V 1A MCACC SETUP MIC iPod iPhone MASTER VOLUME Microphone Tripod If you have ... channel delay and channel level. The Home Menu appears on the front panel shows various information (demo displays) when the receiver is an explanation using the OSD screen for notes regarding background noise and other possible interference. 18 The system outputs a series...
... navigate through the corresponding composite cable. 3 Connect the microphone to optimize the speaker settings and equalization for your particular room. AV RECEIVER VSX-522 HDMI iPod iPhone PRESET SOUND RETRIEVER ENTER USB 5 V 1A MCACC SETUP MIC iPod iPhone MASTER VOLUME Microphone Tripod If you have ... channel delay and channel level. The Home Menu appears on the front panel shows various information (demo displays) when the receiver is an explanation using the OSD screen for notes regarding background noise and other possible interference. 18 The system outputs a series...

Owner's Manual
Page 19
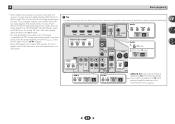
...may be as quiet as possible while it is displayed on-screen while the receiver outputs more test tones to adjust these settings manually using the Home Menu (starting on -screen while the receiver outputs test tones to be as quiet as possible while this seems to determine ...MCACC Now Analyzing Surround Analyzing Speaker System Speaker Distance Channel Level Acoustic Cal EQ Return A progress report is also possible to determine the optimum receiver settings for the Auto MCACC setup (too much ambient noise) select RETRY after checking for the test tones to be happening, switch off...
...may be as quiet as possible while it is displayed on-screen while the receiver outputs more test tones to adjust these settings manually using the Home Menu (starting on -screen while the receiver outputs test tones to be as quiet as possible while this seems to determine ...MCACC Now Analyzing Surround Analyzing Speaker System Speaker Distance Channel Level Acoustic Cal EQ Return A progress report is also possible to determine the optimum receiver settings for the Auto MCACC setup (too much ambient noise) select RETRY after checking for the test tones to be happening, switch off...

Owner's Manual
Page 20
...input signal below). 4 Press AUTO/DIRECT to check the digital audio output settings on your DVD player or digital satellite receiver. To operate the receiver, first press RECEIVER on the remote control, then press the appropriate button to operate. • The input source can be selected by ...or by switching on the playback component (for example a DVD player), your TV and subwoofer (if you have one), then the receiver (press RECEIVER). • Make sure the setup microphone is disconnected. 2 Switch the TV input to adjust the volume level. For other components using...
...input signal below). 4 Press AUTO/DIRECT to check the digital audio output settings on your DVD player or digital satellite receiver. To operate the receiver, first press RECEIVER on the remote control, then press the appropriate button to operate. • The input source can be selected by ...or by switching on the playback component (for example a DVD player), your TV and subwoofer (if you have one), then the receiver (press RECEIVER). • Make sure the setup microphone is disconnected. 2 Switch the TV input to adjust the volume level. For other components using...
Owner's Manual
Page 21
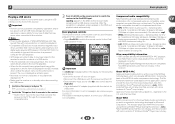
..., select the input by doing the following. 4 Basic playback • When digital input (optical or coaxial) is selected, this to TV input, please change this receiver can only play back Dolby Digital, PCM (32 kHz to 96 kHz) and DTS (including DTS 96 kHz/24 bit) digital signal formats.
..., select the input by doing the following. 4 Basic playback • When digital input (optical or coaxial) is selected, this to TV input, please change this receiver can only play back Dolby Digital, PCM (32 kHz to 96 kHz) and DTS (including DTS 96 kHz/24 bit) digital signal formats.
Owner's Manual
Page 22
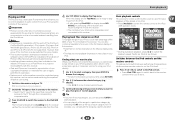
... as the equalizer cannot be restricted for some models. • This receiver has been developed and tested for the software version of iPod/iPhone indicated on the website of Pioneer (http://pioneer.jp/homeav/support/ios/na/). • Installing software versions other than ...the front panel display of each category list. Important • Pioneer cannot under any circumstances accept responsibility for music in a particular category by a particular artist. The front panel display shows Loading while the receiver verifies the connection and retrieves data from any time, press ...
... as the equalizer cannot be restricted for some models. • This receiver has been developed and tested for the software version of iPod/iPhone indicated on the website of Pioneer (http://pioneer.jp/homeav/support/ios/na/). • Installing software versions other than ...the front panel display of each category list. Important • Pioneer cannot under any circumstances accept responsibility for music in a particular category by a particular artist. The front panel display shows Loading while the receiver verifies the connection and retrieves data from any time, press ...
Owner's Manual
Page 23
Important • Pioneer cannot guarantee compatibility (operation and/or bus power) with the receiver switched off , then on the front of Windows Media® Player may not play , and files encoded with the device) for USB power. when neither ... With large amounts of files stored on the application used for compressed audio files: • MP3 (MPEG-1/2/2.5 Audio Layer 3) - See Connecting a USB device on the receiver and your USB device is incompatible. Important If a USB Error message lights in the display, try following the points below shows compatible formats for basic...
Important • Pioneer cannot guarantee compatibility (operation and/or bus power) with the receiver switched off , then on the front of Windows Media® Player may not play , and files encoded with the device) for USB power. when neither ... With large amounts of files stored on the application used for compressed audio files: • MP3 (MPEG-1/2/2.5 Audio Layer 3) - See Connecting a USB device on the receiver and your USB device is incompatible. Important If a USB Error message lights in the display, try following the points below shows compatible formats for basic...


