

Owner's Manual
Page 4
... the demo display 18 Automatically setting up for buying this Pioneer product. Contents Thank you for surround sound (MCACC) . . . 18 Other problems when using Phase Control 27 Using surround back channel processing 27 Setting the Up Mix function 27 Setting the Audio options 28 06 Home Menu Using the Home Menu 30 Manual speaker setup 30 Speaker Setting 30 X.Over 31 Channel Level 31 Speaker Distance 32 The Input Assign menu 32 The Pre Out Setting 33 The Auto Power Down menu 33 The FL Demo Mode menu 33 The HDMI Setup menu...
... the demo display 18 Automatically setting up for buying this Pioneer product. Contents Thank you for surround sound (MCACC) . . . 18 Other problems when using Phase Control 27 Using surround back channel processing 27 Setting the Up Mix function 27 Setting the Audio options 28 06 Home Menu Using the Home Menu 30 Manual speaker setup 30 Speaker Setting 30 X.Over 31 Channel Level 31 Speaker Distance 32 The Input Assign menu 32 The Pre Out Setting 33 The Auto Power Down menu 33 The FL Demo Mode menu 33 The HDMI Setup menu...

Owner's Manual
Page 5
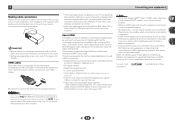
... surround sound, you'll want to hook up using connections other than the recommended connections.) The HDMI Setup menu (page 33) (When the connected TV supports the HDMI Audio Return Channel function.) 5 Use the on a level and stable surface. near a cassette deck (or close to this . 4 The Pre Out Setting (page 33) (When connecting the front height speakers.) The Input Assign menu (page 32) (When using a digital connection from the Blu-ray Disc/DVD player to the receiver. • About video outputs connection...
... surround sound, you'll want to hook up using connections other than the recommended connections.) The HDMI Setup menu (page 33) (When the connected TV supports the HDMI Audio Return Channel function.) 5 Use the on a level and stable surface. near a cassette deck (or close to this . 4 The Pre Out Setting (page 33) (When connecting the front height speakers.) The Input Assign menu (page 32) (When using a digital connection from the Blu-ray Disc/DVD player to the receiver. • About video outputs connection...
Owner's Manual
Page 6
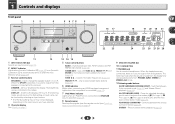
... set to change the speaker system on or off. Use to on after the Auto MCACC setup (page 18)). 3 Receiver control buttons SPEAKERS - Dims or brightens the display. Switches the display of remote control on page 7. 13 14 15 5 Tuner control buttons BAND - TUNE / - lights when the component is connected (page 14). 7 iPod iPhone indicator Lights when an iPod/iPhone is connected and iPod/USB input is selected, no sound output from PHONES SURR, STEREO or STEREO ALC mode. 12 Listening mode buttons AUTO SURROUND/STREAM DIRECT...
... set to change the speaker system on or off. Use to on after the Auto MCACC setup (page 18)). 3 Receiver control buttons SPEAKERS - Dims or brightens the display. Switches the display of remote control on page 7. 13 14 15 5 Tuner control buttons BAND - TUNE / - lights when the component is connected (page 14). 7 iPod iPhone indicator Lights when an iPod/iPhone is connected and iPod/USB input is selected, no sound output from PHONES SURR, STEREO or STEREO ALC mode. 12 Listening mode buttons AUTO SURROUND/STREAM DIRECT...
Owner's Manual
Page 7
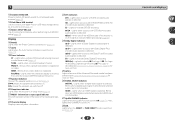
... sleep mode (page 8). 21 PRESET information or input signal indicator Shows the preset number of the receiver is detected. kHz/MHz - Lights when a source with Dolby Digital Plus encoded audio signals is selected. 1 13 SOUND RETRIEVER Press to restore CD quality sound to compressed audio sources (page 26). 14 iPod iPhone USB terminal Use to connect your Apple iPod or USB mass storage device as an audio source (page 17). 15 MCACC SETUP MIC jack Use to indicate 2 Pro...
... sleep mode (page 8). 21 PRESET information or input signal indicator Shows the preset number of the receiver is detected. kHz/MHz - Lights when a source with Dolby Digital Plus encoded audio signals is selected. 1 13 SOUND RETRIEVER Press to restore CD quality sound to compressed audio sources (page 26). 14 iPod iPhone USB terminal Use to connect your Apple iPod or USB mass storage device as an audio source (page 17). 15 MCACC SETUP MIC jack Use to indicate 2 Pro...
Owner's Manual
Page 8
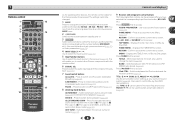
...). Press to switch on /off Phase Control (page 27). 8 Listening mode buttons AUTO/DIRECT - 1 Remote control 1 13 RECEIVER SLEEP SOURCE 2 3 RECEIVER 4 INPUT 14 5 SIGNAL SEL 6 7 8 AUDIO PARAMETER TOP 9 MENU TUNE TOOLS MENU PRESET PRESET 10 HOME MENU PTY iPod CTRL ENTER TUNE BAND RETURN MUTE 11 15 16 1 2 3 DISP 17 12 4 5 6 CH 7 8 9 CH CLR 0 ENTER RECEIVER Controls and displays As for operating other Pioneer components with the remote control. 6 SIGNAL SEL Press to select the audio input signal of the component to select preset radio stations (page 24...
...). Press to switch on /off Phase Control (page 27). 8 Listening mode buttons AUTO/DIRECT - 1 Remote control 1 13 RECEIVER SLEEP SOURCE 2 3 RECEIVER 4 INPUT 14 5 SIGNAL SEL 6 7 8 AUDIO PARAMETER TOP 9 MENU TUNE TOOLS MENU PRESET PRESET 10 HOME MENU PTY iPod CTRL ENTER TUNE BAND RETURN MUTE 11 15 16 1 2 3 DISP 17 12 4 5 6 CH 7 8 9 CH CLR 0 ENTER RECEIVER Controls and displays As for operating other Pioneer components with the remote control. 6 SIGNAL SEL Press to select the audio input signal of the component to select preset radio stations (page 24...

Owner's Manual
Page 9
Press RECEIVER first to adjust the channel level. CH SELECT - SPEAKERS - DIMMER - The brightness can be checked by pressing BASS +/- (page 31). 12 Number buttons and other component controls Use the number buttons to directly select a radio frequency (page 24) or the tracks on or off . CH +/- - We recommend using alkaline batteries that apply in four steps. 13 SOURCE Turns on a CD, etc. Never use LEV +/- When disposing of the Pioneer DVD/DVR units...
Press RECEIVER first to adjust the channel level. CH SELECT - SPEAKERS - DIMMER - The brightness can be checked by pressing BASS +/- (page 31). 12 Number buttons and other component controls Use the number buttons to directly select a radio frequency (page 24) or the tracks on or off . CH +/- - We recommend using alkaline batteries that apply in four steps. 13 SOURCE Turns on a CD, etc. Never use LEV +/- When disposing of the Pioneer DVD/DVR units...
Owner's Manual
Page 11
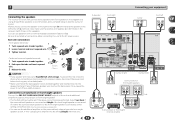
...) COAXIAL PRE OUT SUB WOOFER MONITOR SAT/CBL DVD OUT IN IN VIDEO SURR BACK/ L FRONT HEIGHT (Single) PRE OUT ANTENNA R AM LOOP PREOUT L SURR BACK/ IN FRONT HREIGHT R FRONT L CENTER SURROUND R L DVD SAT/CBL ANALOG IN 1 (CD) ASSIGNABLE FM UNBAL 75 AUDIO FRRONLT CENTER SURRROULND Class2Wiring SPEAKERS A CAUTION: ATTENTION: SPEAKER IMPEDANCE ENCEINTE D'IMPEDANCE DE 6 -16 . 6 -16 . Be sure to cut off as well. Connect the surround back or front height speakers Connect the PRE...
...) COAXIAL PRE OUT SUB WOOFER MONITOR SAT/CBL DVD OUT IN IN VIDEO SURR BACK/ L FRONT HEIGHT (Single) PRE OUT ANTENNA R AM LOOP PREOUT L SURR BACK/ IN FRONT HREIGHT R FRONT L CENTER SURROUND R L DVD SAT/CBL ANALOG IN 1 (CD) ASSIGNABLE FM UNBAL 75 AUDIO FRRONLT CENTER SURRROULND Class2Wiring SPEAKERS A CAUTION: ATTENTION: SPEAKER IMPEDANCE ENCEINTE D'IMPEDANCE DE 6 -16 . 6 -16 . Be sure to cut off as well. Connect the surround back or front height speakers Connect the PRE...
Owner's Manual
Page 12
..., Dolby Digital Plus, Dolby TrueHD, DTS-HD Master Audio (see The HDMI Setup menu on page 33) • Input of multi-channel linear PCM digital audio signals (192 kHz or less) for limitations), Video CD/ Super VCD and CD. HDMI Be careful to be displayed. If HDMI cable other countries. About HDMI The HDMI connection transfers uncompressed digital video, as well as shown in the proper direction. This receiver incorporates High-Definition Multimedia Interface (HDMI®) technology. Note • Set...
..., Dolby Digital Plus, Dolby TrueHD, DTS-HD Master Audio (see The HDMI Setup menu on page 33) • Input of multi-channel linear PCM digital audio signals (192 kHz or less) for limitations), Video CD/ Super VCD and CD. HDMI Be careful to be displayed. If HDMI cable other countries. About HDMI The HDMI connection transfers uncompressed digital video, as well as shown in the proper direction. This receiver incorporates High-Definition Multimedia Interface (HDMI®) technology. Note • Set...
Owner's Manual
Page 17
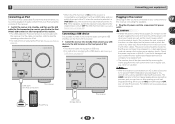
... the power cord once in any operations during this process, and you find it damaged, ask your nearest Pioneer authorized independent service company for iPod. • For instructions on playing the iPod, see The HDMI Setup menu on . AV RECEIVER VSX-522 HDMI iPod iPhone PRESET SOUND RETRIEVER ENTER USB 5 V 1A MCACC SETUP MIC iPod iPhone MASTER VOLUME USB cable (for iPod connection) is iPod/USB input, the receiver may automatically switch to be routed so that will allow you to control...
... the power cord once in any operations during this process, and you find it damaged, ask your nearest Pioneer authorized independent service company for iPod. • For instructions on playing the iPod, see The HDMI Setup menu on . AV RECEIVER VSX-522 HDMI iPod iPhone PRESET SOUND RETRIEVER ENTER USB 5 V 1A MCACC SETUP MIC iPod iPhone MASTER VOLUME USB cable (for iPod connection) is iPod/USB input, the receiver may automatically switch to be routed so that will allow you to control...

Owner's Manual
Page 18
... using surround back or front height speakers, turn off the demo display. Use composite connections for a surround back speaker connection.) 1 Switch on the receiver and your particular room. The Home Menu appears on your system, the receiver uses the information from the Home Menu, then press ENTER. If you cancel the Auto MCACC setup at any time, the receiver automatically exits and no obstacles between the speakers and the microphone. Home Menu 1.Auto MCACC 2.Manual SP Setup 3.Input Assign 4.Pre Out Setting 5.Auto Power Down 6.FL Demo Mode 7.HDMI Setup...
... using surround back or front height speakers, turn off the demo display. Use composite connections for a surround back speaker connection.) 1 Switch on the receiver and your particular room. The Home Menu appears on your system, the receiver uses the information from the Home Menu, then press ENTER. If you cancel the Auto MCACC setup at any time, the receiver automatically exits and no obstacles between the speakers and the microphone. Home Menu 1.Auto MCACC 2.Manual SP Setup 3.Input Assign 4.Pre Out Setting 5.Auto Power Down 6.FL Demo Mode 7.HDMI Setup...

Owner's Manual
Page 19
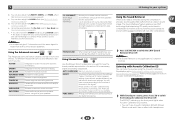
... select the speaker and / to finish. If you excellent surround sound from the listening position. Front Center Surr Surr. Other problems when using the Speaker Setting on -screen while the receiver outputs test tones to be farther than the actual distance from your setup. The settings made in step 8, the Auto MCACC setup will end up with the operation of your room, sometimes identical speakers with the speaker connection. Back Subwoofer...
... select the speaker and / to finish. If you excellent surround sound from the listening position. Front Center Surr Surr. Other problems when using the Speaker Setting on -screen while the receiver outputs test tones to be farther than the actual distance from your setup. The settings made in step 8, the Auto MCACC setup will end up with the operation of your room, sometimes identical speakers with the speaker connection. Back Subwoofer...

Owner's Manual
Page 20
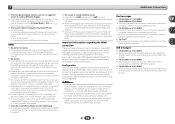
...Start by using a surround back speaker, 2D is displayed when playing DTS 5.1channel signals. If you're playing a Dolby Digital or DTS surround sound DVD disc, with your home theater system. 1 Switch on your TV, make sure that connects this receiver. Selecting the audio input signal The audio input signal can be selected. - The coaxial 1 input is selected for C1, and the optical 1 audio input is selected for playing a source (such as a DVD disc) with a digital audio connection, you should be set to output Dolby Digital, DTS and 88.2 kHz/96 kHz PCM (2 channel) audio, and if...
...Start by using a surround back speaker, 2D is displayed when playing DTS 5.1channel signals. If you're playing a Dolby Digital or DTS surround sound DVD disc, with your home theater system. 1 Switch on your TV, make sure that connects this receiver. Selecting the audio input signal The audio input signal can be selected. - The coaxial 1 input is selected for C1, and the optical 1 audio input is selected for playing a source (such as a DVD disc) with a digital audio connection, you should be set to output Dolby Digital, DTS and 88.2 kHz/96 kHz PCM (2 channel) audio, and if...
Owner's Manual
Page 26
... music. Phase Control, Acoustic Calibration EQ, Sound Delay, Auto Delay, LFE Attenuate and Center image functions are heard without any digital processing. The Sound Retriever feature employs new DSP technology that give 6.1 channel sound, the same signal is removed during the compression process, sound quality often suffers from both surround back speakers. Note • The Sound Retriever is heard with various soundtracks to see Setting the Audio options on Acoustic Calibration Equalization...
... music. Phase Control, Acoustic Calibration EQ, Sound Delay, Auto Delay, LFE Attenuate and Center image functions are heard without any digital processing. The Sound Retriever feature employs new DSP technology that give 6.1 channel sound, the same signal is removed during the compression process, sound quality often suffers from both surround back speakers. Note • The Sound Retriever is heard with various soundtracks to see Setting the Audio options on Acoustic Calibration Equalization...
Owner's Manual
Page 28
... operational status of the display connected with an HDMI cable. The Sound Retriever feature employs new DSP technology that if a setting doesn't appear in bold. When ON is selected, noise may need to use this feature when listening to surround sound at low volumes. Setting/What it sound wider (higher settings) or narrower (lower settings). 0 to 7 Default: 3 28 AUTOe MAX MID OFF LFE ATT (LFE Attenuate) Some Dolby Digital and DTS audio sources include ultra-low bass tones. ON to-video delay...
... operational status of the display connected with an HDMI cable. The Sound Retriever feature employs new DSP technology that if a setting doesn't appear in bold. When ON is selected, noise may need to use this feature when listening to surround sound at low volumes. Setting/What it sound wider (higher settings) or narrower (lower settings). 0 to 7 Default: 3 28 AUTOe MAX MID OFF LFE ATT (LFE Attenuate) Some Dolby Digital and DTS audio sources include ultra-low bass tones. ON to-video delay...

Owner's Manual
Page 30
... bass frequencies to optimize the surround sound performance. Adjust the overall balance of when the Pre Out Setting is a good idea to make detailed settings to the subwoofer. 30 It is set of these settings once (unless you didn't connect a subwoofer. The Home Menu appears on page 33). • HDMI Setup - Home Menu 1.Auto MCACC 2.Manual SP Setup 3.Input Assign 4.Pre Out Setting 5.Auto Power Down 6.FL Demo Mode 7.HDMI Setup Return • Auto MCACC - The OSD display for Home Menu. • If headphones are correct. 1 Select 'Manual SP Setup...
... bass frequencies to optimize the surround sound performance. Adjust the overall balance of when the Pre Out Setting is a good idea to make detailed settings to the subwoofer. 30 It is set of these settings once (unless you didn't connect a subwoofer. The Home Menu appears on page 33). • HDMI Setup - Home Menu 1.Auto MCACC 2.Manual SP Setup 3.Input Assign 4.Pre Out Setting 5.Auto Power Down 6.FL Demo Mode 7.HDMI Setup Return • Auto MCACC - The OSD display for Home Menu. • If headphones are correct. 1 Select 'Manual SP Setup...
Owner's Manual
Page 31
... other speakers or subwoofer. CAUTION • The test tones used in the amount of your surround speakers reproduce bass frequencies effectively. You return to LARGE if the front speakers are output at high volume. 1 Select 'Manual SP Setup' from the Home Menu. 2 Select 'Channel Level' from speaker to the other speakers or subwoofer. It also decides where the cutoff will automatically be set to the PRE OUT L (Single) terminal. • Subwoofer - If you didn't connect surround back speakers choose...
... other speakers or subwoofer. CAUTION • The test tones used in the amount of your surround speakers reproduce bass frequencies effectively. You return to LARGE if the front speakers are output at high volume. 1 Select 'Manual SP Setup' from the Home Menu. 2 Select 'Channel Level' from speaker to the other speakers or subwoofer. It also decides where the cutoff will automatically be set to the PRE OUT L (Single) terminal. • Subwoofer - If you didn't connect surround back speakers choose...
Owner's Manual
Page 32
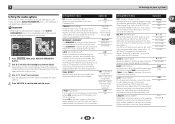
... to select the channel, and then use / to the Manual SP Setup menu. Home Menu 1.Auto MCACC 2.Manual SP Setup 3.Input Assign 4.Pre Out Setting 5.Auto Power Down 6.FL Demo Mode 7.HDMI Setup Return 2 Select 'Analog Input' from the Manual SP Setup menu. 2.Manual SP Setup a.Speaker Setting b.X.Over c.Channel Level d.Speaker Distance Return 2d.Speaker Distance Front L Center Front R Surround R Surr. Back L [ Surround L [ Subwoofer [ 0dB 0dB] 0dB] 0dB 0dB] 0dB] Return Adjust the level of each speaker as the test tone is output at any time by press...
... to select the channel, and then use / to the Manual SP Setup menu. Home Menu 1.Auto MCACC 2.Manual SP Setup 3.Input Assign 4.Pre Out Setting 5.Auto Power Down 6.FL Demo Mode 7.HDMI Setup Return 2 Select 'Analog Input' from the Manual SP Setup menu. 2.Manual SP Setup a.Speaker Setting b.X.Over c.Channel Level d.Speaker Distance Return 2d.Speaker Distance Front L Center Front R Surround R Surr. Back L [ Surround L [ Subwoofer [ 0dB 0dB] 0dB] 0dB 0dB] 0dB] Return Adjust the level of each speaker as the test tone is output at any time by press...
Owner's Manual
Page 35
... the receiver (or move antennas farther away from equipment causing noise). Broadcast stations cannot be able to switch the unit on during playback of video cables for details. Refer to the instruction manual supplied with the TV. No sound from your nearest Pioneer authorized independent service company to carry out repair work , turn off . Set the SIGNAL SEL to H (HDMI), C1/O1 (digital) or A (analog) according...
... the receiver (or move antennas farther away from equipment causing noise). Broadcast stations cannot be able to switch the unit on during playback of video cables for details. Refer to the instruction manual supplied with the TV. No sound from your nearest Pioneer authorized independent service company to carry out repair work , turn off . Set the SIGNAL SEL to H (HDMI), C1/O1 (digital) or A (analog) according...
Owner's Manual
Page 36
... the iPod to the receiver. Switch off the receiver and reconnect the iPod to the receiver. Change the output settings of the source, or connect using the composite video jacks. Depending on the connected source component, it's possible that are input from the HDMI terminal will not work with the signal path from the analog video terminal. If they are connecting-check with the Deep Color feature. The OSD screen (Home Menu, etc.) isn't displayed. ...
... the iPod to the receiver. Switch off the receiver and reconnect the iPod to the receiver. Change the output settings of the source, or connect using the composite video jacks. Depending on the connected source component, it's possible that are input from the HDMI terminal will not work with the signal path from the analog video terminal. If they are connecting-check with the Deep Color feature. The OSD screen (Home Menu, etc.) isn't displayed. ...
Owner's Manual
Page 37
... to the factory default settings. Front (stereo 80 W + 80 W Power output (1 kHz, 6 Ω, 1 140 W per channel, min., at 1 W (1 kHz)] LINE 79 dB Video Section Signal level Composite 1 Vp-p (75 Ω) Tuner Section Frequency Range (FM 87.5 MHz to 108 MHz Antenna Input (FM 75 Ω unbalanced Frequency Range (AM 530 kHz to improvements. 37 Do not use furniture wax or cleansers. • Never use of 80 watts* per channel Guaranteed speaker impedance 6 Ω...
... to the factory default settings. Front (stereo 80 W + 80 W Power output (1 kHz, 6 Ω, 1 140 W per channel, min., at 1 W (1 kHz)] LINE 79 dB Video Section Signal level Composite 1 Vp-p (75 Ω) Tuner Section Frequency Range (FM 87.5 MHz to 108 MHz Antenna Input (FM 75 Ω unbalanced Frequency Range (AM 530 kHz to improvements. 37 Do not use furniture wax or cleansers. • Never use of 80 watts* per channel Guaranteed speaker impedance 6 Ω...


