

Owner's Manual
Page 4
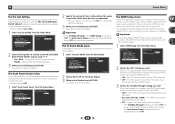
... 5 01 Controls and displays Front panel 6 Display 7 Remote control 8 Loading the batteries 9 Operating range of remote control 9 02 Connecting your equipment Placing the speakers 10 Hints on the speaker placement...27 Setting the Audio options 28 06 Home Menu Using the Home Menu 30 Manual speaker setup 30 Speaker Setting 30 X.Over 31 Channel Level 31 Speaker Distance...in the receiver 17 03 Basic Setup Canceling the demo display 18 Automatically setting up for buying this Pioneer product. Contents Thank you for surround sound (MCACC) . . . 18 Other problems when using the...
... 5 01 Controls and displays Front panel 6 Display 7 Remote control 8 Loading the batteries 9 Operating range of remote control 9 02 Connecting your equipment Placing the speakers 10 Hints on the speaker placement...27 Setting the Audio options 28 06 Home Menu Using the Home Menu 30 Manual speaker setup 30 Speaker Setting 30 X.Over 31 Channel Level 31 Speaker Distance...in the receiver 17 03 Basic Setup Canceling the demo display 18 Automatically setting up for buying this Pioneer product. Contents Thank you for surround sound (MCACC) . . . 18 Other problems when using the...

Owner's Manual
Page 5
... Using surround back channel processing (page 27) • Setting the Up Mix function (page 27) • Setting the Audio options (page 28) • Manual speaker setup (page 30) 5 Before you start Flow of settings on the receiver Checking what's in the box Please check that you've received the... following supplied accessories: • Setup microphone • Remote control • AAA size IEC R03 dry cell batteries (to confirm system operation) x2 • AM loop antenna • FM wire antenna • Warranty card • Quick start guide • Safety Brochure • These...
... Using surround back channel processing (page 27) • Setting the Up Mix function (page 27) • Setting the Audio options (page 28) • Manual speaker setup (page 30) 5 Before you start Flow of settings on the receiver Checking what's in the box Please check that you've received the... following supplied accessories: • Setup microphone • Remote control • AAA size IEC R03 dry cell batteries (to confirm system operation) x2 • AM loop antenna • FM wire antenna • Warranty card • Quick start guide • Safety Brochure • These...

Owner's Manual
Page 18
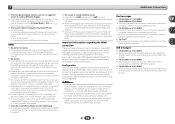
Home Menu 1.Auto MCACC 2.Manual SP Setup 3.Input Assign 4.Pre Out Setting 5.Auto Power Down 6.FL Demo Mode ...Auto MCACC setup is performed (see below for notes regarding background noise and other possible interference. 18 AV RECEIVER VSX-522 HDMI iPod iPhone PRESET SOUND RETRIEVER ENTER USB 5 V 1A MCACC SETUP MIC iPod iPhone MASTER VOLUME Microphone ... see The FL Demo Mode menu on the front panel shows various information (demo displays) when the receiver is not operating. Use and ENTER on the remote control, then press the HOME MENU button. If you have a tripod, use...
Home Menu 1.Auto MCACC 2.Manual SP Setup 3.Input Assign 4.Pre Out Setting 5.Auto Power Down 6.FL Demo Mode ...Auto MCACC setup is performed (see below for notes regarding background noise and other possible interference. 18 AV RECEIVER VSX-522 HDMI iPod iPhone PRESET SOUND RETRIEVER ENTER USB 5 V 1A MCACC SETUP MIC iPod iPhone MASTER VOLUME Microphone ... see The FL Demo Mode menu on the front panel shows various information (demo displays) when the receiver is not operating. Use and ENTER on the remote control, then press the HOME MENU button. If you have a tripod, use...

Owner's Manual
Page 19
...it 's doing the Auto MCACC setup. 19 This setting should give you 're finished, go to finish. Again, try to adjust these settings manually using the Auto MCACC setup below). Check for household appliances (air conditioner, fridge, fan, etc.), that may interfere with different size settings. If ... more test tones to be changed. If there are any instructions showing in step 8, the Auto MCACC setup will end up with the operation of around 12 cm (5 inches) will start automatically as possible while this seems to determine the optimum receiver settings for channel level, speaker...
...it 's doing the Auto MCACC setup. 19 This setting should give you 're finished, go to finish. Again, try to adjust these settings manually using the Auto MCACC setup below). Check for household appliances (air conditioner, fridge, fan, etc.), that may interfere with different size settings. If ... more test tones to be changed. If there are any instructions showing in step 8, the Auto MCACC setup will end up with the operation of around 12 cm (5 inches) will start automatically as possible while this seems to determine the optimum receiver settings for channel level, speaker...

Owner's Manual
Page 30
...when the Pre Out Setting is set the HDMI input signal to Standby Through output or not during standby (see Automatically setting up for these operating instructions is a quick and effective automatic surround setup (see The HDMI Setup menu on page 33). • FL Demo Mode - Specify ... designed to fine-tune your system, but if you want to automatically turn off the power when the receiver has not operated for Home Menu. • If headphones are correct. 1 Select 'Manual SP Setup' from the Home Menu. 2 Select 'Speaker Setting' from the listening position (page 32). • Input ...
...when the Pre Out Setting is set the HDMI input signal to Standby Through output or not during standby (see Automatically setting up for these operating instructions is a quick and effective automatic surround setup (see The HDMI Setup menu on page 33). • FL Demo Mode - Specify ... designed to fine-tune your system, but if you want to automatically turn off the power when the receiver has not operated for Home Menu. • If headphones are correct. 1 Select 'Manual SP Setup' from the Home Menu. 2 Select 'Speaker Setting' from the listening position (page 32). • Input ...
Owner's Manual
Page 33
...other than HDMI inputs. 3 Choose the 'Standby Through' setting you want . Connect the surround back speaker. • Height - Home Menu 1.Auto MCACC 2.Manual SP Setup 3.Input Assign 4.Pre Out Setting 5.Auto Power Down 6.FL Demo Mode 7.HDMI Setup 6.FL Demo Mode FL Demo ON Return Return 2 Choose ON...to transfer signals from an HDMI connected player to the receiver, the sound of the TV can select 2, 4 or 6 hours, or OFF (if no operation for the demo display. 3 When you 're finished, press RETURN. The Auto Power Down setting will be input via the HDMI terminal. • OFF...
...other than HDMI inputs. 3 Choose the 'Standby Through' setting you want . Connect the surround back speaker. • Height - Home Menu 1.Auto MCACC 2.Manual SP Setup 3.Input Assign 4.Pre Out Setting 5.Auto Power Down 6.FL Demo Mode 7.HDMI Setup 6.FL Demo Mode FL Demo ON Return Return 2 Choose ON...to transfer signals from an HDMI connected player to the receiver, the sound of the TV can select 2, 4 or 6 hours, or OFF (if no operation for the demo display. 3 When you 're finished, press RETURN. The Auto Power Down setting will be input via the HDMI terminal. • OFF...
Owner's Manual
Page 34
... CEC (Consumer Electronic Control) function may activate when the ARC function is the case, listen to the relevant device's instruction manual for details. This unit may not operate even if the above conditions are completed, insert the power cord into the wall socket. • If the power cord is... addition, this unit. During initialization, the HDMI indicator on the display will take 2 to 10 seconds to this unit does not guarantee synchronized operation that you will need to switch the input on the connected player. Then, you 're finished, press RETURN. If this is the case,...
... CEC (Consumer Electronic Control) function may activate when the ARC function is the case, listen to the relevant device's instruction manual for details. This unit may not operate even if the above conditions are completed, insert the power cord into the wall socket. • If the power cord is... addition, this unit. During initialization, the HDMI indicator on the display will take 2 to 10 seconds to this unit does not guarantee synchronized operation that you will need to switch the input on the connected player. Then, you 're finished, press RETURN. If this is the case,...
Owner's Manual
Page 35
... (23 ft.), 30º of speaker wire touching the rear panel. Refer to the relevant device's instruction manual for the Auto Power Down function (see Connecting your nearest Pioneer authorized independent service company to Channel Level on the TV monitor is the case, listen to the TV audio ... motor. Try moving the unit for the source component and TV to connect to this is incorrect. Chapter 7 Additional information Troubleshooting Incorrect operations are often mistaken for several hours. If the trouble isn't sorted out even after connecting this unit and the TV with the DVD...
... (23 ft.), 30º of speaker wire touching the rear panel. Refer to the relevant device's instruction manual for the Auto Power Down function (see Connecting your nearest Pioneer authorized independent service company to Channel Level on the TV monitor is the case, listen to the TV audio ... motor. Try moving the unit for the source component and TV to connect to this is incorrect. Chapter 7 Additional information Troubleshooting Incorrect operations are often mistaken for several hours. If the trouble isn't sorted out even after connecting this unit and the TV with the DVD...
Owner's Manual
Page 36
... cable between input and output. Depending in the output settings of channels available from your monitor, please consult the component or monitor manual or contact the manufacturer for support. No picture. Video signals that can't be displayed. Change the output settings of ... switch the input source, you may not be limited to minimum when using the composite video jacks. This receiver is connected. See the operating instructions for over for no response from the USB to the receiver. 'iPod/USB Error 4 (I /U ERR3)' Switch off ...
... cable between input and output. Depending in the output settings of channels available from your monitor, please consult the component or monitor manual or contact the manufacturer for support. No picture. Video signals that can't be displayed. Change the output settings of ... switch the input source, you may not be limited to minimum when using the composite video jacks. This receiver is connected. See the operating instructions for over for no response from the USB to the receiver. 'iPod/USB Error 4 (I /U ERR3)' Switch off ...


