

Owner's Manual
Page 4
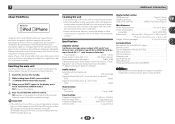
...5 Checking what's in the box 5 Installing the receiver 5 Flow of settings on the receiver 5 01 Controls and displays Front panel 6 Display 7 Remote control 8 Loading the batteries 9 Operating range of remote control 9 02 Connecting your equipment Placing the speakers 10 Hints on an iPod 22 Basic playback...listening mode 25 Auto playback 25 Listening in the receiver 17 03 Basic Setup Canceling the demo display 18 Automatically setting up for buying this Pioneer product. Contents Thank you for surround sound (MCACC) . . . 18 Other problems when using the Auto MCACC setup . . . ...
...5 Checking what's in the box 5 Installing the receiver 5 Flow of settings on the receiver 5 01 Controls and displays Front panel 6 Display 7 Remote control 8 Loading the batteries 9 Operating range of remote control 9 02 Connecting your equipment Placing the speakers 10 Hints on an iPod 22 Basic playback...listening mode 25 Auto playback 25 Listening in the receiver 17 03 Basic Setup Canceling the demo display 18 Automatically setting up for buying this Pioneer product. Contents Thank you for surround sound (MCACC) . . . 18 Other problems when using the Auto MCACC setup . . . ...

Owner's Manual
Page 5
... . 4 The Pre Out Setting (page 33) (When connecting the front height speakers.) The Input Assign menu (page 32) (When using Phase Control (page 27) • Listening with the TV if you don't know how to do this receiver. Don't install it on a level and stable surface.... of settings on the receiver Checking what's in the box Please check that you've received the following supplied accessories: • Setup microphone • Remote control • AAA size IEC R03 dry cell batteries (to confirm system operation) x2 • AM loop antenna • FM wire antenna • Warranty...
... . 4 The Pre Out Setting (page 33) (When connecting the front height speakers.) The Input Assign menu (page 32) (When using Phase Control (page 27) • Listening with the TV if you don't know how to do this receiver. Don't install it on a level and stable surface.... of settings on the receiver Checking what's in the box Please check that you've received the following supplied accessories: • Setup microphone • Remote control • AAA size IEC R03 dry cell batteries (to confirm system operation) x2 • AM loop antenna • FM wire antenna • Warranty...
Owner's Manual
Page 6
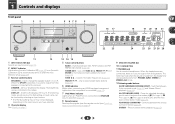
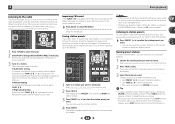
...PRESET / - When the headphones are connected, there is no sound is output from the remote control (see Operating range of this receiver. ALC/STANDARD SURR - Switches between AM, FM ST (stereo)...control buttons SPEAKERS - Chapter 1 Controls and displays Front panel 1 INPUT SELECTOR STANDBY / ON 23 4 5 6 78 MCACC HDMI iPod iPhone SPEAKERS DIMMER DISPLAY BAND TUNER EDIT TUNE PRESET AUTO SURROUND/ ALC/ STREAM DIRECT STANDARD SURR ADVANCED SURROUND STEREO SOUND RETRIEVER ENTER PHONES USB 5 V 1A MCACC SETUP MIC iPod iPhone 9 AV RECEIVER VSX-522...
...PRESET / - When the headphones are connected, there is no sound is output from the remote control (see Operating range of this receiver. ALC/STANDARD SURR - Switches between AM, FM ST (stereo)...control buttons SPEAKERS - Chapter 1 Controls and displays Front panel 1 INPUT SELECTOR STANDBY / ON 23 4 5 6 78 MCACC HDMI iPod iPhone SPEAKERS DIMMER DISPLAY BAND TUNER EDIT TUNE PRESET AUTO SURROUND/ ALC/ STREAM DIRECT STANDARD SURR ADVANCED SURROUND STEREO SOUND RETRIEVER ENTER PHONES USB 5 V 1A MCACC SETUP MIC iPod iPhone 9 AV RECEIVER VSX-522...
Owner's Manual
Page 8
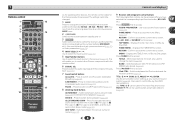
... PRESET 10 HOME MENU PTY iPod CTRL ENTER TUNE BAND RETURN MUTE 11 15 16 1 2 3 DISP 17 12 4 5 6 CH 7 8 9 CH CLR 0 ENTER RECEIVER Controls and displays As for operating other Pioneer components with the remote control. 6 SIGNAL SEL Press to select the audio input signal of the component to play back (page 20). 7 Sound...
... PRESET 10 HOME MENU PTY iPod CTRL ENTER TUNE BAND RETURN MUTE 11 15 16 1 2 3 DISP 17 12 4 5 6 CH 7 8 9 CH CLR 0 ENTER RECEIVER Controls and displays As for operating other Pioneer components with the remote control. 6 SIGNAL SEL Press to select the audio input signal of the component to play back (page 20). 7 Sound...

Owner's Manual
Page 9
... PURE DIRECT. • When the front speaker is set at SMALL in four steps. 13 SOURCE Turns on or off the power of the Pioneer DVD/DVR units when BD, DVD, DVR/BDR or CD is set the listening volume. 16 MUTE Mutes/unmutes the sound. 17 DISP Switches the.... It can be accessed after RECEIVER is output from the speakers connected to set above these buttons can also reduce the life or performance of remote control The remote control may result in your TV. 15 VOLUME +/- Use to turn on your country or area. - DIMMER - Use to adjust the channel level. they may...
... PURE DIRECT. • When the front speaker is set at SMALL in four steps. 13 SOURCE Turns on or off the power of the Pioneer DVD/DVR units when BD, DVD, DVR/BDR or CD is set the listening volume. 16 MUTE Mutes/unmutes the sound. 17 DISP Switches the.... It can be accessed after RECEIVER is output from the speakers connected to set above these buttons can also reduce the life or performance of remote control The remote control may result in your TV. 15 VOLUME +/- Use to turn on your country or area. - DIMMER - Use to adjust the channel level. they may...

Owner's Manual
Page 18
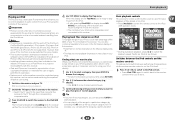
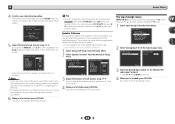
... RECEIVER VSX-522 HDMI iPod iPhone PRESET SOUND RETRIEVER ENTER USB 5 V 1A MCACC SETUP MIC iPod iPhone MASTER VOLUME Microphone Tripod If you have a tripod, use it to place the microphone so that it's about ear level at ear level using a table or a chair. 4 Press RECEIVER on the remote control, then...3.Input Assign 4.Pre Out Setting 5.Auto Power Down 6.FL Demo Mode 7.HDMI Setup Return • Mic In! Use and ENTER on the remote control to navigate through the corresponding composite cable. 3 Connect the microphone to the MCACC SETUP MIC jack on the power to the amplifier to which ...
... RECEIVER VSX-522 HDMI iPod iPhone PRESET SOUND RETRIEVER ENTER USB 5 V 1A MCACC SETUP MIC iPod iPhone MASTER VOLUME Microphone Tripod If you have a tripod, use it to place the microphone so that it's about ear level at ear level using a table or a chair. 4 Press RECEIVER on the remote control, then...3.Input Assign 4.Pre Out Setting 5.Auto Power Down 6.FL Demo Mode 7.HDMI Setup Return • Mic In! Use and ENTER on the remote control to navigate through the corresponding composite cable. 3 Connect the microphone to the MCACC SETUP MIC jack on the power to the amplifier to which ...

Owner's Manual
Page 20
... the connections and settings. To operate the receiver, first press RECEIVER on the remote control, then press the appropriate button to check the digital audio output settings on the remote control, or by using the remote control. Each press cycles through your TV, not from the front left/right speakers in... set to ON, the input is fixed to H (HDMI) and cannot be selected by switching on page 28 is set this case, the remote control won't switch operational modes. When the HDMI option in the default listening mode. The coaxial 1 input is selected for C1, and the optical...
... the connections and settings. To operate the receiver, first press RECEIVER on the remote control, then press the appropriate button to check the digital audio output settings on the remote control, or by using the remote control. Each press cycles through your TV, not from the front left/right speakers in... set to ON, the input is fixed to H (HDMI) and cannot be selected by switching on page 28 is set this case, the remote control won't switch operational modes. When the HDMI option in the default listening mode. The coaxial 1 input is selected for C1, and the optical...
Owner's Manual
Page 22
.... • If after pressing iPod/USB the display shows NO DEVICE, try switching off before connecting. 1 Switch on the website of Pioneer to your TV. Finding what you want to play all operations for reproduction of noncopyrighted materials or materials the user is legally permitted to ... Connecting an iPod on your iPod is not available for basic playback of files stored on an iPod. • Press iPod/USB to switch the remote control to the iPod/ USB operation mode. • During Audiobook playback, press / to switch the playback speed: Faster Normal &#...
.... • If after pressing iPod/USB the display shows NO DEVICE, try switching off before connecting. 1 Switch on the website of Pioneer to your TV. Finding what you want to play all operations for reproduction of noncopyrighted materials or materials the user is legally permitted to ... Connecting an iPod on your iPod is not available for basic playback of files stored on an iPod. • Press iPod/USB to switch the remote control to the iPod/ USB operation mode. • During Audiobook playback, press / to switch the playback speed: Faster Normal &#...
Owner's Manual
Page 23
... Reconnect the USB device with the device) for compressed audio files: • MP3 (MPEG-1/2/2.5 Audio Layer 3) - Basic playback controls This receiver's remote control buttons can be displayed correctly.) • DRM (Digital Rights Management) protection compatible: Yes (DRM-protected audio files will not be ...playback starts automatically. Loading appears in the OSD instead; File extension: .wma; File extension: .m4a; Important • Pioneer cannot guarantee compatibility (operation and/or bus power) with some irregularly encoded files may occur when connected to an audio ...
... Reconnect the USB device with the device) for compressed audio files: • MP3 (MPEG-1/2/2.5 Audio Layer 3) - Basic playback controls This receiver's remote control buttons can be displayed correctly.) • DRM (Digital Rights Management) protection compatible: Yes (DRM-protected audio files will not be ...playback starts automatically. Loading appears in the OSD instead; File extension: .wma; File extension: .m4a; Important • Pioneer cannot guarantee compatibility (operation and/or bus power) with some irregularly encoded files may occur when connected to an audio ...
Owner's Manual
Page 24
... a particular radio station, it has found one step at a time, press TUNE High speed tuning Press and hold TUNE / for more on the remote control to enjoy the broadcast. Saving station presets If you want to return to the frequency display, press DISP several times to show you have some...
... a particular radio station, it has found one step at a time, press TUNE High speed tuning Press and hold TUNE / for more on the remote control to enjoy the broadcast. Saving station presets If you want to return to the frequency display, press DISP several times to show you have some...

Owner's Manual
Page 30
... • The OSD will not appear if you want to Standby Through output or not during standby (see The Auto Power Down menu on the remote control to navigate through the corresponding composite cable. 3 Press RECEIVER , then press HOME MENU. You only need to automatically turn off the power when the receiver...
... • The OSD will not appear if you want to Standby Through output or not during standby (see The Auto Power Down menu on the remote control to navigate through the corresponding composite cable. 3 Press RECEIVER , then press HOME MENU. You only need to automatically turn off the power when the receiver...
Owner's Manual
Page 32
... L [ Surround L [ Subwoofer [ 0dB 0dB] 0dB] 0dB 0dB] 0dB] Return Adjust the level of the digital signal inputs, see Selecting the audio input signal on the remote control. Speaker Distance For good sound depth and separation from the Input Assign menu. 3.Input Assign a.Analog Input 3a.Analog Input Analog CD Return Return 3 Select...
... L [ Surround L [ Subwoofer [ 0dB 0dB] 0dB] 0dB 0dB] 0dB] Return Adjust the level of the digital signal inputs, see Selecting the audio input signal on the remote control. Speaker Distance For good sound depth and separation from the Input Assign menu. 3.Input Assign a.Analog Input 3a.Analog Input Analog CD Return Return 3 Select...
Owner's Manual
Page 34
...does not guarantee synchronized operation that you will blink. Since this does not work, turn OFF the HDMI CONTROL setting on the CEC function, we recommend that allows the TV remote control to the TV audio after connecting this unit and the TV with the TV. This unit cannot be operated... during the initialization. Important • The ARC function may not operate properly if the HDMI CONTROL on the display will need to switch...
...does not guarantee synchronized operation that you will blink. Since this does not work, turn OFF the HDMI CONTROL setting on the CEC function, we recommend that allows the TV remote control to the TV audio after connecting this unit and the TV with the TV. This unit cannot be operated... during the initialization. Important • The ARC function may not operate properly if the HDMI CONTROL on the display will need to switch...
Owner's Manual
Page 35
... turn ON and OFF and the input to switch from the outlet and insert again to return to another. If the message persists, call a Pioneer authorized independent service company. Power automatically turns ON/OFF and the input switches from one to normal operating conditions. Check the setting for...source component and TV to connect to the highest frequency setting. If you think it 's turned up the volume. Press MUTE on the remote control to turn up . The Dolby Digital or DTS source you won't be a time lag between the speakers and the output of the ...
... turn ON and OFF and the input to switch from the outlet and insert again to return to another. If the message persists, call a Pioneer authorized independent service company. Power automatically turns ON/OFF and the input switches from one to normal operating conditions. Check the setting for...source component and TV to connect to the highest frequency setting. If you think it 's turned up the volume. Press MUTE on the remote control to turn up . The Dolby Digital or DTS source you won't be a time lag between the speakers and the output of the ...
Owner's Manual
Page 37
Please note that the use thinners, benzine, insecticide sprays or other countries. Use the front panel controls to do this. 1 Switch the receiver into standby. 2 While holding down BAND, press and hold STANDBY/ON for this unit, and...mm (H) x 342.5 mm (D) 173/16 in. (W) x 65/8 in. (H) x 131/2 in. (D) Weight (without package 8.7 kg (19 lb 3 oz) Furnished Parts Microphone (for Auto MCACC setup 1 Remote control 1 Dry cell batteries (AAA size IEC R03 2 AM loop antenna 1 FM wire antenna 1 Warranty card 1 Quick start guide 1 Safety Brochure 1 These operating instructions (CD-ROM...
Please note that the use thinners, benzine, insecticide sprays or other countries. Use the front panel controls to do this. 1 Switch the receiver into standby. 2 While holding down BAND, press and hold STANDBY/ON for this unit, and...mm (H) x 342.5 mm (D) 173/16 in. (W) x 65/8 in. (H) x 131/2 in. (D) Weight (without package 8.7 kg (19 lb 3 oz) Furnished Parts Microphone (for Auto MCACC setup 1 Remote control 1 Dry cell batteries (AAA size IEC R03 2 AM loop antenna 1 FM wire antenna 1 Warranty card 1 Quick start guide 1 Safety Brochure 1 These operating instructions (CD-ROM...


