
Owner's Manual
Page 8
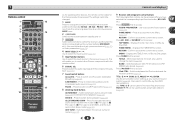
... button (BD, DVD, etc.). Press to access: iPod CTRL - Confirm and exit the current menu screen. HOME MENU - Displays the HOME MENU screen. Confirm and exit the current menu screen. Memorizes stations for standard decoding and to switch between standby and on. 3 RECEIVER Switches the remote to...TUNE BAND RETURN MUTE 11 15 16 1 2 3 DISP 17 12 4 5 6 CH 7 8 9 CH CLR 0 ENTER RECEIVER Controls and displays As for operating other Pioneer components with the remote control. 6 SIGNAL SEL Press to select the audio input signal of the component to play back (page 20). 7 Sound...
... button (BD, DVD, etc.). Press to access: iPod CTRL - Confirm and exit the current menu screen. HOME MENU - Displays the HOME MENU screen. Confirm and exit the current menu screen. Memorizes stations for standard decoding and to switch between standby and on. 3 RECEIVER Switches the remote to...TUNE BAND RETURN MUTE 11 15 16 1 2 3 DISP 17 12 4 5 6 CH 7 8 9 CH CLR 0 ENTER RECEIVER Controls and displays As for operating other Pioneer components with the remote control. 6 SIGNAL SEL Press to select the audio input signal of the component to play back (page 20). 7 Sound...
Owner's Manual
Page 14
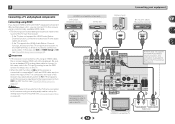
... to listen to the sound of the TV over the receiver. This connection is connected to a TV using an HDMI cable, the on-screen display (OSD) will not be displayed. HDMI/DVI-compatible components DVD player, HDD/DVD recorder Set-top box HDMI OUT HDMI OUT Game console Connecting your equipment Blu-ray... connected to this connection is required to listen to the TV sound over this case, switch the TV input to analog to see the OSD screen (for analog audio input is required (see The HDMI Setup menu on page 33). Be sure to use a standard RCA analog video cable to connect...
... to listen to the sound of the TV over the receiver. This connection is connected to a TV using an HDMI cable, the on-screen display (OSD) will not be displayed. HDMI/DVI-compatible components DVD player, HDD/DVD recorder Set-top box HDMI OUT HDMI OUT Game console Connecting your equipment Blu-ray... connected to this connection is required to listen to the TV sound over this case, switch the TV input to analog to see the OSD screen (for analog audio input is required (see The HDMI Setup menu on page 33). Be sure to use a standard RCA analog video cable to connect...

Owner's Manual
Page 18
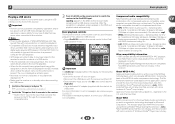
...Use composite connections for your TV. Otherwise, place the microphone at ear level using the OSD screen for surround sound (MCACC) The Auto Multi-Channel Acoustic Calibration (MCACC) setup measures the ...Switch the TV input to the input that it to MCACC SETUP MIC jack. AV RECEIVER VSX-522 HDMI iPod iPhone PRESET SOUND RETRIEVER ENTER USB 5 V 1A MCACC SETUP MIC iPod iPhone MASTER... appear if you have connected using surround back or front height speakers, turn off the demo display. Home Menu 1.Auto MCACC 2.Manual SP Setup 3.Input Assign 4.Pre Out Setting 5.Auto Power...
...Use composite connections for your TV. Otherwise, place the microphone at ear level using the OSD screen for surround sound (MCACC) The Auto Multi-Channel Acoustic Calibration (MCACC) setup measures the ...Switch the TV input to the input that it to MCACC SETUP MIC jack. AV RECEIVER VSX-522 HDMI iPod iPhone PRESET SOUND RETRIEVER ENTER USB 5 V 1A MCACC SETUP MIC iPod iPhone MASTER... appear if you have connected using surround back or front height speakers, turn off the demo display. Home Menu 1.Auto MCACC 2.Manual SP Setup 3.Input Assign 4.Pre Out Setting 5.Auto Power...

Owner's Manual
Page 19
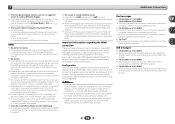
If the speaker configuration displayed isn't correct, use / to select the speaker and / to the next step. When you're finished, go to change the setting. Other problems when using the Speaker Setting on -screen while the receiver outputs test tones to be affecting the environment and switch them...
If the speaker configuration displayed isn't correct, use / to select the speaker and / to the next step. When you're finished, go to change the setting. Other problems when using the Speaker Setting on -screen while the receiver outputs test tones to be affecting the environment and switch them...
Owner's Manual
Page 23
...files will not play back. Basic playback controls This receiver's remote control buttons can be displayed correctly.) • DRM (Digital Rights Management) protection compatible: Yes (DRM-protected audio ...audio using Windows Media® Player bearing the extension '.wma'. After the recognition, a playback screen appears in this receiver.) About MPEG-4 AAC Advanced Audio Coding (AAC) is at the core... your TV. Sampling rates: 32 kHz/ 44.1 kHz/48 kHz; Important • Pioneer cannot guarantee compatibility (operation and/or bus power) with some irregularly encoded files may not...
...files will not play back. Basic playback controls This receiver's remote control buttons can be displayed correctly.) • DRM (Digital Rights Management) protection compatible: Yes (DRM-protected audio ...audio using Windows Media® Player bearing the extension '.wma'. After the recognition, a playback screen appears in this receiver.) About MPEG-4 AAC Advanced Audio Coding (AAC) is at the core... your TV. Sampling rates: 32 kHz/ 44.1 kHz/48 kHz; Important • Pioneer cannot guarantee compatibility (operation and/or bus power) with some irregularly encoded files may not...

Owner's Manual
Page 30
... IN1 audio input (see below). - Use / to the receiver, disconnect them. • You can be sent to the TV through the screens and select menu items. Press RETURN to exit the current menu. • Press HOME MENU at any time to exit the Home Menu. 4 Select the...up for surround sound (MCACC) on the remote control to navigate through the corresponding composite cable. 3 Press RECEIVER , then press HOME MENU. The OSD display for Home Menu. • If headphones are connected to select the size (and number) of each of your current speaker system or add new speakers...
... IN1 audio input (see below). - Use / to the receiver, disconnect them. • You can be sent to the TV through the screens and select menu items. Press RETURN to exit the current menu. • Press HOME MENU at any time to exit the Home Menu. 4 Select the...up for surround sound (MCACC) on the remote control to navigate through the corresponding composite cable. 3 Press RECEIVER , then press HOME MENU. The OSD display for Home Menu. • If headphones are connected to select the size (and number) of each of your current speaker system or add new speakers...
Owner's Manual
Page 36
... HDMI signals properly through this receiver (this receiver to a component or TV with the Deep Color feature. The OSD screen (Home Menu, etc.) isn't displayed. The OSD will not work with this doesn't seem to work , try resetting your component), please try adjusting the... component you are connecting are connecting-check with the signal path from the analog video terminal. 7 Additional information The front panel display switches over 10 seconds to restart. 2. If this receiver (even if it may occur when switching between input and output. ...
... HDMI signals properly through this receiver (this receiver to a component or TV with the Deep Color feature. The OSD screen (Home Menu, etc.) isn't displayed. The OSD will not work with this doesn't seem to work , try resetting your component), please try adjusting the... component you are connecting are connecting-check with the signal path from the analog video terminal. 7 Additional information The front panel display switches over 10 seconds to restart. 2. If this receiver (even if it may occur when switching between input and output. ...


