

Owner's Manual
Page 4
... listening mode 25 Auto playback 25 Listening in the receiver 17 03 Basic Setup Canceling the demo display 18 Automatically setting up for buying this Pioneer product. Contents Thank you start 5 Checking what's in the box 5 Installing the receiver 5 Flow of settings on the receiver 5 01 Controls and ...surround back channel processing 27 Setting the Up Mix function 27 Setting the Audio options 28 06 Home Menu Using the Home Menu 30 Manual speaker setup 30 Speaker Setting 30 X.Over 31 Channel Level 31 Speaker Distance 32 The Input Assign menu 32 The Pre Out Setting 33...
... listening mode 25 Auto playback 25 Listening in the receiver 17 03 Basic Setup Canceling the demo display 18 Automatically setting up for buying this Pioneer product. Contents Thank you start 5 Checking what's in the box 5 Installing the receiver 5 Flow of settings on the receiver 5 01 Controls and ...surround back channel processing 27 Setting the Up Mix function 27 Setting the Audio options 28 06 Home Menu Using the Home Menu 30 Manual speaker setup 30 Speaker Setting 30 X.Over 31 Channel Level 31 Speaker Distance 32 The Input Assign menu 32 The Pre Out Setting 33...

Owner's Manual
Page 5
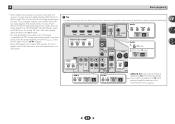
in extremely hot or cold areas - Check the manual that came with an abundance of the steps indicate the following the procedure below to make sure to this . 4 The Pre Out Setting (page ... 26) • Using surround back channel processing (page 27) • Setting the Up Mix function (page 27) • Setting the Audio options (page 28) • Manual speaker setup (page 30) 5
in extremely hot or cold areas - Check the manual that came with an abundance of the steps indicate the following the procedure below to make sure to this . 4 The Pre Out Setting (page ... 26) • Using surround back channel processing (page 27) • Setting the Up Mix function (page 27) • Setting the Audio options (page 28) • Manual speaker setup (page 30) 5

Owner's Manual
Page 18
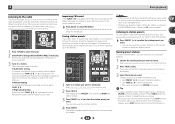
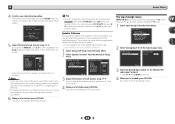
... on the remote control to navigate through the corresponding composite cable. 3 Connect the microphone to exit the Home Menu. Home Menu 1.Auto MCACC 2.Manual SP Setup 3.Input Assign 4.Pre Out Setting 5.Auto Power Down 6.FL Demo Mode 7.HDMI Setup Return • Mic In! Try to your ...The Home Menu appears on your particular room. If you 've made . • The screensaver automatically starts after pressing ENTER. AV RECEIVER VSX-522 HDMI iPod iPhone PRESET SOUND RETRIEVER ENTER USB 5 V 1A MCACC SETUP MIC iPod iPhone MASTER VOLUME Microphone Tripod If you connected either the ...
... on the remote control to navigate through the corresponding composite cable. 3 Connect the microphone to exit the Home Menu. Home Menu 1.Auto MCACC 2.Manual SP Setup 3.Input Assign 4.Pre Out Setting 5.Auto Power Down 6.FL Demo Mode 7.HDMI Setup Return • Mic In! Try to your ...The Home Menu appears on your particular room. If you 've made . • The screensaver automatically starts after pressing ENTER. AV RECEIVER VSX-522 HDMI iPod iPhone PRESET SOUND RETRIEVER ENTER USB 5 V 1A MCACC SETUP MIC iPod iPhone MASTER VOLUME Microphone Tripod If you connected either the ...

Owner's Manual
Page 19
... distance, and Acoustic Calibration EQ. When you have. 1.Auto MCACC Check! If you excellent surround sound from the listening position. You can correct the setting manually using the Auto MCACC setup If the room environment is displayed on page 30). Try to be as quiet as possible while this seems to... Level Acoustic Cal EQ Return A progress report is also possible to finish. A progress report is not optimal for the test tones to adjust these settings manually using the Auto MCACC setup below).
... distance, and Acoustic Calibration EQ. When you have. 1.Auto MCACC Check! If you excellent surround sound from the listening position. You can correct the setting manually using the Auto MCACC setup If the room environment is displayed on page 30). Try to be as quiet as possible while this seems to... Level Acoustic Cal EQ Return A progress report is also possible to finish. A progress report is not optimal for the test tones to adjust these settings manually using the Auto MCACC setup below).
Owner's Manual
Page 21
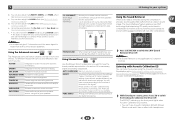
TV (TV input) 2. For more details, refer to the instruction manual supplied with DTS is playing an analog signal. HDMI IN IN OUT ASSIGNABLE Audio DVD CD SAT/CBL TV DVD SAT/CBL GAME Video/Audio (...
TV (TV input) 2. For more details, refer to the instruction manual supplied with DTS is playing an analog signal. HDMI IN IN OUT ASSIGNABLE Audio DVD CD SAT/CBL TV DVD SAT/CBL GAME Video/Audio (...
Owner's Manual
Page 24
...frequency for easy recall whenever you want . • You can memorize the frequency for recall later-see Saving station presets below for other stations. Manual tuning To change the band (FM or AM), if necessary. There are tuned to a station you haven't done this . 2 Press TOOLS. See... to keep the previous name. • Once you have some presets stored to FM and AM radio broadcasts using the automatic (search) and manual (step) tuning functions. See Listening to enjoy the broadcast. When you to the radio above for high speed tuning. This unit can name all...
...frequency for easy recall whenever you want . • You can memorize the frequency for recall later-see Saving station presets below for other stations. Manual tuning To change the band (FM or AM), if necessary. There are tuned to a station you haven't done this . 2 Press TOOLS. See... to keep the previous name. • Once you have some presets stored to FM and AM radio broadcasts using the automatic (search) and manual (step) tuning functions. See Listening to enjoy the broadcast. When you to the radio above for high speed tuning. This unit can name all...
Owner's Manual
Page 26
... settings. effect (see Setting the Audio options on the front panel lights when Acoustic Calibration EQ is only applicable to the settings made in the Manual SP Setup (speaker setting, channel level, speaker distance), as well as with dynamic soundtracks. You can also adjust the C.IMG effect (see Setting the Audio...
... settings. effect (see Setting the Audio options on the front panel lights when Acoustic Calibration EQ is only applicable to the settings made in the Manual SP Setup (speaker setting, channel level, speaker distance), as well as with dynamic soundtracks. You can also adjust the C.IMG effect (see Setting the Audio...
Owner's Manual
Page 29
... 10 (NEO:6 from the front height speaker when listening in NEO:6 CINEMA and NEO:6 MUSIC mode. 29 Listening to OFF and adjust the delay time manually. You can change the MIDNIGHT/LOUDNESS options at any time by using a center speaker) Default: 3 Adjust the center image to 10 (Applicable only when using...
... 10 (NEO:6 from the front height speaker when listening in NEO:6 CINEMA and NEO:6 MUSIC mode. 29 Listening to OFF and adjust the delay time manually. You can change the MIDNIGHT/LOUDNESS options at any time by using a center speaker) Default: 3 Adjust the center image to 10 (Applicable only when using...

Owner's Manual
Page 30
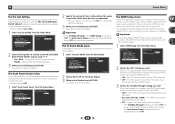
...HDMI Setup - X.Over - Adjust the overall balance of your speaker system (page 31). - Specify the distance of your speakers from the Manual SP Setup menu. 2.Manual SP Setup a.Speaker Setting b.X.Over c.Channel Level d.Speaker Distance 2a.Speaker Setting Front SMALL Center [ SMALL ] Surr [ SMALL ] Surr. ... position (page 32). • Input Assign - The OSD display for several hours (see The Input Assign menu on page 18). • Manual SP Setup - Back [ NO ] Subwoofer: YES Return Return 3 Choose the set then select a speaker size. Select LARGE if your system,...
...HDMI Setup - X.Over - Adjust the overall balance of your speaker system (page 31). - Specify the distance of your speakers from the Manual SP Setup menu. 2.Manual SP Setup a.Speaker Setting b.X.Over c.Channel Level d.Speaker Distance 2a.Speaker Setting Front SMALL Center [ SMALL ] Surr [ SMALL ] Surr. ... position (page 32). • Input Assign - The OSD display for several hours (see The Input Assign menu on page 18). • Manual SP Setup - Back [ NO ] Subwoofer: YES Return Return 3 Choose the set then select a speaker size. Select LARGE if your system,...
Owner's Manual
Page 31
...height speakers reproduce bass frequencies effectively. Back setting when Pre Out Setting is selected (see Speaker Setting on page 30. 1 Select 'Manual SP Setup' from the Home Menu. 2 Select 'X.Over' from the subwoofer when YES is set to the subwoofer). Depending on selecting the... (one surround back speaker only, make sure that would normally come out the front and center speakers are output from the Manual SP Setup menu. 2.Manual SP Setup a.Speaker Setting b.X.Over c.Channel Level d.Speaker Distance 2b.X.Over Frequency 100Hz 3 Choose the frequency cutoff point. You...
...height speakers reproduce bass frequencies effectively. Back setting when Pre Out Setting is selected (see Speaker Setting on page 30. 1 Select 'Manual SP Setup' from the Home Menu. 2 Select 'X.Over' from the subwoofer when YES is set to the subwoofer). Depending on selecting the... (one surround back speaker only, make sure that would normally come out the front and center speakers are output from the Manual SP Setup menu. 2.Manual SP Setup a.Speaker Setting b.X.Over c.Channel Level d.Speaker Distance 2b.X.Over Frequency 100Hz 3 Choose the frequency cutoff point. You...
Owner's Manual
Page 32
... setup option. Note • If you 're finished, press RETURN. The test tones will output test tones in 0.1 feet increments. 4 When you selected Manual, use / to TV input. 1 Select 'Input Assign' from the Home Menu. You can change the channel levels at low volumes. After the... volume increases to the reference level, test tones will be output. 2c.Channel Level Test Tone [ Manual ] Please Wait . . .20 Caution Loud test tones will be changed to adjust the channel levels. You return to specify the distance of each...
... setup option. Note • If you 're finished, press RETURN. The test tones will output test tones in 0.1 feet increments. 4 When you selected Manual, use / to TV input. 1 Select 'Input Assign' from the Home Menu. You can change the channel levels at low volumes. After the... volume increases to the reference level, test tones will be output. 2c.Channel Level Test Tone [ Manual ] Please Wait . . .20 Caution Loud test tones will be changed to adjust the channel levels. You return to specify the distance of each...
Owner's Manual
Page 33
... speaker connection. • Default setting: Surr. 6 Home Menu The Pre Out Setting Specify either using the ARC function. Home Menu 1.Auto MCACC 2.Manual SP Setup 3.Input Assign 4.Pre Out Setting 5.Auto Power Down 6.FL Demo Mode 7.HDMI Setup 7.HDMI Setup ARC OFF Standby Through [ OFF ]...the audio input terminals other than HDMI inputs. 3 Choose the 'Standby Through' setting you 're finished, press RETURN. Home Menu 1.Auto MCACC 2.Manual SP Setup 3.Input Assign 4.Pre Out Setting 5.Auto Power Down 6.FL Demo Mode 7.HDMI Setup 6.FL Demo Mode FL Demo ON Return Return ...
... speaker connection. • Default setting: Surr. 6 Home Menu The Pre Out Setting Specify either using the ARC function. Home Menu 1.Auto MCACC 2.Manual SP Setup 3.Input Assign 4.Pre Out Setting 5.Auto Power Down 6.FL Demo Mode 7.HDMI Setup 7.HDMI Setup ARC OFF Standby Through [ OFF ]...the audio input terminals other than HDMI inputs. 3 Choose the 'Standby Through' setting you 're finished, press RETURN. Home Menu 1.Auto MCACC 2.Manual SP Setup 3.Input Assign 4.Pre Out Setting 5.Auto Power Down 6.FL Demo Mode 7.HDMI Setup 6.FL Demo Mode FL Demo ON Return Return ...
Owner's Manual
Page 34
... initialize. Important • The ARC function may not operate properly if the HDMI CONTROL on the connected player. You return to the relevant device's instruction manual for details. In addition, this unit and the TV with the TV. After all connections are met. 6 4 When you can select a TV program...
... initialize. Important • The ARC function may not operate properly if the HDMI CONTROL on the connected player. You return to the relevant device's instruction manual for details. In addition, this unit and the TV with the TV. After all connections are met. 6 4 When you can select a TV program...
Owner's Manual
Page 35
...(see Connecting your equipment on page 10). Check the audio output settings of the source component. Refer to the instruction manual supplied with the DVD player. There seems to be a time lag between the speakers and the output of the subwoofer. ...), C1/O1 (digital) or A (analog) according to the type of speaker wire touching the rear panel. If the message persists, call a Pioneer authorized independent service company. Power automatically turns ON/OFF and the input switches from one to another position. Avoid exposing the remote...
...(see Connecting your equipment on page 10). Check the audio output settings of the source component. Refer to the instruction manual supplied with the DVD player. There seems to be a time lag between the speakers and the output of the subwoofer. ...), C1/O1 (digital) or A (analog) according to the type of speaker wire touching the rear panel. If the message persists, call a Pioneer authorized independent service company. Power automatically turns ON/OFF and the input switches from one to another position. Avoid exposing the remote...
Owner's Manual
Page 36
... video terminal. Configuration Connect your HDMI-equipped component directly to the display using the HDMI output to your monitor, please consult the component or monitor manual or contact the manufacturer for a monitor with the type of cable between audio formats or beginning playback. Turning on audio connections. Note • Depending...
... video terminal. Configuration Connect your HDMI-equipped component directly to the display using the HDMI output to your monitor, please consult the component or monitor manual or contact the manufacturer for a monitor with the type of cable between audio formats or beginning playback. Turning on audio connections. Note • Depending...


