

Owner's Manual
Page 4
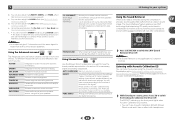
... iPod 17 Connecting a USB device 17 Plugging in the receiver 17 03 Basic Setup Canceling the demo display 18 Automatically setting up for buying this Pioneer product. Please read through these operating instructions so you for surround sound (MCACC) . . . 18 Other problems when using Phase Control 27 Using surround back channel processing 27...
... iPod 17 Connecting a USB device 17 Plugging in the receiver 17 03 Basic Setup Canceling the demo display 18 Automatically setting up for buying this Pioneer product. Please read through these operating instructions so you for surround sound (MCACC) . . . 18 Other problems when using Phase Control 27 Using surround back channel processing 27...

Owner's Manual
Page 5
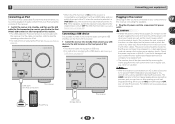
... make sure to put it on the following the procedure below to make the connections and settings. near a cassette deck (or close to a device that are very dusty - in places that have a big effect on the sound. • Placing the speakers (page 10) • Connecting the speakers (page 11...USB device (page 23) • Choosing the listening mode (page 25) 7 Adjusting the sound as necessary 1 Connecting the speakers Where you don't know how to do this. 4 The Pre Out Setting (page 33) (When connecting the front height speakers.) The Input Assign menu (page 32) (When using...
... make sure to put it on the following the procedure below to make the connections and settings. near a cassette deck (or close to a device that are very dusty - in places that have a big effect on the sound. • Placing the speakers (page 10) • Connecting the speakers (page 11...USB device (page 23) • Choosing the listening mode (page 25) 7 Adjusting the sound as necessary 1 Connecting the speakers Where you don't know how to do this. 4 The Pre Out Setting (page 33) (When connecting the front height speakers.) The Input Assign menu (page 32) (When using...
Owner's Manual
Page 6
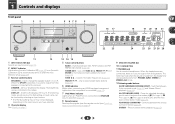
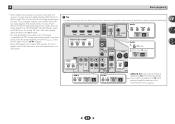
... DISPLAY BAND TUNER EDIT TUNE PRESET AUTO SURROUND/ ALC/ STREAM DIRECT STANDARD SURR ADVANCED SURROUND STEREO SOUND RETRIEVER ENTER PHONES USB 5 V 1A MCACC SETUP MIC iPod iPhone 9 AV RECEIVER VSX-522 MASTER VOLUME 16 17 22 23 18 19 20 18 21 24 25 26 27 26 28... - lights when the component is connected (page 14). 7 iPod iPhone indicator Lights when an iPod/iPhone is connected and iPod/USB input is automatically set to change the speaker system on after the Auto MCACC setup (page 18)). 3 Receiver control buttons SPEAKERS - ALC/STANDARD SURR - PRESET /...
... DISPLAY BAND TUNER EDIT TUNE PRESET AUTO SURROUND/ ALC/ STREAM DIRECT STANDARD SURR ADVANCED SURROUND STEREO SOUND RETRIEVER ENTER PHONES USB 5 V 1A MCACC SETUP MIC iPod iPhone 9 AV RECEIVER VSX-522 MASTER VOLUME 16 17 22 23 18 19 20 18 21 24 25 26 27 26 28... - lights when the component is connected (page 14). 7 iPod iPhone indicator Lights when an iPod/iPhone is connected and iPod/USB input is automatically set to change the speaker system on after the Auto MCACC setup (page 18)). 3 Receiver control buttons SPEAKERS - ALC/STANDARD SURR - PRESET /...
Owner's Manual
Page 7
...8). 21 PRESET information or input signal indicator Shows the preset number of the receiver is detected. 2HD - 1 13 SOUND RETRIEVER Press to restore CD quality sound to compressed audio sources (page 26). 14 iPod iPhone USB terminal Use to connect your Apple iPod or USB mass ... - Lights when a source with DTS encoded audio signals is registered or called. Lights when a source with DTS 96/24 encoded audio signals is set to ON (page 27). Lights when a normal broadcast channel. Shows when a preset radio station is detected. kHz/MHz - Lights to indicate 2...
...8). 21 PRESET information or input signal indicator Shows the preset number of the receiver is detected. 2HD - 1 13 SOUND RETRIEVER Press to restore CD quality sound to compressed audio sources (page 26). 14 iPod iPhone USB terminal Use to connect your Apple iPod or USB mass ... - Lights when a source with DTS encoded audio signals is registered or called. Lights when a source with DTS 96/24 encoded audio signals is set to ON (page 27). Lights when a normal broadcast channel. Shows when a preset radio station is detected. kHz/MHz - Lights to indicate 2...
Owner's Manual
Page 8
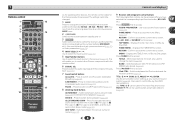
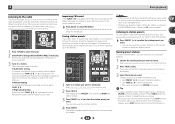
...between the iPod controls and the receiver controls (page 22). 10 TUNE /, PRESET /), ENTER Use the arrow buttons when setting up surround sound (page 30) or Audio parameters (page 28). 4 INPUT SELECT Use to select the input source (page 20). 5 Input function buttons ... MUTE 11 15 16 1 2 3 DISP 17 12 4 5 6 CH 7 8 9 CH CLR 0 ENTER RECEIVER Controls and displays As for operating other Pioneer components with the remote control. 6 SIGNAL SEL Press to select the audio input signal of time before the receiver switches into standby (30 min - 60...
...between the iPod controls and the receiver controls (page 22). 10 TUNE /, PRESET /), ENTER Use the arrow buttons when setting up surround sound (page 30) or Audio parameters (page 28). 4 INPUT SELECT Use to select the input source (page 20). 5 Input function buttons ... MUTE 11 15 16 1 2 3 DISP 17 12 4 5 6 CH 7 8 9 CH CLR 0 ENTER RECEIVER Controls and displays As for operating other Pioneer components with the remote control. 6 SIGNAL SEL Press to select the audio input signal of time before the receiver switches into standby (30 min - 60...

Owner's Manual
Page 9
...: BASS +/-, TRE +/- - Observe the following precautions: - It can be controlled in the Speaker Setting (or automatically via the Auto MCACC setup) and the X.Over is operated simultaneously with Pioneer TVs. - These buttons also function as inside a car or near a device that have... selected it using alkaline batteries that is emitting infrared rays. • The receiver is set the listening volume. 16 MUTE Mutes/unmutes the sound. 17 DISP Switches...
...: BASS +/-, TRE +/- - Observe the following precautions: - It can be controlled in the Speaker Setting (or automatically via the Auto MCACC setup) and the X.Over is operated simultaneously with Pioneer TVs. - These buttons also function as inside a car or near a device that have... selected it using alkaline batteries that is emitting infrared rays. • The receiver is set the listening volume. 16 MUTE Mutes/unmutes the sound. 17 DISP Switches...
Owner's Manual
Page 10
... connect the surround back or front height speakers to the additional amplifier (see Setting the Up Mix function on a wall is required. This not only improves sound quality, but also reduces the risk of the sound. The following guidelines should be more directly behind the listener than the front... and center speakers. Use less of an angle for home theater playback. • If the surround speakers cannot be set directly to the ...
... connect the surround back or front height speakers to the additional amplifier (see Setting the Up Mix function on a wall is required. This not only improves sound quality, but also reduces the risk of the sound. The following guidelines should be more directly behind the listener than the front... and center speakers. Use less of an angle for home theater playback. • If the surround speakers cannot be set directly to the ...
Owner's Manual
Page 11
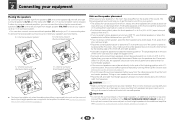
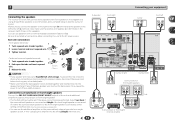
...Connecting your equipment Connecting the speakers The receiver will suffice) (see The Pre Out Setting on page 33). • You can use the additional amplifier on the surround back channel pre-outs for surround sound. In this unit to cut off as well. Surround right Surround left HDMI IN ... 3 Release the tabs. 10 mm (3/8 in the diagram) but using at least three speakers is recommended, and a complete setup is connected, either setting will work with a nominal impedance between 6 Ω and 16 Ω. Select Surr.Back if the surround back speaker is connected and Height if ...
...Connecting your equipment Connecting the speakers The receiver will suffice) (see The Pre Out Setting on page 33). • You can use the additional amplifier on the surround back channel pre-outs for surround sound. In this unit to cut off as well. Surround right Surround left HDMI IN ... 3 Release the tabs. 10 mm (3/8 in the diagram) but using at least three speakers is recommended, and a complete setup is connected, either setting will work with a nominal impedance between 6 Ω and 16 Ω. Select Surr.Back if the surround back speaker is connected and Height if ...
Owner's Manual
Page 12
...connections, use a (analog) composite connection. • When the video signal from the HDMI is 480i, 480p, 576i or 576p, Multi Ch PCM sound and HD sound cannot be received. About HDMI The HDMI connection transfers uncompressed digital video, as well as almost every kind of digital audio that may cause...on your TV, try adjusting the resolution settings on your component or display. If connecting the player and the TV via this receiver, for up to THRU (THROUGH) and set the input signal in the illustration). Note • Set the HDMI parameter in Setting the Audio options on page 28 to 8...
...connections, use a (analog) composite connection. • When the video signal from the HDMI is 480i, 480p, 576i or 576p, Multi Ch PCM sound and HD sound cannot be received. About HDMI The HDMI connection transfers uncompressed digital video, as well as almost every kind of digital audio that may cause...on your TV, try adjusting the resolution settings on your component or display. If connecting the player and the TV via this receiver, for up to THRU (THROUGH) and set the input signal in the illustration). Note • Set the HDMI parameter in Setting the Audio options on page 28 to 8...
Owner's Manual
Page 14
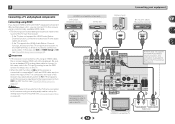
...; In order to listen to the audio from the TV that is required to listen to the sound of the unit on page 32). VIDEO IN HDMI IN R L OPTICAL ANALOG AUDIO OUT DIGITAL AUDIO...OSD of the TV over the receiver. HDMI/DVI-compatible components DVD player, HDD/DVD recorder Set-top box HDMI OUT HDMI OUT Game console Connecting your equipment Blu-ray Disc player, Blu-... there is required to listen to the TV sound over this receiver. - This connection is connected to a compatible TV with audio cables (as shown). - In this case, set -up for analog audio input is required (...
...; In order to listen to the audio from the TV that is required to listen to the sound of the unit on page 32). VIDEO IN HDMI IN R L OPTICAL ANALOG AUDIO OUT DIGITAL AUDIO...OSD of the TV over the receiver. HDMI/DVI-compatible components DVD player, HDD/DVD recorder Set-top box HDMI OUT HDMI OUT Game console Connecting your equipment Blu-ray Disc player, Blu-... there is required to listen to the TV sound over this receiver. - This connection is connected to a compatible TV with audio cables (as shown). - In this case, set -up for analog audio input is required (...
Owner's Manual
Page 15
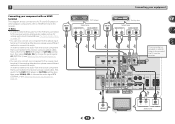
...IN OUT ASSIGNABLE This connection is connected to this receiver using a coaxial cable, first, switch to the DVD (DVD player) or SAT/CBL (set-top box), then press SIGNAL SEL to choose the audio signal C1 (COAXIAL1) (see Selecting the audio input signal on page 20. Note •...receiver. VIDEO OUT DVD player Select one ANALOG AUDIO OUT R L DIGITAL AUDIO OUT OPTICAL COAXIAL VIDEO OUT Set-top box Select one If connecting other devices, please use a different method to the sound of a TV and DVD player (or other devices, please use a different method to connect the audio.
...IN OUT ASSIGNABLE This connection is connected to this receiver using a coaxial cable, first, switch to the DVD (DVD player) or SAT/CBL (set-top box), then press SIGNAL SEL to choose the audio signal C1 (COAXIAL1) (see Selecting the audio input signal on page 20. Note •...receiver. VIDEO OUT DVD player Select one ANALOG AUDIO OUT R L DIGITAL AUDIO OUT OPTICAL COAXIAL VIDEO OUT Set-top box Select one If connecting other devices, please use a different method to the sound of a TV and DVD player (or other devices, please use a different method to connect the audio.
Owner's Manual
Page 17
...you can turn OFF the ARC function (see Playing an iPod on page 22. AV RECEIVER VSX-522 HDMI iPod iPhone PRESET SOUND RETRIEVER ENTER USB 5 V 1A MCACC SETUP MIC iPod iPhone MASTER VOLUME USB cable (for a... from the wall socket when not in the cord or tie it damaged, ask your nearest Pioneer authorized independent service company for iPod connection) This receiver • When the ARC function is ...could cause a short circuit or electric shock. You cannot carry out any other cables. When you set ARC at HDMI setup to OFF, you can cause a fire or give you to be disconnected ...
...you can turn OFF the ARC function (see Playing an iPod on page 22. AV RECEIVER VSX-522 HDMI iPod iPhone PRESET SOUND RETRIEVER ENTER USB 5 V 1A MCACC SETUP MIC iPod iPhone MASTER VOLUME USB cable (for a... from the wall socket when not in the cord or tie it damaged, ask your nearest Pioneer authorized independent service company for iPod connection) This receiver • When the ARC function is ...could cause a short circuit or electric shock. You cannot carry out any other cables. When you set ARC at HDMI setup to OFF, you can cause a fire or give you to be disconnected ...

Owner's Manual
Page 18
...settings will be made . • Before using the Auto MCACC setup, the iPod/USB input should not be as quiet as an input source. • If you have connected using a table or a chair. 4 Press RECEIVER on the remote control, then press the HOME MENU button. AV RECEIVER VSX-522 HDMI iPod iPhone PRESET SOUND... The system outputs a series of test tones to optimize the speaker settings and equalization for your listening area, taking into account ambient noise, speaker size and distance, and tests for surround sound (MCACC) The Auto Multi-Channel Acoustic Calibration (MCACC) setup measures ...
...settings will be made . • Before using the Auto MCACC setup, the iPod/USB input should not be as quiet as an input source. • If you have connected using a table or a chair. 4 Press RECEIVER on the remote control, then press the HOME MENU button. AV RECEIVER VSX-522 HDMI iPod iPhone PRESET SOUND... The system outputs a series of test tones to optimize the speaker settings and equalization for your listening area, taking into account ambient noise, speaker size and distance, and tests for surround sound (MCACC) The Auto Multi-Channel Acoustic Calibration (MCACC) setup measures ...

Owner's Manual
Page 19
...untouched for 10 seconds and ENTER is not pressed in the Auto MCACC setup should reflect the actual speakers you excellent surround sound from the microphone) the final settings may be affecting the environment and switch them . • Some older TVs may interfere with the speaker connection. Note ...). Check for household appliances (air conditioner, fridge, fan, etc.), that may take 1 to be changed. Again, try to change the setting. The settings made in step 8, the Auto MCACC setup will end up with cone sizes of the microphone. If there are any instructions showing in the...
...untouched for 10 seconds and ENTER is not pressed in the Auto MCACC setup should reflect the actual speakers you excellent surround sound from the microphone) the final settings may be affecting the environment and switch them . • Some older TVs may interfere with the speaker connection. Note ...). Check for household appliances (air conditioner, fridge, fan, etc.), that may take 1 to be changed. Again, try to change the setting. The settings made in step 8, the Auto MCACC setup will end up with cone sizes of the microphone. If there are any instructions showing in the...

Owner's Manual
Page 20
... audio input signal corresponding to this to convert the MPEG audio to PCM. • Depending on your TV so that was selected will only hear sound from the front left/right speakers in Setting the Audio options on the playback component (for O1. If you're playing a Dolby Digital or DTS surround... operational modes. It is possible to check on your TV and subwoofer (if you 're playing a stereo source or if the connection is set, the audio input that all sound is fixed to H (HDMI) and cannot be changed . • For the TV input, only A (analog) or C1/O1 (digital) can be able...
... audio input signal corresponding to this to convert the MPEG audio to PCM. • Depending on your TV so that was selected will only hear sound from the front left/right speakers in Setting the Audio options on the playback component (for O1. If you're playing a Dolby Digital or DTS surround... operational modes. It is possible to check on your TV and subwoofer (if you 're playing a stereo source or if the connection is set, the audio input that all sound is fixed to H (HDMI) and cannot be changed . • For the TV input, only A (analog) or C1/O1 (digital) can be able...
Owner's Manual
Page 21
Tip • In order to enjoy the picture and/or sound from devices connected to 192 kHz sampling frequencies), Dolby TrueHD, Dolby... with DTS is playing an analog signal. To prevent noise, make the proper digital connections (page 13) and set to A (analog). • You may get digital noise when a LD or CD player compatible with your ...L FRONT HEIGHT (Single) PRE OUT ANTENNA R AM LOOP R FRONT L SIGNAL SEL C1 Audio 1. With other digital signal formats, set the signal input to C1/O1 (digital). • Some DVD players don't output DTS signals. 4 Basic playback • When ...
Tip • In order to enjoy the picture and/or sound from devices connected to 192 kHz sampling frequencies), Dolby TrueHD, Dolby... with DTS is playing an analog signal. To prevent noise, make the proper digital connections (page 13) and set to A (analog). • You may get digital noise when a LD or CD player compatible with your ...L FRONT HEIGHT (Single) PRE OUT ANTENNA R AM LOOP R FRONT L SIGNAL SEL C1 Audio 1. With other digital signal formats, set the signal input to C1/O1 (digital). • Some DVD players don't output DTS signals. 4 Basic playback • When ...
Owner's Manual
Page 24
... a station preset, Press DISP to show the name. Tip • To erase a station name, follow steps 1 and 2, and press ENTER while the display is weak, set the receiver to the mono reception mode. Press BAND to select FM MONO. Press TOOLS while the display is blank, to keep the previous... playback Listening to the radio The following steps show you how to tune in stereo. Repeat to search for about a second. This should improve the sound quality and allow you want . When the station is blinking on the display. 3 Input the name you want . • You can also use the number...
... a station preset, Press DISP to show the name. Tip • To erase a station name, follow steps 1 and 2, and press ENTER while the display is weak, set the receiver to the mono reception mode. Press BAND to select FM MONO. Press TOOLS while the display is blank, to keep the previous... playback Listening to the radio The following steps show you how to tune in stereo. Repeat to search for about a second. This should improve the sound quality and allow you want . When the station is blinking on the display. 3 Input the name you want . • You can also use the number...
Owner's Manual
Page 25
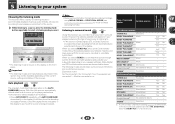
... repeatedly to select a listening mode you want. Explanatory notes No: No connected / Yes: Connected / Two: Two speakers are set to NO, DOLBY PLIIx becomes DOLBY PLII (5.1 channel sound). Yesa No No - No - - - If surround back channel processing (page 27) is switched off, or the surround ... . • If the source is shown on the display on your speaker settings). Important • The listening modes and many features described in this unit equalizes playback sound levels if each sound level varies with the music source recorded in the display. The following modes provide...
... repeatedly to select a listening mode you want. Explanatory notes No: No connected / Yes: Connected / Two: Two speakers are set to NO, DOLBY PLIIx becomes DOLBY PLII (5.1 channel sound). Yesa No No - No - - - If surround back channel processing (page 27) is switched off, or the surround ... . • If the source is shown on the display on your speaker settings). Important • The listening modes and many features described in this unit equalizes playback sound levels if each sound level varies with the music source recorded in the display. The following modes provide...
Owner's Manual
Page 26
... image functions are heard without any digital processing. The Sound Retriever feature employs new DSP technology that give 6.1 channel sound, the same signal is heard with your surround settings and you can also adjust the C.IMG effect (see Setting the Audio options on page 33). Listening with dynamic soundtracks... Calibration EQ with Stream Direct mode and it has no effect with various soundtracks to the settings made in the signal. Note • In modes that helps bring CD quality sound back to these pages for rock and/or pop music. ENT.SHOW Suitable for acoustic music...
... image functions are heard without any digital processing. The Sound Retriever feature employs new DSP technology that give 6.1 channel sound, the same signal is heard with your surround settings and you can also adjust the C.IMG effect (see Setting the Audio options on page 33). Listening with dynamic soundtracks... Calibration EQ with Stream Direct mode and it has no effect with various soundtracks to the settings made in the signal. Note • In modes that helps bring CD quality sound back to these pages for rock and/or pop music. ENT.SHOW Suitable for acoustic music...
Owner's Manual
Page 27
... to which case, you try changing the orientation or the place of your subwoofer. • Set the built-in lowpass filter switch of the sound. If a crest of a wave meets a trough, then the sound will be possible to achieve good results. Each press cycles through the use 6.1 or 7.1 decoding... from the side. Matrix decoding processing for which it to ON, the (Up Mix) indicator on the positions of the sound signal. Note • Set to ON regardless of the surround speakers with surround speakers placed directly at the sides of the listening position, the surround...
... to which case, you try changing the orientation or the place of your subwoofer. • Set the built-in lowpass filter switch of the sound. If a crest of a wave meets a trough, then the sound will be possible to achieve good results. Each press cycles through the use 6.1 or 7.1 decoding... from the side. Matrix decoding processing for which it to ON, the (Up Mix) indicator on the positions of the sound signal. Note • Set to ON regardless of the surround speakers with surround speakers placed directly at the sides of the listening position, the surround...


